|
|
|
| Easier to Read Pro-651/652/106/197 - WS1040/1065 - PSR 500/600 |
| Digital Scanner Manual |
|
Click here to buy a printed, bound, formatted in color, copy of this manual from Scanner Master |
| Last Updated July 28, 2024 |
![]()
| Contents |
| Intro/Review | Scanning the Scan Lists |
| Main Features | Turning Scan Lists Off and On |
| Scanning Terminology | Storing... |
| Understanding Object Oriented Memory | Using Pause and Manual |
| Object Numbering | Temporary/Permanent Lockout |
| Understanding Scan Lists | Unlocking Objects |
| Understanding Trunking | Priority Scanning |
| Understanding Multi-Site Trunking | Using the Attenuator |
| Understanding IDs | Using the Favorites/Skywarn Lists |
| Understanding Receive Modes | Optimizing Scanning Parameters |
| Understanding CTCSS/DCS/NAC | Tune Search/Analyze Mode |
| Turning on the Scanner and Setting the Squelch | Dedicated Searches |
| A Look at the Keypad | Public Safety/Air/Ham Search |
| A Look at the Display | Public Safety, Air, and Ham Group Charts |
| Basic Settings for Navigation | Marine/CB/FRS Search |
| Navigating the Menus | Marine, CB, and FRS/GRMS/MURS Search Channels |
| Using Menu Help | Rail Search |
| Text Tagging and Qtext | Limit Search |
| Customizing Qtext | Zeromatic Tuning |
| Using Qtext | Signal Stalker/Spectrum Sweeper Search |
| Global Settings (GLOB) Menu | Unlocking Search Frequencies |
| Planning Systems and Scan Lists | Using Weather Modes |
| Creating (Programming) Objects | Weather Radio |
| CONV (Conventional) Object Menu | Weather Priority |
| Programming CTCSS/DCS/NAC Tones | SAME Standby |
| TSYS (Trunked System) Object Menu | Event Codes |
| Programming a Motorola Fleet Map | Using V-Scanner Folders |
| Fleet Maps | Preprogrammed V-Scanner Folders |
| Programming Offset and Base Frequency for UHF/VHF | Expert Settings Menu |
| Selecting EDACS ID Format | Cloning/Uploading/Downloading |
| TGRP (Talkgroup) Object Menu | Firmware Version/Updates and Power-On Menus |
| SRCH/STLK/SWPR (Search/Stalker/Sweeper) Object Menus | Memory Used |
| Duplicating Objects | Scanner Reset |
| Finding Objects | Default Step Chart |
| Deleting Objects | Menu Outline |
| Footnotes/Related Links |
![]()
| Intro/Review | Contents |
 WS1065 |
 Pro-652 |
|
 Pro-197 |
 PSR600 |
 WS1040 |
 Pro-651 |
 Pro-106 |
 PSR500 |
|
This generation of radios,
half made
by GRE and the newer Pro-651/652 and WS1040/65 by Whistler, are all identical in operation. The PSR-C
(Canadian) models are no different from the US models except that the
bandplan setting defaults to Canada, the V-Scanner folders include
Canadian provinces, and firmware updates are separate. The newer
Pro-651/652 and WS1040/65 don’t have preprogrammed V-Scanner folders.
|
|
Pros: These radios are packed with new features for scanning, searching, and especially for digital trunking. The 'Multi-Site' feature allows you to monitor only the strongest, consecutive, or all control channel frequencies in the system. The audio is great and setting up a digital system is fairly easy right out of the box. 'Object Oriented Memory' also allows you to add service, limit, and stalker/sweeper objects to your scan lists. Squelch 'Search' for conventional objects will search for CTCSS, DCS, and NAC codes. The radios include an 'Expert Settings' menu for fine tuning many other parameters. Multi-site trunking, P25 NAC functionality, 21 V-Scanner Folders, 'multiple' priority channels, hit counters, 'Qtext' can be programmed then used for alpha-tagging, adjustable scan/search delay, the 'Automove' feature arranges LTR freqs in correct LCN order, and the 'Duplication' feature saves programming parameters for similar objects. 'FlexStep' is great for entering channels down to 1.25 kHz steps but the search ranges and limit search are still fixed steps. SAME programming now allows you to enter 'wildcard' location codes and specific event codes that can also be locked out. The display is as bright and big as my Pro-97. There is a configurable LED for visual alerts as well as audible alerts for most objects. The high speed interface is a nice upgrade too. Cons: The number buttons on the keypad are very tiny, too close together, and relatively hard to press compared to my older RS/GRE scanners. The clear lens designed over the display on the Pro 106/651 bulges up just begging for scratches. The displays for the base models are the same small display as the hand-helds (even has the low-battery icon when you turn the radio on!). The VHF air service search still has the same 8.33 MHz fixed steps which we still do not use here in the US making it ridiculously slow. You can view the frequency of a conventional channel with the alpha tag but not the ID of a trunked system with the tag unless it's a 'Private' (or 'Radio') ID (?). No status bit control for Motorola IDs. I think they went overboard on some of the features like possible light intensities for each color of the LED (about 576), and most people won't be programming their IDs in HEX format. There are a lot of settings in these radios the average Joe (or Mary) won't understand and need just to scan or trunktrack their local systems. Luckily, the defaults for most (not all) of the settings work pretty well. The descriptions of some of the settings in the 'Expert Settings' menu are truly vague and, as of this writing, there are limited or no instructions on how change the parameters for improvement. When there is no documentation in the manual for certain features, I have provided links to other resources that have tried to explain how to use and tweak them. An overview of the features can also be viewed at my Trunking Scanner Comparison Chart page. You will also need a better antenna as the stock antennas aren't fabulous. Scanner Master has a large selection of quality antennas. If you have a big database of channels to program you will definitely need the programming software ($35) and the programming cable (if you bought the Pro 106/651/197/652- another $35). Qtext is great but still, much easier with the software. With all the features and setting it will save you hours of programming and frustration. For those of you who are new to trunking or haven't had a scanner in the last 10 years it is a good idea to read the respective sections on those topics. You really have to know how trunking works in order to program a trunking system. It won't do you any good to try to program a trunking system unless you know what the radio needs and is going to do with the data (control channel, IDs, LCN order, etc.). I will assume you know how to obtain the basic information from the original manual such as following safety procedures, putting the batteries in, connecting the antenna, etc. as I will concentrate on the operation and main functions of the scanner. I hereby absolve myself from anything that happens to anyone or the scanner as a result of the information you will be reading. You are welcome to copy and/or print these pages and use them in the scanning hobby as long as you don't change, redistribute, or charge/accept money for them. I have tried the best I can to make sure everything is accurate here but if I missed a step, you see something that's obviously wrong, or have any other information you would like to contribute to make this manual better for everyone, please email me. Check back often as this document will be updated and revised from time to time. |
![]()
| Main Features | Contents |
| Object Oriented Memory - You can have about 1800 'objects' for each of the 21 V-Scanner Folders (plus the main memory loaded in the scanner). Like Dynamic Memory, you use only the amount of memory you need. Total memory capacity is over 37,800 objects. |
| Multi-System Trunking - you can track Digital Motorola, Motorola, GE/Ericsson (EDACS), and LTR trunking systems including VHF, UHF, 380, and 700MHz systems. |
| Automatic Adaptive Digital Tracking (ADT) - when monitoring P25 digital systems, instantly adapts the digital decoder to the digital modulation format of the transmitted signal, then analyzes the signal over 50 times each second and adapts to any subtle changes caused by multipath or fading. No cumbersome manual adjustments are required. |
| Multi-Site Trunking - allows you to scan systems covering a very large geographic area that use multiple antenna sites and operate on different frequencies but use the same Talk Group IDs. |
| Menu Driven Programming with Context Sensitive Help - each menu item provides a few lines of help text that provide assistance with programming and using the scanner. |
| V-Scanner Technology - allows you to save complete radio configurations within the radio for recall into main memory as needed. 21 V-Scanner Folders are provided (plus the main memory loaded in the scanner), each capable of storing over 1,800 objects. |
| Alert LED - programmable LED can be configured to illuminate or flash when certain objects are active. User-defined colors and brightness levels can be specified. |
| Audible Alarms - programmable audible alerts can be configured to sound when certain objects are active. |
| Signal Stalker/Spectrum Sweeper - quickly sweeps the scanner's frequency ranges for transmissions from nearby sources. |
| Simultaneous Trunktrack, Scan, Search, and Stalk/Sweep - scans conventional and trunked frequencies together at the same time along with any search objects (including any Stalker/Sweeper objects) programmed. |
| Digital AGC - instantly compensates for low user audio levels that are common on digital systems. |
| 22 Scan Lists - 20 lists to program, use, and select like traditional banks allowing you to arrange, group and scan objects according to your preference with an additional 'Favorites' list and a 'Skywarn' list. |
| Priority Scan - the scanner will sample conventional objects for activity periodically while scanning and monitoring other objects. The scanner will also give IDs priority over other IDs while checking a particular trunking system for activity. |
| Object 'Find' - lets you search by lockout status or by text. |
| Hit Counters - keep track of how many transmissions are received for each object type. |
| Built-In Discriminator Data Output - in simple ASCII output using the PC/IF port. |
| CTCSS/DCS/NAC Tone Decode - CTCSS and DCS subaudible squelch coding is processed by the same powerful DSP chip that is used for P25 digital decoding. Provides fast and reliable decoding of subaudible squelch signaling with squelch tail elimination. |
| Preprogrammed - systems for most major metropolitan areas. |
|
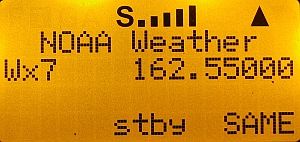
SAME and All Hazards Weather Alerting - can be set to automatically sound the alarm tone to advise of hazardous weather conditions when it detects the alert signal on the local NOAA weather channel (SAME standby mode) or you can scan and set the weather channel as a priority channel. |
| Control Channel Only Scanning - automatically determines the trunking frequencies for Motorola trunking systems once the control channels are programmed. |
| Object Duplication- useful when entering multiple ID objects that are in the same trunked radio system, or multiple conventional objects that have similar parameters or tag names. |
| FlexStep - allows you to enter a frequency in any 1.25 kHz step. |
| Backlit Keypad and Display - you select one or the other or both to light (or not), when you press the light button, on any key press (function ignore), or on any key press with that key's function. |
| Real-time Signal Strength Indicator - shows relative strength of received signals with customizable thresholds. |
| Temporary/Permanent Lockouts - lets you temporary or permanently lockout any programmed object and permanently lockout up to 250 search frequencies. |
| Scan/Search/Trunking Delay - variable delay (0 to 25 seconds) before searching for another object so you can hear more replies that are made on the same object. |
| Data Cloning - lets you transfer the programmed data from one scanner to another. You can also download the programmed data from a PC to the scanner or upload the programmed data to the scanner (using an optional two-way PC cable) with optional software. |
| 16 Character, 4-line, Dot Matrix Text Display - lets you program a text label for each object so you can easily identify the transmission. |
| 7 Service Search Bands - Marine, CB, FRS/GMRS/MURS, Police/Fire, Air, Ham, and Railroad ranges to reduce search setup and monitor interesting frequencies more quickly. |
| 250 Search Lockouts - allow you lockout up to 250 frequencies from the service, limit, and Spectrum Sweeper/Signal Stalker dedicated searches. |
| Tune Search - The scanner will allow you to start searching up or down from a specific frequency. |
| Attenuation - lets you program your scanner (per object or globally) to reduce the scanner's sensitivity to strong local signals or noise caused by these signals to reduce interference. |
| HyperScan and HyperSearch - scans up to 55 channels per second and searches up to 90 steps per second. |
| Low Battery Alert (HH models) - with customizable battery icon threshold values for NiMH, alkaline, and NiCad batteries. |
| Three Power Options (HH models) - lets you power the scanner using internal batteries; alkaline, NiCad, or NiMH; external AC power using an optional 9 volt 500-mA AC adapter (and RS ‘type C’ adaptaplug); or DC power using an optional 9 volt DC cigarette-lighter power cable adaptor. |
| Key Lock (HH models) - lets you lock the scanner's keys to help prevent accidental changes to the scanner's programming. |
| Key Confirmation Tones - the scanner sounds a tone when you press a key, perform an operation correctly, and an error tone if you make an error. Can be turned off. |
| Memory Backup - keeps the frequencies stored in memory for an extended time if the radio loses power. |
![]()
| Scanning Terminology | Contents |
| Scanning-
the process of stepping
through programmed
conventional objects
in scan lists. You can also program a limit, service, and/or Stalker/Sweeper search as an object into a scan list and include the search during scan. |
| Searching- the process of searching for active frequencies in pre-programmed service searches, Spectrum Sweeper bands, and the limit search. |
| Pause Mode- used for monitor single talkgroup objects or frequencies. |
| Manual Mode- used for browsing objects and monitoring conventional objects. Monitoring active IDs in a trunked system parked on a wildcard ID. |
| Program Mode- used for programming objects in scan lists, programming/duplicating/finding objects, and accessing the radio settings menus. |
| Search Mode- the mode the radio is in while performing a dedicated (one at a time) Stalker/Sweeper, service, limit, or tune searches. |
| Clone Mode- used for cloning scanners and uploading/downloading to/from scanners using a computer. |
![]()
| Understanding Object Orientated Memory | Contents |
| First we had
'Dynamic Memory' to get used to and now we have 'Object
Oriented Memory' to figure out. Memory organization is
nothing more than a large collection of scannable objects
assigned to various scan lists. You only have to program any object once, then it can be scanned from any list(s) it is assigned to. A scannable 'object' is any Frequency, ID, Stalker/Sweeper Search, Limit Search, or Service Search. The searches still can be used the same old (dedicated) way and/or be treated as 'objects' (except the 'Tune' search). Trunking systems and sites are configuration objects that are used to scan ID objects. Trunking systems/sites are not assigned to scan lists because you don't scan a trunking system/site; you monitor the IDs it generates. There are no 'Conventional Systems' for conventional frequencies anymore, just conventional objects assigned to a scan list. Like Dynamic Memory, you use only the amount of memory you need. Unlike Dynamic Memory, you don't have to 'build' systems or groups first to program them. They are 'created as you go'. Also, there is no limit (except total memory) to the number of conventional systems, IDs, or conventional channels for each list. Each scannable object can be assigned to one or more of the 20 main lists, the 'Favorites List' (#21), or the 'Skywarn List' (#22). Each list is scanned like a traditional bank. The main lists can be scanned with any other list but when the 'Skywarn' list is selected, only objects in that list will be scanned and no other lists. The V-Scanner Folders allow you to save complete radio configurations. 21 V-Scanner Folders are provided (plus the main memory in the scanner), each capable of storing over 1,800 objects. Total memory capacity of main memory combined with V-Scanners is 39,600 objects. Object Numbering Objects do have numbers associated with them but are assigned by the scanner in 'blocks'. Motorola systems use 10 blocks each, EDACs and LTR systems 4 blocks, Search/Stalker/Sweeper objects 2 blocks, and Talk Group or conventional objects 1 block. For example if you program a Motorola system first, the object number would be (start at) 0. The next object number would be 10. The Win500 software will allow you to re-assign the objects in the order you prefer and re-number them too. |
![]()
| Understanding Trunking | Contents |
|
Trunking systems let a large group of 2-way radio users (or even
different groups of 2-way radio users) efficiently use a set of
frequencies. Instead of selecting a specific frequency for a transmission,
the user’s radio selects a programmed trunking bank in the system when
that user presses their PTT (push to talk) button. The trunking system
automatically transmits the call on the first available frequency, and
also sends (on a different frequency called a Data or Control channel) a
code that uniquely identifies that transmission as a talkgroup ID (or just
ID.) So when you are trunktracking a system, you are listening to active
IDs transmitting in the system (each using the first available frequency
in the system.) Trunking systems in general allocate and use fewer
frequencies among many different users. Since the trunking system might send a call and its response on different frequencies, it is difficult to listen to trunked communications using a conventional scanner. These scanners let you monitor the control channel frequency so you can hear calls and responses for users and more easily "follow" conversations than with a conventional scanner. These trunking scanners trunktrack the following types of systems: |
|
|
| When you
program Motorola/P25 and EDACS system frequencies into the scanner, one frequency is the
control (or data) channel, and the rest are voice frequencies shared by
all the users. There may be 3 or 4 frequencies assigned as (primary or
alternate) control channels but only one control channel will be active at
a time. These scanners will allow you to program just Motorola/P25 control
channels into the trunking system and the voice channels will
automatically be found (but not programmed). EDACS systems need all the frequencies for the
system programmed and in the correct LCN (Logical Channel Number)
order. The control channel is continually transmitted to the field units and has a sound similar to listening to a boat engine over the phone (in manual mode; you won't hear this when you are trunking the system.) This control channel is also a good check to see if you can trunktrack the system. If you can't hear a control channel when you step through the trunking frequencies (in manual mode), you either don't have all the frequencies or are too far away to receive the control channel and the system. Motorola systems are limited to a maximum of 28 frequencies per system or site. Ericsson EDACS systems are limited to 25 frequencies per system or site. Motorola and EDACS systems can be either analog, digital, or mixed (digital and analog talkgroups). Mixed Motorola systems should be programmed as Motorola systems and not P25 digital systems. That way the talkgroup options will allow you to select if it is a digital or analog. LTR systems work a little differently. LTR systems typically do not have a dedicated control channel. This type of system encodes all trunking information as digital subaudible data that accompanies each transmission. The frequencies also have to be in LCN (Logical Channel Number) order or the correct 'slot' for the system to trunktrack properly. The Auto-Move feature will accomplish this for you. Each repeater has its own controller, and all of these controllers are synchronized together. Even though each controller monitors its own channel, one of the channel controllers is assigned to be a master that all controllers report to. Each of these controllers sends out a data burst approximately every 10 seconds so that the subscriber units know that the system is there. This data burst is not sent at the same time by all the channels, but happens randomly throughout all the system channels. If you listen to the frequencies of an LTR system in manual mode (not trunking), on every channel in the system you will hear this data burst that will sound like a short blip of static like someone keyed up and unkeyed a radio within about 500 msec. LTR systems are limited to 20 frequencies per system. Trunkscanning
is basically scanning IDs that are programmed into ID
locations (same concept as frequencies into channels).
You can then trunkscan just the programmed IDs. Trunktracking
is searching for all IDs in a system (same
concept as searching for frequencies in a band). |
| Radio Reference.com has an excellent page explaining the various types of trunking systems in more detail here. |
![]()
| Understanding IDs | Contents |
| ID Formats |
| Motorola IDs come in two display formats: Type I and Type II. Each format displays and uses Talk Group IDs in slightly different ways. Type I/II hybrid systems use both Type I and Type II formats for Talk Group IDs. |
|
| EDACS IDs come in two display formats: AFS (Agency-Fleet-Subfleet) and Decimal. |
|
| LTR IDs are in the format A-HH-UUU where A is the area code (0 or 1), HH is the home repeater (01-20), and UUU is the user ID (000-254). |
| ID Types |
| Group Wildcard IDs will monitor all talkgroup IDs on the trunked radio system. A wildcard TGRP object allows you to receive IDs that are not already stored as objects in the radio's memory. |
| Group IDs will only monitor talkgroup radio traffic on that specified TGID. |
| Private Wildcard IDs will monitor all private IDs on the trunked radio system. |
| Private IDs will only monitor private radio traffic on that specified private TGID. |
| Radio IDs are group or private IDs associated with individual radios. |
![]()
| Understanding Receive Modes | Contents |
| Each conventional channel can have its own receive mode: Auto, AM, FM, or NFM. |
| Auto - Receives transmissions in the modulation sent. | AM - Receives transmissions in AM modulation. |
| FM - Receives transmissions in FM modulation. | NFM - Receives transmissions in NFM modulation. |
| Understanding CTCSS/DCS/NAC |
| Each conventional channel can have its own squelch mode: None, CTCSS, DCS, P25, or Search. |
| None no codes will be searched. |
| CTCSS - PL codes appear (if received) in the format xxx.x, where xxx.x is a frequency in Hz. |
| DCS - DPL codes appear (if received) in the format xxx, where xxx is an octal code. |
| P25 - NAC codes appear (if received) as a 3-digit hexadecimal number. |
| Search - the scanner will search and display any codes (if received). |
| Continuous Tone
Coded Squelch System (CTCSS), Digital Coded Squelch
(DCS), Network Access Code (NAC), are three methods used
to prevent interference by other radio communications.
Your scanner can receive transmissions that use these
codes (or sometimes referred to as tones). Coded squelch techniques involve the transmission of a special 'code' signal along with the audio of a radio transmission. A receiver with coded squelch only activates when the received signal has the correct 'code'. This lets many users share a single frequency, and decreases interference caused by distant transmitters on the same channel. In all major metropolitan areas of the United States, every available radio channel is assigned to more than one user. Public safety radio systems on the same frequency are usually set up at a distance of 40 miles apart, or more. This means that you may hear transmissions from a distant system when your local system is not transmitting. By programming the code (or tone) for a local channel the scanner will not stop on transmissions from the distant system. With few exceptions, such as the VHF Aircraft and Marine bands, almost every other VHF or UHF radio system uses some form of coded squelch. By far, CTCSS is the most popular mode among non-trunked systems. Usually, but not always, VHF channels will use CTCSS and UHF channels will use DCS. P25 (digital) conventional channels will use only NAC. NAC, similar to CTCSS/DCS, has a 3 digit hexadecimal code that can be broadcast along with the digital signal being transmitted. For more information visit Radio Reference's respective pages on CTCSS, DCS, and NAC. |
![]()
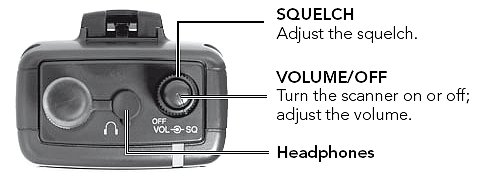
| Turning On The Scanner And Setting the Squelch |
|
|
| Make sure the
scanner's antenna is connected before you turn it on. 1. Turn the VOL and SQ knobs clockwise to about the 9:00 o'clock position. 2. Press TUNE 3. Turn SQ down (counterclockwise) until you hear noise. 4. Turn SQ up (clockwise) a little past where the noise stops. The higher the squelch is set, the stronger the signal required to break the squelch. 5. If noise starts breaking the squelch, turn SQ up to decrease the scanner's sensitivity. To hear weaker signals, turn SQ down to increase its sensitivity. 6. Press SCAN to scan or PGM to begin programming. |
![]()
| A Look at the Keypad | Contents |
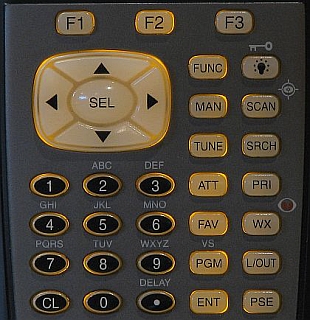 Pro 106/651 Keypad |
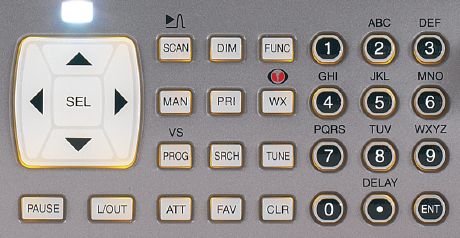 PSR 600 Keypad |
 Function Soft Keys on the base models |
| Your scanner's keys might seem confusing at first, but this information should help you understand each key's function. |
| Key | Function(s) |
| F1,F2,F3 | Soft keys that select the function in the display directly above each key. |
| FUNC-F1 | Used to access the F1 key during transmissions in search modes (overrides FrL/O for Band and Lmts). |
| ◄ ► | Used to navigate menus and scan lists. |
| ▼ ▲ | Used to navigate menus and objects in scan lists. |
| SEL (Select) |
Enters sub-menus for objects. Selects/de-selects scan lists in object menus; same as ENT (enter). Exits help menu. |
| FUNC-SEL | Brings up help menu for selected menu item. |
| FUNC | In text mode toggles capital/small letters; 1st and 2nd set of characters. |
|
|
(HH) Turns the backlight off/on in normal mode. |
|
FUNC- |
(HH) Locks/unlocks the keypad. |
| DIM | (Base) Toggles the display brightness. |
| MAN (Manual) | Allows you to navigate to and monitor single objects including search objects. Recalls last tuned object. |
| SCAN/ |
Scans the enabled scan lists. |
| FUNC-SCAN | Starts dedicated Signal Stalker/Spectrum Sweeper search. |
| TUNE | Starts a 'Tune' search. |
| FUNC-TUNE | Starts a 'Tune' search at the current or most recently tuned frequency. |
| SRCH (Search) | Selects dedicated service searches and the dedicated limit search. |
| ATT (Attenuator) |
Toggles the attenuator on/off for a specific object in manual or pause
modes. Toggles the global attenuator mode on/off in scan and search modes. |
| FUNC-ATT | Toggles the global attenuator on/off in scan and search modes. |
| PRI (Priority) | Toggles priority setting on/off for a specific object or weather channel. |
| FUNC-PRI | Toggles priority mode on/off. |
| FAV (Favorites) | Scans the Favorites (only) scan list. |
| FUNC-FAV | Adds the displayed object to the Favorites scan list. |
|
WX/ |
Enters weather scan mode. |
|
FUNC-WX/ |
Scans the Skywarn (only) scan list. |
| PGM (Program) | Enters program mode for editing radio-wide options, adding new objects or editing existing objects. |
| FUNC-PGM(VS) | Enters V-Scanner mode. |
| L/OUT | Locks or temporarily locks out an object (depending on the setting of the button). |
| FUNC-L/OUT | Locks or temporarily locks out an object (depending on the setting of the button). |
| ENT (Enter) |
Enters sub-menus for objects. Saves text and numbers when programming. Selects/de-selects scan lists in object menus; same as SEL (select). |
| PSE (Pause) | Pauses scan or search mode. |
| 1-0/A-Z | Used to turn scan lists 1-10 on/off. Inputs numbers or characters. |
| FUNC- 1-0 |
Used to turn scan lists 11-20 on/off. FUNC-0 toggles Zeromatic Tuning on/off in dedicated search mode. |
| CL (Clear) | Clears an incorrect character in text mode. |
| FUNC-CL | Clears an entire entry field in text mode or deletes objects. |
| .(DELAY) | Inputs decimal point for frequency, space for text, or hyphen for TGID. |
| FUNC-.(DELAY) | Toggles delay on/off for an object or for searches. |
![]()
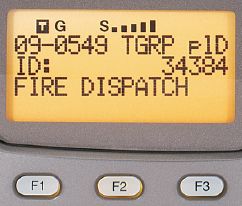
| A Look at the Display |
 Scan Mode Scan List 1 System Name  Program Mode Object #582 ID Number, System Name
|
 Receiving Conventional Channel
|
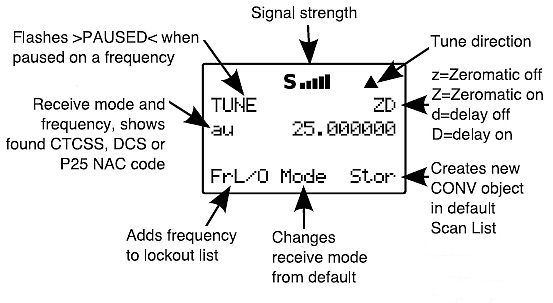
| Scan Mode | Contents |
|
Top Line |
|
|
|
|
|
|
|
|
|
|
|
|
|
critical warning flashes two times each second when battery failure is soon. flashes empty each second when the charging circuit is active. |
|
2nd Line |
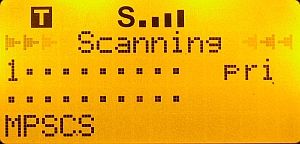
| >>>Scanning<<< appears. |
|
3rd Line |
| Scan Lists 1-10 that are enabled for scan will appear. A . (dot) indicates the Scan List is disabled. Blinking numbers indicate empty Scan Lists. |
| pri appears if priority is off. |
| PRI appears if priority is on. |
| Wx# shows the weather channel number in Weather Scan Mode. Wx#-P indicates weather priority is on |
|
4th Line |
| Scan Lists 11-20 (1-20) that are enabled for scan will appear. A . (dot) indicates the Scan List is disabled. Blinking numbers indicate empty enabled Scan Lists. |
|
5th Line |
| shows the System Name when monitoring a trunking system.. |
| shows the Conventional Channels being scanned. |
| shows the Limit, Service, or Stalker/Sweeper Object Name being searched. |
|
WX PRI Check appears briefly when weather priority is on. |
| Scan Receiving Mode | Contents |
|
Top Line |
|
|
|
|
|
|
|
|
|
|
|
|
|
critical warning flashes two times each second when battery failure is soon. flashes empty each second when the charging circuit is active. |
|
2nd Line |
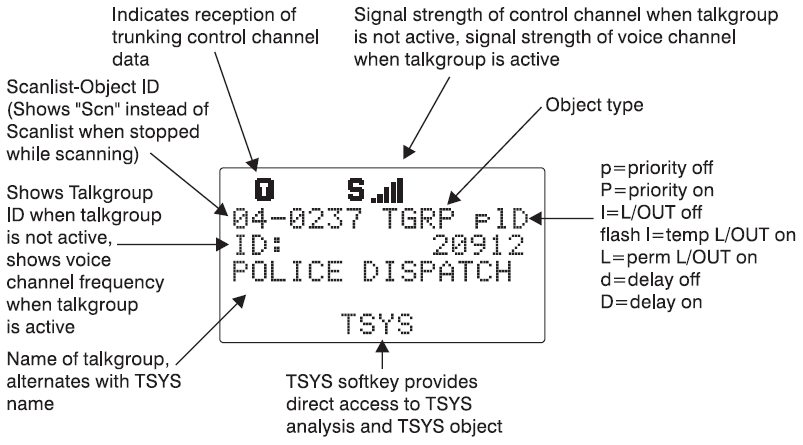
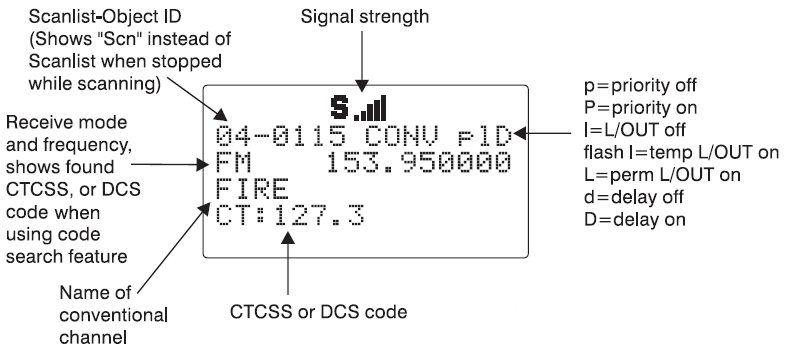
| Scn then the 4-digit object number appear. |
| The Object Type appears as TGRP (Talkgroup), CONV (Conventional), LMIT (Limit search), SWPR/STLK (Sweeper/Stalker search), SR-P (Public Safety service search), SR-A (Air service search), SR-H (Ham service search), SR-C (CB service search), SR-M (Marine service search), SR-F (FRS/GMRS/MURS service search), or SR-R (Railroad service search). |
| p (not set for priority) or P (set for priority) appears to show the Priority Status of the TGRP or CONV object. |
| z (lowercase) shows zeromatic off or Z (uppercase) shows zeromatic on for a PubSafty, Aircraft, Ham, or Railroad Service Search SRCH object. |
| l (unlocked) or L (locked out) or a blinking l (temporary locked out) appears to show the Lock Out Status of the object. |
| d (delay off) or D (delay on) appears to show the Delay Status of the object. |
|
3rd Line |
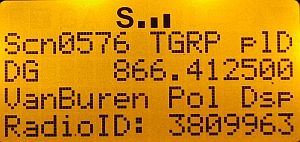
| VC and the Analog Voice Channel Frequency appear for a TGRP object. | |
| DG (uppercase G) shows Digital AGC is on for the trunked system and the Digital Voice Channel Frequency appear for a TGRP object. | |
| Dg (lowercase g) shows Digital AGC is off for the trunked system. | |
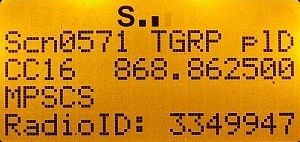
| CC## (control channel number in the system frequencies list) and the Control Channel Frequency alternates (if enabled) for a Motorola System. | |
| FM, AM, or NFM appears to show the received Modulation then the Frequency for a CONV object. | |
|
FM, AM, or NFM appears to show the received Modulation then the Frequency and alternates with any CTCSS/DCS/NAC tone/code received for a SRCH object. |
|
| Ch## appears to show the CB, Marine, or FRS/GMRS/MURS Channel Number and the Frequency alternates with any CTCSS/DCS/NAC tone/code received for a SRCH object. | |
|
4th Line |
| *ID: and the ID Number (or ID Name if tagged) appear for a TGRP object. | |
| *PC: and the Private ID Number (or ID Name if tagged) appear for a TGRP object. | |
| *AC: and the ID Number appear for a TGRP object that has been 'auto-created' from a Wildcard hit with the WIN500 software. | |
| ARID: and the Radio ID (or Radio ID Name if tagged) appear for a TGRP object that has been 'auto-created' with the WIN500 software. | |
| The System Name will alternate with the ID number (or ID Name if tagged) for a TGRP object. | |
| the Scan List Name and Object Name alternate for a CONV object. | |
| the Limit, Service, or Stalker/Sweeper Object Name appears for a SRCH object. | |
|
5th Line |
| TGL/O appears above F1 to lockout a talkgroup received with a Wildcard ID in Receiving/Pause Modes for a TGRP object. | |
| TSYS appears above F2 to go to Analyze Mode for the system in Receiving/Pause Modes for a TGRP object. | |
| LCN## appears above F2 to show the LCN for an EDACS System. | |
| R## appears above F2 to show the Home Repeater for an LTR System. | |
| the Trunking Channel Number appears above F2 (if enabled) for a Motorola System. | |
| Stor (store) appears above F3 to store the ID for a TGRP object. | |
| RadioID: and the radio ID appears (if enabled and if received) in Receiving/Pause Modes for a TGRP object. | |
| CT#:,DC#:,P25#: displays any CTCSS/DCS/NAC tone/code received/programmed (if enabled) for a CONV object. | |
|
A
|
|
| Stor (store) appears above F3 to store any CTCSS/DCS/NAC tone/code received for a CONV object. | |
| FrL/O (frequency lockout) appears above F1 for a SRCH object. | |
| Stor (store) appears above F3 to store the frequency for a SRCH object. | |
| Manual/Program/Pause Modes | Contents |
|
Top Line |
|
|
|
|
|
|
|
|
|
|
|
|
|
|
|
critical warning flashes two times each second when battery failure is soon. flashes empty each second when the charging circuit is active. |
|
2nd Line |
| Scn then the 4-digit object number alternates with >PAUSED< in Pause Mode. |
| the Scan List Number (01-20), FV (Favorites), SW (Skywarn), or ns (no scan list) shows the Scan List the object is assigned to in Manual Mode and PGM alternates in Program Mode. |
| The Object Type appears as TGRP (Talkgroup), CONV (Conventional), LMIT (Limit search), SWPR/STLK (Sweeper/Stalker search), SR-P (Public Safety service search), SR-A (Air service search), SR-H (Ham service search), SR-C (CB service search), SR-M (Marine service search), SR-F (FRS/GMRS/MURS service search), or SR-R (Railroad service search). |
| p (not set for priority) or P (set for priority) appears to show the Priority Status of the TGRP or CONV object. |
| z (lowercase) shows zeromatic off or Z (uppercase) shows zeromatic on for a PubSafty, Aircraft, Ham, or Railroad Service Search SRCH object. |
| l (unlocked) or L (locked out) or a blinking l (temporary locked out) appears to show the Lock Out Status of the object. |
| d (delay off) or D (delay on) appears to show the Delay Status of the object. |
|
3rd Line |
| ID: and the ID Number (or Wildcard) appear for a TGRP object. |
| PC: and the Private ID Number (or Wildcard) appear for a TGRP object. |
| au (auto), FM, AM, or NFM appears to show the programmed Modulation then the Frequency for a CONV object. |
|
au (auto), FM, AM, or NFM and the Frequency alternates with any CTCSS/DCS/NAC tone/code received for a SRCH object. |
| Ch## appears to show the CB, Marine, or FRS/GMRS/MURS Channel Number and the Frequency alternates with any CTCSS/DCS/NAC tone/code received for a SRCH object. |
|
4th Line |
| *ID: and the ID Number (or ID Name if tagged) appear for a TGRP object. | |
| *PC: and the Private ID Number (or Private ID Name if tagged) appear for a TGRP object. | |
| *AC: and the ID Number (or ID Name if tagged) appear in for a TGRP object that has been 'auto-created' from a Wildcard hit with the WIN500 software. | |
| ARID: and the Radio ID (or Radio ID Name if tagged) appear in for a TGRP object that has been 'auto-created' with the WIN500 software. | |
| The System Name will alternate with the ID number (or ID Name if tagged) for a TGRP object. | |
| the Scan List Name and Object Name alternate for a CONV object. | |
| the Limit, Service, or Stalker/Sweeper Object Name appears for a SRCH object. | |
|
5th Line |
| RadioID: and the radio ID appears (if enabled and if received) in Receiving/Pause Modes for a TGRP object. |
| CT#:,DC#:,P25#: displays any CTCSS/DCS/NAC tone/code received/programmed for a CONV object. |
|
A
|
| Stor (store) appears above F3 to store any CTCSS/DCS/NAC tone/code received for a CONV object. |
| FrL/O (frequency lockout) appears above F1 for a SRCH object. |
| Stor (store) appears above F3 to store the frequency for a SRCH object. |
| Dedicated Search/Pause Mode | Contents |
|
Top Line |
|
|
|
|
|
|
|
|
|
|
|
|
|
critical warning flashes two times each second when battery failure is soon. flashes empty each second when the charging circuit is active. |
|
2nd Line |
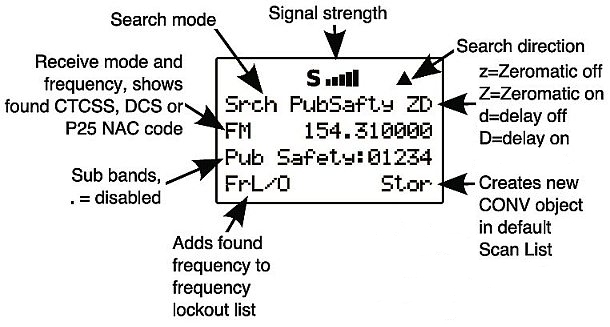
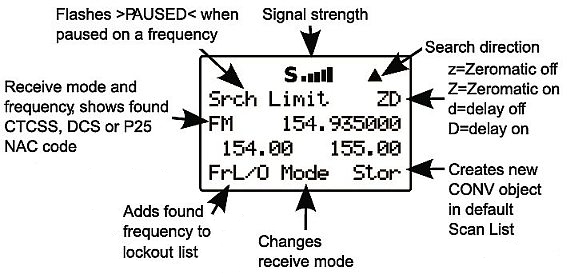
| Srch Limit, Railroad, PubSafty, Aircraft, Ham, CB, Marine, F/G/MURS, appears to show each Dedicated Search Name. |
| Sweeper/Stalker appears to show a Sweeper/Stalker search. |
| z (lowercase) shows zeromatic off or Z (uppercase) shows zeromatic on for a Sweeper/Stalker Search or PubSafty, Aircraft, Ham, or Railroad Service Search. |
| d (lowercase) shows the delay off or D (uppercase) shows the delay on for the search. |
|
3rd Line |
| au (auto), FM, AM, or NFM appears to show the Modulation then the Frequencies being searched. |
| Ch## appears to show the CB, Marine, or FRS/GMRS/MURS Channel Number and the Frequency alternates with any CTCSS/DCS/NAC tone/code received. |
|
4th Line |
| Pub Safety and the enable sub-bands (0-4) appear to toggle on or off for a Public Safety Service or Sweeper/Stalker Search. Disabled sub-bands show a . (dot). |
| All: and the enable sub-bands (0-9) appear to toggle on or off for a Sweeper/Stalker Search. Disabled sub-bands show a . (dot). |
| shows the lower and upper search limits for a Limit Search. |
|
5th Line |
| Lmts (limits) appears above F1 to reset the search limits for a Limit Search. |
| Band appears above F1 to toggle All Bands or Public Safety Bands for a Sweeper/Stalker Search. |
| Mode appears above F2 to change the modulation for a Limit, Aircraft, or Amateur Service Search. |
| spcl (special) appears above F2 to toggle Special Sweeper/Stalker on or off for a Sweeper/Stalker Search. |
| Stor (store) appears above F3 to store the frequency (to the default Scan List). |
| Dedicated Search Receiving Mode | Contents |
|
Top Line |
|
|
|
|
|
|
|
|
|
|
|
|
|
critical warning flashes two times each second when battery failure is soon. flashes each second when the charging circuit is active. |
|
2nd Line |
| Sweeper/Stalker, Srch Limit, Railroad, PubSafty, Aircraft, Ham, CB, Marine, F/G/MURS, appears to show each Dedicated Search Name. |
| z (lowercase) shows zeromatic off or Z (uppercase) shows zeromatic on for the search. |
| d (lowercase) shows the delay off or D (uppercase) shows the delay on for the search. |
|
3rd Line |
| FM, AM, or NFM appears to show the Modulation and Frequency. |
| any CTCSS/DCS/NAC tone/code received alternates with a Conventional frequency. |
| the System Type and NAC alternates with a Motorola P25 Trunked frequency. |
|
4th Line |
| The Dedicated Search Sub-bands Name and the enable sub-bands (0-4)(0-6 for amateur) appear to toggle on or off for a Public Safety, Aircraft, or Amateur Service Search. Disabled sub-bands show a . (dot). |
| shows the Lower and Upper Search Limits for a Limit Search. |
|
5th Line |
| FrL/O (frequency lockout) appears above F1 to lockout a transmitting frequency. |
| Mode appears above F2 to change the modulation for a Limit, Aircraft, or Ham search. |
| all (all channels not locked out) or ALL (all channels) appears above F2 to select the channels to scan for a CB, Marine, or FRS/GMRS/MURS search. |
| Stor (store) appears above F3 to store the frequency. |
![]()
| Basic Settings for Navigation | Contents |
| You may
want to change some settings right away to help you
program your scanner a little easier.
At least it helped me. Press and hold Press PGM to enter program mode. Press F3 (GLOB) to bring you to the 'Radio Settings' menu. Press ▼ until the cursor is blinking in front of LCD BlinkOFF. For alternating text displays, this sets the display time for the secondary display. Enter a value that is comfortable to view. 150 (1.5 seconds) is the default setting. I prefer something around 1 second (100). Press ▼ until the cursor is blinking in front of LCD BlinkOn. For alternating text displays, this sets the display time for the primary display. Enter a value that is comfortable to view. 50 (.5 seconds) is the default setting. I prefer something around 1 second (100). Press F1 (Save) to save the settings and exit the GLOB menu. |
| Navigating the Menus |
| If you
just bought the radio new, right out of the box (or reset
it), when you turn it on you will (should) see "Press
NEW to create objects" in the display,
otherwise press PGM to enter program
mode. The 3 'soft keys', F1, F2, and F3 activate the function shown in the LCD display above each softkey. In Program Mode: NEW (F1) will create a new object. EDIT (F2) will edit, duplicate, or find an object. GLOB (F3) will bring you to the 'Radio Settings' menu. FUNC then GLOB (F3) will bring you to the 'Expert Settings' menu. In Manual or Program Mode: ◄ or ► will scroll through the scan lists that have objects in them. Empty Scan Lists will not be displayed. (ex: 01-222 is in scan list 1, object number 222) ▼ or ▲ will scroll through objects in each scan list. After you have programmed at least 2 scannable objects (not trunked systems) , pressing ▼ or ▲ in manual or program mode will select each object in the current Scan List. After you have programmed in at least 2 Scan Lists, pressing ◄ or ► in manual or program mode will select each Scan List. The top left of the display will show the Scan List number then the object number; ex: 01-0010. When you enter a menu, press the ▼ or ▲ keys to navigate to the parameter you wish to change. Pressing and holding the ▼ or ▲ keys will scroll faster. Pressing FUNC then ▲ will bring you to the top of the menu (or any sub menu) and FUNC then ▼ will bring you to the bottom. The active parameter is always the middle parameter and is indicated by a flashing colon. Pressing FUNC then SEL will enable the 'help' menu for the selected item. Press SEL again to exit the 'help' menu. Pressing SEL or ENT activates entry fields. For most numeric entries (except Contrast) simply enter the new value and press F1 (Done). For most selectable entries (like Yes, No, On, Off, etc. and Contrast) use the ◄ or ► keys to select the new parameter. For entries with SEL after them, press SEL/ENT to bring you to another menu to change the parameter. Pressing ◄, ►, ▼, or ▲ will allow you to navigate inside the sub-menus and place the blinking cursor on what you want to edit. Use the 'soft keys' (F1, F2, and F3) in the sub menus to Save, Undo, Exit, Stop, Reset, Del, Cancl or for Done, Qtxt, Yes, No, Dflt, and OK. Main menu changes do not take effect until the menu is saved-F1 (Save). If you forget to save any changes, you will see 'Unsaved Changes! Go Back?'. Press F1 (Yes) to go back or F3 (No) to exit without saving. If you later find out that you don't like your new setting(s), you can always go back to the parameter, press F3 (Dflt), and restore the default setting. See also Finding Objects. You can restore all 'Global Settings' to their defaults without affecting your programmed objects or V-Scanners. Turn the radio off then back on and press 0 then 2 during the welcome screen. Press ENT to confirm the global parameter reset then ENT again to reboot. |
![]()
| Text Tagging and Qtext | Contents |
|
|
|
QuickText
allows you to store up to 10 of your commonly used entries to
select when tagging object. Customizing Qtext: 1. Press PGM then GLOB to enter the 'Radio Settings' menu. 2. Press ▼ to scroll to Qtxt1 and press SEL/ENT. 3. Enter the text you wish to assign to Qtxt1. |
| Note: When you use the Qtext entry in a text field, any unused spaces will be filled with space characters. If you want to leave room for adding more text after the Qtext entry, enter a space and a dollar sign ($) (or just a dollar sign [$]). When you use the Qtext in a text field, the edit cursor will be placed where the dollar sign is positioned so you can continue adding text. |
| 4. Press F1 (Done) to
save the Qtext and exit. 5. Press ▼ to scroll to the next Qtxt entry and repeat for each of the 9 remaining entries. 6. Press F1 (Save) to save the settings and exit the GLOB menu. You can, at anytime, press F2 (Undo) to exit. You will see 'Unsaved Changes! Go Back?'. Press F1 (Yes) to go back or F3 (No) to exit, cancel any changes, and return to the 'Radio Settings' menu. You can, at anytime, press F3 (Qtext) to use existing Qtext for any new Qtext buy selecting the number assigned to any existing Qtext. You can also press F3 multiple times to add more than one Qtext. For example, if you want to change Qtext1 (Fire $) to 'Police Sheriff $', press F3 (Qtxt), and 2 to select 'Police $', then F3 (Qtxt), and 3 to select 'Sheriff $'. |
| Using
Qtext: 1. Navigate to the Tag: option (or Owner: to change the welcome screen) in the menu of the object you wish to tag and press SEL/ENT. 2. Press FUNC then CL to clear the existing tag if desired. Move the cursor to the position where you want to insert the text. 3. Press F3 (Qtxt) then ▼ to scroll to the Qtxt item (1-10) you want to insert and press ENT. Or, press the number key (1-10) corresponding to the Qtxt you want to insert and press ENT. You may then continue adding text or another Qtext entry (press F3 [Qtxt] again). 4. Press F1 (Done) to save the tag and exit. You can, at anytime, press F2 (Undo) to exit. You will see 'Unsaved Changes! Go Back?'. Press F1 (Yes) to go back or F3 (No) to exit, cancel any changes, and return to the previous menu. |
![]()
| Global Settings Menu |
| The GLOB ('Radio
Settings') menu allows you to change the radio-wide
settings used by the scanner. The default settings will
work fine for most users but you will probably want to
personalize the radio to suit your individual needs. Press PGM then F3 (GLOB). Use ▼ or ▲ to select each option. Main menu changes do not take effect until the menu is saved-F1 (Save). If you forget to save any changes, you will see 'Unsaved Changes! Go Back?'. Press F1 (Yes) to go back or F3 (No) to exit without saving. |
| Contrast | Dim LED (Base only) | Priority | Key Repeat | Search Delay |
| Owner | Battery (HH only) | WxPri | LCD BlinkOff | SRCH Dig AGC |
| Clone Send | Lo Batt Alert (HH only) | Scan Lists | LCD BlinkOn | SRCH SuprTrk |
| Alert Mode | Battery Info (HH only) | SRCH L/Outs | LED BlinkOff | TLO=FUNC L/O |
| Sound Mode | Charge Time (HH only) | Clear FAV | LED BlinkOn | DupChecksSQ |
| Key Beeps | AttenMode | Memory Info | Pri Channels | TGID Format |
| Light Mode | Global Atten | Tune LED | Pri Interval | TGRP Ignore |
| Light Area (HH only) | Clear Hits | Color 0-7 | TGRP Pri Int | ShowCCInfo |
| Light Secs (HH only) | Hit Counts | Qtxt 1-10 | QuickPriRtn | Set password |
| Light Level (Base only) | Dflt ScanList |
| Press SEL/ENT to edit. You are allowed 4 lines of (16 character) text. Press ▼ or ▲ to select each line. Enter text or Qtext for the selected line. Press ▼ or ▲ to select another line and enter more text or Qtext. Press F1 (Done) to save and exit. |
| Turn
on both radios. Connect the cable to each scanner's PC/IF jack. On the sending radio press PGM then GLOB. Scroll to 'Clone Send:' and press SEL/ENT when you are ready to send to the target radio. Press F1 (Done) on the sending radio to exit. The target radio should reboot when finished. |
| Press
◄ or
► to select: Off - no alerts. Both - uses the Alert LED and Tone. Tone - uses the audible alarm only. Light - uses the Alert LED only. |
| Sound Mode When set to 'On', allows all radio beeps including Key Beeps. Must be 'On' for Alert Mode. Default is On. |
| Press ◄ or ► to select On, or Stlth (stealth=off). |
| Press
◄ or
► to select On,
Stlth (stealth=off), Norml,
Key, or Ignre. On(HH only) - backlight is on when you turn on the radio and stays on. Stlth - disables backlight. Norml - uses the backlight button on the keypad. Press to turn on for the amount of time set in Light Secs. Key(HH only) - backlight turns on when any key is pressed for the amount of time set in Light Secs. Ignre(HH only) - backlight turns on when any key is pressed for the amount of time set in Light Secs and the key's normal function is ignored for the first press. Pressing any key again (when the light is on) will activate its function. |
| Note: (HH only) You can still press and hold the backlight
button until you hear the beep in any mode (except Stlth) to
keep it on and then press it to turn it off. When you power off the radio it will revert to its set mode in the Light Mode menu. |
| Press
◄ or
► to select Both,
LCD, or Keybd. Both - lights the display and keyboard. LCD - lights the display only. Keybd - lights the keyboard only. |
| Enter the amount of time, 1- 99 seconds, the backlight will stay when Light Mode is set to Norml, Key, or Ignre. |
| Light Level (Base only) Controls backlight intensity. When Dim LED is set to Yes, it also controls the Alert LED intensity. Accessed from the front panel using the DIM key. Default is Brit. |
| Press
◄ or
► to select: Brit - lights the display bright. Dim - lights the display dim. Off - display light is off. |
| Dim LED (Base only) When set to Yes, DIM key and Light Level setting also control intensity of alert LED. Default is Yes. |
| Press ◄ or ► to select Yes or No. |
| Press ◄ or ► to select NiMH, Alkaline, or NiCad. |
| Note: You must use the yellow battery holder to charge NiMH and NiCad batteries. (External charger is strongly recommended). Do not use the yellow battery holder with alkaline batteries! |
| Enter the amount of time, (0=off) - 60 seconds between alert beeps. |
| Press SEL/ENT to view. When the scanner is plugged in and charging, will show 'Charge: (and time left)' if charging. To reset the timer press F3 (Reset). To stop charging press F2 (Stop). Will show 'Charger is off'. To restart press F3 (charge). Press F1 (Done) to exit. |
| Charge Time (HH only) Allows you to set the battery charge time in hours. 0 = off. The battery charger charges at a current rate of 150 mA. The charger is disabled when Battery option is set to Alkaline. The default charge time (99) will charge 9 hours for Ni-Cd batteries and 16 hours for Ni-MH batteries. Warning: The scanner will charge continuously with the scanner turned off and plugged into external power. (External smart charger is strongly recommended). |
| Enter the number of hours, 0 - 16 the charger will charge. |
| AttenMode Sets the global attenuator mode. Global applies attenuation (on or off) to all objects. Normal uses object attenuation settings. 'G' will appear in the middle of the display when set to Global. See chart below. Default is Global. See also System Attenuation and (conventional) Object Attenuation. |
| Press
◄ or
► to select Normal
or Global. Normal - the attenuator follows the individual object attenuator setting. Global - applies attenuation radio-wide regardless of object settings only when Global Atten is set to On. 'G' will appear in the display when scanning or searching. |
| Note: You can also toggle this setting by pressing FUNC then ATT in Scan or Search mode. |
| Press ◄ or ► to select On or Off. |
| Note: You can also toggle this setting by pressing ATT in Scan or Search mode. |
| Attenuation Settings | ||||||
| Object Attenuation | AttenMode | Global Atten | Display |
Results |
||
| Off | Normal | Off | No G or A | Object/system/search attenuation Off | ||
| On | Normal | Off | A | Object/system/search attenuation On | ||
| On or Off | Global | Off | G | Attenuation Off- all objects/systems/searches | ||
| On or Off | Global | On | GA | Attenuation On- all objects/systems/searches | ||
| Clear Hits Clears all the hit counters for all objects if Hit Counts (see next entry) has previously been set to On. You can clear each object's hit count by going to each object's menu. |
| Press SEL/ENT. 'Really clear all object hit count data?' will appear. Press F1 (Yes) to clear or F3 (No) to exit. |
| Hit Counts When set to 'On', keeps track of how many transmissions are received (or not received) for each object. Default is No. |
| Press ◄ or ► to select Yes or No. |
| Enter 0 - 22 and press ENT. |
| Note: Any object assigned to 0 (no scan list) will not be scanned. You can't select this list to scan. |
| Priority Turns priority scan on or off. The display will show 'PRI' (uppercase) when priority is on and 'pri' (lowercase) when priority is off. Default is Off. |
| Press ◄ or ► to select On or Off. See also Priority Scanning. |
| Notes: You can also do this by pressing FUNC then PRI in scan mode. You can enabled priority scan even with no objects set for priority.(?) |
| WxPriority Allows you to check the specified weather frequency periodically
while scanning to see if the All Hazards 1050 Hz Warning
Alert Tone (WAT) is present. If the WAT is present, the
scanner will sound an alarm and tune to the programmed
weather frequency to monitor the nature of the alert.
WX PRI Check appears briefly on the
bottom line of the display in scan mode. Default is Off. See also Weather Settings (in the 'Expert Settings' menu). |
| Press ◄ or ► to select Off or one of the preprogrammed weather channels. |
| Notes: You can also do this by pressing WX then PRI in Scan mode. Does not work in Search or Stalker/Sweeper Modes. |
| Scan Lists Allows you to enable (turn on) and disable (turn off) the (normal; 1-20) Scan Lists to scan. |
| Press SEL/ENT
to edit. Press ▼ or ▲ to select the Scan List and press SEL/ENT to enable or disable the list. An asterisk (*) appears next to all enabled scan lists. |
| Note: You can also do this by pressing the number keys on the keypad for single digit scan lists or FUNC then the number keys for double-digit scan lists (FUNC then 1 for 11) in Scan mode. |
| SRCH L/Outs Allows you to enter a sub menu for reviewing, editing or deleting search lockout frequencies. |
| Press SEL/ENT
to edit. Press
▼ or
▲ to select the locked out frequency. To unlock the frequency press F3 (Del). To add a frequency press ▼ or ▲ to select an empty slot and enter the frequency. Press F1 (Save) to save and exit. |
| Press SEL/ENT. 'Really remove all objects from FAV scan list?' will appear. Press F1 (Yes) to clear or F3 (No) to exit. |
| Memory Info This will show you total number of objects, free space percentage, number of conventional channels, talkgroups, trunked systems, and search objects. |
| Press SEL/ENT. Press F1 (Done) to exit. |
| Tune LED When set to 'On', activates the signal strength driven LED when in 'Tune' mode. The color of the LED will change as the signal increases (from 'color 0' to 'color 7' ?). Default is Off. |
| Press ◄ or ► to select On or Off. |
| For
each color, (0-7), press SEL/ENT
to edit. Press ◄ or ► to select R (red), G (green), or B (blue). Use the number keys (0-9) to set preset intensities or press ▼ or ▲ to select your own custom intensity. Press ◄ or ► to select the next color and repeat. Press F1 (Done) to save and exit. |
| Qtxt 0-9 See Customizing Qtext. |
| Key Repeat When set to 'On', allows you to press and hold keys like ▼ or ▲ to navigate through the menu faster. Default is On. |
| Press ◄ or ► to select On or Off. |
| LCD BlinkOff For alternating text displays, sets the display time for the secondary display element. (object number, channel name, ID name/number, search name, scan list number) |
| Enter the amount of time, 1 - 250 (10 - 2500 ms). Enter 1 for 'off'. Default is 150 (1.5 secs). |
| LCD BlinkOn For alternating text displays, sets the display time for the primary display element. (system name, scan status, scan list name, program mode, >PAUSED<) |
| Enter the amount of time, 1 - 250 (10 - 2500 ms). Enter 1 for 'off'. Default is 50 (.5 secs). |
| LED BlinkOff When the Alert LED setting for an object is set to 'Flash', this is the amount of time the LED stays turned off. |
| Enter the amount of time, 1 - 250 (10 - 2500 ms). Enter 1 for 'off'. Default is 50 (.5 secs). |
| Note: Alert Mode must be set to Both or Light for the LED to function. |
| Contents |
| LED BlinkOn When the Alert LED setting for an object is set to 'Flash', this is the amount of time the LED stays turned on. |
| Enter the amount of time, 1 - 250 (10 - 2500 ms). Enter 1 for 'off'. Default is 5 (50 msecs). |
| Note: Alert Mode must be set to Both or Light for the LED to function. |
| Pri Channels Sets the number of conventional
priority channels to check during a priority scan. 0
checks all conventional priority channels. Default is 0. See also Priority Scanning. |
| Enter the number of priority channels, 0 - 250, the scanner will check. |
| Pri Interval Sets how often the scanner checks conventional priority channels. See also Priority Scanning. |
| Enter the amount of time, 2 - 100 (.2 - 10 seconds), the scanner will do a priority check. Default is 20 (2 secs). |
| TGRP Pri Int When set to 'On', the
scanner interrupts trunked activity to check for
conventional priority channels according to the Pri
Interval
setting when priority is turned on. Default is On. See also Priority Scanning. |
| Press ◄ or ► to select On or Off. |
| QuickPriRtn When set to 'On', does not wait for verification of correct CTCSS, DCS or NAC when returning to an active conventional channel after priority sampling. Default is Off. |
| Press ◄ or ► to select On or Off. |
| Enter the amount of time, 1 - 250 (.1 - 25 seconds), for the delay. Default is 20 (2 secs). |
| SRCH Dig AGC When set to 'On', sets AGC for digital audio in all search modes. Useful to compensate for low or high digital audio levels on the system. Default is On. |
| Press ◄ or ► to select On or Off. |
| SRCH SuprTrk Alternative DSP decoding algorithm is applied to all search types. When set to 'On', may help reception on some systems. Default is On. |
| Press ◄ or ► to select On or Off. |
| Press ◄ or ► to select Yes or No. |
| DupeCheckSQ If set to 'Yes', the scanner will check the stored frequency and any squelch settings when checking for duplicate conventional objects. Default is Yes. |
| Press ◄ or ► to select Yes or No. |
| TGID Format Sets Talk Group ID format display. Default is Norm. See also Understanding IDs. |
| Press
◄ or
► to select: Norm - for EDACS AFS format, Motorola, and LTR systems. Dec - for EDACS Decimal format, Motorola, and LTR systems. Hex - for EDACs and Motorola - shows IDs in Hexadecimal format. |
| Press ◄ or ► to select Yes or No. |
| ShowCCInfo If set to 'Yes', shows current control channel frequency alternating with the voice frequency for Motorola and P25 systems. Default is No. |
| Press ◄ or ► to select Yes or No. |
| Press SEL/ENT. To set new password then press F1 (Yes). Enter text (or numbers) for new password and press F1 (OK). |
![]()
| Planning Systems and Scan Lists | Contents |
|
Scan Lists Each scannable object (not trunking systems) can be assigned to one or more of the 20 main lists, the 'Favorites List' (#21), or the 'Skywarn List' (#22). Each list is scanned like a traditional bank. You can put any type of scannable object in any list with any other type of scannable object. Conventional, Search, and Talk Group objects can all go in the same list. The main lists, 1-20, can be scanned with any other list but the 'Favorites List' and the 'Skywarn List' will only scan objects in each respective list and no other lists. The only disadvantage here is there are only 22 lists to put everything in. But, you can put as many objects in each of these 22 locations that memory allows. The scanner is designed to be programmed by 'Scan List'. Once you set the Default Scan List, (in the GLOB menu) you can simply start programming your objects. When you create an object, it is by default, assigned to the default Scan List. Object Order If you don't have the software (yet) you should program your objects in some kind of order you can remember in case you want to find them. Every object you program (by hand) is assigned an object number by the scanner, not you. See Object Numbering for more detail on how that happens. You may want to put your trunking systems in first. Remember, you can also program searches and Sweeper/Stalker searches as objects too. Multi-Site Systems Some Motorola and EDACS systems covering a very large geographic area use multiple antenna sites that each operate on different frequencies and use the same talkgroup IDs for traffic. You can program up to 32 frequencies for each trunking system (all you need are the control channel frequencies) but if you have more than 32 frequencies for a system (such as large multi-site system), you will have to split it into separate sites (or groups of sites) and duplicate the IDs for each site (or group of sites). Each talkgroup object can be assigned to one or more scan lists but only assigned to one trunking system or site. That's when the software comes in handy. This method fixes the 32 control channel limit per system but also defeats the Multi-site 'Roaming' functionality. Each TGRP object can be assigned to multiple Scan Lists but only to one trunking system. But, you are really only able to monitor sites within about a 30 mile radius and that usually wouldn't be more than 15-20 sites or 32 control channels anyway. Splitting your big system up will also allow you to tag the smaller groups (or sites) as the scanner only displays tags for systems and not sites. Using Menu Help For each menu item there is a few lines of help text to explain the setting or options accessible by pressing FUNC then SEL when the item is highlighted (has the blinking : [colon] after it). To exit the help menu press SEL again. |
![]()
| Creating (Programming) Objects | Contents |
| Programming Object Orientated Memory is relatively easy and straight forward compared to Dynamic memory. The only real confusing twist is that you have to go into the 'Talkgroup' menu to get to the 'Trunked System' menu to create a trunking system. I believe that is so you won't forget to program at least a 'Wildcard' ID which allows you to monitor all talkgroups. |
| To Create
a New
Conventional
Object press
PGM then F1 (NEW) then
F2 (CONV). A new conventional object is created in the Default Scan List and you are taken to the CONV Channel Menu. See the CONV Channel Menu to edit the conventional channel. |
|
To Create a New
Trunked System
Object press
PGM then F1 (NEW) then
F1 (TGRP). You are now in the Talkgroup Menu. A new Group 'Wildcard' ID is created in the Default Scan List that will receive all (not private) talkgroups. Press ▼ until TSYS: is selected. Press ◄ or ► to select NEW then press SEL/ENT. You are now in the Trunked System Menu. See the Trunked System Menu options. |
| To Create
a New Talkgroup Object press PGM
then F1 (NEW) then F1 (TGRP). A new Group 'Wildcard' ID is created in the Default Scan List that will receive all (not private) talkgroups. See the Talkgroup Menu options. |
|
To Create
a New Limit Search Object press PGM
then F1 (NEW) then F3
(SRCH) then F1
(LMIT). To Create a New Service Search Object press PGM then F1 (NEW) then F3 (SRCH) then F2 (SRVC). To Create a New Stalker/Sweeper Search Object press PGM then F1 (NEW) then F3 (SRCH) then F3 (STLK/SWPR). A new search object is created in the Default Scan List. See the Search/Stalker/Sweeper Object Menu options. |
There is a 'Duplication' feature that allows you make a copy of an object and all of its parameters and tweak any parameters for the new object. Good for agencies that have multiple frequencies with the same name, tone code, alert settings, etc. See also Finding Objects to change anything after programming. |
| To Use a regular Stalker/Sweeper, Limit, or Service Search go to Dedicated Searches. |
![]()
| CONV (Conventional) Channel Menu | Contents |
| The CONV menu is
used when editing Conventional objects. To create a
Conventional object see Creating Objects. To Edit an existing conventional object press PGM then press F2 (EDIT). Press ► until CONV is over F3 then press F3. Press ◄ or ► to select the Scan List where the object is located. Press ▼ or ▲ to locate the object in the list. Press F2 (EDIT) then F2 (CURR). See also Finding Objects.
Use
▼ or
▲ to select each option below. |
| Press ◄ or ► to select the list (01-22) then press SEL/ENT to select any/every list you want the conventional object to be in. A * (asterisk) will appear in front of each list the object will be assigned to. |
| Note: The * will always be in front of the Default Scan List. If you want to select a different list, don't forget to deselect the default Scan List. |
| Freq: Enter the frequency and press SEL/ENT. See also BandPlan and FlexStep settings (in the 'Expert Settings' menu) for step size defaults. |
| See Enter Text or Enter Qtext. |
| Search
- automatically analyzes signals to determine
squelch mode and code to display if received. None - ignores all squelch codes. CTCSS - to receive and display tone squelch if received. See also CTCSS Hz. DCS - to receive and display digital coded squelch if received. See also DCS Code. P25 - to receive and display Project 25 conventional digital squelch (NAC-Network Access Code) if received. See also P25 NAC. The minimum unmute delay for analog conventional channels is when Sq Mode is set to CTCSS or DCS and CTCSS Hz or DCS Code is set to Search: Sq Mode = None or Search: scanner first tries for digital (default time 600ms), then decides it's analog and unmutes audio. See DG Int Prime. Sq Mode = CTCSS or DCS, with a tone/code programmed: scanner presumes it's analog (doesn't try for digital), but must decode the programmed tone/code before unmuting audio. Sq Mode = CTCSS or DCS, with no tone/code programmed ('search'): scanner presumes it's analog (doesn't try for digital), unmutes audio immediately, then displays any decoded tone/code. [10] |
| CTCSS Hz: Allows you to program a specific tone when SQ Mode is set to CTCSS. Press ◄ or ► to select the tone or Search for any tone. |
| DCS Code: Allows you to program a specific digital code when SQ Mode is set to DCS. Press ◄ or ► to select the digital code or Search for any code. |
| P25 NAC: Allows you to program a specific NAC code when SQ Mode is set to P25. Press ◄ or ► to enter the NAC code or press F3 (Dflt) to select 'NAC Search'. |
| See Entering text to enter the (decimal) number code or Hex code. |
| Press ◄ or ► to select On or Off. |
| Priority: When set to 'On', the object will be included in priority scan when Priority (in the GLOB menu) is also set to On. Default is Off. See also Priority Scanning. |
| Press ◄ or ► to select On or Off. |
| Note: You can also do this by pressing PRI when the object is in the display in manual, program, or scan modes. |
| LED Mode: Controls whether the Alert LED flashes or remains on solid at the beginning of each transmission or anytime the scanner stops on the object while scanning. Default is Solid. |
| Press ◄ or ► to select Flash or Solid. |
| Notes: Alert Mode (in the GLOB
menu) must
be set to Light or Both for the LED to
function.
(Base only) Dim LED (in the GLOB menu) must be set to No if Light Level (in the GLOB menu) is set to Off for the LED to function. |
| LED Color: Sets the LED color for the object (as defined in the GLOB menu). Default is 0. |
| Press ◄ or ► to select the color 0-7. |
| Latch LED: When set to 'On', the Alert LED will remain in the LED Mode after the transmission is complete or until it is overridden by the next object that is also using an Alert LED. Default is Off. |
| Press ◄ or ► to select On or Off. |
| Press ◄ or ► to select Off, On, or Flash. |
| Notes: Does not function when Light Mode (in the GLOB menu) is set to Stlth. Light Mode has to be set to Norml, Key, or Ignre for the backlight to come on only during a transmission. |
| Alarm: Sets the selected audio alarm to play at the beginning of each transmission or anytime the scanner stops on the object while scanning. Default is None. |
| Press ◄ or ► to select None, Chirp, Hi-Lo, Alert, Ring, 2-Chirp, Fast Hi-Lo, or DTMF #. |
| Note: Alert Mode (in the GLOB menu) must be set to Tone or Both for the audio alarm to function. |
| Fav: When set to 'Yes', the object is also assigned to the 'Favorites List' (list #21). Default is No. |
| Press ◄ or ► to select Yes or No. |
| SkyWarn: When set to 'Yes', the object is also assigned to the 'Skywarn List' (list #22). Default is No. |
| Press ◄ or ► to select Yes or No. |
| Modulation: Selects the receive mode for the object. Auto will work fine unless you want to force a mode. Default is Auto. |
| Press
◄ or
► to select: Auto - automatically detects the receive mode. AM - forces AM mode. FM - forces FM mode. NFM - forces NFM mode. |
| Atten: When set to 'On', applies 20 dB of attenuation to the object. Useful in areas where interference from nearby strong signals is present. Default is Off. |
| Press ◄ or ► to select On or Off. |
| Note: AttenMode
must be set to Normal for this setting to
apply. You can also toggle this setting by pressing ATT when the object is in the display in Scan mode. |
| Delay: When set to 'On', a delay is used to wait for reply traffic after a transmission according to the Delay Time setting for the object. Default is On. |
| Press ◄ or ► to select On or Off. |
| Note: You can also do this by pressing FUNC then .(DELAY) when the object is in the display in manual, program, or scan modes. |
| Delay Time: Sets the delay time used when
Delay is set to On. |
| Enter the amount of time, 1-250 (.1 - 25 seconds), to set the delay. Default is 20 (2 secs). |
| Press ◄ or ► to select On or Off. |
| SuperTrack: Alternative DSP decoding algorithm. When set to 'On', may help reception on some systems. Default is On. |
| Press ◄ or ► to select On or Off. |
| AudioBoost: When set to 'On', sets a 6 dB boost to audio levels when the object is active. Default is Off. |
| Press ◄ or ► to select On or Off. |
| Hit Count: When Hit Counts (in the GLOB menu) is set to 'On', will increment each time a transmission is received on the object. |
| Enter a number (0-9999) to change the count if you wish or press F3 (Dflt) to reset to 0. |
![]()
| TSYS (Trunked System) Menu | Contents |
| The Trunked System
menu is used when editing trunking system objects. To create a
Trunked System object see Creating Objects. Trunked
system objects are assigned object numbers automatically but are not assigned to scan
lists; just the talkgroups associated with the system are assigned to
the scan lists. There is a 32 control channel limit for a trunking system. Large Multi-site systems
with more than 32 control channels will have
to broken up into smaller systems. 'Duplication' will copy a system but each ID can only be
associated with one system. You will have to have to
re-enter (or duplicate) all the IDs for the new system.
That's when the software comes in handy. To Edit an existing Trunked System object press PGM then F2 (EDIT). Press ► until TSYS is over F3 then press F3. Press ▼ or ▲ to scroll to the trunked system and press F2 (EDIT). See also Finding Objects.
Use
▼ or
▲ to select each option. |
| Type | Narrow FM | SuperTrack | Threshold Hi (Motorola/P25 only) |
| Tag | AudioBoost | AutoMove HRs (LTR only) | Threshold Lo (Motorola/P25 only) |
| Frequencies | Dwell | Invert Data (EDACS Narrow only) | T Tables (Motorola/P25 only) |
| L/Out | DIG AGC | Multi-Site (Motorola/P25 only) | Fleet Map (Motorola Type I/IIi only) |
| Atten | Check All CC (Motorola/P25 only) |
| Type: Selects the type of trunking system. Note for Motorola/P25 systems: If you are not sure if the system is Motorola or P25, look at the system voice in the RR database for your system. Those entries that say System Voice: Analog and APCO-25 Common Air Interface are not true Project 25 systems as they have one or more analog talkgroups. Program these systems as a MOT system and let the scanner detect the digital. If the System Voice says System Voice: APCO-25 Common Air Interface Exclusive then the system is a true Project 25 system and program it as a P25 system. |
| Press
◄ or
► to select: MOT 800/900 - for Motorola 700/800/900 MHz analog or mixed (analog and digital) trunked radio systems that use the 3600 baud control channel. MOT VHF/UHF - for Motorola VHF/UHF analog or mixed (analog and digital) trunked radio systems. P25 MANUAL - for Motorola 700/800/900/VHF/UHF Project 25 systems where it is necessary to manually set the channel table information or if you wish to use the default table data (for 700/800/900 MHz systems). P25 AUTO - for most Motorola 700/800/900/VHF/UHF Project 25 systems that send channel table information over the system control channel. EDACS STD - for most 800 MHz EDACS systems using a 9600 BPS control channel. EDACS NARROW - for most 900 MHz and some VHF/UHF EDACS systems using a 4800 BPS control channel. LTR - for Logic Trunked Radio (LTR) systems. |
| See Enter text or Enter Qtext. |
| Frequencies: Press SEL/ENT
to enter the frequencies for the trunking system. For
Motorola systems you only need to enter the control
channel frequencies. Note: EDACSs frequencies also have to be entered in LCN order. See Finding EDACS LCN Order. See also BandPlan and FlexStep settings (in the 'Expert Settings' menu) for step size defaults. |
| Enter
the frequency and press SEL/ENT. Press ▼ to move to the next channel number and repeat for all the frequencies. Press F1 (Save) to exit. |
| Press ◄ or ► to select On or Off. |
| Atten: When set to 'On', applies 20 dB of attenuation to all transmissions in the system. Useful in areas where interference from nearby strong signals is present. Default is Off. |
| Press ◄ or ► to select On or Off. |
| Note: AttenMode
must be set to Normal for this setting to
apply. You can also toggle this setting by pressing ATT while monitoring any talkgroup in the system. |
| Narrow FM: Use Yes when the system is known to use Narrow FM modulation. Most 900 MHz analog trunked radio systems utilize NFM modulation. Default is No. |
| Press ◄ or ► to select Yes or No. |
| Press ◄ or ► to select On or Off. |
| Enter the amount of time, 0-200 (0 - 20 seconds), for the delay. Default is 0. |
| Press ◄ or ► to select On or Off. |
| SuperTrack: Alternative DSP decoding algorithm. When set to 'On', may help reception on some systems. Default is On. |
| Press ◄ or ► to select On or Off. |
| Press ◄ or ► to select On or Off. |
| Invert Data (EDACS Narrow only): For some EDACS Narrow systems, the control channel data may need to be inverted if you can't receive (hear) the control channel. Default is No. |
| Press ◄ or ► to select Yes to invert or No. |
| Multi-Site (Motorola/P25 only): Used with Motorola Networked and P25 trunked radio systems. The multi-site feature mainly concerns how the scanner "looks" at the control channels you have programmed into a particular system object. Default is Off. [8] See also [15]. |
| Press
◄ or
► to select: Off - the scanner will find the first usable control channel in the control channel list and use it to track the system. Roam - while (you are) moving, the scanner will attempt to lock on the best site it can find. The scanner will always attempt to lock on to control channels where the decoding quality is greater than 'Threshold Hi', and will search for new control channels when the decoding quality of a control channel drops below 'Threshold Lo' (see next entries below). If no control channels are available that meet the Threshold Hi criteria, the scanner will seek the best control channel to use, and continue checking periodically for a new control channel that meets the Threshold Hi criteria. Stat - intended to allow you to scan through all decent quality control channels while stationary (say, at home or work) so that you can hear all of the available traffic on all of the available receivable decent quality control channels depending on the Check All CC setting below. [8] |
| Threshold Hi (Motorola/P25 only): When Multi-Site is set to Roam, sets the control channel decode % threshold for a site to be considered good when looking for a new site. |
| Enter the percentage (1-99) and press SEL/ENT. Default setting is 95(%). |
| Threshold Lo (Motorola/P25 only): When Multi-Site is set to Roam, sets the control channel decode % threshold for a site to be considered out of range, which will begin the process of looking for a new site. |
| Enter the percentage (1-99) and press SEL/ENT. Default setting is 75(%). |
| Check All CC (Motorola/P25 only): When Multi-Site is set to Stat (stationary) This setting determines how the scanner scans the control channels. Default is Off. |
| Press
◄ or
► to select Off
or On. Off - the scanner will check a new control channel on each pass, starting with the next frequency in line after the previous pass. It will check only one control channel per pass. [2] The scanner will park on a different decent quality control channel each time it scans that system. [8] On - the scanner will park on each decent control channel in the list successively looking for programmed talk groups BEFORE leaving that system and moving on to other system's or conventional channels. [8] |
|
T Tables (Motorola/P25
only): Allows you to select the default trunking table or to
customize the tables for each type of system.
Trunking tables are required so the scanner can correctly
determine the voice channel frequencies. Trunking table information can usually be found in the
Radio
Reference Database for implicit and VHF/UHF systems. The
Win500 and
PSREdit500 software will also allow you to select the
tables needed for each type of system. For Splinter Systems (analog 800Mhz systems with frequencies between 866-869 MHz [or rebanded 851-854 MHz] ending with 0 instead of 5 e.g. 852.1250, not 852.1375) select Splintr. For Motorola/P25 Systems there are two types of systems: Explicit mode and Implicit mode channel assignment. Explicit mode systems include all information needed to determine voice frequencies on the control channel. For Explicit mode systems, leave this setting at Default. The system will automatically detect the band plan and populate the table for the system. You must supply the system's band plan for Implicit systems for the scanner to correctly determine voice frequencies. For Rebanded Motorola Systems you must select Custom and create a custom band plan. For Motorola 800 MHz rebanded table entries see this post. For VHF and UHF Systems Custom will be the only option. You must program the applicable lo channel, hi channel, offset, base frequency, and step for the system. I have found an explanation at the Trunked Radio Systems User’s Page that describes how to find some of this information. Look for 'Determining Base and Offset Frequencies for the BC245xlt' by John C. See also this post for UHF systems. Radio Reference.com also has an explanation. Inquire at Radio Reference.com Forums to find more information about specific systems. |
| Press
◄ or
► to select Default,
Splintr,
or Custom. VHF/UHF systems will only have Custom
for an option. If Custom is selected, press SEL/ENT to edit the tables. |
| Press
◄ or
► to select Table
1-16 and
press SEL/ENT. Enter the Lo Channel and press SEL/ENT. Enter the Hi Channel and press SEL/ENT. Enter the Offset and press SEL/ENT. Enter the Base Frequency and press SEL/ENT. Enter the Step and press SEL/ENT. Press F1 (Save) to save the table and exit. Press ▼ to move to the next table number (as needed) and repeat. Press F1 (Save) to save all trunking tables and exit. |
| Fleet Map (Motorola Type I/IIi only): Motorola Type I and Type IIi systems require you to program a fleet map. This allows you to receive the talkgroup IDs correctly. If you don’t know which fleet map to use, you can try a method I found at Radio Reference.com., Determining Type I Motorola Fleet Maps by Dave Goodson. If you know the fleet map by name, E1P1, E1P2, etc., I have listed 16 pre-set fleet maps so you can see the size codes. |
| Press
◄ or
► to select one
of the pre-set fleet maps, or Custom. If Custom is selected, press SEL/ENT to edit the size codes for the blocks. |
| Press
▼ to select the
Block (0-7)
then press
◄ or ► to select the
size code S(0-14). Press ▼ to move to the next Block and repeat for all the blocks (as needed). Press F1 (Save) to save the fleet map and exit. |
| Note:
If you select size code S-12, S-13, or S-14, these
restrictions apply: S-12 can only be assigned to blocks 0, 2, 4 or 6. S-13 can only be assigned to blocks 0 and 4. S-14 can only be assigned to block 0. Since these size codes require multiple blocks, you will be prompted for the next available block. For example, if you assign Block 0 as S-12, the scanner prompts you for block 2, the next block available, instead of block 1. If you assign Block 0 as S-14, you would not see another prompt because S-14 uses all available blocks. |
![]()
| TalkGroup Menu | Contents |
| Here is
where you edit talkgroup IDs.
To create a Talkgroup object see
Creating Objects.
If you have a lot of IDs to program and don't have the software, 'Duplication' will be your best
friend. This will allow you to set all the parameters for
an ID, i.e. delay, LED color, etc., duplicate it, and
just change the ID number. To Edit an existing Talkgroup object press PGM then press F2 (EDIT). Press ► until TGRP is over F3 then press F3. Press ◄ or ► to select the Scan List where the object is located. Press ▼ or ▲ to locate the object in the list. Press F2 (EDIT) then F2 (CURR). See also Finding Objects. Use ▼ or ▲ to select each option. Menu changes do not take effect until the menu is saved-F1 (Save). If you forget to save any changes, you will see 'Unsaved Changes! Go Back?'. Press F1 (Yes) to go back or F3 (No) to exit without saving. |
| Scan Lists | Tag | LED Color | Fav | Delay Time |
| TSYS | L/Out | Latch LED | SkyWarn | AudioBoost |
| ID | Priority | Backlight | Delay | Hit Count |
| Type | LED Mode | Alarm |
| Press ◄ or ► to select the list (01-22) then press SEL/ENT to select any/every list you want the talkgroup object to be in. A * (asterisk) will appear in front of each list the object will be assigned to. |
| Note: The * will always be in front of the Default Scan List. If you want to select a different list, don't forget to deselect the default Scan List. |
| TSYS: This is where you select a (1) trunking system or create a new trunking system to be associated with the ID. |
| Press ◄ or ► to select the trunking system you want the ID to be in. |
| ID: This is where you enter the talkgroup ID (or private/radio ID) number. A 'Wildcard' is a special type of ID object that allows you to monitor all Talk Group traffic on the trunked system and is created by default. IDs can be classified as 'Group' or 'Private'. Wildcard IDs monitor all Talk Group traffic on the system and you have the option to store (F3) or lock out (F1) new Talk Groups as they appear. See also ID Formats. |
| Press F3
(Dflt) for a Wildcard ID. Enter a Motorola Type II ID - a 1-5-digit ID number. Valid Talk Group IDs are divisible by 16. Enter a Motorola Type I ID - fff-ss where fff is the fleet and ss is the sub-fleet. Enter a EDACS ID (AFS) - aa-ffs where aa is the agency, ff is the fleet, and s is the sub-fleet. Enter a EDACS ID (Decimal) - the default EDACS format is AFS. If you want to enter in Decimal format you will have to change TGID Format (in the GLOB menu) to 'Decimal' first, then enter the 1-4 digit ID number. Enter a LTR ID - a-hh-uuu where a is the area code (0 or 1), hh is the home repeater (01-20), and uuu is the user ID (000-254). Enter a Radio ID - a 1-8 digit Radio number. |
| Type: Selects the ID Type. Default is Group. |
| Press
◄ or
► to select: Group - will only monitor Talk Group radio traffic on the specified Talk Group ID. Private - will only monitor private radio traffic on the specified Private ID (or Radio ID). IDs designated as 'Private' can also be tagged and viewed on line 5 of the display when 'Show RadioID' (in the 'Expert Settings' menu) is set to Yes. |
| See Entering text or Using Quick Text. |
| Press ◄ or ► to select On or Off. |
| Note: locking out Talk Group IDs that have private Radio IDs associated with them will also lock out those private Radio IDs. |
| Priority: When set to 'On', the ID will be given priority over other IDs when Priority (in the GLOB menu) is also set to On. Default is Off. See also Priority Scanning. |
| Press ◄ or ► to select On or Off. |
| Note: You can also do this by pressing PRI when the ID is in the display in manual, program, or scan modes. |
| LED Mode: Controls whether the Alert LED flashes or remains on solid at the beginning of each transmission or anytime the scanner stops on the ID while scanning. Default is Solid. |
| Press ◄ or ► to select Flash or Solid. |
| Notes: Alert Mode (in the GLOB
menu) must
be set to Light or Both for the LED to
function.
(Base only) Dim LED (in the GLOB menu) must be set to No if Light Level (in the GLOB menu) is set to Off for the LED to function. |
| LED Color: Sets the LED color for the object as defined (in the GLOB menu). Default is 0. |
| Press ◄ or ► to select the color 0-7. |
| Latch LED: When set to 'On', the Alert LED will remain in the LED Mode after the transmission is complete or until it is overridden by the next object that is also using an Alert LED. Default is Off. |
| Press ◄ or ► to select On or Off. |
| Press ◄ or ► to select Off, On, or Flash. |
| Notes: Does not function when Light Mode (in the GLOB menu) is set to Stlth. Light Mode has to be set to Norml, Key, or Ignre for the backlight to come on only during a transmission. |
| Alarm: Sets the selected audio alarm to play at the beginning of each transmission or anytime the scanner stops on the ID while scanning. Default is None. |
| Press ◄ or ► to select None, Chirp, Hi-Lo, Alert, Ring, 2-Chirp, Fast Hi-Lo, or DTMF #. |
| Note: Alert Mode (in the GLOB menu) must be set to Tone or Both for the alarm to function. |
| Fav: When set to 'On', the ID is also included in the 'Favorites List' (list #21). Default is No. |
| Press ◄ or ► to select Yes or No. |
| SkyWarn: When set to 'On', the ID is also included in the 'Skywarn List' (list #22). Default is No. |
| Press ◄ or ► to select Yes or No. |
| Delay: When set to 'On', a delay is used to wait for reply traffic after a transmission according to the Delay Time setting for the object. Default is On. |
| Press ◄ or ► to select On or Off. |
| Note: You can also do this by pressing FUNC then .(DELAY) when the object is in the display in manual, program, or scan modes. |
|
Delay Time: Sets the delay time used when Delay is set to On. |
|
Enter the amount of time, 1-250 (.1 - 25 seconds), to set the delay. Default is 20 (2 secs). |
| AudioBoost: When set to 'On', sets a 6 dB boost to audio levels when the ID is active. Default is Off. |
| Press ◄ or ► to select On or Off. |
| Hit Count: When Hit Counts (in the GLOB menu) is set to 'On', will increment each time a transmission is received on the object. |
| Enter a number (0-9999) to change the count if you wish or press F3 (Dflt) to reset to 0. |
![]()
| Search/Signal Stalker/Spectrum Sweeper Object Menus | Contents |
|
|
| These menus are
used when editing Stalker/Sweeper, Service, and
Limit Search objects. To create a Stalker/Sweeper, Service, or Limit Search object see Creating Objects. Go here to use the Dedicated Searches that are not used when scanning objects. See also BandPlan and FlexStep settings (in the 'Expert Settings' menu) for step size defaults. To Edit an existing Search object press PGM then press F2 (EDIT). Press ► until SRCH or STLK/SWPR is over F3 then press F3. Press ◄ or ► to select the Scan List where the object is located. Press ▼ or ▲ to locate the object in the list. Press F2 (EDIT) then F2 (CURR). See also Finding Objects. Use ▼ or ▲ to select each option. Menu changes do not take effect until the menu is
saved-F1 (Save). |
| Options for All Search Objects: See also SearchTunes (in the 'Expert Settings' menu) to set the maximum number of frequencies to check in each search object while scanning. |
| Scan Lists | LED Mode | Backlight | Atten | Search Dir |
| Tag | LED Color | Alarm | Delay | Hit Count |
| L/Out | Latch LED | Fav | Delay Time |
| Options for Stalker/Sweeper Search Objects: |
| Options for Service Search Objects: |
| Srvc | Groups (PubSafty,Aircraft,Amateur only) | Channels (CB,Marine,F/G/MURS only) | Modulation | Zeromatic (not w/ CB,Marine,F/G/MURS) |
| Options for Limit Search Objects: |
| Options for All Search Object Options |
| Press ◄ or ► to select the list (01-22) then press SEL/ENT to select any/every list you want the object to be in. A * (asterisk) will appear in front of each list the object will be assigned to. |
| Note: The * will always be in front of the Default Scan List. If you want to select a different list, don't forget to deselect the default Scan List. |
| See Enter text or Enter Qtext. |
| Press ◄ or ► to select On or Off. |
| LED Mode: Controls whether the Alert LED flashes or remains on solid at the beginning of each transmission or anytime the scanner stops on the object while scanning. Default is Solid. |
| Press ◄ or ► to select Flash or Solid. |
| Notes: Alert Mode (in the GLOB
menu) must
be set to Light or Both for the LED to
function.
(Base only) Dim LED (in the GLOB menu) must be set to No if Light Level (in the GLOB menu) is set to Off for the LED to function. |
| LED Color: Sets the LED color for the object (as defined in the GLOB menu). Default is 0. |
| Press ◄ or ► to select the color 0-7. |
| Latch LED: When set to 'On', the Alert LED will remain in the LED Mode after the transmission is complete or until it is overridden by the next object that is also using an Alert LED. Default is Off. |
| Press ◄ or ► to select On or Off. |
| Press ◄ or ► to select Off, On, or Flash. |
| Notes: Does not function when Light Mode (in the GLOB menu) is set to Stlth. Light Mode has to be set to Norml, Key, or Ignre for the backlight to come on only during a transmission. |
| Alarm: Sets the selected audio alarm to play at the beginning of each transmission or anytime the scanner stops on the object while scanning. Default is None. |
| Press ◄ or ► to select None, Chirp, Hi-Lo, Alert, Ring, 2-Chirp, Fast Hi-Lo, or DTMF #. |
| Note: Alert Mode (in the GLOB menu) must be set to Tone, or Both for the alarm to function. |
| Fav: When set to 'Yes', the object is also included in the 'Favorites List' (list #21). Default is No. |
| Press ◄ or ► to select Yes or No. |
| Atten: When set to 'On', applies 20 dB of attenuation to the object. Useful in areas where interference from nearby strong signals is present. Default is Off. |
| Press ◄ or ► to select On or Off. |
| You can also toggle this setting by pressing ATT when the object is in the display in Scan mode. |
| Delay: When set to 'On', a delay is used to wait for reply traffic after a transmission according to the Delay Time setting for the object. Default is On. |
| Press ◄ or ► to select On or Off. |
| Note: You can also do this by pressing FUNC then .(DELAY) when the object is in the display in manual, program, or scan modes. |
| Delay Time: Sets the delay time used when Delay is set to On. |
| Enter the amount of time, 1-250 (.1 - 25 seconds), to set the delay. Default is 20 (2 secs). |
| Zeromatic: (not with CB,Marine,F/G/MURS) When set to 'On', enhances the scanner's ability to lock on to the actual center frequency of a search hit instead of an adjacent frequency. Default is On. |
| Press ◄ or ► to select On or Off. |
| Note: You can also do this by pressing FUNC then 0 when the object is in the display in search or scan modes. |
| Hit Count: When Hit Counts (in the GLOB menu) is set to On, this will increment each time a transmission is received on the object. |
| Enter a number (0-9999) to change the count if you wish or press F3 (Dflt) to reset to 0. |
| Stalker/Sweeper Search Options |
| Type: Allows you to search from All bands or just Public Safety Bands. Default is All Bands. |
| Press
◄ or
► to select: All Bands - will allow you to search from all the sub-bands the scanner can receive. Pub Safety - will allow you to search from just the Public Safety sub-bands. |
| Sub-bands: Allows you to select which Stalker/Sweeper Bands that will be searched. |
| If you selected
All Bands press
◄ or
► to select each band
0-9 then press SEL/ENT to turn it on or off for search. Default
is 0,2,5,7,8. If you selected Public Safety Bands press ◄ or ► to select each band 0-4 then press SEL/ENT to turn it on or off for search. Default is 0,1,2,3,4. A * (asterisk) will appear in front of each selected band to be searched. |
| Special: Turns Special Signal Stalker/Spectrum Sweeper on or off. Default is Off. |
| Press ◄ or ► to select On or Off. |
| Services Search Options |
| Press ◄ or ► to select Pub Safety, Aircraft, Amateur, CB, Marine, FRS/GMRS/MURS, or Railroad. |
| Groups (PubSafty,Aircraft,Amateur only): Allows you to select which groups that will be searched for Pub Safety, Aircraft, and Amateur service searches. Default is All Groups On. |
| Press ◄ or ► to select each group then press SEL/ENT to enable the group. A * (asterisk) will appear in front of each selected group to be searched. |
| Channels (CB,Marine,F/G/MURS only): Allows you to select which channels will be searched for CB, Marine, and FRS/GMRS/MURS service searches. Default is All Channels. |
| Press SEL/ENT. Press ▼ or ▲ to locate the channels you want to scan. Press SEL/ENT to disable or enable each channel. A * (asterisk) will appear in front of each selected channel to be searched. |
| Modulation: Selects the receive mode for the Service Search object. Auto will work fine unless you want to force a mode. Default is Auto. |
| Press
◄ or
► to select: Auto - automatically detects the receive mode. AM - forces AM mode. FM - forces FM mode. NFM -forces NFM mode. |
| Limit Search Options |
| FrLo: Enter the lower frequency of the limit search and press SEL/ENT. See also BandPlan and FlexStep settings (in the 'Expert Settings' menu) for step size defaults. |
| Modulation: Selects the receive mode for the Limit Search object. Auto will work fine unless you want to force a mode. Default is Auto. |
| Press
◄ or
► to select: Auto - automatically detects the receive mode. AM - forces AM mode. FM - forces FM mode. NFM -forces NFM mode. |
![]()
| Duplicating Objects | Contents |
|
Duplication is especially useful when entering multiple TGRP objects in the same trunked system or multiple CONV objects that have similar parameters or tag names. |
| To Duplicate an Object: |
| Press
MAN. Press
◄ or ► to select the
Scan List where the object is located. Press ▼ or ▲ to locate the object in the scan list. Press PGM then F2 (EDIT) then F1 (DUPE). |
|
An exact copy of the object you selected is created and assigned to the Scan List you copied the object from. The scanner then displays the newly created object menu so you can change the parameters that need to be changed. Edit any parameters you wish and press F1 (Save) when you are finished. |
| Note: as soon as you press DUPE an object is created and stored. Pressing F1 (Save) will only save changed parameters. |
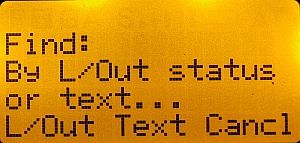 Find Menu |
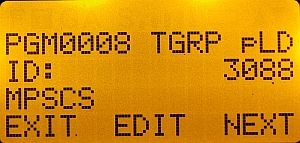 Find by Lockout Status |
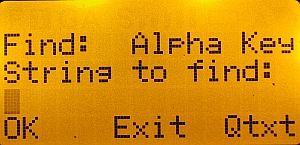 Find by Text |
| Finding Objects |
| There are many different ways to locate objects: |
| 1. By Object Number: |
| Press MAN,
the object number, then SEL/ENT. To edit the object, press PGM then F2 (EDIT) then F2 (CURR). |
| 2. By Browsing: |
| Press
MAN. Press
◄ or ► to select the
Scan List where the object is located. Press ▼ or ▲ to locate the object in the scan list. To edit the object, press PGM then F2 (EDIT) then F2 (CURR). Note: Trunking Systems are not assigned to Scan Lists and cannot be found using the ▼, ◄, ▲, or ► keys in Manual or Program Modes. See next entry to use the Edit Method. |
| 3. By Object Type: |
| Press PGM
then
F2 (EDIT) then
► until CONV,
TGRP, TSYS, SRCH,
or STLK/SWPR is over any softkey (F1,
F2, or F3) Press the softkey under the object type you wish to locate. Press ◄ or ► to select the Scan List where the object is located. Press ▼ or ▲ to locate the object in the list. To edit the object, press F2 (EDIT). |
| 4. By Text: |
| Press PGM
then
F2 (EDIT)
then F3
(FIND) then F2 (Text). Enter the string of text to find or press F3 (Qtxt) to insert any Programmed Quicktext. Press F1 (OK) to search. Press F3 (NEXT) to search again. To edit the object, press F2 (EDIT). |
| Press
PGM then
F2 (EDIT)
then F3
(FIND) then F1 (L/Out). Press (or press and hold) F3 (Next) to locate the
object in the list. Press L/OUT to unlock. To edit the object, press F2 (EDIT) then F2 (CURR). |
| Deleting Objects |
| Locate the object using one of
the first three methods (not FIND) above then press PGM. Press FUNC then CL. |
![]()
| Scanning the Scan Lists | Contents |
| Turning Scan List On and Off |
| Press the number key assigned to the Scan List. For double-digit Scan Lists, press FUNC then the
second digit of the Scan List. Example: FUNC then 8 for
list 18. To use the Favorites List press FAV. Press SCAN to exit. To use the Skywarn List press FUNC then WX. Press SCAN to exit. |
| Storing... |
| To store an ID
found with a Wildcard ID press F3 (Stor). The ID will be
assigned to the current Scan List. Then see the TGRP
Menu to customize the ID. To store any search frequency (Limit, Service, Tune, or Stalker/Sweeper) press F3 (Stor). The frequency will be assigned to the default Scan List. Any tone/code/NAC will also be stored (if enabled) with the frequency. Then see the CONV Menu to customize the channel. To store a CTCSS/DCS/NAC tone/code (if enabled) press F3 (Stor). |
| Using Pause and Manual |
| Pause
(PSE) will pause any
scan or search and monitor that single object or frequency. Press PSE again to resume. PAUSE pauses the scanner but keeps the scanner in scan or search mode. If you press PSE while viewing a Wildcard ID, the scanner will monitor only the talkgroup the scanner is paused on. Manual (MAN) will pause Scan Mode and allow you to monitor that object. MAN stops scan mode and allows you to select other objects to monitor including search objects. To monitor an object, press MAN, enter an object number and press SEL/ENT. If the number isn't in use, the scanner will just beep. If you press MAN while viewing a Wildcard ID, the scanner will monitor all active IDs in that system. MAN will also recall the last object or frequency stored or received in Scan or Search Modes. If that object is in multiple lists, the scanner displays the lowest number Scan List that the object is in. |
| Temporary/Permanent Object Lockout |
| To Lockout an ID found with a Wildcard ID
press F1 (TGL/O).
This will create an object for the ID and then permanently lock it out. To Lockout a Search Frequency within a search object or in a dedicated search press F1 (FrL/O). This will permanently lockout the frequency. The F1 softkey (FrL/O) permanently locks out search frequencies when searching, and (TGL/O) permanently locks out talkgroups found with the Wildcard IDs and both will not perform temporary lockouts. Note: By default, pressing the L/OUT button toggles a temporary lockout (on or off) and FUNC then L/OUT toggles a permanent lockout for an object. To change the L/OUT button to toggle a permanent lockout when pressed and FUNC then L/OUT to toggle a temporary lockout see Setting the Function of the L/OUT Button (in the GLOB menu). I will use the default setting to explain the following. Anything that has (TGL/O) in the display above F1 (ID found with a wildcard ID) has to be (can only be) permanently locked out with the F1 softkey. Anything that has (FrL/O) in the display above F1 (search/stalker/sweeper frequency) has to be (can only be) permanently locked out with the F1 softkey. Anything that has the lowercase 'l' in the upper right of the display (CONV, TSYS, TGRP, or wildcard ID object) can be temporarily locked out (L/OUT button) or permanently locked out (FUNC then L/OUT button). Temporary Lockout (L/OUT button) locks out conventional objects, programmed talkgroup objects (not IDs found with Wildcard IDs), and programmed search objects (not frequencies within search objects) only until the scanner is turned off. When the scanner is powered on again, all objects that have been temporarily locked out are unlocked. To Temporarily Lockout a Programmed Object: When the scanner stops on an object, press the L/OUT button. Or, In Manual or Program Mode, Press ◄ or ► to select the Scan List where the object is located. Press ▼ or ▲ to locate the object in the list. Press the L/OUT button. The lowercase 'l' flashes in the display to show the object is temporarily locked out. Permanent Lockout (FUNC then L/OUT button) locks out conventional objects and programmed talkgroup objects (not IDs found with Wildcard IDs), and programmed search objects (not frequencies within search objects) permanently until they are unlocked. To Permanently Lockout a Programmed Object: When the scanner stops on an object, press FUNC then the L/OUT button. Or, In Manual or Program Mode, Press ◄ or ► to select the Scan List where the object is located. Press ▼ or ▲ to locate the object in the list. Press FUNC then the L/OUT button. The uppercase 'L' appears in the display to show the object is permanently locked out. To Lockout or Unlock a Trunked System: Press PGM then F2 (EDIT). Press ► until TSYS is over F3 then press F3 (TSYS). Press ▼ or ▲ to scroll to the trunked system and press FUNC then L/OUT to toggle temporary lockout or L/OUT to toggle permanently lockout for the system. |
| Unlocking Objects See also Find by L/O Status. | Contents |
| To Unlock a
Conventional, Talkgroup, or Search Object:
(to unlock search
frequencies within search objects see
Unlocking Search Frequencies). In Manual or Program Mode, press ◄ or ► to select the Scan List where the object is located. Press ▼ or ▲ to locate the object in the list. To unlock a temporary lockout press the L/OUT button. The flashing lowercase 'l' in the display turns solid to show the object is unlocked. To unlock a permanent lockout press FUNC then the L/OUT button. The uppercase 'L' in the display changes to the lowercase 'l' to show the object is unlocked. |
| To Unlock a Trunked System: Press PGM then F2 (EDIT). Press ► until TSYS is over F3 then press F3 (TSYS). Press ▼ or ▲ to scroll to the trunked system and press FUNC then L/OUT to toggle temporary lockout or L/OUT to toggle permanently lockout for the system. |
| Priority Scanning |
| To Turn Priority Scanning
On press FUNC then
PRI while scanning. All objects with their priority mode set to
'On' are given equal priority status. No object has higher
priority over any another. Conventional Priority Scanning will give priority to conventional objects that have their priority mode set to 'On'. The scanner will sample the conventional objects for activity periodically while scanning and monitoring other objects. This sampling will cause a brief muting of received audio when it occurs while another object is active. The more conventional objects that are set for priority, the longer this audio muting will be, since it takes a certain amount of time to sample each priority conventional object for activity. It will not check for conventional objects when scanning search or Stalker/Sweeper objects. Talk Group Priority Scanning will give priority to IDs that have their priority mode set to 'On'. IDs with priority on are checked for activity before any other IDs and during the delay time after non-priority ID calls. On some trunked systems (e.g. Mot 3600 if the system is programmed for it, and LTR for some talkgroups), it will look at low-speed data on the voice frequency checking for any priority Talk Group information. It will not check for IDs when receiving any other talkgroup. It will not check for IDs when scanning conventional, search, or Stalker/Sweeper objects. Priority does work for Radio IDs associated with 'Private' IDs. Priority does not work for Radio IDs associated with 'Group' IDs, the scanner will only check the 'Group' IDs. See also these Priority settings in the GLOB Menu: The Priority Channels setting sets the number of conventional priority channels to check during priority scan (default=0). The Pri Interval sets how often the scanner checks the priority channels (default 2 secs). The QuickPriRtn setting when set to 'On', (default 'Off') will not wait for verification of correct CTCSS, DCS, or NAC when returning to an active conventional channel after priority sampling. The TGRP Pri Int setting will interrupt trunked activity to check for conventional priority channels when set to (default) 'On'. Weather Priority Scanning will give priority to a weather channel that has its priority mode set to 'On'. Weather Priority mode samples the specified weather frequency periodically while scanning to see if the 'All Hazards 1050 Hz Warning Alert Tone' (WAT) is present. If the WAT is present, the scanner will sound an alarm and tune to the specified weather frequency to monitor the nature of the alert. The WX Check Int setting (in the 'Expert Settings' menu) allows you to set the interval of time to check for a weather alarm signal on a channel while scanning. |
| Using the Attenuator |
| The attenuator reduces the amount of
signal at the receiver input (20 dB) and may help reduce interference from strong
nearby transmitters. There are two attenuation modes, Normal and Global.
Normal attenuation uses the attenuation settings for each object or
search. Global attenuation forces attenuation for all objects, on or off To Attenuate a Conventional Object press ATT anytime a conventional object is in the display. To Attenuate a Trunking System press ATT anytime a talkgroup object is in the display. To Attenuate a Search Object or Dedicated Search press ATT during the search. To Turn Global Attenuation Mode Off press FUNC then ATT (no G in the display). To Turn Global Attenuation Mode On press FUNC then ATT (G in the display). To Turn Global Attenuation On press ATT (GA in the display). To Turn Global Attenuation Off press ATT (G in the display). |
| Using the Favorites List and Skywarn List | Contents |
| The
Favorites List and Skywarn List are 2 list that can be scanned
independently from the regular 20 lists. They scan the objects in their
list only and no other lists. The Skywarn list is really just another
Favorites list.
The Favorites List is scan list #21 and the Skywarn List #22 when
selecting lists in the menus. Objects in the Skywarn and Favorites lists
can also be assigned to one or more of the other 20 lists. The Favorites List is an easy way to scan one or just a few objects at a time without reprogramming anything as it is easy to add objects or clear the list. To Add an object to the Favorites List press FUNC then FAV when the object is in the display. Or, when programming an object, select '21' in the 'Scan Lists:' option of the menu or 'Yes' in the 'FAV:' option of the menus. To Scan the Favorites List press FAV. Press SCAN to exit. To Clear the Favorites List press PGM then GLOB, scroll down to 'Clear FAV' and press SEL/ENT. At 'Really remove all objects from FAV scan list?', press F1 (YES). The Skywarn list is meant to be a more permanent list. Although the manual states "Instant access to frequencies used by storm spotter networks", you still have to program the frequencies yourself. To Add an object to the Skywarn List when programming an object, select '22' in the 'Scan Lists:' option of the menu or 'Yes' in the 'SkyWarn:' option of the object menu. To Scan the Skywarn List press FUNC then WX. Press SCAN to exit. |
![]()
| Optimizing Scanning Parameters | Contents |
| Move your
scanner/antenna to a different location. Sometimes just 12" helps.
Digital is especially real fussy. Get a better antenna. The stock rubber duck/whip antennas are just average quality. |
| Conventional Scanning |
| Setting the squelch properly is the
easiest and quickest way to receive channels better. Set the SQ Wait 1 (in the 'Expert Settings' menu) down to 7 or 5. The minimum unmute delay for analog conventional channels is when Sq Mode is set to CTCSS or DCS and CTCSS Hz or DCS Code is set to Search. |
| Analog/Digital Trunking |
| The one thing that frustrated me
most with the default settings is the constant blinking of an ID in the
display while the scanner was trying to lock on to it. Here's what I did. Move your scanner/antenna to a different location. Sometimes just 12" helps. You want that For Motorola systems/sites, only enter the known control channels/alternate control channels to speed up scanning. You don't need to program the voice channels. There also are articles on Simulcast Digital Distortion and Object Oriented Scanners Overload Issues at RR. Turning the squelch down a little will help pull in fringe sites especially for P25 decoding. It will scan multiple sites slower but gives the scanner time to lock onto the control channels. Turning the squelch up a little will find the stronger sites faster and therefore move to the next site/system quicker. If you are having trouble with garbled digital transmissions, try turning AGC on or off for the system or convention frequency. In the 'Global Settings' menu: |
![]()
| Tune Search/Analyze Mode | Contents |
|
The scanner's TUNE mode allows you to quickly enter any frequency and monitor that frequency for
transmissions, or search up or down from that frequency for activity.
TUNE mode also displays information about trunking
control channels and trunked voice channels it finds while tuning and
other information for conventional frequencies depending on the
ADC Cal
setting in the 'Expert Settings' menu. TUNE search will always check for and display any CTCSS/DCS/NAC squelch, control channel information, and digital modulation each time it finds an active frequency. |
|
|
|
Tune Search: |
| Tune Mode for Analyzing
Trunked System Frequencies: Pressing FUNC TUNE while scanning or paused on a trunked radio system will load the control channel frequency into TUNE mode if the control channel frequency is the last frequency that the scanner checked while scanning. Pressing FUNC TUNE while receiving a trunked radio TGRP will load the voice channel frequency into TUNE mode. Or, you can manually enter a control or voice channel by pressing TUNE then enter the frequency and press SEL/ENT. Changing the ADC Cal (analog to digital conversion calibration?) setting (in the 'Expert Settings' menu) will show different information. OFF (the default setting) will show the receive mode and CTCSS/DCS/NAC code for conventional frequencies and the information in the charts below for trunking frequencies. RSSI will show digital received signal strength indication and analog voltage(?). ZM will show zeromatic tune thresholds(?). DSP will show IMBE detect (XF), P25 control channel detection (HD2), and NAC detection (HD5) for digital frequencies and CTCSS/DCS/NAC detect (HD5) for conventional frequencies. |
| Motorola P25 9600 baud Control Channel |
|
Primary Display (LCD BlinkOn) |
Secondary Display (LCD BlinkOff) |
||||||
| system type P25 |
system type |
NAC |
system type P25 |
control channel |
|||
| system ID Sy:sss |
RFSS ID (Zone) |
site number |
decoding
quality qq% |
NAC |
WACN Address |
||
| NAC=Network Access Code | RFSS=Radio Frequency Sub System |
WACN=Wide Area Communication Network |
|||||
| Motorola 3600 baud Control Channel |
|
Primary Display (LCD BlinkOn) |
Secondary Display (LCD BlinkOff) |
||||
| system type M36 |
control channel |
system type M36 |
control channel |
||
|
tone? CT:cc.ccc |
decoding
quality qq% |
system ID |
site number |
||
| EDACS (Wideband) 9600 baud Control Channel |
|
||||||||||||||
| LTR Home Repeater |
|
|||||||||||||
| Motorola Analog Voice Channel |
|
|||||
|
lsTGID is the decoded talkgroup ID data from the lowspeed data stream. Note that the analog lowspeed data protocol does not provide error correction and some false "VC: lsTGID" readings should be expected. |
|||||
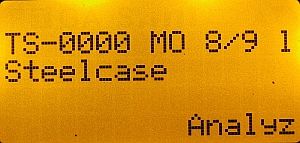 Analyze Option |
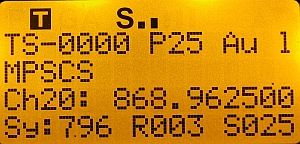 Analyze Mode Motorola P25 System |
![]()
| Dedicated Searches | Contents |
|
|
|
|
|
The scanner's dedicated
Service search allows you to search commonly used public safety
frequencies, civilian and military air
frequencies, and amateur radio frequencies.
Programming your Service Search as an object
gives you more options for the search (delay time, LED mode/color/latch,
alarm, etc.). You could then use the search in Manual mode. This will also
allow you to program and search more than one service search at a time by
assigning them to one (or more) of the 22 Scan Lists.
|
![]()
|
Public Safety, Air, and Ham Search Group Charts (*=Canada Bandplan) |
|
|
|||||||||||||||||||||||||||||||||||||||||||||||||||||||||||||||||||||||||||||||||||||||||||||||||||||||||||||||||||||
![]()
| Marine, CB, or FRS/GRMS/MURS Search | Contents |
| The CB, Marine, and FRS/GMRS/MURS bands are actually frequencies pre-programmed into special channels. You are not searching from a lower frequency to a higher frequency. There are 40 CB channels, 60 Marine channels, and 34 FRS/GMRS/MURS channels. Programming your CB, Marine, or FRS/GMRS/MURS search as an object gives you more options for the search (delay time, LED mode/color/latch, alarm, etc.). You could then use the search in Manual mode. This will also allow you to program and search more than one service search at a time by assigning them to one (or more) of the 22 Scan Lists. |
|
To Start a Dedicated CB, Marine, or
FRS/GMRS/MURS
Search
press SRCH until Srch
CB,
Marine, or
F/G/MURS
appears on the top line. To change direction or resume searching press ▼ or ▲. To pause on a channel press PSE. To view all channels press F2 until (ALL-[uppercase]) appears. To view just unlocked channels press F2 until (all-[lowercase]) appears. To lockout a channel press F1 (FrL/O). To unlock a channel press F2 until (ALL)(uppercase) appears. Press ▼ or ▲ to locate the locked out channel ('L' in front of channel) and press L/OUT to unlock. To store a channel into the Default Scan List press F3 (Stor). To toggle the search delay on or off press FUNC then . (DELAY). To toggle attenuation for the search on or off press ATT. |
 CB Search With Locked Out Channels Invisible |
 CB Search With All Channels Visible |
![]()
|
|
|
||||||||||||||||||||||||||||||||||||||||||||||||||||||||||||||||||||||||||||||||||||||||||||||||||||||||||||||||||||||||||||||||||||||||||||||||||||||||||||||||||||||||||||||||||||||||||||||||||||||||||||||||||||||||||||||||||||||||||||||||||||||||||||||||||||||||||||||||||||||||||||||||||||||||||||
![]()
| Rail Search | Contents |
|
The Railroad band searches all frequencies between 159.810 and 161.565. Most rail VHF frequencies still use the 15 kHz spacing between designated rail channels. Programming your Rail Search as an object gives you more options for the search (delay time, LED mode/color/latch, alarm, etc.). You could then use the search in Manual mode. This will also allow you to program and search more than one service search at a time by assigning them to one (or more) of the 22 Scan Lists. |
|
||||||
|
To Start a Dedicated Rail Search
press SRCH until Srch Railroad
appears on the top line. To change direction or resume searching press ▼ or ▲. To pause on a frequency press PSE. To lockout a frequency press F1 (FrL/O). To unlock a frequency see Unlocking Search Frequencies. To store a channel into the Default Scan List press F3 (Stor). To toggle the search delay on or off press FUNC then . (DELAY). To toggle attenuation for the search on or off press ATT. To toggle Zeromatic tuning on or off press FUNC then 0. |
![]()
| Limit Search | Contents |
| The scanner's dedicated limit search mode allows you to program one
limit search of upper and lower frequencies.
Programming your Limit Search as an object
gives you more options for the search (delay time, LED mode/color/latch,
alarm, etc.). You could then use the search in Manual mode. This will also
allow you to program and search more than one range at a time by assigning
them to one (or more) of the 22 Scan Lists.
See also BandPlan and FlexStep settings (in the 'Expert Settings' menu) for step size defaults. |
|
|
|
To Start a Dedicated Limit Search
press SRCH until Srch Limit
appears on the top line. Press F1 (Lmts) to set the lower and upper frequencies. (Press FUNC then F1 during transmissions to override FrL/O). Enter the lower frequency and press ENT. Enter the upper frequency and press ENT. Press F1 (Save). To change direction or resume searching press ▼ or ▲. To pause on a frequency press PSE. To lockout a frequency press F1 (FrL/O). To unlock a frequency see Unlocking Search Frequencies. To toggle the receive mode press F2 (Mode). To store a frequency into the Default Scan List press F3 (Stor). To toggle the search delay on or off press FUNC then . (DELAY). To toggle attenuation for the search on or off press ATT. To toggle Zeromatic tuning on or off press FUNC then 0. |
![]()
|
|
| Zeromatic tuning is a feature that
enhances the scanner's ability to lock on to the actual center frequency
of a search hit instead of an adjacent frequency. This option is available
for all Limit, Service, and Stalker/Sweeper search objects and dedicated searches except CB, Marine, and F/G/MURS. Press FUNC then 0 to toggle On (uppercase Z in display) or Off (lowercase z in display) while searching. |
![]()
| Signal Stalker/Spectrum Sweeper Search | Contents |
| Your scanner's Stalker/Sweeper feature provides a powerful new tool for you to rapidly detect, monitor, and store frequencies from nearby radio transmissions. The Stalker/Sweeper feature is more sensitive than portable frequency counters and will detect transmissions at a greater distance. Stalker/Sweeper functions by rapidly searching through the RF spectrum in 1 MHz segments. If RF signal energy is detected in a 1 MHz segment, the scanner will search through the 1MHz segment in finer steps until the source of the RF signal energy is found. The Stalker/Sweeper feature is similar in functionality to portable frequency counters that cost much more than your scanner, but provides many advantages over typical portable frequency counters. For example: The Stalker/Sweeper allows you to search the entire range of your scanner's design frequencies, or you can specify just those frequency ranges that you wish to search. |
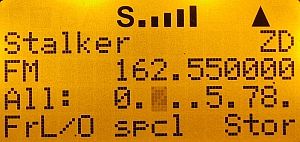 Stalker/Sweeper Search |
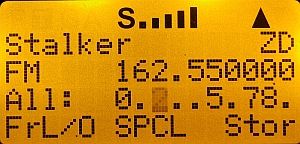 Special Stalker/Sweeper Search |
|
Special Stalker/Sweeper If a 1 MHz sweep indicates that activity is present, when set to 'On' (F2-SPCL), Special Stalker/Sweeper searches the whole 1 MHz range to find the source. If you lockout 5 frequencies within a 1 MHz segment, the scanner will skip that entire segment in subsequent searches. See SpclStalk(Sweep)Lmt (in the 'Expert Settings' menu) to change the (default 5) number of frequencies within a 1 MHz segment. You can press F1 (FrL/O) when the Stalker/Sweeper stops on these undesired transmissions to prevent the Stalker/Sweeper from stopping on them in future searches, however, the Stalker/Sweeper will still see their signal energy when searching through the 1 MHz segment. This will cause the Stalker/Sweeper to execute another fine step search of the 1 MHz segment. If you have locked out the undesired transmissions, the Stalker/Sweeper will not stop on them again but the overall search performance of the Stalker/Sweeper will be slowed accordingly. |
| Programming your
Stalker/Sweeper Search as an object gives
you more options for the search (delay time, LED mode/color/latch, alarm,
etc.). This will also allow you to program different Stalker/Sweeper
objects with different settings and assign them to one (or more) of the 22
Scan Lists.
To Start a Dedicated Sweeper/Stalker Search press FUNC then SCAN/ To switch between All bands or just Public Safety Bands. Press F1 (Band). (Press FUNC then F1 during transmissions to override FrL/O). To toggle bands on or off press the number key assigned to the band. To change direction or resume searching press ▼ or ▲. To pause on a frequency press PSE. To lockout a frequency press F1 (FrL/O). To unlock a frequency see Unlocking Search Frequencies. To turn 'Special Stalker/Sweeper on or off press F2 (spcl). SPCL (uppercase) indicates 'Special' is active. To store a frequency into the Default Scan List press F3 (Stor). To toggle the search delay on or off press FUNC then . (DELAY). To toggle attenuation for all search bands on or off press ATT. To toggle Zeromatic tuning on or off press FUNC then 0. To exit press SCAN. Notes: See also BandPlan and FlexStep settings (in the 'Expert Settings' menu) for step size defaults. Priority mode is not available while using Signal Stalker/Spectrum Sweeper. |
![]()
|
To unlock a frequency press PGM then F3 (GLOB)
to enter the 'Global Settings'
Menu. Press ▼ to locate SRCH L/Outs then press SEL/ENT to view the lockout list. Press ▼ to locate the frequency and press F3 (Del) to unlock (or press and hold to delete multiple frequencies). To unlock all frequencies press FUNC then F3 (Del) while in the lockout menu. Press F1 (Save) to exit. |
![]()
| Using Weather Modes | Contents |
|
There are three weather modes you can use with these scanners; Weather Radio, Weather Priority, and SAME Standby. |
|
|
|
Weather Radio Weather radio mode allows you to receive weather broadcasts from your local weather service. While in Weather Radio Mode, your scanner will alert on SAME messages that match the SAME location codes you have entered or all SAME messages if you have not entered any SAME location codes. To hear your local weather channel press WX. If it is a weak signal, press ▼ or ▲ to find a stronger channel. Press SCAN to exit. Weather Priority Weather Priority mode monitors the current weather frequency periodically (see Weather settings in the 'Expert Settings' menu) while scanning to see if the All Hazards 1050 Hz Warning Alert Tone (WAT) is present. If so, the scanner will sound an alarm and tune to the specified weather frequency to monitor the alert. To toggle Weather Priority Mode press WX then PRI. You will see -P next to the weather channel number. Press SCAN to exit. |
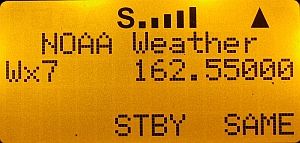 SAME Standby Mode |
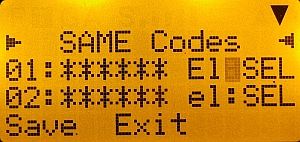 SAME Program Menu |
| SAME Standby Mode monitors the
specified weather frequency silently, waiting to receive a Specific
Area Message Encoding (SAME) alert that corresponds with up to 10 SAME
location code(s) and event code(s) that you have programmed. If there is a
match between a sent SAME location code/event code and one that you have
programmed, the scanner will sound an alarm, display the alert type, and
monitor the alert. To activate SAME Standby Mode for your area, you should
provide at least one SAME location code for your city, county or state.
You may wish to enter additional codes for surrounding areas so that you
can receive advance warning of adverse or dangerous weather that may be
headed in your direction. By default, SAME mode will alert on any SAME
message received if no SAME location codes are programmed. The NWS has divided the United States into regions by state and county (or parish, where applicable) then assigned a 6-digit FIPS code to identify each county or parish. For example, the code for Tarrant County, Texas, is 048439. The first digit in a FIPS code identifies the county subdivision, the next two digits identify the state, and the last three digits identify the county or parish. Most FIPS codes begin with 0, which means the code represents an entire county. The NWS, however, plans to eventually subdivide some large counties. When that happens, each subdivision will be assigned a digit from 1-9, resulting in codes such as 148439, 248439, and so on. FIPS (SAME) codes are in the format nSSCCC: n: A special subcounty designator. For an entire county, use 0. SS: The state code. CCC: The county code. These scanners also feature a SAME wildcard feature that allows you to set the radio to alarm on partial matches of the location code or all codes. Using the wildcard feature you can enter a SAME area code such as *48***. This tells the radio to alert on any SAME message with a location code that matches 48 for any county in Texas. Each SAME location and event code can be set to 'ON' (enabled) or 'OFF' and Lockout set to 'ON' or 'OFF'. The Lockout feature allows you to enter and lockout certain event codes like the weekly test event code and still here other event codes with one or more location codes. Warning: In case of a conflict (i.e., two identical codes and events are entered), and one is locked out, the locked out entry will take precedence. To obtain the FIPS (SAME) codes call the NWS toll free at 1-888-697-7263 (follow the instructions you hear) or see NWR Station Search. |
| Event codes are just different types of warnings. These scanners will allow to program specific alert event codes or a wildcard code (that will receive any event) and/or lock them out so you can monitor just the events you want to hear. A list of event codes can be found here. |
| To Program SAME
Codes and Event Codes press WX.
Make sure you are receiving a strong weather channel. Press F3 (SAME) then ▼ or ▲ to select a SAME location (1-10) and press SEL/ENT. For the Entry field press ◄ or ► to select On or Off to enable or disable the location. For the Code field enter the SAME code for the location or F3 (Dflt) for all locations or a wildcard location. For the Event field enter the event code for the location or F3 (Dflt) for all events. For the Tag field give the location a name. See Enter text or Enter Qtext. For the Alarm field press ◄ or ► to select the alarm type. For the Lockout field press ◄ or ► to select On or Off Press F1 (Save) to exit Press ▼ or ▲ to select another SAME location (1-10) and repeat for each. Press F1 (Save) again to exit back to weather mode. To Toggle SAME Standby Mode On or Off press F2 (stby). STBY (uppercase) indicates SAME Standby is active. |
![]()
| Using V-Scanner Folders |
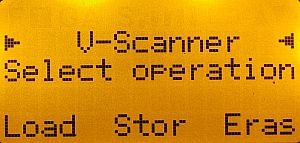 V-Scanner Menu |
 V-Scanner Selection |
| Contents |
| These
scanners have two types of memory storage.
Main memory and V-Scanner memory. Main memory is what you see and use
when you turn on the scanner. V-Scanner memory is used to store complete
copies of your scanner's main memory including objects, 'Global Settings'
and dedicated search configurations. The V-Scanner menu will allow you
to store, load, and name up to 21 'Main Memories'. Handy if you have a
lot of systems for several different areas. This can also be useful if
you want to store or 'backup' your current memory 'as is', then try
different settings for improvement. If the settings don't work, you can
reload your previous memory. There is a CD that comes the 106/197 andPSR models to re-install the factory V-Scanner folders if you happen to delete them. Note: The scanner won't let you load/store V-Folders when the low battery icon is in the display. To Store the Main Memory press FUNC then PGM. At 'Select Operation', press F2 (Stor). Use ▼ to select the V-Folder (00-20) you want to store the main memory into. Press F3 (Stor). If the selected V-Scanner folder already contains a 'main memory' 'Really overwrite V-Folder data?' appears then press F1 (Yes) to store. The scanner then allows you to name the selected folder (see Enter text or Qtext) or to keep the existing folder name. Press F1 (OK) to finish the operation. Press F1 (Cancl) to exit. Press SCAN to start scanning. To Load a V-Scanner Folder press FUNC then PGM. At 'Select Operation', press F1 (Load). Use ▼ to select the V-Folder (00-20) you want to load into the main memory. Press F3 (Load). 'Really overwrite main memory?' appears then press F1 (Yes) to load. Press SCAN to reboot the scanner and start scanning. To Erase a V-Scanner Folder press FUNC then PGM. At 'Select Operation', press F3 (Eras). Use ▼ to select the V-Folder (00-20) you want to erase. Press F3 (Eras). 'Really erase V-Folder data?' appears then press F1 (Yes) to erase. Press F1 (Cancl) to exit. Press SCAN to start scanning. |
| Preprogrammed V-Scanner Folders (not with the Pro-651/652) |
| See the V-Scanner guide included with each scanner for more detailed system information. |
| VS-0 | -empty- | VS-7 | Washington, Oregon, Nevada and Utah | VS-14 | Michigan, Indiana |
| VS-1 | Washington, DC, Maryland, Virginia | VS-8 | Arizona, New Mexico, Colorado, Kansas, Oklahoma | VS-15 | North Ohio, Pennsylvania |
| VS-2 | North Florida | VS-9 | North Texas | VS-16 | South Ohio |
| VS-3 | South Florida | VS-10 | South Texas, Louisiana | VS-17 | Delaware, Maryland, New Jersey Shores |
| VS-4 | Virginia | VS-11 | Mississippi, Alabama, Arkansas | VS-18 | North New Jersey, New York |
| VS-5 | California Desert | VS-12 | Tennessee, Georgia, Missouri | VS-19 | Kentucky, North Carolina, South Carolina |
| VS-6 | California | VS-13 | Wisconsin, Illinois | VS-20 | Connecticut, Massachusetts, New Hampshire, Maine |
![]()
| Expert Settings Menu |
| The 'Expert
Settings' menu allows you to adjust some of the more
advanced features of these scanners. The default settings
will work fine in most cases but you will probably want
to fine tune the radio to suit your individual needs. Press PGM then FUNC then F3 (GLOB). Use ▼ or ▲ to select each option. See Navigating Menus if you are new to the radio. Main menu changes do not take effect until the menu is saved-F1 (Save). If you forget to save any changes, you will see 'Unsaved Changes! Go Back?'. Press F1 (Yes) to go back or F3 (No) to exit without saving. |
|
All settings in menu order |
Contents |
|
Settings by Type |
| General Tuning | P25 Trunking | Motorola Trunking | Stalker/Sweeper Settings | Weather Settings |
| Digital Tuning | CTCSS/DCS/NAC | EDACS Trunking | Zeromatic Settings | Misc Settings |
|
SQ Wait 1 The amount of time to wait for a signal on a frequency while scanning (scan speed) in the same band. The lower the value the faster the scan speed, the higher the value, the slower the scan speed. There is probably a possibility of setting the value too low and the scanner would not stop on active frequencies. These values also impact searching and tuning ('Tune' search). [1] |
|
|
Default Value: 10 (10 ms). Values: Enter 1-200 (1 - 200 ms). Suggested value 5-7. |
Menu Help Text: Squelch wait time, same band |
|
Win500 Name - Extended
Settings>General Tuning> |
PSREdit Name -
Weather/Advanced Configuration>Expert Settings> Squelch Time Same Band |
|
SQ Wait 2 The amount of time to wait for a signal on a frequency while scanning (scan speed) in a different band. The lower the value the faster the scan speed, the higher the value, the slower the scan speed. There is probably a possibility of setting the value too low and the scanner would not stop on active frequencies. These values also impact searching and tuning. [1] |
|
|
Default Value: 15 (15 ms). Values: Enter 1-200 (1 - 200 ms). Suggested value 10-12. |
Menu Help Text: Squelch wait time, new band |
|
Win500 Name - Extended
Settings>General Tuning> |
PSREdit Name -
Weather/Advanced Configuration>Expert Settings> Squelch Time Different Band |
|
RF SQ Fade Length of time to wait before closing the squelch after lost signal (squelch tail). |
|
|
Default Value: 10 (100 ms). Values: Enter 0-99 (0 - 990 ms). |
Menu Help Text: RF SQ fade delay |
|
Win500 Name - Extended
Settings>General Tuning> |
PSREdit Name -
Weather/Advanced Configuration>Expert Settings> RF Fade Time |
| DG Int Prime Controls how long the scanner waits to automatically detect digital (P25 CAI) transmissions, when the type of transmission isn't known/expected ahead of time. [2] | |
| Default Value: 60 (600 ms). Values: Enter 1-100 (10 - 1000 ms). Suggested value 30. | Menu Help Text: Preselect DG audio |
| Win500 Name - Extended
Settings>Digital> Digital detect timeout |
PSREdit Name -
Weather/Advanced Configuration>Expert Settings> Digital Detect Time |
| Noise Thresh Sounds like the number of noisy 'bits' that the scanner will allow prior to retuning or adjusting with the DSP. External noise appearing at the front end of a receiver, plus the noise added by the receiver itself; determines a noise threshold that has to be exceeded by the minimum discernible signal. [9]. | |
| Default Value: 20. Values: Enter 1-128. Suggested value 45-50. | Menu Help Text: Noise threshold value for DSP |
| Win500 Name - Extended
Settings>Digital> Noise threshold |
PSREdit Name -
Weather/Advanced Configuration>Expert Settings> Noise Threshold |
| Contents |
| 96CC HD2 TO Length of time to wait for P25 control channel detection timeout. | |
| Default Value: 30 (300 ms). Values: Enter 10-250 (100 - 2500 ms). | Menu Help Text: 9600CC SQ to HD2 timeout |
| Win500 Name - Extended
Settings>P25 Trunking> CC detect timeout |
PSREdit Name -
Weather/Advanced Configuration>P25 Settings> CC HD2 Timeout |
|
|
| 96VC SQ TO Length of time to wait for P25 voice channel RF squelch timeout. Go lower to release squelch sooner, go up to extend squelch longer. [11] | |
| Default Value: 50 (500 ms). Values: Enter 10-250 (100 - 2500 ms). | Menu Help Text: 9600VC RF SQ timeout |
| Win500 Name - Extended
Settings>P25 Trunking> VC RF SQ timeout |
PSREdit Name -
Weather/Advanced Configuration>P25 Settings> VC SQ Timeout |
|
|
| 96VC XF TO Length of time to wait for P25 voice channel digital IMBE timeout. | |
| Default Value: 100 (1000 ms). Values: Enter 10-250 (100 - 2500 ms). | Menu Help Text: 9600VC SQ to XF timeout |
| Win500 Name - Extended
Settings>P25 Trunking> VC Digital timeout |
PSREdit Name -
Weather/Advanced Configuration>P25 Settings> VC XF Timeout |
|
|
| HD2 Qual DG Length of time to check for a P25 control channel before unmuting in 'Analyze'. | |
| Default Value: 100 (1000 ms). Values: Enter 10-250 (100 - 2500 ms). | Menu Help Text: HD2 qual time to unmute 96CC |
| Win500 Name - Extended
Settings>P25 Trunking> Qualify CC in analyze |
PSREdit Name -
Weather/Advanced Configuration>HD2 Settings> Qualify Time (Digital) |
| CTCSS/DCS/NAC |
| ACSQ SrcInt Length of time to wait for a CTCSS/DCS/NAC signal in auto squelch search. | |
| Default Value 500 (500 ms). Values: Enter 10-2000 (10 - 2000 ms). | Menu Help Text: Wait for HD5 sig in auto CSQ srch |
| Win500 Name - Extended
Settings>CTCSS/DCS/NAC> Search Interval |
PSREdit Name -
Weather/Advanced Configuration>HD5 Settings> Search Delay |
| ACSQ PolInt The interval of time to check for a CTCSS/DCS/NAC signal. | |
| Default Value 100 (100 ms). Values: Enter 10-1000 (10 - 1000 ms). | Menu Help Text: Interval to poll for CSQ value |
| Win500 Name - Extended
Settings>CTCSS/DCS/NAC> Query Interval |
PSREdit Name -
Weather/Advanced Configuration>HD5 Settings> Query Interval |
| HD5 Fade Length of time to wait after losing a CTCSS/DCS/NAC signal. If the scanner loses programmed CTCSS, DCS, or NAC for the time specified in that parameter, it will mute audio. Increasing the time may help with the above-described behavior under weak signal or overload conditions. [12]. See also [13]. | |
| Default Value 2000 (2000 ms). Values: Enter 10-2500 (10 - 2500 ms). | Menu Help Text: CSQ fade delay |
| Win500 Name - Extended
Settings>CTCSS/DCS/NAC> Fade Timeout |
PSREdit Name -
Weather/Advanced Configuration>HD5 Settings> Fade Delay |
| HD2 Qualify Length of time to check to detect an end of signal turn off code command. See also [13]. | |
| Default Value 75 (75 ms). Values: Enter 1-1000 (1 - 1000 ms). | Menu Help Text: CSQ end detect threshold |
| Win500 Name - Extended
Settings>CTCSS/DCS/NAC> End detect qualify |
PSREdit Name -
Weather/Advanced Configuration>HD2 Settings> Qualify Time (Analog) |
| HD2 Holdoff Length of time to mute a signal after an end of signal turn off code command. | |
| Default Value 500 (500 ms). Values: Enter 10-1000 (10 - 1000 ms). | Menu Help Text: CSQ post-end wait time |
| Win500 Name - Extended
Settings>CTCSS/DCS/NAC> Delay after end |
PSREdit Name -
Weather/Advanced Configuration>HD2 Settings> Mute Time |
| Contents |
| EDACS Trunking - these settings control how the scanner behaves after it has already recognized a "call grant" message. [2] |
| EndtoneEDACS While on a "voice frequency", qualifying time in bits for the "endtone" to indicate end of transmission. [2] | |
| Default Value 10. Values: Enter 0-250. | Menu Help Text: # of >baud bits to trig 4800CC analog end |
| Win500 Name - Extended
Settings>EDACS Trunking> Endtone threshold |
PSREdit Name -
Weather/Advanced Configuration>EDACS Settings> End Tone Threshold |
| EDACS UnMute After tuning to a 'voice frequency', a delay before unmuting audio. [2] | |
| Default Value 18 (180 ms). Values: Enter 0-100 (0 - 1000 ms). | Menu Help Text: EDACS unmute delay |
| Win500 Name - Extended
Settings>EDACS Trunking> GCG unmute delay |
PSREdit Name -
Weather/Advanced Configuration>EDACS Settings> GCG Unmute Delay |
| EDACS ET HO After returning to the CC from a "voice frequency", how long to ignore any calls on the same "voice frequency". [2] | |
| Default Value 35 (350 ms). Values: Enter 0-100 (0 - 1000 ms). | Menu Help Text: EDACS post end-tone holdoff |
| Win500 Name - Extended
Settings>EDACS Trunking> Endtone holdoff |
PSREdit Name -
Weather/Advanced Configuration>EDACS Settings> End Tone Holdoff |
| Contents |
|
Max Tunes This setting value appears to set the number of tunes (frequencies) prior to restart of new Stalker/Sweeper group. [3] |
|
|
Default Value: 20 (frequencies). Values: Enter 1 to 1000 tunes (frequencies). |
Menu Help Text: Max search tunes per scan loop |
|
Win500 Name -
Extended Settings> General Tuning> |
PSREdit Name -
Weather/Advanced Configuration>Sweeper/Search Options> Resume Delay Time |
| Contents |
| Zeromatc Cal Customize the zeromatic tune threshold values for 5kHz ranges and non-5kHz ranges (entrance low value and high value, exit low value and high value). See also [4]. | ||||
|
Default Values: |
Suggested Values: [17] |
Menu Help Text: Zeromatic tune thresholds | ||
|
5kHz In Lo-252 5kHz In Hi-552 5kHz Out Lo-210 5kHz Out Hi-594 |
In Lo-210 In Hi-594 Out Lo-174 Out Hi-633 |
5kHz In Lo-170 5kHz In Hi-480 5kHz Out Lo-150 5kHz Out Hi-530 |
In Lo-170 In Hi-480 Out Lo-150 Out Hi-530 |
Values:1-1023 |
| Win500 Name - Extended
Settings> Zeromatic Thresholds |
PSREdit Name
- Weather/Advanced Configuration> ZeroMatic Settings |
|||
| ZM Delay Zeromatic check delay. | |
|
Default Value
5 (5 ms). Values:
Enter 0-1000 (0 - 1000 ms). Actually only able to enter values up to 100. [1] |
Menu Help Text: Zeromatic check delay |
| Win500 Name - Extended Settings> ZM Check delay |
PSREdit Name - Weather/Advanced
Configuration>ZeroMatic Setting> Check Delay |
| Weather Settings |
| WX Check Int Interval of time to check for a weather alarm signal on a channel while scanning (WX Priority). See also Priority Scanning. | |
| Default Value 60 (6 seconds). Values: Enter 5-250 (.5 - 25 seconds). | Menu Help Text: Weather 1050 chk interval in SCAN and MAN modes |
| Win500 Name - Weather Settings>Weather
Priority Settings> Check interval |
PSREdit Name - Weather/Advanced
Configuration>Timer Settings> 1050 Hz Tone Detect Threshold |
| Contents |
| FlexStep When set to 'On' allows you to enter a frequency down to any 1250 Hz (1.25 kHz - .00125) step (except in the civil air band 108-136 where the step size is fixed at 8.333 kHz), otherwise the scanner will use the default steps. | |
| Default Value Off. Values: ◄ or ► to Off/On. | Menu Help Text: On= Allow any 1250Hz freq Off=Enforce fixed steps |
| Win500 Name - Extended Settings> Enable FlexStep |
PSREdit Name - General Configuration>Other
Options> Enable FlexStep |
| ADC Cal Allows you to customize the information shown in the display while in 'Tune' mode. See also Analyzing Trunking Systems. | |
| Default Value Off. Values: ◄ or ► to OFF, RSSI, ZM, DSP. | Menu Help Text: Show various data within Tune Mode on LCD line 3 |
| Win500 Name - Extended Settings> TUNE mode display |
PSREdit Name - Weather/Advanced
Configuration> Tune Mode Text |
| RSSI Sig Cal Allows you to customize the signal strength meter bar threshold values for the bars 1-5. Settings of 470 540 610 680 750 provide a wider range indication of signal strength than the default settings. [2] | |||||
| Default Values: | (WS1040/65) | Suggested Values: | (WS1040/65) | Values: 1-750 | Menu Help Text: Signal strength meter thresholds |
|
Bar 1: 370 Bar 2: 450 Bar 3: 520 Bar 4: 610 Bar 5: 680 |
Bar 1: 190 Bar 2: 230 Bar 3: 260 Bar 4: 290 Bar 5: 320 |
Bar 1: 470 Bar 2: 540 Bar 3: 610 Bar 4: 680 Bar 5: 750 |
Bar 1: ? Bar 2: ? Bar 3: ? Bar 4: ? Bar 5: ? |
||
| Win500 Name - Extended Settings> RSSI Bar Thresholds |
PSREdit Name - Weather/Advanced
Configuration> Signal Strength Values |
||||
|
Bat Icon Cal (HH only) Allows you
to customize when the low battery icon shows solid in the display (and
hear the audio alert if enabled) and when it blinks. You can set how long
you wish to see each based on the voltage of the batteries. My radio will
die at about 3.4 volts when it's left alone scanning or searching but be
careful; if you set the thresholds too low the radio will die instantly if
you put a load on it (navigate menus, switch operations, etc.) - and probably not a good idea for a $500 scanner.
(Icon)OFF: Once
the low battery icon has been turned on, the voltage must rise above this
level to turn it back off (hysteresis). |
| Setting Names | Default Values: | Default Voltages: | Suggested Values: | Suggested Voltages: |
Values:
1-1023
|
Menu Help Text: Battery icon thresholds |
|
NiMH OFF NiMH ON NiMH BlinkH NiMH BlinkL Alk OFF Alk ON Alk BlinkH Alk BlinkL NiCd OFF NiCd ON NiCd BlinkH NiCd BlinkL |
511 502 498 484 471 462 444 430 502 493 480 466 |
4.55 4.47 4.44 4.31 4.20 4.12 3.96 3.83 4.47 4.39 4.28 4.15 |
452 451 450 449 452 451 450 449 452 451 450 449 |
4.03 4.02 4.01 4.00 4.03 4.02 4.01 4.00 4.03 4.02 4.01 4.00 |
||
| Win500 Name - General
Settings>Battery Settings> Icon Thresholds |
PSREdit Name - General
Configuration>PSR-500/Pro-106 Settings>Battery Settings> Voltage Thresholds |
|||||
| Trunking Ch# When set to 'On' shows the Motorola trunking channel number in the middle of line 5 of the display. F2 (TSYS) still functions. 3600 baud systems will use the standard trunking channel assignments. Systems with custom trunking tables will not use the standard trunking channel assignments. | |
| Default Value Off. Values: ◄ or ► to Off/On. | Menu Help Text: Show CC Chan # while showing VC |
| Win500 Name - Extended Settings> Show trunked chan w/VC |
PSREdit Name - General Configuration>Other
Options> Show Trunking Channel |
|
Show RadioID
When set to 'Yes' shows the radio ID (not tgrp ID), if available,
on line 5 of the display. F1 (TGL/O), F2
(TSYS), and F3 (Stor) still function. On
some trunked systems (e.g. Mot 3600 if the system is programmed for it,
and LTR for some talkgroups), will look at low-speed data on the voice
frequency, checking for any priority Talk Group information [2]. Notes: If you enter (program) private TGRP objects with the various Radio IDs and alpha tag them, the scanner will show the tag instead of the numeric ID (on line 5). Radio IDs only show in SCAN mode, not PAUSE or MANUAL. Radio IDs are only available on group calls for certain types of trunked systems (i.e. not LTR), and then only if the scanner receives the initial "grant" message on the control channel. If you are scanning more than just a single TSYS, the scanner will likely miss that initial "grant" message and won't be able to show any Radio ID or (if programmed) alpha tag. [5] |
|
| Default Value No. Values: ◄ or ► to No/Yes. | Menu Help Text: Show RadioID in group calls, if available, on line 4 |
| Win500 Name - Extended Settings> Show Radio IDs for group calls |
PSREdit Name - General Configuration>Other
Options> Enable RadioID Display |
| RadioIDAlert The scanner will use any LED/backlight/tone alert settings from programmed Private TGRP objects instead of the Group TGRP object's alert settings. For example, you could have a dispatch console's radio ID programmed as a Private TGRP object with alert settings different from the normal "Police Dispatch" Group TGRP object's settings. When the console initiates the call, the scanner will use the alert settings from the Private TGRP object instead of from the Group TGRP object. [5] [6] | |
| Default Value No. Values: ◄ or ► to No/Yes. | Menu Help Text: Use RadioID's alert setting if showing tag on line 4 |
| Win500 Name - Extended Settings> Use RadioID Alert |
PSREdit Name - General Configuration>Other
Options> Use RadioID Alert Values |
| Bandplan If turned on (Yes/Canada), 5 kHz steps are used in ALL receive modes between 138 and 174 MHz. If not turned on (No/USA), will use the 'Default' steps. CONV objects created in one "mode" will tune based on the "active mode" - that is, if you create a CONV object 138.005 MHz with the feature enabled, the radio will tune to 138.000 MHz if the feature is not enabled (although 138.005 will be displayed). [7] The Canadian band plan also uses 12.5 kHz steps between 406 and 470 MHz. | |
| Default Value USA. Values: ◄ or ► to USA/Canada. | Menu Help Text: Controls steps in 138-174 MHz and 406-470 MHz ranges |
| Win500 Name - Extended Settings> Allow 5kHz steps 138-174 MHz |
PSREdit Name - General Configuration>Other
Options> Use 5khz steps from 138-174 MHz |
| CCDump Enables the Control Channel Dump feature. | |
| Default Value No. Values: ◄ or ► to No/Yes. | Menu Help Text: Dump CC msgs to PC/IF |
| Win500 Name - Extended Settings> Dump trunking data to PC/IF |
PSREdit Name - General Configuration>Other
Options> Enable CC Dump |
| DSPDump Enables the DSP Dump feature. | |
| Default Value No. Values: ◄ or ► to No/Yes | Menu Help Text: Dump CPU< - >DSP msgs to PC/IF |
| Win500 Name - Extended Settings> Echo DSP comms to PC/IF |
PSREdit Name - General Configuration>Other
Options> Enable DSP Dump |
|
Abbreviations: |
| ADC = Analog to Digital Conversion? | HD2 in CTCSS/DCS mode = reverse burst/turn off code detect | RSSI = Received Signal Strength Indication |
| CAI = Common Air Interface | HD2 in DG mode = P25 CC detect | SQ = Squelch |
| CC = Control Channel | HD5 = CTCSS/DCS/NAC detect | VC = Voice Channel |
| CSQ = Carrier Squelch | IMBE = Improved Multi-Band Excitation | WX = Weather |
| DG = Digital | NAC = Network Access Code | XF = IMBE detect |
| DSP = Digital Signal Processor | RF = Radio Frequency | ZM = Zeromatic |
| ET = End Tone |
![]()
| Cloning/Uploading/Downloading | Contents |
|
You can clone your PSR 500/600 or Pro-106/651/197/652 to any other PSR 500/600 or Pro-106651//197/652 using just a 1/8" stereo audio patch cord. You
will need the high speed USB data cable to
upload/download to/from your computer and to use for monitoring your
scanner with the software. You will also have to install drivers for the
cable (that come with it before you plug it in) to use the cable.
The PSR 500/600 includes the high speed USB data cable.
If you bought the Pro-106/651/197/652 then you will have to purchase the
GRE USB data cable ($29.99) separately. The GRE cable that came with
my PSR 600 is only 3 feet long. The old (20-047 grey and orange) RS cable I
bought for my Pro-106 is about 5-1/2 feet. The new (20-546 black) RS cable
is 4-6 feet. |
|
To Clone
from one scanner to another, connect
the stereo patch cord to the PC/IF jack on each scanner. |
|
To
Upload or Download Data, connect the
(installed) USB cable to the computer and the 1/8' stereo end to the PC/IF
jack on the scanner. |
![]()
| Firmware Version/Updates and Power-On Menus | Contents |
|
The scanners have power-on keypress sequences that
are used as shortcuts to configuration items, like attenuator settings,
backlight settings and memory information. They will also allow you to
reset the whole scanner or just the 'Global Settings'.
The resets do not affect the V-Scanner Folders. Power-on key
sequences are also used to place your scanner into firmware upgrade mode
for CPU and DSP firmware upgrades. 1 shortcut to PGM>GLOB>Sound Mode. 2 shortcut to PGM>GLOB>Key Beeps. 3 displays CPU and DSP versions. DIM shortcut to PGM>GLOB>Light Mode (Base only). ATT shortcut to PGM>GLOB>AttenMode. 0, 0 shortcut to PGM>GLOB>Memory Info. Press F1 (Done) to exit. 0, 1 clears all working memory and resets all 'Global Settings' to factory defaults. Press ENT to continue within 6 seconds. 0, 2 resets all 'Global Settings' to factory defaults. Does not affect working memory. Press ENT to continue within 6 seconds. 0, 5 (and 0,6) executes EEPROM memory test, then clears working memory and resets all 'Global Settings' to factory defaults. Press ENT to continue within 6 seconds. The firmware in the is divided into three portions; a boot loader, the o/s (CPU) firmware and the DSP (Digital Signal Processor) code. The boot loader is the code which will perform the physical programming of the ICs with new (o/s or DSP) firmware. A user can not update the boot version. The DSP performs specific tasks (such as digital decoding). [16]. Although the 106/651/197/652 and 500/600 are operationally identical, you can not use the firmware for one model in another.See also this post at RR to determine PSR "C" (Canadian) models. The first key must be pressed while the Welcome/Owner screen is being displayed when you turn on the radio. 0, CLR to erase DSP firmware version. Restores factory DSP firmware version. Press ENT to continue within 6 seconds. 0, PGM to upgrade DSP firmware version. Press ENT to continue within 6 seconds. Waits for DSP update program from computer. Hold PGM while turning the radio on to show the Boot version and to upgrade the CPU firmware version. Waits for CPU update program from computer. |
![]()
| Default Step Chart (*=Canada Bandplan) | Contents |
| Frequency Range | *Default Step (kHz) |
Mode | Band | Frequency Range | *Default Step (kHz) |
Mode | Band |
| 25-26.960 | 10 | AM | VHF Lo Band | 156.275-157.450 | 25 (*5) | FM | Maritime |
| 26.965-27.405 | 10 | AM | CB | 157.470-161.5725 | 7.5 | FM | Police-Business-Rail |
| 27.410-29.505 | 5 | AM | VHF Lo | 157.455-161.595 | *5 | FM | Police-Business-Rail |
| 29.510-29.700 | 5 | FM | 10m Ham | 161.600-161.975 | 5 | FM | Remote Broadcast-Maritime |
| 29.710-49.830 | 10 | FM | VHF Lo Band | 162-174 | 12.5 (*5) | FM | Government Band |
| 49.835-54 | 5 | FM | 6m Ham | 216.0025-219.9975 | 5 | FM | Maritime |
| 108-136.9916 | 8.33 | AM | Civilian Air | 220-224.995 | 5 | FM | 1.25m Ham-General Trunked |
| 137-137.995 | 5 | FM | Satellite | 225-379.99375 | 6.25 | AM | Military Air |
| 138-143.9875 | 12.5 | FM | Government | 380-419.9875 | 12.5 | FM | Military Trunked |
| 138-143.995 | *5 | FM | Government | 420-450 | 5 (*12.5) | FM | 70cm Ham |
| 144-147.995 | 5 | FM | 2m Ham | 450.00625-469.99375 | 6.25 | FM | Public Safety-Business |
| 148-150.7875 | 12.5 | FM | Government-Satellite | 450.0125-512 | *12.5 | FM | Public Safety-Business |
| 148-150.795 | *5 | FM | Government-Satellite | 470-512 | 6.25 | FM | UHF TV |
| 150.800-150.845 | 5 | FM | Auto Emergency | 764-781.996875 | 3.125 | FM | Trunked Public Safety |
| 150.8525-154.4975 | 7.5 | FM | Fire-Business | 791-796.996875 | 3.125 | FM | Trunked Public Safety |
| 150.850-154.495 | *5 | FM | Fire-Business | 806-823.9875 | 12.5 | FM | Mobile Trunked Public Safety |
| 154.515-154.640 | 5 | FM | Industry | 849-868.9875 | 12.5 | FM | Base Trunked Public Safety |
| 154.500-154.640 | *5 | FM | Industry | 894-939.9875 | 12.5 | FM | 33cm Ham-Business Trunked |
| 154.650-156.255 | 7.5 | FM | Police | 940-960 | 6.25 | FM | Government-Broadcast |
| 154.645-156.270 | *5 | FM | Police | 1240-1300 | 6.25 | FM | 23cm Ham-Government |
| Notes: the 700MHz and first
part of 800MHz ranges here are different than the original owner's manual. This is what I got with a TUNE search, FlexStep 'Off', BandPlan set to 'USA' then 'Canada'. *FlexStep (in the 'Expert Settings' menu) will allow step increments of 1.25 kHz. |
![]()
| Footnotes/Related Links | Contents |
| [1] From Jeffrey Pryor - PSR-500 Expert Settings : Information - Google Docs. |
| [2] PSR500 Operating Hints (PDF). Expert settings based on a spreadsheet by Jeffrey Pryor. Firmware release notes from GRE. Operating hints from Radio Reference Wiki, GRE website, and forum posts, especially those of Don Starr and Mike Vander Veer. |
| [9] RR thread Advanced Settings. | [13] RR thread Problems with DCS Decode and scanning. |
| [10] RR thread PSR-500, beginning conversation clipped. | [17] RR thread Object Oriented Scanner Issues. |
| [11] RR thread PRO106 P25 [4 settings] question. | [18] RR thread Programming the PRO-96 and 2096 for Rebanded Motorola Trunked Systems. |
| [12] RR thread Breaks During Transmission. | [19] RR thread GRE 500 Battery Questions. |
| RR thread Simulcast Digital Distortion. | |
| RR thread Object Oriented Scanners Overload Issues. |
| Finding EDACS LCN order - EDACS frequencies have to be programmed in LCN (Logical Channel Number) order. I have found a procedure at the Trunked Radio Systems User’s Page which explains how to find the LCN order for an EDACS system if you don't know the order. Look for 'Finding EDACS Logical Channel Numbers' by Todd Hartzel near the bottom of the page. |
| Determining Type I Motorola Fleetmaps - You can try a method I found at Radio Reference.com. Determining Type I Motorola Fleet Maps. by Dave Goodson. |
| Determining Base/Step/Offset for VHF/UHF Motorola Systems - I have found an explanation at Radio Reference.com that describes how to do this if you don't have the information. The Trunked Radio Systems User’s Page also has an explanation. Look for 'Determining Base and Offset Frequencies for the BC245xlt' by John C. |
| Decimal/AFS Conversion Chart - Here is a Conversion Chart to help convert your IDs. |
| How to view these pages in your browsers |
| I have formatted these pages so that you can view them with any monitor, in any browser (Foxfire, Opera, I.E., or Netscape), at any zoom level, and in any screen area size (ex: 600x800)-small or large fonts. So if the print is too small, go to the 'view' menu in your browser and adjust it to a bigger level (or smaller if you want to see more on the screen). |
| Finding and reading the date code |
| The date code or date of manufacture for RS models is located inside the battery compartment of the 106/651 or on the bottom of the 197/652 (Don't rely on the date code on the box). You will see two numbers then a "A" then two more numbers. The first two numbers are the month and the last two are the year. Ex: 01A05 is January of 2005. |
| Newsgroups and Forums |
| Radio Reference Forums |
|
|
|
Links |
|
eHam.net-reviews |
|
Win500- recommended! |
![]()
|
| Click here to visit Scanner Master |
![]()
| Preset Fleet Maps | Contents |
|
In
Motorola II systems (no programming the fleet map
required), all the blocks have size code, S0, which has a
size limitation of 512 radios. In Type I systems,
size codes are used in different blocks to denote the
maximum number of users in that block. Notice that size
code S-12 uses 2 blocks. A Motorola Hybrid system (Type
IIi) has 'blocks' of the system that are Type I
Fleets/Subfleets and Type II talkgroups. |
| E1P1 | E1P2 | E1P3 | E1P4 | E1P5 | E1P6 | E1P7 | E1P8 | ||||||||
| Block | Size Code | Block | Size Code | Block | Size Code | Block | Size Code | Block | Size Code | Block | Size Code | Block | Size Code | Block | Size Code |
| 0 | S-11 | 0 | S-4 | 0 | S-4 | 0 | S-12 | 0 | S-4 | 0 | S-3 | 0 | S-10 | 0 | S-1 |
| 1 | S-11 | 1 | S-4 | 1 | S-4 | 1 | (S-12) | 1 | S-4 | 1 | S-4 | 1 | S-10 | 1 | S-1 |
| 2 | S-11 | 2 | S-4 | 2 | S-4 | 2 | S-4 | 2 | S-12 | 2 | S-4 | 2 | S-11 | 2 | S-2 |
| 3 | S-11 | 3 | S-4 | 3 | S-4 | 3 | S-4 | 3 | (S-12) | 3 | S-4 | 3 | S-4 | 3 | S-2 |
| 4 | S-11 | 4 | S-4 | 4 | S-4 | 4 | S-4 | 4 | S-4 | 4 | S-12 | 4 | S-4 | 4 | S-3 |
| 5 | S-11 | 5 | S-4 | 5 | S-4 | 5 | S-4 | 5 | S-4 | 5 | (S-12) | 5 | S-4 | 5 | S-3 |
| 6 | S-11 | 6 | S-4 | 6 | S-12 | 6 | S-4 | 6 | S-4 | 6 | S-12 | 6 | S-4 | 6 | S-4 |
| 7 | S-11 | 7 | S-4 | 7 | (S-12) | 7 | S-4 | 7 | S-4 | 7 | (S-12) | 7 | S-4 | 7 | S-4 |
| E1P9 | E1P10 | E1P11 | E1P12 | E1P13 | E1P14 | E1P15 | E1P16 | ||||||||
| Block | Size Code | Block | Size Code | Block | Size Code | Block | Size Code | Block | Size Code | Block | Size Code | Block | Size Code | Block | Size Code |
| 0 | S-4 | 0 | S-0 | 0 | S-4 | 0 | S-0 | 0 | S-3 | 0 | S-4 | 0 | S-4 | 0 | S-3 |
| 1 | S-4 | 1 | S-0 | 1 | S-0 | 1 | S-0 | 1 | S-3 | 1 | S-3 | 1 | S-4 | 1 | S-10 |
| 2 | S-0 | 2 | S-0 | 2 | S-0 | 2 | S-0 | 2 | S-11 | 2 | S-10 | 2 | S-4 | 2 | S-10 |
| 3 | S-0 | 3 | S-0 | 3 | S-0 | 3 | S-0 | 3 | S-4 | 3 | S-4 | 3 | S-11 | 3 | S-11 |
| 4 | S-0 | 4 | S-0 | 4 | S-0 | 4 | S-0 | 4 | S-4 | 4 | S-4 | 4 | S-11 | 4 | S-0 |
| 5 | S-0 | 5 | S-0 | 5 | S-0 | 5 | S-0 | 5 | S-0 | 5 | S-4 | 5 | S-0 | 5 | S-0 |
| 6 | S-0 | 6 | S-4 | 6 | S-0 | 6 | S-0 | 6 | S-0 | 6 | S-12 | 6 | S-12 | 6 | S-12 |
| 7 | S-0 | 7 | S-4 | 7 | S-0 | 7 | S-4 | 7 | S-0 | 7 | (S-12) | 7 | (S-12) | 7 | (S-12) |
You can tell which block a Motorola ID is
in by its number.
|
|
Thanks to Radio Reference.com for most of this information. |
![]()
| Last updated July 28, 2024 |