|
|
| Easier to Read PSR700 Scanner and EZ-Scan Software Manual |
|
Click here to buy a printed, bound, formatted in color, copy of this manual from Scanner Master |
| Home |
Last Updated July 28, 2024 |
![]()
| Contents |
| Intro/Review | Copy Programming To/From SD Card |
| Main Features | Selecting V-Scanner Folders |
| Scanning Terminology | Scanning |
| Understanding Object Oriented Memory | Turning Scan Lists On/Off |
| Understanding Scan Lists | Skipping Objects |
| Understanding Trunking | Restore Skipped Objects |
| Understanding Multi-Site Trunking | Storing CTCSS/DCS Codes |
| Understanding IDs | Using Pause |
| Understanding Receive Modes | Monitoring Objects |
| Understanding CTCSS/DCS | Using the Attenuator |
| Band Coverage/Default Steps | Priority Scanning |
| Turning on the Scanner and Setting the Squelch | Optimizing Scanning Parameters |
| Navigating the Scanner Menus | Searching |
| A Look at the Keypad | Public Safety, Air, or Ham Search |
| A Look at the Display | Search Group Charts |
| Installing the EZ Scan Software | Marine, CB, Rail, or FRS/GRMS/MURS Search |
| Updating... | Marine, CB, Rail, and FRS/GRMS/MURS Channels |
| Software | Limit Search |
| Firmware | Spectrum Sweeper Search |
| Library | Special Spectrum Sweeper |
| Existing Channels | Sweeper Search Bands |
|
|
|
|
|
|
|
|
|
|
|
|
|
|
Event Codes |
|
|
|
|
|
|
|
|
|
|
|
![]()
| Intro/Review | Contents |
| This is GRE's
introduction to the "simple" scanner made for people with limited
programming knowledge. The menus are fairly simple but not all self
explanatory.
We now have unlimited memory available on a SD card along with the
Radio
Reference Data Base
for the US and Canada. Like the PSR500/310,
the PSR700 uses
Object
Oriented Memory for storing channels but now has 51 scan lists. More V-Scanner folders
too, 200 vs. 20 in the older models. It
comes with free software required for uploading/downloading and for updating the
firmware or database. The incomplete menus, lack of a full keypad, and the absence of many key features from the 500/310 models turn a lot of people away. The scanner is really made for the 'set it and forget it' type of user. While you can edit objects and import from the library with just the scanner, there are some things you can't do with the scanner and have to do with the software including program/edit single frequencies, set receive mode, set/pre-store CTCSS/DCS tones/codes (you can store on the fly), set delay time, toggle audioBoost, update the scanner firmware, and then programming and settings of all trunking systems and sites. And then oddly, all the searching/Spectrum Sweeper options can only be set in the scanner, there are no settings for those in the software. There are quite a few settings that are dependent on other settings and make it confusing for even experienced users. Example: one setting for alerts on, another for the alert volume, and then another for the object to use an alert, all in different places in the menus. Attenuation is another setting that is in multiple menus (global, system, site, object) that has to be carefully checked. There are quite a few things that just don't make sense. Anytime you want to do a quick edit for a channel, i.e. attenuate, lockout, set priority, the scanner spends too much time re-writing to the SD card. Then you have just the manual on CD, no printed manual. Seems a bit ridiculous that you need to have a PC (and what about MAC users?) to fully program or edit a hand-held (i.e. mobile) scanner. One big drawback over the PSR-800 is that for the PSR-700, you have to remove the SD card (and the batteries to get to it) and use a card reader to upload or download any information. The only thing the USB cable does is update the firmware or charge the batteries. Again, two steps forward, three steps back. Because only a few settings/options are available in the scanner itself, this manual will also explain how to use the EZ-Scan software which is required for any custom programming. Purple text will refer to scanner instructions and Green text will refer to Software instructions to make it easier to find steps with the scanner or software. Blue will pertain to both. The manual that comes with the scanner is still poorly organized IMHO. This manual should make it easier for most people to use the features of the radio as I will try to explain procedures a little more clearly and in a more logical order. And, thanks to the many people who have posted their valuable insight on the Radio Reference forums and Yahoo groups. An overview of the features can also be viewed at my Trunking Radio Comparison Chart page. You will also need a better antenna as the stock antennas aren't fabulous. Scanner Master has a large selection of quality antennas. For those of you who are new to trunking or haven't had a scanner in the last 10 years it is a good idea to read the respective sections on those topics. You really have to know how trunking works in order to program a trunking system. It won't do you any good to try to program a trunking system unless you know what the radio needs and is going to do with the data (control channel, IDs, LCN order, etc.). I will assume you know how to obtain the basic information from the original manual such as following safety procedures, putting the batteries in, connecting the antenna, etc. as I will concentrate on the operation and main functions of the scanner. I hereby absolve myself from anything that happens to anyone or the scanner as a result of the information you will be reading. You are welcome to copy and/or print these pages and use them in the scanning hobby as long as you don't change, redistribute, or charge/accept money for them. I have tried the best I can to make sure everything is accurate here but if I missed a step, you see something that's obviously wrong, or have any other information you would like to contribute to make this manual better for everyone, please email me. Check back often as this document will be updated and revised from time to time. |
![]()
| Main Features | Contents |
| Multi-System Trunking - you can track Motorola, GE/Ericsson (EDACS), and LTR trunking systems including VHF, UHF, 380, and 700MHz systems. |
|
Simplified Keypad and Display - with familiar Scan, Pause, Skip and navigation controls make it easy for you to use your scanner. |
| Multi-Site Trunking - allows you to scan systems covering a very large geographic area that use multiple antenna sites and operate on different frequencies but use the same Talk Group IDs. |
| V-Scanner Technology - allows you to save complete radio configurations within the radio for recall into main memory as needed. 200 V-Scanner Folders are provided (plus the main memory loaded in the scanner) with memory for roughly 10 million objects. |
| Object Oriented Memory - Each frequency or talkgroup is programmed as an object. Like Dynamic Memory, you use only the amount of memory you need. Total memory is limited only by the SD card. |
| 51 Scan Lists - 50 lists to program, use, and select like traditional banks allowing you to arrange, group and scan objects according to your preference with an additional 'Skywarn' list. |
|
Programmable Radio/Private IDs - allows you to program radio (unit) IDs and private IDs for conventional and trunked objects. |
| Audible Alarms - programmable audible alerts can be configured when certain objects are active. |
| Spectrum Sweeper - quickly sweeps the scanner's frequency ranges for transmissions from nearby sources. |
| Simultaneous Trunktrack and Scan - scans conventional and trunked frequencies together at the same time. |
| AudioBoost (software only) - available for conventional frequencies, IDs, and trunked systems, boosts the audio levels slightly louder. |
| Priority Scan - the scanner will sample conventional objects for activity periodically while scanning and monitoring other objects. The scanner will also give IDs priority over other IDs while checking a particular trunking system for activity. |
| CTCSS/DCS Tone Decode - Provides fast and reliable decoding of subaudible squelch signaling with squelch tail elimination. |
|
SAME and All Hazards Weather Alerting - can be set to automatically sound the alarm tone to advise of hazardous weather conditions when it detects the alert signal on the local NOAA weather channel (SAME standby mode) or you can scan and set the weather channel as a priority channel. |
| Control Channel Only Scanning - automatically determines the trunking frequencies for Motorola trunking systems once the control channels are programmed. |
| FlexStep - allows you to enter a frequency in any 1.250 kHz step. |
| Backlit Keypad and Display - you select one or the other or both to light (or not), when you press the light button, on any key press (function ignore), or on any key press with that key's function. |
| Real-time Signal Strength Meter - shows relative strength of received signals with customizable thresholds. |
| Skip or Lockout - lets you skip or permanently lockout any programmed object. All skipped objects can be restored (unskipped). |
| Scan/Search/Trunking Delay - variable delay (software only; 0 to 60 seconds) before searching for another object so you can hear more replies that are made on the same object. |
| 16 Character, 4-line, Dot Matrix Text Display - lets you program a text label for each object so you can easily identify the transmission. |
| 7 Service Search Bands - Marine, CB, FRS/GMRS/MURS, Police/Fire, Air, Ham, and Railroad ranges to monitor interesting frequencies more quickly. |
| 250 Search Lockouts - allow you lockout up to 250 frequencies (total) from the service, limit, and Spectrum Sweeper searches. |
| Attenuation - lets you program your scanner (per object or globally) to reduce the scanner's sensitivity to strong local signals or noise caused by these signals to reduce interference. |
| Scan, Search Speed - scans up to 75 channels per second and searches up to 85 steps per second. |
| Low Battery Alert - with adjustable volume and alert times. |
| Four Power Options - lets you power the scanner using alkaline, Ni-Cad, or NiMH internal batteries, USB power using the included transfer cable, or external power using an optional AC or DC USB adapter. |
| Key Confirmation Tones - the scanner sounds a tone when you press a key, perform an operation correctly, and an error tone if you make an error with adjustable volume level. |
![]()
| Scanning Terminology | Contents |
| Scanning- the process of stepping through programmed conventional objects in scan lists. |
| Searching- the process of searching for frequencies in pre-programmed service searches, Spectrum Sweeper bands, and the limit search. |
| Pause Mode- used for monitor single objects or frequencies. |
| Update Mode- used for updating firmware, the library (database), and uploading/downloading to/from scanner using a computer. |
![]()
| Understanding Object Orientated Memory | Contents |
| First we had
'Dynamic Memory' to get used to and now we have 'Object
Oriented Memory' to figure out. Memory organization is
nothing more than a large collection of scannable objects
assigned to scan lists. A scannable 'object' is
any frequency or ID. Trunking systems and sites are configuration
objects that are used to scan ID objects. Trunking
systems/sites are not assigned to scan lists because
you don't scan a trunking
system/site; you monitor the IDs it generates. You only have to
program any object once, then it can be scanned from any list(s) it is assigned to.
Like Dynamic Memory, you use only the amount of memory
you need. Unlike Dynamic Memory, you don't have to
'build' systems or groups first to program them. They are
'created as you go'. Also, there is no limit (except total memory) to
the number of conventional systems, IDs, or
conventional channels for each list. Each scannable object can be assigned to one or more of the main lists (1-50) or the 'Skywarn List' (51). Each list is scanned like a traditional bank. The main lists can be scanned with any other list but when the 'Skywarn List' is selected, only objects in that list will be scanned and no other lists. The V-Scanner Folders allow you to save complete radio configurations. 200 V-Scanner folders are provided (plus the main memory in the scanner). Total memory capacity of main memory combined with V-Scanner folders is limited only by the amount of memory on the SD card. V-Scanner II folders are a new feature that update automatically in the scanner as you change/use them. Any changes that you make to the current V-Scanner folder in the scanner will be automatically saved to the SD card. Any changes that you make to the current V-Scanner folder in the software will be automatically saved to your computer. Unlike the V-Scanner folders in the Pro-106/197, it is not necessary to “save” and “load” them each time. |
![]()
| Understanding Trunking | Contents |
| Trunking
systems let a large group of 2-way radio users (or even
different groups of 2-way radio users) efficiently use a set
of frequencies. Instead of selecting a specific frequency
for a transmission, the user’s radio selects a
programmed trunking bank in the system when that user
presses their PTT (push to talk) button. The trunking
system automatically transmits the call on the first
available frequency, and also sends (on a different
frequency called a Data or Control channel) a code that
uniquely identifies that transmission as a talkgroup ID
(or just ID). So when you are trunktracking a system, you
are listening to active IDs transmitting in the system
(each using the first available frequency in the system).
Trunking systems in general allocate and use fewer
frequencies among many different users. Since the trunking system might send a call and its response on different frequencies, it is difficult to listen to trunked communications using a conventional scanner. These scanners let you monitor the control channel frequency so you can hear calls and responses for users and more easily "follow" conversations than with a conventional scanner. This trunking scanner trunktrack the following types of systems: |
|
|
| When you
program Motorola frequencies into the scanner, one
frequency is the control (or data) channel, and the rest
are voice frequencies shared by all the users. There may
be 3 or 4 frequencies assigned as (primary or alternate)
control channels but only one control channel will be
active at a time. These scanners will allow you to
program just the Motorola control channels into the
trunking system and the voice channels will automatically
be found. EDACS systems need all the frequencies for the
system programmed and in the correct LCN
(Logical Channel Number) order. The control channel is continually transmitted to the field units and has a sound similar to listening to a boat engine over the phone (in manual mode; you won't hear this when you are trunking the system). This control channel is also a good check to see if you can trunktrack the system. If you can't hear a control channel when you step through the trunking frequencies (in manual mode), you either don't have all the frequencies or are too far away to receive the control channel and the system. Motorola systems are limited to a maximum of 28 frequencies per system, Ericsson EDACS systems are limited to 25 frequencies per system. LTR systems work a little differently. This type of system encodes all trunking information as digital subaudible data that accompanies each transmission. LTR systems typically do not have a dedicated control channel. The frequencies also have to be in LCN (Logical Channel Number) order or the correct 'slot' for the system to trunktrack properly. These radios have a 'Auto Move' feature that allows you to enter the frequencies in any order in the scanner will position the frequencies in the proper 'slot' base on the received subaudible data. Each repeater has its own controller, and all of these controllers are synchronized together. Even though each controller monitors its own channel, one of the channel controllers is assigned to be a master that all controllers report to. Each of these controllers sends out a data burst approximately every 10 seconds so that the subscriber units know that the system is there. This data burst is not sent at the same time by all the channels, but happens randomly throughout all the system channels. If you listen to the frequencies of an LTR system in manual mode (not trunking), on every channel in the system you will hear this data burst that will sound like a short blip of static like someone keyed up and unkeyed a radio within about 500 ms. LTR systems are limited to 20 frequencies per system. Trunkscanning
is basically scanning IDs that are programmed into ID
locations (same concept as frequencies into channels).
You can then trunkscan just the programmed IDs. Trunktracking
is searching for all IDs in a system (same
concept as searching for frequencies in a band). |
| Radio Reference.com has an excellent page explaining the various types of trunking systems in more detail here. |
![]()
| Understanding IDs | Contents |
| ID Formats |
| Motorola IDs come in two formats: Type I and Type II. Each format displays and uses Talk Group IDs in slightly different ways. Type I/II hybrid systems use both Type I and Type II formats for Talk Group IDs. |
|
| EDACS IDs come in two formats: AFS (Agency-Fleet-Subfleet) and Decimal. |
|
| LTR IDs are in the format A-HH-UUU where A is the area code (0 or 1), HH is the home repeater (01-20), and UUU is the user ID (000-254). |
| ID Types |
| Group Wildcard IDs will monitor all talkgroup IDs on the trunked radio system. A wildcard TGRP object allows you to receive IDs that are not already stored as objects in the radio's memory. |
| Group IDs will only monitor talkgroup radio traffic on that specified TGID. |
| Private Wildcard IDs will monitor all private IDs on the trunked radio system. |
| Private IDs will only monitor private radio traffic on that specified private TGID. |
| Radio IDs are group or private IDs associated with individual radios. |
![]()
| Understanding Receive Modes | Contents |
| Each conventional channel can have its own receive mode: Auto, AM, FM, or NFM. |
| Auto - Receives transmissions in the modulation sent. | AM - Receives transmissions in AM modulation. |
| FM - Receives transmissions in FM modulation. | NFM - Receives transmissions in NFM modulation. |
| Understanding CTCSS/DCS |
| Each conventional channel can have its own squelch mode: None, CTCSS, DCS, or Search. |
| None no codes will be searched. |
| CTCSS - PL codes appear (if received) in the format xxx.x, where xxx.x is a frequency in Hz. |
| DCS - DPL codes appear (if received) in the format xxx, where xxx is an octal code. |
| Search - the scanner will search and display any codes (if received). |
| Continuous Tone
Coded Squelch System (CTCSS) and Digital Coded Squelch (DCS) are two methods used
to prevent interference by other radio communications.
Your scanner can receive transmissions that use these
codes (or sometimes referred to as tones). Coded squelch techniques involve the transmission of a special 'code' signal along with the audio of a radio transmission. A receiver with coded squelch only activates when the received signal has the correct 'code'. This lets many users share a single frequency, and decreases interference caused by distant transmitters on the same channel. In all major metropolitan areas of the United States, every available radio channel is assigned to more than one user. Public safety radio systems on the same frequency are usually set up at a distance of 40 miles apart, or more. This means that you may hear transmissions from a distant system when your local system is not transmitting. By programming the code (or tone) for a local channel the scanner will not stop on transmissions from the distant system. With few exceptions, such as the VHF Aircraft and Marine bands, almost every other VHF or UHF radio system uses some form of coded squelch. By far, CTCSS is the most popular mode among non-trunked systems. Usually, but not always, VHF channels will use CTCSS and UHF channels will use DCS. For more information visit Radio Reference's respective pages on CTCSS and DCS. |
![]()
| Default Step Chart (*=Canada Bandplan) | Contents |
| Frequency Range | *Default Step (kHz) | Mode | Band | Frequency Range | *Default Step (kHz) | Mode | Band |
| 25-26.960 | 10 | AM | VHF Lo Band | 156.050-157.450 | 7.5 (*5) | FM | Maritime |
| 26.965-27.405 | 10 | AM | CB | 157.470-161.5725 | 7.5 | FM | Police-Business-Rail |
| 27.410-29.505 | 5 | AM | VHF Lo | 157.455-161.595 | *5 | FM | Police-Business-Rail |
| 29.510-29.700 | 5 | FM | 10m Ham | 161.600-161.975 | 5 | FM | Remote Broadcast-Maritime |
| 29.710-49.830 | 10 | FM | VHF Lo Band | 162-174 | 12.5 (*5) | FM | Government Band |
| 49.835-54 | 5 | FM | 6m Ham | 216.0025-219.9975 | 5 | FM | Maritime |
| 108-136.9916 | 8.33 | AM | Civilian Air | 220-224.995 | 5 | FM | 1.25m Ham-General Trunked |
| 137-137.995 | 5 | FM | Satellite | 225-379.99375 | 25 | AM | Military Air |
| 138-143.9875 | 12.5 | FM | Government | 380-419.9875 | 12.5 | FM | Military Trunked |
| 138-143.995 | *5 | FM | Government | 420-450 | 5 (*12.5) | FM | 70cm Ham |
| 144-147.995 | 5 | FM | 2m Ham | 450.00625-469.99375 | 6.25 | FM | Public Safety-Business |
| 148-150.7875 | 12.5 | FM | Government-Satellite | 450.0125-469.9875 | *12.5 | FM | Public Safety-Business |
| 148-150.795 | *5 | FM | Government-Satellite | 470-512 | 6.25 | FM | UHF TV |
| 150.800-150.845 | 5 | FM | Auto Emergency | 764-781.996875 | 3.125 | FM | Trunked Public Safety |
| 150.8525-154.4975 | 7.5 | FM | Fire-Business | 791-796.996875 | 3.125 | FM | Trunked Public Safety |
| 150.850-154.495 | *5 | FM | Fire-Business | 806-823.9875 | 12.5 | FM | Mobile Trunked Public Safety |
| 154.515-154.640 | 5 | FM | Industry | 849-868.9875 | 12.5 | FM | Base Trunked Public Safety |
| 154.500-154.640 | *5 | FM | Industry | 894-939.9875 | 12.5 | FM | 33cm Ham-Business Trunked |
| 154.650-156.045 | 7.5 | FM | Police | 940-960 | 6.25 | FM | Government-Broadcast |
| 154.645-156.045 | *5 | FM | Police | 1240-1300 | 6.25 | FM | 23cm Ham-Government |
| This is what I got with FlexStep 'Off', BandPlan set to
'USA' then 'Canada'. *Flexstep (in the 'Settings' menu) will allow step increments of 1.25 kHz. |
![]()
| Turning On The Scanner And Setting the Squelch | Contents |
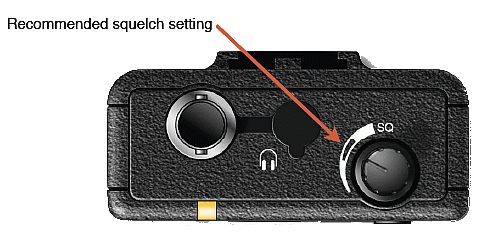 |
| Make sure the
scanner's antenna is connected before you turn it on. Press on hold the power button Set the squelch to the recommended setting. The scanner is equipped with a Main Power Off switch which is located on the left hand side of the scanner underneath a protective cover. The Main Power Off switch can be used if desired to prevent battery drain when the scanner is not used for long periods of time. Always use the front panel key to turn the scanner off. Using the main power switch to turn the scanner off or removing the batteries without first turning the unit off via the key may result in lost data or corrupted memory on the SD Card. |
![]()
|
Navigating the Scanner Menus |
Contents |
|
Press
▼
or
▲
to select each main menu item. Press ► or SEL to select a menu item. Use ▼ or ▲ to scroll through the menus. Press and hold ▼ or ▲ to scroll faster. To exit most menus (with no SEL, Skip, or Menu options) press ◄ (or Menu if ◄ doesn't work first). If you try to exit the menu without saving your changes, the scanner will prompt you to save changes? Press SEL(Yes), or Skip(No). |
| Basic Settings |
| You may
want to change some settings right away to help you
program your scanner a little easier.
At least it helped me. From the main menu press ▼ to scroll and select Settings then press ► or SEL to enter the Settings menu. Press ▼ to scroll and select Simply Display then press ► or SEL to see all information in the display. Press ▼ to scroll and select Beep Vol then press ◄ or ► to adjust a comfortable beep volume. Press ▼ to scroll and select Contrast then press ◄ or ► to adjust a comfortable contrast level. Press ▼ to scroll and select LMode then press ◄ or ► to select On. Press Menu to exit and SEL to save the changes. |
| Sub Menus |
| For each mode, scan, spectrum
sweeper, service search, limit search, and weather, there is a
sub menu accessed by pressing the Menu button in each mode. Pressing Menu in scan mode will return to the main menu. Pressing Menu in scan receive mode will show the object menu for the object being received. Pressing Menu in any search mode will show the search menu. Pressing Menu in weather mode will show the weather menu. The first few lines of each sub-menu will show: Main Menu Back Save Changes Default Values If you are receiving a frequency or ID and press Menu you may also see: Store Channel- in any search mode. Store Wildcard in scan mode if a Wildcard ID is found in a trunked system. Store sq code- in scan mode if a CTCSS/DCS tone/code is found for a conventional object. |
| To Browse Objects: |
| From the main menu,
press
▼ to scroll and select 'Browse
Objects' then press
► or SEL. Pressing ◄ or ► will scroll through the scan lists. Pressing ▼ or ▲ will scroll through objects in each scan list. When you enter a menu, use ▼ or ▲ to scroll to the setting you wish to change. Pressing and holding ▼ or ▲ will scroll faster. The scanner will double beep at the beginning of each scan list. The active setting has a ► next to it. |
![]()
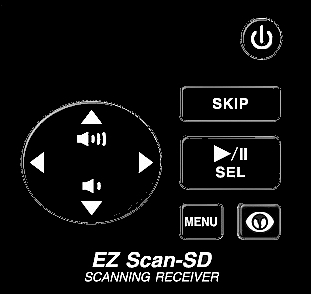
| A Look at the Keypad | Contents |
|
|
|
|
| Key | Function |
|
|
press and hold to turn on/off scanner. press to toggle the backlight on or off. |
| MENU | selects the main menu in scan mode. selects the object menu in scan receive, pause, or browse objects modes. selects the service/sweeper/limit menu in service/sweeper/limit search modes. selects the Library Import menu in Browse Library mode. selects the weather menu in weather scan mode. exits top-level sub-menus to the main menu. |
| ◄ (Left) | resumes/changes to searching down in search modes. steps backward through frequencies in search pause mode. navigates out of a menu or selection. scrolls down scan lists when browsing objects. |
| ► (Right) |
resumes scanning in receiving or pause modes. |
|
Scroll Up) |
increases the volume when scanning or
monitoring objects. scrolls up through a menu. scrolls up through objects in a scan list when browsing. |
|
Scroll Down) |
decreases the volume when scanning or
monitoring objects. scrolls down through a menu. scrolls down through objects in a scan list when browsing. |
| Skip | toggles weather standby mode in weather
scan mode. toggles skip in receiving, browse object, and pause modes. key clears all text at and to the right of the cursor when editing text. |
|
►
/ (Scan,Pause,Select) |
select/execute options in menus. pauses on object in scan mode. pauses on search frequency in search mode. |
|
|
Enters weather scan mode
from any mode. selects SkyWarn List in weather scan or standby modes. |
![]()
| A Look at the Display | Contents |
| Scan Mode |
|
SCAN appears with the scan lists scrolling (if more than 5) below. |
|
|
| G appears when global attenuation is off for all objects/searches. |
| GA appears when global attenuation is on for all objects/searches. |
| A appears when attenuation is on for the scanned object/system/search. |
| ► scrolls to show scan mode. |
|
|
| Scan Receiving/Pause/Browse Modes |
|
Top Row |
|
|
|
|
|
|
| G appears when global attenuation is off for all objects/systems/searches. |
| GA appears when global attenuation is on for all objects/systems/searches. |
| A appears when attenuation is on for the displayed object/search. |
| FM, AM, or NF appears to show the received Modulation for a conventional or search object. |
| ► appears to show scan mode. |
|
|
|
|
| 1st Line |
| shows the Scan List Name. |
|
2nd Line |
|
the Object Type appears as TGRP (Talkgroup),
or
CONV (Conventional). (simple display off). shows Channel: for a conventional object or Group: for a talkgroup object. (simply display on). |
| p (not set for priority) or P (set for priority) appears to show the Priority Status of the talkgroup or conventional object. |
| s (not skipped) or S (skipped) appears to show the Skip Status of the object/search frequency. |
| d (delay off) or D (delay on) appears to show the Delay Status of the object/search. |
|
3rd Line |
| shows the Text Tag for a conventional or talkgroup object and (with simple display off) will alternate with TGID. |
|
4th Line |
| shows the Receive Mode for a conventional object. (simple display off). |
| shows the Frequency for a conventional object. (simple display off). |
| shows the System Name for a trunked system and (with simple display off) will alternate with Site Name. |
|
5th Line |
| shows the Squelch Type for a conventional object. (simple display off). |
| shows the Tone/Code received for a conventional object. shows SRCH if no code/tone received. (simple display off). |
| S appears if the tone/code is found in search mode. (simple display off). |
| shows the VC/CC for a talkgroup object (if Radio ID is disabled). (simple display off). |
| shows the Radio ID for a talkgroup object if received and enabled. (simple display off). |
| shows the Radio ID Text Tag (only if enabled) for a talkgroup object. (simple display off). |
![]()
| Installing the EZ Scan Software | Contents |
| Insert the EZ Scan software installation disk that came with the scanner.
Computers with autoplay enabled will start the installation wizard
automatically. If the installation doesn't start, open windows explorer
and navigate to your CD drive and double-click EZScanCD.exe. Click 'Install EZ Scan Handheld Scanner PC Application' and select the "Complete" setup option. Follow the prompts to finish the installation. |
![]()
| Updating... | Contents |
| Update the Software |
| In the EZ Scan software, click the Updates menu then Check for Software Update. Follow the prompts to finish the update. |
| Update the CPU Firmware |
| In the EZ Scan software, click the Updates menu then Check for CPU Firmware Update. Follow the prompts to finish the update. |
| Update the Library (Database) in the Software |
| The database is updated every week on Mondays. In the EZ Scan software, click the Updates menu then Check for Library Update. Follow the prompts to finish the update. You will also have the options to copy the database to the SD card (follow the prompts) and/or update objects in the software. |
|
|
|
Update Existing Channels in the Software This will allow you to update all objects in the current V-Scanner folder imported using an older version of the database with the current database in the software. You will have the options to replace the object names with updated object names (replacing all custom object names) and to import primary and alternate control channels (replacing all existing channels) for Motorola systems. This import option in the software is basically the same function as 'Update from Lib' in the scanner. |
|
|
From the Library Import tab click the Update Channels
button. |
| Copy the Library (Database) to the SD Card |
| If you have updated your existing
channels or did not use the 'copy database
to scanner' option when you updated the library, you can do it
with this step. In the EZ Scan software, click the SD Card menu then Copy Library to SD Card. Follow the prompts to finish the update. |
| Updating the Scanner from the Library (Database) |
| After you have copied the database to the
SD card (above), this feature automatically updates all objects in the
current V-Scanner folder that
you already have programmed in the scanner to the latest version of the Library
database. This should be done after all of your programming and only if
you want to update anything from the current database in the scanner. You will need to turn off the scanner first and remove the batteries, SD card and insert SD card into card reader to connect the card reader to the computer using the supplied USB cable. The software is not needed. This option in the scanner is basically the same function as 'Update Existing Channels' in the software. |
|
From the main menu, press
▼ to scroll and select Update
from Lib then press
► or SEL. To use the alpha tags from the database press SEL. To retain the alpha tags you have programmed press Skip. When the update is finished, you will be presented with the results showing you the channels, systems, sites, and talkgroups that have been updated. |
![]()
| EZ Scan Software Menus (for the current 1.06 version) | Contents |
| File Menu |
|
New Configuration opens a new, empty default configuration. Open V-Scanner Folder opens a window to select and open an existing V-Scanner Folder. You can also select the default V-Scanner folder to power up with the scanner. Delete V-Scanner Folder opens a window to select and delete an existing V-Scanner Folder. Copy current data to V-Scanner Folder opens a window to select and copy an existing V-Scanner Folder to another folder with an option to switch to it after the copy. Set V-Scanner Descriptions allows you to type a description for the current V-Scanner Folder. Restore Factory Defaults will restore the factory defaults for the current V-Scanner folder except the welcome text. Exit saves all configurations and exits the program. |
| SD Card Menu |
|
Copy Configuration To SD Card allows you to copy V-Scanner folders to
the SD card. Copy Configuration From SD Card allows you to copy V-Scanner folders from the SD card. Copy Library To SD Card allows you to copy the database to the SD card. Prepare SD Card for use allows you to format the SD card. Optimize SD Card will copy files from the scanner to the computer, optimize the data, then copy the files back to the SD card. |
| Updates Menu |
|
Check for CPU Firmware Update Check for Library Update Check for Software Update Configure Proxy Server If you need to configure a proxy server to access the internet. |
| Advanced Menu |
| Allows you to show/hide the programming tabs and start the software in
full-screen mode. Show Conventional Frequencies Tab Show Trunked Radio Systems Tab Start Full Screen Remember Position and Size on Exit Will remember window size if Start Full Screen is unchecked. |
| Help Menu |
| Allows you to access the help file, the pdf manual, various support links, and the software version (select About). |
![]()
| Managing V-Scanner Folders (Software only) | Contents |
|
These scanners have two types of memory storage. Main memory and V-Scanner memory. Main memory is what you see and use when you turn on the scanner. V-Scanner memory is used to store complete configurations of your scanner's main memory including objects, 'Settings' and search configurations. V-Scanner II folders are saved 'on the fly' meaning any changes you make to the current V-Scanner folder in the software will be automatically saved to your computer. Any changes you make to the current V-Scanner folder in the scanner will be automatically saved to the SD card. Unlike the previous V-Scanner I feature, It is not necessary to “save” or “load” the V-Scanners folders. See also Selecting V-Scanner Folders to load folders with the scanner. |
|
To manage your V-Scanner folders open the software. The default V-Scanner folder will open. The folder name is in the title bar of the software window. The CDAT folder is the working folder. The 200 main folders are named CDAT_VS.001 through CDAT_VS.200.Select the File menu then: |
![]()
| Settings Menu | Contents |
| The Settings menu allows you to change the radio-wide
settings used by the scanner. The default settings will
work fine for most users but you will probably want to
personalize the radio to suit your individual needs. Note: Not all setting are not available in both the scanner and the software. To Edit Settings in the Scanner, from the main menu press ▼ or ▲ to scroll to 'Settings' then press SEL or ►. Use ▼ or ▲ to select the Settings in the menu. Changes do not take effect until the menu is saved. Press Menu to save. |
| Scanner Menu... |
| Volume Settings | G Atten Mode | Contrast | Welcome Text 1-5 | PC/IF CCDump |
| Default Vals | G Atten On | LiteMode | Blink Time 1 | Low Batt Time |
| Simple Display | Key Beeps | LiteArea | Blink Time 2 | TG Disp |
| Priority Mode | Beep Vol | LiteTime | Show Radio ID | Bandplan |
| Priority Time | Alert Vol |
| To Edit Settings in the EZ Scan Software select the General Settings tab. |
| General Settings Tab... |
| Welcome Text | Display Settings | Scanlist Control | Priority Settings | Trunking Options |
| Volume Settings | Display Mode | Alpha Tag | Priority Mode | Talkgroup ID Mode |
| Backlight Settings | Blink Time 1 | Enabled, Default | Priority Interval | Use Radio ID Alarm |
| Mode | Blink Time 2 | Restore Factory Defaults | Attenuation Settings | Radio ID Display Mode |
| Area | Contrast | Clear Search Lockouts | Attenuation Mode | Flexible Frequency Entry |
| Timeout | Sound Settings | Alert Settings | Global Attenuation On/Off | Band Plan Settings |
| Mode | Mode |
| Key Beep | Volume |
| Key Volume | Low Battery Time |
| Updates Menu... |
| Configure Proxy Server |
![]()
| Speaker |
| Scanner Press ▼ or ▲ to select Mute, 1-30, or Max. |
| Software General Settings > Volume Settings > Speaker- Mute, 1-30, or Max. |
| Headphone (Software only) |
| General Settings > Volume Settings > Headphone- Mute, 1-30, or Max. |
| Default Vals/Restore Factory Defaults Resets all settings to their default values except the welcome message. |
| Scanner Press SEL or ► to reset. |
| Software General Settings - Restore Factory Defaults (button). |
| Clear Search Lockouts (Software only) (does not work for me). See also Unlocking Search Frequencies. |
| General Settings- Clear Search Lockouts (button). |
| Scanner- Press SEL or ► to check (Simple), or uncheck (Advance). |
| Software General Settings > Display Settings > Display Mode- Advance or Simple. |
| General Settings > Scanlist Control. |
|
Alpha Tag Click
to select and highlight the scan list name to edit. Enabled Click to enable each scan list. Default Click to select the default scan list. |
| Priority Mode Objects with Priority enabled will be sampled according to the Priority Time setting for activity. Priority mode works by periodically sampling objects for activity which briefly interrupts transmissions on conventional systems. Priority IDs are sampled only between transmissions and only while monitoring each trunked system that contains the ID. Default is Off. See also Priority Scanning. |
| Scanner Press SEL or ► to check On, or uncheck Off. |
| Software General Settings > Priority Settings > Priority Mode- On or Off. |
| Priority Time/Priority Interval Sets (in .1 seconds) how frequently conventional objects are sampled. Default is 20 (2 secs). |
| Scanner Press SEL or
► to edit.
Enter
the amount of time, 10 - 250 (1 - 25 secs). Press ▼ or ▲ to select the first digit, then ► to move the cursor and repeat as needed. Press SEL to save and exit. |
| Software General Settings > Priority Settings > Priority Interval- 1-25 (seconds). |
| G Atten Mode/Attenuation Mode Sets the global attenuator mode. Global applies attenuation (on or off) to all objects only when Global Attenuation is set to On. Normal follows the individual object attenuator settings. 'G' will appear in the middle of the display when set to Global. See chart below. Default is Global. See also System Attenuation, Site Attenuation, and (conventional) Object Attenuation. |
| Scanner Press SEL or ► to check (Global), or uncheck (Normal). |
| Software General Settings > Attenuation Settings > Attenuation Mode- Normal or Global. |
| Scanner Press SEL or ► to check On, or uncheck Off. |
| Software General Settings > Attenuation Settings > Global Attenuation On/Off- On or Off. |
| Attenuation Settings | |||||
| Object Attenuation | G Atten Mode | G Atten On | Display |
Results |
|
| Off | Normal | Off | No G or A | Object/system/search attenuation Off | |
| On | Normal | Off | A | Object/system/search attenuation On | |
| On or Off | Global | Off | G | Attenuation Off- all objects/systems/searches | |
| On or Off | Global | On | GA | Attenuation On- all objects/systems/searches | |
| Sound Settings-Mode (Software only) Controls all beep and alert sounds used by the scanner. Default is On. |
| General Settings > Sound Settings > Mode- On or Stealth. |
| Alert Settings-Mode (Software only) Controls audible and visual alerts used by the scanner. When set to Audio, only audio alerts will be used. When set to Visual, only visual alerts (Flash) will be used. Default is Both. Note: Sounds must also be On for audio alerts. |
| General Settings > Alert Settings > Mode- Both, Audio, Visual, or Off. |
| Key Beeps/Key Beep Enables or disables key beep sounds. Default is On. Note: Sounds must also be On. |
| Scanner Press SEL or ► to check On, or uncheck Off. |
| Software General Settings > Sound Settings > Key Beep- On or Off. |
| Beep Vol/Key Volume Controls the volume of key beep sounds. Default is 15. Note: Sounds must also be On. |
| Scanner Press ◄ or ► to select Mute, 1-30, or Max. |
| Software General Settings > Sound Settings > Key Volume- Mute, 1-30, or Max. |
| Alert Vol/Alert Settings-Volume Controls the volume of object alert sounds when Alerts is set to Audio or Both. Default is 15. Note: Sounds must also be On. |
| Scanner Press ◄ or ► to select Mute, 1-30, or Max. |
| Software General Settings > Alert Settings > Volume- Mute, 1-30, or Max. |
| Contrast |
| Scanner Press ◄ or ► to select the best contrast. Default is 12. |
| Software General Settings > Display Settings > Contrast- 0-20. |
|
LiteMode/Backlight Settings-Mode
Controls how the backlight operates. Default is
Key/Key
Press. Note: see also Backlight Mode/Light for object backlight settings. |
|
On - backlight is always
on. Stlth - backlight is always off. Norml - backlight turns on when the power key is pressed for the amount of time set in LiteTime. Key/Key Press - backlight turns on when any key is pressed (and used) for the amount of time set in LiteTime. Ignor - works like 'Key' but the key's normal function is ignored for the first press. Pressing any key again (when the light is on) will activate that key's function. Scanner Press ◄ or ► to select On, Stlth, Norml, Key, or Ignor. Software General Settings > Backlight Settings > Mode- On, Stealth, Normal, Key Press, or Ignore First Key Press. |
|
Both - lights the display and keypad. LCD - lights the display only. Keybd - lights the keypad only. Scanner Press ◄ or ► to select Both, LCD, or Keybd. Software General Settings > Backlight Settings > Area- Both, LCD, or Keys. |
| Contents |
| LiteTime/Timeout Controls the amount of time the LiteArea stays on when LiteMode is set to Key/Key Press, Ignor, or Norml. Default is 5. |
| Scanner Press SEL or
► to edit. Enter
the number of seconds, 1 - 99. Press ▼ or ▲ to select the first digit, then ► to move the cursor and select the second digit. Press SEL to save and exit. |
| Software General Settings > Backlight Settings > Timeout- 1-99. |
| Welcome Text 1-5/Welcome Text Allows you to text up to five lines of the display to be shown when the scanner is turned on. |
| Scanner Press SEL or
► to edit. Press ▼ or ▲ to select the character, then ► to move the cursor and repeat for up to 16 characters. Press SEL to save and exit. |
| Software General Settings > Welcome Text. |
| Scanner Press SEL or
► to edit. Enter
the amount of time, 1 - 250 (.1 - 2.5 secs). Press ▼ or ▲ to select the first digit, then ► to move the cursor and select the second digit, then ► to move the cursor and select the third digit. Press SEL to save and exit. |
| Software General Settings > Display Settings > Blink Time 1,2-.1 - 2.5. |
| PC/IF CCDump (Scanner only) When enabled, the scanner streams control channel data over the USB interface when the radio is tuned to a trunking control channel. Default is Off. |
| Press SEL or ► to check On, or uncheck Off. |
| Low Batt Time/Low Battery Time Sets the number of seconds between low battery warning alerts. The radio will shut down automatically to prevent corruption of the SD card when the battery level is critically low. Default is 30. Note: Sounds must also be On and Alerts must be set to Audio or Both. |
| Scanner Press SEL or
► to edit. Enter
the number of seconds, 0-60. Press ▼ or ▲ to select the first digit, then ► to move the cursor and select the second digit. Press SEL to save and exit. |
| Software General Settings > Alert Settings > Low Battery Time- 0-60. |
| Contents |
| TG Disp/Talkgroup ID Mode Sets the display format for talkgroup IDs. Default is Normal (DEC for Motorola, AFS for EDACS). Simple Display must be off. |
| Scanner Press ◄ or ► to select Normal, DEC, or HEX. |
| Software General Settings > Trunking Options > Talkgroup ID Mode- Normal, DEC, or HEX. |
| Use Radio ID Alarm (Software only) Uses the visual and/or audible alert settings with radio IDs. Default is Off. Note: Sounds must also be On and Alerts must be set to Audio, Visual, or Both. |
| General Settings > Trunking Options > Use Radio ID Alarm- Off or On. |
| Radio ID Display Mode (Software only) If set to On will display the radio ID name (if programmed). If set to Off will display the radio ID number. Simple Display must be off. Default is Off. |
| General Settings > Trunking Options > Radio ID Display Mode- Off or On. |
| Bandplan/Band Plan Settings Selects USA or Canada search frequency steps in VHF and UHF bands. Imported frequencies will use the bandplan obtained from the Library. Default is USA. |
| Scanner Press ◄ or ► to select USA or Canada. |
| Software General Settings > Band Plan Settings- USA or Canada. |
| Flexible frequency entry-Flex Step When checked allows you to enter a frequency down to any 1250 Hz (1.25 kHz - .00125) step (except in the civil air band 108-136 where the step size is fixed at 8.333 kHz), otherwise the scanner will use the default steps. Default is Off. |
| General Settings > Flexible frequency entry > Flex Step- Off or On. |
| Configure Proxy Server Allows you to configure a proxy server if you need to one to access the internet. |
![]()
| Planning Systems and Scan Lists | Contents |
|
Scan Lists Each object (not trunking systems/sites) can be assigned to one or more of the 50 main lists or the 'Skywarn List' (51). Each list is scanned like a traditional bank. You can put any type of object in any list with any other object. Conventional and talkgroup objects can all go in the same list. The main lists, 1-50, can be scanned with any other list but selecting the 'Skywarn List' (51) will only scan objects in the SkyWarn list and no other lists. You can put as many objects in each of these 51 lists that memory allows. Scan lists are your way of organizing your selected objects, so you should give some thought as to how you want to your scanner organized. You may wish to group your objects into scan lists according to the type of use, for example, Police, Fire, Racing, etc. Or, you may wish to group objects by into scan lists according to geographical area, such as separate scan lists for different counties or cities, or even separate scan lists for different police and fire districts inside of a given county or city. You can even do both - use one scan list for the police and fire channels for an entire county, and use other scan lists for the areas of interest within the county, or for special situations. The scanner is designed to be programmed by 'scan list'. Once you set the Default Scan List, when you create any objects in the software or import any with the scanner, they are, by default, assigned to this list. Also, any search/Spectrum Sweeper frequencies stored with 'Store Channel' will be saved to the default scan list. Multi-Site Systems Some Motorola and EDACS systems covering a very large geographic area use multiple antenna sites that each operate on different frequencies and use the same talkgroup IDs for traffic. Each site will have its own set of trunking frequencies and is monitored like a single system. All talkgroups in the system are available to every site so they don't have to be reprogrammed for each site. Each talkgroup object can be assigned to one or more scan lists but only assigned to one trunking system. |
![]()
| Naming Scan Lists | Contents |
| Naming Scan Lists | |
| Scanner
From the main menu, press
▼ to select Scanlists then
press
►. Press
▼ or
▲ to select the scan list then
press
► to edit. Press ▼ or ▲ to select the first character, then ► to move the cursor and repeat for each character. Press SEL to save and exit. Press Menu or ◄ to return to the main menu. |
|
| Software Click the General Settings tab then scroll in the Scanlist Control area to select the list number and click in the Alpha Tag field to highlight and edit. |
![]()
| Importing Objects |
| Import Using Browse Library | Import Using the Library Import Tab | Import from Text File/Clipboard |
![]()
| Import Using Browse Library | Contents |
| This is another quick way to add objects to the
scanner by state/province and then by Agencies, Counties, and Systems.
At least one site must be selected for a trunked system along with any individual talkgroup
objects. If you don't know which site to select, you can select
all sites, or even the entire system, and the scanner will automatically
find and use the best available site. As you browse the library and pick objects for importing, all selected objects will be imported into the scan list or group of scan lists that you select when you execute the import operation. These scan lists are not automatically enabled for scanning. You will have to enable them with the Scanlists selection in the main menu after the import operation. It is advisable to use a separate V-Scanner folder for importing with 'Browse Library'.
For counties and independent cities, there will typically be three
options to choose from: Agencies, Categories, and Systems. The
association of objects with each of these groups depends a lot on how
the RadioReference volunteers decide to group the information they
submitted to the RadioReference database. You can lookup your county in
the RadioReference Data Base
to see what is available and match headings in the database with the
headings in the scanner (i.e. municipalities and districts, agencies,
etc.). Picking an entire Agency, Category, or System may result in a very large number of objects being imported to the scan lists. It is suggest that you drill into each grouping that you want to import to see the objects that are beneath it, and only select the entire grouping if you know that you want to monitor everything that it contains. Checkbox codes are displayed instead of a checkbox to indicate when systems or frequencies are not compatible with the scanner. When one of these codes is shown instead of a checkbox, you cannot to select that checkbox. A “D” in place of a checkbox indicates that the object or system uses an unsupported digital modulation mode and cannot be scanned by the scanner. An “S” in place of a checkbox indicates that the system type is not supported. An “F” in place of a checkbox indicates that there are no sites or frequencies in the RadioReference database for the system or category. The Default Scan List is always selected. If you do not want to import your selected objects into the Default Scan List, be sure to unselect it before importing. You can change the Default Scan List only with the EZ Scan software. |
| To
Import Using Browse Library,
basically drill down through the menus to check items. Some menus may be
empty with no selection available. Menus that have a lot of objects in them
will load and import slower. You can navigate back (
◄) at anytime to change/add to
you selections before you press Menu to import all selections. From the main menu press ▼ or ▲ and scroll to 'Browse Library' and press SEL or ►. Use ▼ or ▲ to scroll to 'United States', or 'Canada' and press SEL or ►. To select Nationwide entities scroll to (Nationwide). Scroll to your state/province and press SEL or ►. At 'Data Types' scroll to 'Agencies', 'Counties/Cities', or 'Systems' and press SEL or ►. |
|
|
Agencies:
At 'Select Agency in State' press
▼ or
▲ to scroll to the agency type and press
SEL or
►. At 'Categories in Agency' press ▼ or ▲ to scroll to the category and press SEL or ►. At 'Subcategories in Category' press ▼ or ▲ to scroll to the subcategory and press SEL or ►. To select all frequencies in the subcategory press SEL to check the subcategory. Press ◄ to navigate back and select more objects or press Menu to Import Selections. To select specific frequencies in the subcategory press ►. At 'Frequencies in Subcategory' press ▼ or ▲ to scroll to the frequency and press SEL to check the frequency. Press ◄ to navigate back and select more objects or Menu to import. |
| Counties At 'Data Types' scroll to 'Agencies', 'Categories', or 'Systems' and press SEL or ►. |
| Agencies:
At 'Select Agency in County' press
▼ or
▲ to scroll to the agency and press
SEL or
►. At 'Categories in Agency' press ▼ or ▲ to scroll to the category and press SEL or ►. At 'Subcategories in Category' press ▼ or ▲ to scroll to the subcategory and press SEL or ►. To select all frequencies in the subcategory press SEL to check the subcategory. Press ◄ to navigate back and select more objects or press Menu to Import Selections. To select specific frequencies in the subcategory press ►. At 'Frequencies in Subcategory' press ▼ or ▲ to scroll to the frequency and press SEL to check the frequency. Press ◄ to navigate back and select more objects or press Menu to Import Selections. |
| Categories:
At 'Categories in County' press
▼ or
▲ to scroll to the category and press
SEL or
►. At 'Subcategories in Category' press ▼ or ▲ to scroll to the subcategory and press SEL or ►. To select all frequencies in the subcategory press SEL to check the subcategory. Press ◄ to navigate back and select more objects or press Menu to Import Selections. To select specific frequencies in the subcategory press ►. At 'Frequencies in Subcategory' press ▼ or ▲ to scroll to the frequency and press SEL to check the frequency. Press ◄ to navigate back and select more objects or press Menu to Import Selections. |
| Systems:
At 'Select System in County' press
▼ or
▲ to scroll to the system. To select all sites, categories, and talkgroups in the system press SEL to check the system. Press ◄ to navigate back and select more objects or press Menu to Import Selections. To select specific sites, categories, or talkgroups in the system press ►. At 'System Sites and Categories' press ▼ or ▲ to scroll to 'Sites', or 'Categories'. |
| Sites:
To select all
sites in the system press SEL to check Sites. To select specific sites in the system press ►. You must select at least one site. At 'System Sites' press ▼ or ▲ to scroll to the site and press SEL to check the site. |
| Press ◄ to navigate back and scroll to select Categories. |
| Categories:
To select all
categories and talkgroups in the system press SEL to check
Categories. To select specific categories or talkgroups in the system press ►. At 'Categories in System' press ▼ or ▲ to scroll to the category. |
| Talkgroups:
To select all
talkgroups in the category press SEL to check the category.
To select specific talkgroups in the category press ►. At 'Talkgroups in Category' press ▼ or ▲ to scroll to the talkgroup and press SEL to check the talkgroup. Press ◄ to navigate back and scroll to select another category. Press ◄ to navigate back and select more objects or press Menu to Import Selections. |
| Systems:
At 'Select System in State' press
▼ or
▲ to scroll to the system and press
SEL or
►. To select all sites, categories, and talkgroups in the system press SEL to check the system. Press ◄ to navigate back and select more objects or press Menu to Import Selections. To select specific sites, categories, or talkgroups in the system press ►. At 'System Sites and Categories' press ▼ or ▲ to scroll to 'Sites', or 'Categories'. |
| Sites:
To select all
sites in the system press SEL to check Sites. To select specific sites in the system press ►. At 'System Sites' press ▼ or ▲ to scroll to the site and press SEL to check the site. |
| Press ◄ to navigate back and scroll to select Categories. |
| Categories:
To select all
categories and talkgroups in the system press SEL to check
Categories. To select specific categories or talkgroups in the system press ►. At 'Categories in System' press ▼ or ▲ to scroll to the category. |
| Talkgroups:
To select all
talkgroups in the category press SEL to check the category.
To select specific talkgroups in the category press ►. At 'Talkgroups in Category' press ▼ or ▲ to scroll to the talkgroup and press SEL to check the talkgroup. Press ◄ to navigate back and scroll to select another category. Press ◄ to navigate back and select more objects or Menu to import. |
|
Import Selections
To import selections you have made browsing the library, press Menu.
Press
SEL or
► to Import Selected or scroll to Back or Main Menu. At 'Scanlists for chosen objects' press ▼ or ▲ to scroll to each scan list you want to import the objects into and press SEL to select the scan list (don't forget the Default Scan List is always selected). Press ◄ to import or press Menu again then SEL to Import Now. Note: Importing objects into scan lists this way will not automatically enabled them for scanning. See Turning Scan Lists On/Off. |
| Import Using the Library Import Tab | Contents |
| This feature imports objects into the current
V-Scanner folder in the software only. You will still have to
copy the V-Scanner folder to the SD card. The import option lets you select a country, state/province, and then state/provincial agencies, counties (agencies, categories, and systems), and state/provincial systems. The import option in the software is basically the same function as 'Browse Library' in the scanner. You can also update any existing objects in the software from an older version of the database with the current database version using the Update Channels button. |
| To Import Using Library Import Some selections may be empty with no objects available |
| Select a country from the drop-down menu. Scroll and click to
select a
state/province or (Nationwide). Select Agencies, Counties/Cities, or Systems and click the Next button. |
| Agencies: Scroll to and
click the Agency. Note: the instructions state 'then click the
Next button to continue' but the software may continue automatically. Scroll to and click each Category. The sub category list will then be filled in below. To select all objects in the sub category, scroll to and click the sub category checkbox. To select specific objects in the sub category, scroll to and click the sub category Name. Scroll to and click each Object checkbox to select objects. Use the Select All and De-select All buttons as desired. Press the Back button as desired to add more objects or Import Selected Channels to finish. Press the Clear All Selections button to start over. |
| Counties Select a county then Agencies, Categories, or Systems and click the Next button. |
| Agencies: Scroll to and
click each Agency. Note: the instructions state 'then click the
Next button to continue' but the software may continue automatically. Scroll to and click each Category. The sub category list will then be filled in below. To select all objects in the sub category, scroll to and click each sub category checkbox. To select specific objects in the sub category, scroll to and click each sub category Name. Scroll to and click each Object checkbox to select objects. Use the Select All and De-select All buttons as desired. Press the Back button as desired to add more objects or Import Selected Channels to finish. Press the Clear All Selections button to start over. |
| Categories: Scroll to
and click each Category. The sub category list will then be filled in
below. To select all objects in the sub category, scroll to and click the sub category checkbox. To select specific objects in the sub category, scroll to and click the sub category Name. Scroll to and click each Object checkbox to select objects. Use the Select All and De-select All buttons as desired. Press the Back button as desired to add more objects or Import Selected Channels to finish. Press the Clear All Selections button to start over. |
| Systems:
To select all
sites and all talkgroups for each system,
scroll to and click the system checkbox. Press the Back button as desired to add more objects or Import Selected Channels to finish. Press the Clear All Selections button to start over. To select specific sites or specific talkgroups for each system, scroll to and click the system Name. Click the Sites button to select sites or the Talkgroups button to select talkgroups. |
| Sites: Scroll to and click the Site checkbox to select sites. Use the Select All and Clear All buttons as desired. |
| Press the Back button then the Talkgroups button to select talkgroups. |
| Talkgroups: Use the
Select All and Clear All buttons to add talkgroup categories as
desired. To select all talkgroups for each category, scroll to and click the talkgroup category checkbox. The talkgroup listings will then be filled in below. To select specific talkgroups for each category, scroll to and click the sub category Name. The talkgroup listings will then be filled in below. Scroll to and click the Talkgroup checkbox to select talkgroups. Press the Back button as desired to add more objects or Import Selected Channels to finish. Press the Clear All Selections button to start over. |
| Import from Text File/Clipboard Allows you to quickly import multiple frequencies and talkgroups from Notepad or any other file like Excel or Word. This feature imports objects into the current V-Scanner folder in the software only. You will still have to copy the V-Scanner folder to the SD card. |
|
When the 'Import from Text File' or 'Import
from Clipboard' button is pressed, the EZ Scan software will show a
listing of all channels that have been read from the file or clipboard.
Across the top of the listing you will find headings for each column.
The software will make an attempt to select the correct columns for the
frequency, delay, attenuation, and lockout fields. All other columns
will have a default heading in the form of "Column #" where # is the
column number. To change the assignment for a column, click on the
column heading. A pull down list will be provided that will allow you to
select the data types supported by the software. Only those data types
that have not been assigned to another column will be available in the
list. To unassign a column, select the 'No Field' option. When importing, all channels are imported into the default scanlist and will be added to the end of the existing channels. The scanlist memberships may be adjusted by selecting the channels you wish to change, and then clicking on the scanlist column of one of the selected channels. |
![]()
| Programming Trunking Systems/Sites (Software only) | Contents |
| You can't program or edit trunking systems with
the scanner, only the software.
There is a 32 control channel limit for a trunking site. Each talkgroup ID can be assigned to more than one scan list but
can only be associated with one system. To Program/Edit Trunking Systems select the Trunked Radio Systems tab. Not all tabs are visible by default. See Advanced Menu. |
| Trunking System Options... |
| New (button) | Duplicate (button) | Type | Att | Country |
| Delete (button) | Alpha Tag | L/O | ABst |
| Site Details Tab... |
| New (button) | L/O | Site Frequencies Tab | Site Options Tab (Motorola) | Site Options Tab (EDACS, LTR) |
| Delete (button) | Att | Frequency | Trunking Tables | Control Channel Type (EDACS) |
| Alpha Tag | Multi-Site Settings (Motorola, EDACS only) | L/O | Type I/IIi Fleetmaps | Narrow Signal Type (EDACS) |
| Data Decode Thresholds | Mode | Automatically adjust home repeaters (LTR) |
![]()
| Trunking System Options... |
| Duplicate (System) (button) Will create a copy of all settings, sites, talkgroups, and radio IDs of the selected system. |
| Click to select the System then click to highlight the name and edit. |
| Click to select the System then click Type to select from the drop-down menu. |
| Click to select the System then click the L/O checkbox. |
|
Att (System) Allows you to attenuate
all sites or specific sites in the system (20 dB?). Useful in areas where interference
from nearby strong signals is present. Default is Off. See also
Site Attenuation. Note: Global Attenuation Mode must be set to Normal for this setting to apply. |
| Click to select the System then click Att to
select from the drop-down menu. Off - no sites are attenuated. Global - all sites are attenuated. Per Site - uses site attenuation setting. |
| ABst (Audioboost) (System) Boosts the audio slightly (6 dB?) for the system. Default is Off. See also Object ABst. |
| Click to select the System then click the ABst checkbox. |
| Country allows you to specify which country specific band plan to be used when entering frequencies. Default is USA(?). |
| Click to select the System then click Country to select from the drop-down menu. |
| Site Details Tab... |
| New (Site) (button) Allows you to create a new site for the trunked system. |
| Click to select the System then click the Site Details tab and click the New button. |
| Click to select the System then click the Site Details tab and click the Delete button. |
| Click to select the System then click the Site Details tab, click the Site to select, and click to highlight the name and edit. |
| Click to select the System then click the Site Details tab, click the Site to select, and click the L/O checkbox. |
|
Att (Site) Allows you to attenuate
the site. See also System Attenuation. Note: Global Attenuation Mode must be set to Normal for this setting to apply. |
| Click to select the System then click the Site Details tab, click the Site to select, and click the Att checkbox. |
| Data Decode Thresholds Used with multi-site systems. Sets how the scanner follows the control channels you have programmed into multiple sites. While (you are) moving, the scanner will attempt to lock on the best control channel it can find. The scanner will always attempt to lock on to control channels where the decoding quality is greater than 'Threshold Hi', and will search for new control channels when the decoding quality of a control channel drops below 'Threshold Lo'. If no control channels are available that meet the Threshold Hi criteria, the scanner will seek the best control channel to use, and continue checking periodically for a new control channel that meets the Threshold Hi criteria. See also Optimizing Scanning Parameters. |
| Threshold Lo Sets the control channel decode % threshold
for a site to be considered out of range, which will begin the process
of looking for a new site (control channel).
Default is 75. Threshold Hi Sets the control channel decode % threshold for a site to be considered good when looking for a new site (control channel). Default is 95. Click to select the System then click the Site Details tab, click the Site to select, then the up/down arrows to select. Use the Apply to all Sites button as desired. |
|
Frequency (Site Frequencies) For Motorola systems you only need to enter
the control channel frequencies. Note: EDACSs frequencies also have to be entered in LCN order. See
Finding
EDACS LCN Order. See also BandPlan and Flexstep settings for step size defaults. |
| Click to select the System then click the Site Details tab, click the Site to select, click the Site Frequencies tab, then click to highlight the frequency and edit. |
| Click to select the System then click the Site Details tab, click the Site to select, click the Site Frequencies tab, then click to highlight the frequency and click the L/O checkbox. Use the Clear L/O button to unlock all frequencies. |
| Mode (Site Frequencies) Allows you to set the receive mode for all trunking frequencies in the site. |
| Click to select the System then click the Site
Details tab, click the Site to select, click the Site
Frequencies tab, then click drop-down next to Mode to
select FM or NFM. Use the Apply Mode to all Sites button as desired. |
|
Trunking Tables (Site Options)
(Motorola only) Allows you to select the default trunking table or to
customize the tables for each type of system.
Trunking tables are required so the scanner can correctly
determine the voice channel frequencies. Trunking table information can usually be found in the
Radio
Reference Database. For Motorola Analog Systems use the Default option for 800 MHz and 900 MHz Motorola trunked systems. For Motorola Splinter Systems use the Splinter option (analog 800Mhz systems with frequencies between 866-869 MHz [or rebanded 851-854 MHz] ending with 0 instead of 5 e.g. 852.1250, not 852.1375). For Motorola Rebanded Systems you must select Custom and create a custom band plan. For Motorola 800 MHz rebanded table entries see this post. For Motorola VHF and UHF Systems you must select Custom and create a custom band plan. You must program the applicable lo channel, hi channel, offset, base frequency, and step for the system. I have found an explanation at the Trunked Radio Systems User’s Page that describes how to find some of this information. Look for 'Determining Base and Offset Frequencies for the BC245xlt' by John C. See also this post for UHF systems. Radio Reference.com also has an explanation. Inquire at Radio Reference.com Forums to find more information about specific systems. |
| Click to select the System then click the Site
Details tab, click the Site to select, click the Site
Options tab, then click drop-down next to Type to
select. For custom tables select Custom then click the Edit button. Click to select and highlight each field to edit and click the OK button. Repeat for each table as needed. Use the Apply to all Sites button as desired. |
| Type I/IIi Fleetmaps (Site Options) (Motorola only) Motorola Type I and Type IIi systems require you to program a fleet map. This allows you to receive the talkgroup IDs correctly. Trunking table information can usually be found in the Radio Reference Database. If you don’t know which fleet map to use, you can try a method I found at Radio Reference.com., Determining Type I Motorola Fleet Maps by Dave Goodson. If you know the fleet map by name, E1P1, E1P2, etc., I have listed 16 pre-set fleet maps so you can see the size codes. |
| Note:
If you select size code S-12, S-13, or S-14, these
restrictions apply: S-12 can only be assigned to blocks 0, 2, 4 or 6. S-13 can only be assigned to blocks 0 and 4. S-14 can only be assigned to block 0. Since these size codes require multiple blocks, you will be prompted for the next available block. For example, if you assign Block 0 as S-12, the scanner prompts you for block 2, the next block available, instead of block 1. If you assign Block 0 as S-14, you would not see another prompt because S-14 uses all available blocks. |
| Click to select the System then click the Site
Details tab, click the Site to select, click the Site
Options tab, then click drop-down next to Presets to
select. For custom fleetmaps select Custom then click the Edit button. Click the drop-down next to each block to edit and click the OK button. Repeat for each block as needed. Use the Apply to all Sites button as desired. |
| Click to select the System then click the Site
Details tab, click the Site to select, click the Site
Options tab, then click drop-down next to Control Channel
Type to
select from the menu. EDACS Standard (Wide) is the normal EDACS system on 800 MHz and some UHF systems. EDACS Narrow is used on some UHF systems and most 900 MHz systems. |
| Narrow Signal Type this setting inverts the incoming decoded control channel data. Some EDACS Narrow systems may require this setting in order to operate. |
| Click to select the System then click the Site Details tab, click the Site to select, click the Site Options tab, then click drop-down next to Automatically adjust home repeaters to select On. |
![]()
| Program/Edit Frequencies and Talkgroup IDs | Contents |
|
|
|
Scanner Object Menu... |
| Alpha Tag | Skipped | Attenuate (conv only) | Flash Pattern | Off Time |
| Set Scanlists | Priority | Alarm | On Time | Delete Object |
| Lock Out | Delay | Light |
To Program/Edit Conventional Objects
select
the Conventional Frequencies tab. |
| New (button) | Frequency | Pri | Bklt | Alert |
| Duplicate (button) | Mode | Att | Backlight Mode | Scanlists |
| Delete (button) | Squelch | ABst | Flash Pattern | Import from Text File/Clipboard |
| Clear Skipped (button) | L/O | Dly | On Time, Off Time |
| Alpha Tag | Skip | (Delay) Time |
|
Trunked Radio Systems Tab - Talkgroup Details, Radio ID Details... |
| New (button) | Alpha Tag | Bklt | Dly | Scanlists |
| Delete (button) | L/O | Flash Pattern | (Delay) Time | Import from Text File/Clipboard |
| Add Wildcard (button) | Skip | On Time, Off Time | Alert | Show Unassigned Talkgroups |
| Clear Skipped (button) | Pri |
| Compress (button) | ABst |
|
Scanlists Tab... |
| Scanlist | Delete Channel (button) | L/O | Bklt | Dly |
| Enabled | Clear Skipped (button) | Skip | Backlight Mode | Alert |
| New Channel (button) | Alpha Tag | Pri | Flash Pattern | Scanlists |
| Remove Channel (button) | On Time, Off Time |
![]()
| New (Object) (button) Allows you create a new conventional or talkgroup object with the default settings in the Default Scan List. Talkgroup IDs must be entered in the selected ID Format. |
| Click anywhere on an object line to select where to insert the object then use the wizard to create an object. Talkgroup IDs must be entered in the selected ID Format. |
| Duplicate (Object) (button) (conventional only) Allows you to duplicate a conventional object in the same scan list. |
| Click anywhere on the object line to highlight then click the Duplicate button to the right. |
| Delete (Object) (button)/Delete Object This will delete the conventional object from all scan lists or delete a talkgroup ID from the system. |
| Scanner Press SEL or ► to delete. |
| Software Click anywhere on the object line to highlight then click the Delete button. |
| Add Wildcard (button) Allows you to add a wildcard ID that will receive all talkgroups (Talkgroup Details tab) or a wildcard ID that will receive all private IDs (Radio ID Details tab). |
| Click the button to create the wildcard. Scroll to select and click the scan list(s) you want the wildcard ID assigned to and click the Set button. Note: If a wildcard already exists the button will be grayed out. |
| Scanner Press SEL or
► to edit. Press ▼ or ▲ to select the first character, then ► to move the cursor and repeat for each character. Press SEL to save and exit. |
| Software Click anywhere on the object line to highlight then click the Alpha Tag field to edit and press enter to save. |
| Frequency (conventional only) (software only) Allows you to edit the frequency of a conventional object. |
| Click anywhere on the object line to highlight then click the Frequency field to edit and press enter to save. |
| Mode (conventional only) (software only) Allows you to set the receive mode for a conventional object. Default is Auto. |
| Click anywhere on the object line to highlight then click the Mode field to toggle Auto, FM, NFM, or AM. |
| Squelch (conventional only) (software only) Allows you to set the squelch mode for a conventional object. Default is Search. |
| Click anywhere on the
object line to highlight then click the Squelch field. Select the Squelch Mode or Search for any mode with the drop-down arrow. If CTCSS or DCS is chosen, click the Search for value box for any tone/code or select the Squelch Value from the drop-down and click Done. To lockout a value check Exclude this value. |
|
L/O/Locked Out Used for objects you will never want to scan (like encrypted talkgroups). The only way to unlock an object is in the object's menu (or software). Default is Off. |
| Scanner Press SEL or ► to check On, or uncheck Off. |
| Software Click anywhere on the object line to highlight then click the L/O box. |
| Skip/Skipped Used for objects you want to temporarily lockout and unlock with Restore (all) Skipped in the main menu or Clear Skipped in the software. Default is Off. |
| Scanner Press SEL or ► to check On, or uncheck Off. |
| Software Click anywhere on the object line to highlight then click the Skip box. |
| Pri/Priority Sets the object for priority. Priority Mode must also be checked in the main menu. Default is Off. See also Priority Time and Priority Scanning. |
| Scanner Press SEL or ► to check On, or uncheck Off. |
| Software Click anywhere on the object line to highlight then click the Pri box. |
|
Att/Attenuate
(conventional only)
Attenuates the conventional object (20db?). Note: Global Attenuation Mode must be set to Normal for this setting to apply. |
| Scanner Press SEL or ► to check On, or uncheck Off. |
| Software Click anywhere on the object line to highlight then click the Att box. |
| ABst (Audioboost) (software only) Boosts the audio slightly (6 dB?) for the object. Default is Off. See also System ABst. |
| Click anywhere on the object line to highlight then click the ABst box. |
| Dly/Delay Turns the delay on for the object according to the Delay Time. Default is On. |
| Scanner Press SEL or ► to check On, or uncheck Off. |
| Software Click anywhere on the object line to highlight then click the Dly box. |
| (Delay) Time (software only) Sets the time for the object to pause after a transmission before continuing to scan. Default is 2 seconds. |
| Click anywhere on the object line to highlight then click the Time field. Drag the slider to select the time. Tip: Use the left/right arrow buttons on your keyboard for better precision. |
| Leave - uses the
LiteMode backlight setting. On - turns the backlight on when the object is active and Alerts is set to Both or Visual and LiteMode is set to Norml, Key Press/Key, or Ignor. Flash - flashes the backlight according to the Flash Pattern setting when the object is active and Alerts is set to Both or Visual and LiteMode is set to Norml, Key Press/Key, or Ignor. LiteMode has to be set to Norml, Key Press/Key, or Ignre for the backlight to come on only during a transmission. Scanner Press ◄ or ► to select Leave, On, or Flash. Software Click anywhere on the object line to highlight then click the Bklt field to select. Click the drop-down arrow at Backlight Mode to select Leave, On, or Flash. |
|
Flash Pattern
Sets the flash pattern for the backlight when Light is
set to Flash and
Alerts is set to Both or Visual and
LiteMode
is set to On, Norml,
Key Press/Key, or Ignor.
For more information see Flash Programming. |
| Scanner Press SEL or
► to edit. The
flash pattern is set for each block by specifying the number or letter
associated with the desired flash pattern.
Enter
a sequence of 8 numbers and/or letters, 0-9 and
A-F.
Default pattern is 55555555. Press ▼ or ▲ to select the first number/letter of the pattern code, then ► to move the cursor and repeat for the next numbers/letters. Press SEL to save and exit. Software Click anywhere on the object line to highlight then click the Bklt field to select. Use the drop-down arrow to set Backlight Mode to Flash. Enter the On Time and Off Time then check/uncheck the 32 boxes to select a pattern. Each step in the 32 step flash pattern defines whether the backlight is on or off for the durations specified in the On Time and Off Time settings. You can also Load Presets that are included in the software or Save Presets with the buttons. |
|
On Time
Sets the time the backlight is on in the
Flash Pattern when Light
is set to Flash. Off Time Sets the time the backlight is off in the Flash Pattern when Light is set to Flash. |
| Scanner Press SEL or
► to edit. Enter
the time, 1-100 (.01-1 seconds).
Default is 50 (.5 second). Press ▼ or ▲ to select the first number, then ► to move the cursor and repeat for each number. Press SEL to save and exit. |
| Software
Click anywhere on the object line to highlight
then click the Bklt field to select. Use the drop-down arrow to set Backlight Mode to Flash. Enter the on time, 10-2500 (.01-2.5 seconds). Default is 500 (.5 second). |
| Alert/Alarm Sets an audible alarm that is heard when the object becomes active. Default is Off. Note: Sounds must be On and Alerts must also be set to Audio or Both (in the Settings menu). |
| Scanner Press ◄ or ► to preview and select the alarm. |
| Software Click anywhere on the object line to highlight then click the Alert field repeatedly to select. |
|
|
Scanner
Press SEL or
► to edit. |
|
Software
Click anywhere on the object line to
highlight then click the Scanlists field. |
| Trunked Radio Systems tab > Talkgroup Details tab. |
| Click the drop-down arrow and select a list. |
| Click the drop-down arrow and select Yes for enabled or No for disabled. |
| Remove Channel (button) (Scanlists tab) This will remove the object from the scan list. It will not delete the object as it may still be a member of another scan list. Talkgroup ID objects that have been removed from scan lists will still be shown in the Talkgroup/Radio ID Details tabs with no scan list assigned when Show Unassigned Talkgroups is checked. |
| Click to select the object then click the Remove Channel button. |
| Delete Channel (button) (Scanlists tab) This will remove the object from all scan lists and trunking systems. |
| Click to select the object then click the Remove Channel button. |
![]()
| Copy Programming To/From Scanner | Contents |
| Turn off the scanner, remove
the batteries and SD card. Insert the SD card into a card reader and
plug the reader into a USB port on your computer running the
software. Open the EZ Scan software and click on the 'SD Card' menu then 'Copy Configuration To SD Card' or 'Copy Configuration From SD Card'. Note: When selecting folders to copy, the dialog boxes will be the same for copying to the SD card or copying to the EZ Scan software. Read the warning that states all coping will replace existing data (delete existing folders) and click Yes to continue. Make sure the software has detected the correct drive, (or select the correct one with the drop-down arrow) and click the 'Continue' button. Select the from the following: The CDAT folder is the default V-Scanner programming folder. The CDAT_VS.001 folder is V-Scanner folder #1; CDAT_VS.002 is V-Scanner folder #2 and so on. To copy (or delete), select the box next to each folder. Use the other buttons to help you select/unselect your folders for copying or deleting. Click Copy Folders when ready. Click 'OK' when done then unplug the scanner and turn it on. The copy process may take some time depending on how many folders you are copying. |
![]()
| Selecting V-Scanner Folders | Contents |
| The SD Card menu in
the software will allow you to
upload V-Scanner folders to an SD card. The
V-Scanner menu in the scanner will allow you to select
them to use in the scanner. See also Managing V-Scanner Folders to load folders in the software. |
|
|
To
Select V-Scanner Folders with the Scanner,
from the main menu press
▼ or
▲ to scroll to 'V-Scanner'
and press SEL or
►. The current folder and name
will be displayed. |
![]()
| Scanning | Contents |
|
To Start Scanning, from the main menu press
▼ or
▲ to scroll to 'Scan'
and press SEL or
►. The display will show a scrolling arrow and the scan list(s) names and will scroll the names if more than five scan lists are enabled. |
| Turning Scan Lists On/Off |
|
To enable/disable a scan list, from the
main menu press
▼ or
▲ to scroll to 'Scanlists'
and press SEL or
►. Use ▼ or ▲ to scroll to each scan list and press SEL to enable (checked) or disable (unchecked). Press ◄ to save and exit. To use the Skywarn List press |
| Skipping Objects |
| To skip an object press the Skip button. This is not like a 'temporary lockout' that will restore all skipped objects when the scanner is power cycled. Skip is basically the same as lockout but allows you to 'unskip' all objects with 'Restore Skipped' (below). |
| Restore Skipped Objects |
| To restore all skipped objects, from the main menu press ▼ or ▲ to scroll to 'Restore Skipped' and press SEL or ►. |
| Storing CTCSS/DCS Tones/Codes |
| To store an ID
found with a Wildcard ID press Menu when the object is displayed.
Scroll to 'Store Wildcard'
and press SEL. The ID will be
assigned to the current scan list (at the end of the list using 'Browse
Objects'). To store a CTCSS/DCS tone/code (if enabled) press Menu when the object is displayed. Scroll to 'Store sq code' and press SEL. |
| Using Pause |
| Pause
( PAUSE pauses the scanner but keeps the scanner in scan mode. If you press |
| Monitoring Objects |
| To monitor an
object, from the main menu press
▼ or
▲ to scroll to 'Browse
Objects' and press SEL or
►. Pressing ◄ or ► will scroll through the scan lists. Pressing ▼ or ▲ will scroll through objects in each scan list. When you have found the object press SEL. If you monitor a Wildcard ID, the scanner will monitor all active IDs in that system. |
| Using the Attenuator |
| The attenuator reduces the amount of
signal at the receiver input (20 dB?) and may help reduce interference from strong
nearby transmitters. There are two attenuation modes, Normal and Global.
Normal attenuation uses the attenuation settings for each object/system/site/search. Global attenuation forces attenuation for all objects/systems/sites/searches on or off. To Attenuate a Conventional Object press Menu anytime a conventional object is in the display. Use ▼ or ▲ to scroll to 'Attenuate' and press SEL or ►. Press ◄ to return to scanning. To Attenuate any Search press Menu in any search mode. Use ▼ or ▲ to scroll to 'Attenuate' and press SEL or ►. Press ◄ to return to searching. |
| Priority Scanning |
| Conventional
Priority Scanning will give priority to conventional
objects that have their priority mode set to 'On'.
The scanner will sample the conventional objects for activity
periodically while scanning and monitoring other objects. This sampling
will cause a brief muting of received audio when it occurs while another
object is active. The more conventional objects that are set for
priority, the longer this audio muting will be, since it takes a certain
amount of time to sample each priority conventional object for activity. Talk Group Priority Scanning will give priority to IDs that have their priority mode set to 'On'. On some trunked systems (e.g. Mot 3600 if the system is programmed for it, and LTR for some talkgroups), it will look at low-speed data on the voice frequency checking for any priority Talk Group information. It will not check for IDs when receiving any other talkgroup. It will not check for IDs when scanning conventional objects. Priority does work for Radio IDs associated with 'Private' IDs. Priority does not work for Radio IDs associated with 'Group' IDs, the scanner will only check the 'Group' IDs. To Turn Priority Scanning On from the main menu press ▼ or ▲ to scroll to 'Settings' and press SEL or ►. Use ▼ or ▲ to scroll to 'Priority Mode' and press SEL or ► to enable (checked) or disable (unchecked). All objects with their priority mode set to 'On' are given equal priority status. No object has higher priority over any another. Setting the Priority Interval allows you to set how often your scanner will check for priority channels. From the main menu press ▼ or ▲ to scroll to 'Settings' and press SEL or ►. Use ▼ or ▲ to scroll to 'Priority Time' and press SEL or ► to edit. Enter the amount of time, 1 - 25 (seconds). Press ▼ or ▲ to select the first digit, then ► to move the cursor and select the second digit. |
![]()
| Optimizing Scanning Parameters | Contents |
| Move your
scanner/antenna to a different location. Sometimes just 12" helps. Get a better antenna. The stock rubber duck is just average quality. |
| Conventional Scanning |
| Setting the squelch properly is the easiest and quickest way to receive channels better. |
| Analog Trunking |
| The one thing that frustrated me
most with the default settings is the constant blinking of an ID in the
display while the scanner was trying to lock on to it. Here's what I did. Move your scanner/antenna to a different location. Sometimes just turning it helps. You want that For Motorola systems/sites, only enter the known control channels/alternate control channels to speed up scanning. You don't need to program the voice channels. There also are articles on Object Oriented Scanners Overload Issues at Radio Reference. Turning the squelch down a little will help pull in fringe sites. It will scan multiple sites slower but gives the scanner time to lock onto the control channels. Turning the squelch up a little will find the stronger sites faster and therefore move to the next site/system quicker.
For Multi-site systems,
program each site into its own scan list first to see how well the site
receives in different locations or conditions. This way you can see
which sites are receivable by monitoring one scan list at a time and
looking for that little
|
![]()
| Searching |
| The scanner's Service search allows you to search commonly used public safety
frequencies, civilian and military air
frequencies, and amateur radio frequencies. Zeromatic tuning is a feature that
enhances the scanner's ability to lock on to the actual center frequency
of a search hit instead of an adjacent frequency. See also
Flexstep and BandPlan
settings for step size
defaults. To Start a Public Safety, Air, or Ham Search from the main menu press ▼ or ▲ to scroll to 'Search' and press SEL or ►. Use ▼ or ▲ to scroll to 'Service Search' and press SEL or ►. Use ▼ or ▲ to scroll to 'Public Safety', 'Aircraft' or 'Amateur' and press SEL or ►. To change direction or resume searching press ◄ or ►. To pause on a frequency press To store a frequency (to the Default Scan List) press Menu when the frequency is displayed. Use ▼ or ▲ to scroll to 'Store Channel'. To lockout a frequency press Skip. To unlock a frequency see Unlocking Search Frequencies. To select Groups, toggle Attenuation, Zeromatic Tuning, Rx Mode (Air/Amateur only), or Delay press Menu. Use ▼ or ▲ to scroll each option and press SEL or ► to enable (check) or disable (uncheck). Use ▼ or ▲ to scroll to each selection and press SEL or ► to enable (checked) or disable (unchecked). Press ◄ to resume. |
|
Public Safety, Air, and Ham Search Group Charts (*=Canada Bandplan) |
|
|
||||||||||||||||||||||||||||||||||||||||||||||||||||||||||||||||||||||||||||||||||||||||||||||
![]()
|
The CB, Marine, and FRS/GMRS/MURS bands are actually frequencies pre-programmed into special channels. You are not searching from a lower frequency to a higher frequency. There are 40 CB channels, 60 Marine channels, 96 Rail channels, and 34 FRS/GMRS/MURS channels. |
|
To Start a Marine, CB, Rail, or FRS/GRMS/MURS Search
from the main menu press
▼ or
▲ to scroll to 'Search'
and press SEL or
►. Use ▼ or ▲ to scroll to 'Service Search' and press SEL or ►. Use ▼ or ▲ to scroll to 'Marine', 'CB', 'Rail', or 'FRS/GMRS/MURS' and press SEL or ►. To change direction or resume searching press ◄ or ►. To pause on a channel press To store a channel (to the Default Scan List) press Menu when the channel is displayed. To lockout a channel press Skip. To unlock a channel press Menu. Use ▼ or ▲ to scroll to the channel and press SEL or ► to unlock (unchecked). To toggle Attenuation, or Delay press Menu. Use ▼ or ▲ to scroll each option and press SEL or ► to enable (check) or disable (uncheck). Use ▼ or ▲ to scroll to each selection and press SEL or ► to enable (checked) or disable (unchecked). Press ◄ to resume. |
|
|
|
|||||||||||||||||||||||||||||||||||||||||||||||||||||||||||||||||||||||||||||||||||||||||||||||||||||||||||||||||||||||||||||||||||||||||||||||||||||||||||||||||||||||||||||||||||||||||||||||||||||||||||||||||||||||||||||||||||||||||||||||||||||||||||||||||||||||||||||||||||||||||||||||||||||||||||||||||||||||||
![]()
| Limit Search | Contents |
| The scanner's Limit search allows you to program and search a range of upper and lower frequencies. See also Flexstep and BandPlan settings for step size defaults. |
|
To Start a Limit Search
from the main menu press
▼ or
▲ to scroll to 'Search'
and press SEL or
►. Use ▼ or ▲ to scroll to 'Limit Search' and press SEL or ►. To change the lower and upper frequencies press Menu. Use ▼ or ▲ to scroll to 'Lo:' and press SEL or ► to edit. Press ▼ or ▲ to select the first digit, then ► to move the cursor and select the next digit and repeat to set. Press SEL to save and exit. Press ▼ to scroll to 'Hi:' and repeat to edit. Press SEL to save and exit. To change direction or resume searching press ◄ or ►. To pause on a frequency press To store a frequency (to the Default Scan List) press Menu when the frequency is displayed. Use ▼ or ▲ to scroll to 'Store Channel'. To lockout a frequency press Skip. To unlock a frequency see Unlocking Search Frequencies. To toggle Attenuation, Zeromatic Tuning, or Delay press Menu. Use ▼ or ▲ to scroll each option and press SEL or ► to enable (check) or disable (uncheck). Use ▼ or ▲ to scroll to each selection and press SEL or ► to enable (checked) or disable (unchecked). Press ◄ to resume. |
![]()
| Spectrum Sweeper Search | Contents |
| Your scanner's
Spectrum Sweeper feature provides a powerful new tool for
you to rapidly detect, monitor, and store frequencies
from nearby radio transmissions. You can scan all of the bands
the scanner receives or just public safety bands. Spectrum Sweeper is more sensitive than portable
frequency counters and will detect transmissions at a
greater distance. Spectrum Sweeper functions by rapidly
searching through the RF spectrum in 1 MHz segments. If RF signal energy
is detected in a 1 MHz segment, the scanner will search through the 1MHz segment in
finer steps until the source of the signal is found. Spectrum Sweeper
allows you to search the entire range of your scanner's design
frequencies, or you can specify just those frequency ranges that you
wish to search. See also
Flexstep and BandPlan settings for step size
defaults. Special Spectrum Sweeper If a 1 MHz sweep indicates that activity is present, Special Spectrum Sweeper searches the whole 1 MHz range to find the source. If you lockout 5 frequencies within a 1 MHz segment, the scanner will skip that entire segment in subsequent searches. |
| To Start a
Spectrum Sweeper Search
from the main menu press
▼ or
▲ to scroll to 'Search'
and press SEL or
►. Use ▼ or ▲ to scroll to 'Spectrum Sweepr' and press SEL or ►. Use ▼ or ▲ to scroll to 'All Bands', or 'Public Safety' and press SEL or ►. To change direction or resume searching press ◄ or ►. To pause on a frequency press To store a frequency (to the Default Scan List) press Menu when the frequency is displayed. Use ▼ or ▲ to scroll to 'Store Channel'. To lockout a frequency press Skip. To unlock a frequency see Unlocking Search Frequencies. To select Bands, toggle Special Mode, Attenuation, Zeromatic Tuning, or Delay press Menu. Use ▼ or ▲ to scroll each option and press SEL or ► to enable (check) or disable (uncheck). Use ▼ or ▲ to scroll to each selection and press SEL or ► to enable (checked) or disable (unchecked). Press ◄ to resume. |
|
|
|||||||||||||||||||||||||||||||||||||||||||||||||||||||||||||||
![]()
| Zeromatic tuning is a feature that
enhances the scanner's ability to lock on to the actual center frequency
of a search hit instead of an adjacent frequency. This option is available
for all Limit, Service, and Stalker/Sweeper search objects and dedicated searches except CB, Marine, and F/G/MURS. To toggle Zeromatic Tuning, from each search menu use ▼ or ▲ to scroll to 'Zeromatic' and press SEL or ► to enable (check) or disable (uncheck). |
|
|
| Unlocking Search Frequencies |
|
To unlock a frequency,
from the main menu press
▼ or
▲ to scroll to 'Search'
and press SEL or
►. Use ▼ or ▲ to scroll to 'Lockouts' and press SEL or ►. Use ▼ or ▲ to scroll to each frequency and press SEL or ► to check. Press ◄ to save and exit. |
![]()
| Weather Settings | Contents |
|
You can monitor NOAA weather radio broadcasts, you can use the weather priority feature while scanning to alert you to severe weather broadcasts as they occur, or you can use the SAME alert mode where the scanner monitors specific geographic area(s) and/or weather events. |
|
Weather Radio |
|
|
To hear your local weather channel press
|
| Skywarn List |
| The Skywarn List is a list that can be scanned
independently from the regular 50 lists. It scans the objects in that
list only and no other lists. It is provided to program Skywarn or other
related weather frequencies for quick access but can be programmed as a
quick list for any type of frequencies. The Skywarn List is scan list #51 when
selecting lists in the menus. Objects in the Skywarn list
can also be assigned to one or more of the main 50 lists. To Scan the Skywarn List press |
| Scanner
To Turn on Weather Priority press
|
|
|
Press Menu and use
▼ or
▲ to
scroll to 'Priority' and press
► to select the weather channel
number noted as the strongest. |
| Software To Turn Weather Priority on or off select the Weather tab in the software. Click to select/deselect the priority checkbox for the channel you want to use for priority. |
| To Set the Priority Interval enter the time in seconds. Setting the check interval higher than 8 seconds may cause the scanner to miss the alert tone. |
|
SAME Standby Mode monitors the
specified weather frequency silently, waiting to receive a Specific
Area Message Encoding (SAME) alert that corresponds with up to 10 SAME
location code(s) and event code(s) that you have programmed. If there is a
match between a sent SAME location code/event code and one that you have
programmed, the scanner will sound an alarm, display the alert type, and
monitor the alert. To activate SAME Standby Mode for your area, you should
provide at least one SAME location code for your city, county or state.
You may wish to enter additional codes for surrounding areas so that you
can receive advance warning of adverse or dangerous weather that may be
headed in your direction. By default, SAME mode will alert on any SAME
message received if no SAME location codes are programmed. |
|
|
| Scanner
To Program SAME Location Names press
|
|
|
Use
▼ or
▲ to
scroll to 'SAME # Tag' and press SEL or
► to
tag the location. |
|
To Toggle SAME Standby Mode On or Off press
|
| Software To Program SAME Location Names click to select and highlight the Alpha Tag field to edit. |
| To Program SAME FIP
Codes click to select and highlight the FIP
field to edit. To Program an Event Code click to select the Event field and select the event type from the drop-down list. To Lockout an Event Code click to select the Event field and select the event type from the drop-down list then click the lockout button. To Enable SAME FIP Locations click to check the Enable checkbox. To Select the Alert Type click to select the Alert Type field and select the alert from the drop-down list. The Alert Tone Timeout will sound the alert for the number of seconds selected. If set to 0 the scanner will wait for a key press to silence. The Audio Monitor Duration time is how long the scanner will monitor the weather channel after the alert tone has timed out. |
![]()
| Reformatting the SD Card | Contents |
| The SD card comes formatted for
the standard FAT file system with a cluster size of 32kB (Note that
this is not the same as the 'FAT32' file system). The scanner will work
best if the supplied 2GB SD card is formatted for the standard FAT
file system with a cluster size of 32kB.
Formatting the SD card for other file system types may cause the
scanner to malfunction. When using other SD cards the following formatting guidelines should be used: Any card with 2GB or less capacity must be formatted using the FAT file system with a cluster size of 32kB. Any card with greater than 2GB must be formatted using the FAT32 file system with a cluster size of 32kB. Open the EZ Scan software and click on the 'SD Card' menu then 'Prepare SD Card for use'. Make sure the software has detected the correct drive to format (or select the correct one with the drop-down arrow) and click the 'Format' button. You also need to check 'Copy Library files to SD card after format' or the scanner will not power on correctly. If you have a configuration (V-Scanner folder) in the software you can copy to the SD card, also check 'Copy current configuration data to SD card after format'. Note: Do not uncheck the 'Quick Format' box. |
![]()
| LED Flash Programming | Contents |
|
Each Object uses a 32 step
Flash Pattern. The pattern consists of eight blocks with four steps
for each block.
To
Set the
Flash
Pattern in the Scanner, each of the possible 16 patterns within a four step block
is defined using the characters 0-9 and A-F. |
|
||||||||||||||||||||||||||||||||||||||||||||||||||||||||||||||||||||||||||||||||||||||||||||||||||||||||||||||||||||||||||||||||||||||||||||||||||||||||||||||
|
|
|
Example; the default pattern:55555555.
On Time: 50, Off Time: 50 |
|
||||||||||||||||||||||||||||||||||||||||||||||||||||||||||||||||||||||||||||||||||||||||||||||||||||||||||||||||||||||||||||||||||||
|
|
 |
|
To Set the Flash Pattern in the Software
You can also 'save' patterns and 'load' presets patterns. |
![]()
| Firmware/CPU/Library/Software Version | Contents |
|
To view the CPU and Library version in the scanner power on the scanner
and press Menu when the welcome screen appears. |
![]()
| Charging the Batteries |
|
To charge the batteries connect the
supplied USB cable to the scanner (powered on or off) and any USB port.
You will see the battery icon display empty to full until charging is
done then
|
![]()
| Related Links | Contents |
| Finding EDACS LCN order - I have found a procedure at the Trunked Radio Systems User’s Page which explains how to find the LCN order for an EDACS system if you don't know the order. Look for 'Finding EDACS Logical Channel Numbers' by Todd Hartzel near the bottom of the page. |
| Determining Type I Motorola Fleetmaps - You can try a method I found at Radio Reference.com. Determining Type I Motorola Fleet Maps.by Dave Goodson. |
| Determining Base/Step/Offset for VHF/UHF Motorola Systems - I have found an explanation at Radio Reference.com that describes how to do this if you don't have the information. The Trunked Radio Systems User’s Page also has an explanation. Look for 'Determining Base and Offset Frequencies for the BC245xlt' by John C. |
| Decimal/AFS Conversion Chart - Here is a Conversion Chart to help convert your IDs. |
| How to view these pages in your browsers |
| I have formatted these pages so that you can view them with any monitor, in any browser (Foxfire, Opera, I.E., or Netscape), at any zoom level, and in any screen area size (ex: 600x800)-small or large fonts. So if the print is too small, go to the 'view' menu in your browser and adjust it to a bigger level (or smaller if you want to see more on the screen). |
| Newsgroups and Forums |
| Radio Reference GRE Forum | Radio Reference Forums |
| Links |
| Radio Reference PSR 700 Wiki | Radio Reference.com |
| Radio Reference Data Base |
eHam.net-reviews |
![]()
|
| Click here to visit Scanner Master |
![]()
| Preset Fleet Maps | Contents |
| In Motorola II systems (no programming the fleet map required), all the blocks have size code, S0, which has a size limitation of 512 radios. In Type I systems, size codes are used in different blocks to denote the maximum number of users in that block. Notice that size code S-12 uses 2 blocks. A Motorola Hybrid system (Type IIi) has 'blocks' of the system that are Type I Fleets/Subfleets and Type II talkgroups. The maps that are Hybrid systems are in bold. |
| E1P1 | E1P2 | E1P3 | E1P4 | E1P5 | E1P6 | E1P7 | E1P8 | ||||||||
| Block | Size Code | Block | Size Code | Block | Size Code | Block | Size Code | Block | Size Code | Block | Size Code | Block | Size Code | Block | Size Code |
| 0 | S-11 | 0 | S-4 | 0 | S-4 | 0 | S-12 | 0 | S-4 | 0 | S-3 | 0 | S-10 | 0 | S-1 |
| 1 | S-11 | 1 | S-4 | 1 | S-4 | 1 | (S-12) | 1 | S-4 | 1 | S-4 | 1 | S-10 | 1 | S-1 |
| 2 | S-11 | 2 | S-4 | 2 | S-4 | 2 | S-4 | 2 | S-12 | 2 | S-4 | 2 | S-11 | 2 | S-2 |
| 3 | S-11 | 3 | S-4 | 3 | S-4 | 3 | S-4 | 3 | (S-12) | 3 | S-4 | 3 | S-4 | 3 | S-2 |
| 4 | S-11 | 4 | S-4 | 4 | S-4 | 4 | S-4 | 4 | S-4 | 4 | S-12 | 4 | S-4 | 4 | S-3 |
| 5 | S-11 | 5 | S-4 | 5 | S-4 | 5 | S-4 | 5 | S-4 | 5 | (S-12) | 5 | S-4 | 5 | S-3 |
| 6 | S-11 | 6 | S-4 | 6 | S-12 | 6 | S-4 | 6 | S-4 | 6 | S-12 | 6 | S-4 | 6 | S-4 |
| 7 | S-11 | 7 | S-4 | 7 | (S-12) | 7 | S-4 | 7 | S-4 | 7 | (S-12) | 7 | S-4 | 7 | S-4 |
| E1P9 | E1P10 | E1P11 | E1P12 | E1P13 | E1P14 | E1P15 | E1P16 | ||||||||
| Block | Size Code | Block | Size Code | Block | Size Code | Block | Size Code | Block | Size Code | Block | Size Code | Block | Size Code | Block | Size Code |
| 0 | S-4 | 0 | S-0 | 0 | S-4 | 0 | S-0 | 0 | S-3 | 0 | S-4 | 0 | S-4 | 0 | S-3 |
| 1 | S-4 | 1 | S-0 | 1 | S-0 | 1 | S-0 | 1 | S-3 | 1 | S-3 | 1 | S-4 | 1 | S-10 |
| 2 | S-0 | 2 | S-0 | 2 | S-0 | 2 | S-0 | 2 | S-11 | 2 | S-10 | 2 | S-4 | 2 | S-10 |
| 3 | S-0 | 3 | S-0 | 3 | S-0 | 3 | S-0 | 3 | S-4 | 3 | S-4 | 3 | S-11 | 3 | S-11 |
| 4 | S-0 | 4 | S-0 | 4 | S-0 | 4 | S-0 | 4 | S-4 | 4 | S-4 | 4 | S-11 | 4 | S-0 |
| 5 | S-0 | 5 | S-0 | 5 | S-0 | 5 | S-0 | 5 | S-0 | 5 | S-4 | 5 | S-0 | 5 | S-0 |
| 6 | S-0 | 6 | S-4 | 6 | S-0 | 6 | S-0 | 6 | S-0 | 6 | S-12 | 6 | S-12 | 6 | S-12 |
| 7 | S-0 | 7 | S-4 | 7 | S-0 | 7 | S-4 | 7 | S-0 | 7 | (S-12) | 7 | (S-12) | 7 | (S-12) |
You can tell which block a Motorola ID is
in by its number.
|
|
Thanks to Radio Reference.com for most of this information. |
![]()
| Last updated July 28, 2024 |