|
|
|
Easier to Read HomePatrol-1/HP-2 Digital Scanner and Sentinel Manual |
|
Click here to buy a printed, bound, formatted in color, copy of this manual from Scanner Master |
| Last Updated August 16, 2024 |
![]()
| Contents |
| Introduction | Scanning |
| Main Features | Changing Locations |
| Extreme Features | Selecting Favorites List to Scan |
| Band Coverage/Default Steps | Other Option Menu |
| Conventional Simplex and Repeater Systems | Selecting Service Types | |
| Understanding CTCSS/DCS/NAC | Turning Nationwide Systems On/Off |
| Understanding Trunking | Holding |
| Understanding Multi-Site Trunking | System Side Menu |
| Understanding IDs | Department Side Menu |
| Understanding the Memory | Channel Side Menu |
| Profiles | Using Global Attenuation |
| Favorites Lists | Setting the Squelch |
| Systems | Changing the Range |
| Departments/Trunking Sites | Replaying/Recording Transmissions |
| Buttons and Inputs | Muting Audio |
| Power and Batteries | Quick Frequency Entry |
| Text Tagging | Locking/Unlocking the Screen |
| Using the Startup Wizard | Using the HomePatrol with a GPS |
| Installing the Sentinel Software | Weather Modes |
| Sentinel Toolbar and Menu | Weather Scan |
| Updating the Firmware | Weather Alert Standby |
| Updating the Database | Adding Counties to Monitor |
| Using General Help | Extreme Features |
| A Look at the Display | Programming Systems with the Scanner |
| Managing Profiles | Analyze System |
| Radio Settings | Trunked System Analyzer |
| Setting Your Location and Range | System Load/Reception Statu |
| Understanding Range | Current Activity |
| Service Types | LCN Monitor |
| Manage Favorites Lists | Activity Log |
| Adding Channels to a List | Talk Group Converter |
| Create a List when you Find a Channel | EDACS/LTR LCN Finder |
| Create a List Manually | Band Scope |
| Use Location Control | RF Power Plot | ||
| Programming Systems from the Database | Raw Data Output |
| Program/Edit Other Systems | Discovery Mode |
| Selecting Lists to Scan/Download | Conventional Discovery Mode |
| Export/Import a List | Review Discovery Mode |
| Export List to a kml File | Limit Search |
| Copy a List | Serial Mode |
| Rename List | Reformatting the MicroSD Card |
| Move/Sort Favorites Lists | Related Links/Info |
| Delete List | Common Fleet Maps |
| Write to/Read from HomePatrol | Motorola Type II Special Status Bits |
![]()
| Introduction | Contents |
|
|
|
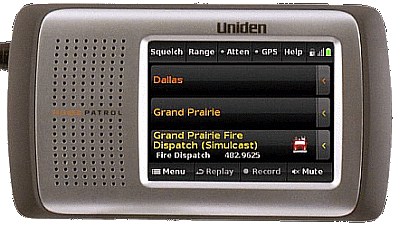
Not like a handheld or base model, it's more of a desktop scanner that
sits on a included stand. It will also sit vertically on any solid
surface. It has a 3.5-inch diagonal color
touch-sensitive LCD screen. |
|
I should also mention that Rich
Barnett, president of
Scanner Master,
was kind enough to lend me a HomePatrol and Paul Opitz, Uniden Product
Manager, was generous with an Extreme upgrade so I could write this manual. Without
these personal gestures, you would not be reading this. And, thanks to the
many people who have posted their valuable insight on the
Radio Reference Forums and Yahoo groups. |
![]()
| Main Features | Contents |
| HP-1 Version 1 Features |
| Scans APCO 25 Trunked and Conventional Systems, Motorola Analog and Mixed Digital Systems, EDACS Narrowband and Wideband Systems, LTR Systems, and Conventional Systems. |
| Includes a 2 GB microSD card for storing favorites lists and recording transmissions. |
| Programmed with the Radio Reference Database (updated weekly) for radio systems in the United States and Canada. |
| Create new or edit existing systems in the Sentinel Software. |
| Allows you to set your location(s) by Zip/Postal code, city, or GPS coordinates for instant reception. |
| Auto-locate feature that may find local systems if you don’t know where you are. |
| A range control lets you set how far out from your current location HomePatrol will search for channels in Favorites Lists and the Full Database. |
| Easily add channels to Favorites Lists from the database with the Sentinel software. |
| Has the ability to scan by service types i.e. Fire, Police, Railroad, etc. |
| Instant replay plays back up to 240 seconds (4 minutes) of the most recent transmissions. |
| One-touch recording to capture transmissions for later playback. |
| 100cps scan rate. |
| Connectible to a GPS unit (not included) for automatic department and site selection. |
| Automatic Gain Control (AGC) reduces the volume if signals are strong and increases it if signals are weak. |
| Temporary or Permanent system/department/site/channel avoid (lockout). |
| CTCSS/DCS/NAC tone decode that displays CTCSS tones/DCS codes and NAC codes being received. |
| Text Tagging allows you to name each system, site, department, channel, talk group ID, location, and SAME group, using up to 37 characters per name. |
| You can use the scanner's attenuator to reduce the input strength of strong signals per channel or trunked system or globally. |
| A Signal Strength Meter shows the signal strength for the more powerful transmissions. |
| Adjustable mute options. |
| Standby options include clock display or weather alert. |
| Shutdown timer up to 3 hours. |
| Auto Dim for display and Power Save options. |
| Weather Scan with Programmable Weather Alert Standby (SAME). |
| Built-in Battery Charger allows you to charge the batteries in the scanner. |
| Accessories include an AC power adapter, car charger, USB cable, 4 X AA NiMH rechargeable batteries, rubber antenna, microSD card (installed), and table stand. |
|
Optional car mount kit. |
| HP-1 Version 2/HP-2 Features |
| Support for the HomePatrol Extreme firmware upgrade. |
| Scan multiple Favorites Lists (up to 256) and/or the Full Database. |
| Per-channel delay/resume lets you determine how long HomePatrol stays on a channel after the transmission ends. |
| ID Search stops on all (unavoided) IDs even if the ID is not in HomePatrol's database. |
| Unit ID Tagging allows an alpha tag showing the information about a specific radio unit being received. |
| The ability to add current channels to a favorites list based on your location, a range, and the service types you are interested in. |
| CTCSS/DCS or NAC Search option. |
| The ability to quickly store CTCSS, DCS, or NAC tones when it finds an active frequency for channels not in the Full Database. |
| The ability to quickly save a found Unit ID. |
| Per-channel attenuation. |
| Per-channel volume offset. |
| Better location precision for departments and sites that allows you to also define a location and range using up to 32 rectangles instead just of a single circle. |
| Channel Alerts allow you to program your scanner to alert you when a channel is received. For each alert in the scanner, you can select from 9 different tone patterns and 15 volume settings. |
| Emergency Alert sounds an alert when a unit triggers their emergency status on compatible EDACS/Motorola radio systems. |
| New service types for Racing Officials, Racing Teams, and eight custom tags. |
| An Import/Export feature that allows you to share Favorites Lists. |
| A kml Export feature so you can map system
information in
Google Earth. |
| HP-2 (New) Features |
| Includes a 4 GB microSD card for storing favorites lists and recording transmissions. |
|
APCO 25 Phase II TDMA Support. |
| Extreme Features |
| Complete programming with the scanner lets you edit existing systems in Favorites Lists and create new systems without the software. |
| Trunked System Load/Reception Status tool. |
| EDACS/LTR LCN Monitor will display which Motorola trunking channels or EDACS/LTR LCN channels that are active. |
| Current Trunked System Activity Log shows details of every channel grant and certain other system activity. |
| Talk Group Converter for P25/Motorola DEC to HEX and EDACS AFS to DEC. |
| EDACS/LTR LCN Finder lets you determine the correct LCN assignments for frequencies on EDACS or LTR systems. |
| A RF Power Plot graphically indicates the received signal level for a single frequency over time to help locate RF signal sources and to determine the effect of other factors on received signal strength. |
| A Band Scope Mode graphically indicates the received signal level across a range of frequencies to help identify RF signal sources. |
| Raw Data Output used to analyze raw decoded data using external software. |
| Trunking Discovery monitors system traffic on a trunked radio system to find unknown IDs and automatically records audio from and logs new channels for later review and identification. |
| Conventional Discovery searches a range of frequencies to find unknown frequencies and automatically records audio from and logs new channels for later review and identification. |
| A Limit Search to search a range of frequencies for activity. |
| USB audio output and control allows you to capture or stream audio and control the HomePatrol using a USB connection. |
![]()
| HomePatrol Band Coverage/Default Steps | Contents |
| Frequency Range | Step (kHz) | Mode | Band | Frequency Range | Step (kHz) | Mode | Band |
| 25-26.960 | 5 | AM | Petroleum/Broadcast Pickup | 216-224.995 | 20 | NFM | 1.25 Meter Ham |
| 26.965-27.405 | 5 | AM | CB | 225-379.995 | 25 | NFM | UHF Air |
| 27.410-27.995 | 5 | AM | Business & Forest Products | 380-399.9875 | 12.5 | NFM | Military Trunked |
| 28-29.695 | 20 | NFM | 10 Meter Ham | 400-405.9875 | 12.5 | NFM | Miscellaneous |
| 29.700-49.995 | 10 | NFM | VHF Low Band | 406-419.9875 | 12.5 | NFM | Federal Trunked |
| 50-53.995 | 20 | WFM | 6 Meter Ham | 420-449.9875 | 12.5 | NFM | 70 cm Ham |
| 108-136.9916 | 8.33 | AM | Commercial Air | 450-469.9875 | 12.5 | NFM | UHF Standard |
| 137-143.9875 | 12.5 | NFM | Military Land Mobile | 470-512 | 12.5 | NFM | UHF TV |
| 144-147.995 | 5 | NFM | 2 Meter Ham | 758-787.99375 | 6.25 | NFM | Public Service |
| 148-150.7875 | 12.5 | NFM | Military Land Mobile | 788-805.99375 | 6.25 | NFM | Public Service |
| 150.8-161.995 | 5 | NFM | VHF High | 806-823.9875 | 12.5 | NFM | Public Service |
| 162-173.9875 | 12.5 | NFM | Federal | 849.0125-868.9875 | 12.5 | NFM | PS Trunked |
| 174-215.950 | 5 | FM | VHF TV | 894.0125-960 | 12.5 | NFM | Public Service, 33 cm Ham |
![]()
| Conventional Simplex and Repeater Systems |
| Simplex systems
use a single frequency for both transmit and receive.
Most radios using this type of operation are limited to
line-of-sight operation. This type of radio is frequently
used at construction job sites, and with inexpensive
consumer radios such as GMRS/FRS radios. The range is
typically 1-8 miles, depending upon the terrain and many
other factors. Repeater systems use two frequencies: one transmits from the radio to a central repeater; the other transmits from the repeater to other radios in the system. With a repeater based system, the repeater is located on top of a tall building or on a radio tower that provides great visibility to the area of operation. When a user transmits (on an input frequency), the signal is picked up by the repeater and retransmitted (on an output frequency). The user's radios always listen for activity on the output frequency and transmit on the input frequency. Since the repeater is located very high, there is a very large line of sight. Typical repeater systems provide coverage out to about a 25-mile radius from the repeater location. |
![]()
| Understanding CTCSS/DCS/NAC | Contents |
| Continuous Tone
Coded Squelch System (CTCSS) and Digital Coded Squelch
(DCS) are two methods used to prevent interference by
other radio communications. Your scanner can receive
transmissions that use these codes (or more commonly
referred to as tone codes). CTCSS and DCS systems all use some form of
coded squelch. Coded squelch techniques involve the
transmission of a special 'code' signal along with the
audio of a radio transmission. A receiver with coded
squelch only activates when the received signal has the
correct 'code'. This lets many users share a single
frequency, and decreases interference caused by distant
transmitters on the same channel. In all major
metropolitan areas of the United States, every available
radio channel is assigned to more than one user. Public
safety radio systems on the same frequency are usually
set up at a distance of 40 miles apart, or more. This
means that you may hear transmissions from a distant
system when your local system is not transmitting. By
programming the CTCSS tone for a local channel the
scanner will not stop on transmissions from the distant
system. With few exceptions, such as the VHF Aircraft and
Marine bands, almost every other VHF or UHF radio system
uses some form of coded squelch. By far, CTCSS is the
most popular mode among non-trunked systems. For more information visit Radio Reference's respective pages on CTCSS, DCS, and NAC. |
![]()
| Understanding Trunking | Contents |
|
Trunking systems let a large group of 2-way radio users (or even
different groups of 2-way radio users) efficiently use a set of
frequencies. Instead of selecting a specific frequency for a transmission,
the user’s radio selects a programmed trunking bank in the system when
that user presses their PTT (push to talk) button. The trunking system
automatically transmits the call on the first available frequency, and
also sends (on a different frequency called a Data or Control channel) a
code that uniquely identifies that transmission as a talkgroup ID (or just
ID.) So when you are trunktracking a system, you are listening to active
IDs transmitting in the system (each using the first available frequency
in the system.) Trunking systems in general allocate and use fewer
frequencies among many different users. Since the trunking system might send a call and its response on different frequencies, it is difficult to listen to trunked communications using a conventional scanner. These scanners let you monitor the control channel frequency so you can hear calls and responses for users and more easily "follow" conversations than with a conventional scanner. This scanners trunktrack the following types of systems: |
|
|
| When you
program Motorola/P25 and EDACS system frequencies into the scanner, one frequency is the
control (or data) channel, and the rest are voice frequencies shared by
all the users. There may be 3 or 4 frequencies assigned as (primary or
alternate) control channels but only one control channel will be active at
a time. These scanners will allow you to program just Motorola/P25 control
channels into the trunking system and the voice channels will
automatically be found (but not programmed). EDACS systems need all the frequencies for the
system programmed and in the correct LCN (Logical Channel Number)
order. The control channel is continually transmitted to the field units and has a sound similar to listening to a boat engine over the phone (in manual mode; you won't hear this when you are trunking the system.) This control channel is also a good check to see if you can trunktrack the system. If you can't hear a control channel when you step through the trunking frequencies (in manual mode), you either don't have all the frequencies or are too far away to receive the control channel and the system. Motorola systems are limited to a maximum of 28 frequencies per system or site. Ericsson EDACS systems are limited to 25 frequencies per system or site. Motorola and EDACS systems can be either analog, digital, or mixed (digital and analog talkgroups). Mixed Motorola systems should be programmed as Motorola systems and not P25 digital systems. That way the talkgroup options will allow you to select if it is a digital or analog. LTR systems work a little differently. LTR systems typically do not have a dedicated control channel. This type of system encodes all trunking information as digital subaudible data that accompanies each transmission. The frequencies also have to be in LCN (Logical Channel Number) order or the correct 'slot' for the system to trunktrack properly. Each repeater has its own controller, and all of these controllers are synchronized together. Even though each controller monitors its own channel, one of the channel controllers is assigned to be a master that all controllers report to. Each of these controllers sends out a data burst approximately every 10 seconds so that the subscriber units know that the system is there. This data burst is not sent at the same time by all the channels, but happens randomly throughout all the system channels. If you listen to the frequencies of an LTR system in manual mode (not trunking), on every channel in the system you will hear this data burst that will sound like a short blip of static like someone keyed up and unkeyed a radio within about 500 msec. LTR systems are limited to 20 frequencies per system. Trunkscanning is basically scanning IDs that are programmed into ID locations (same concept as frequencies into channels.) You can then trunkscan just the programmed IDs. Trunktracking is searching for all IDs in a system (same concept as searching for frequencies in a band.) |
| Understanding Multi-Site Trunking |
| Some Motorola and EDACS systems covering a very large geographic area use multiple antenna sites that each operate on different frequencies and use the same Talk Group ID's for traffic. When programming such a system, you program each site's frequencies into their own site, program departments to group your IDs, then program the IDs into the departments. You can then select which sites to scan or have the scanner select sites based on your location. Since all sites share all the channels within the system, multi-site trunking is much more efficient than programming each site as a separate system. |
| Radio Reference.com has an excellent page explaining the various types of trunking systems in more detail here. |
![]()
| Understanding IDs | Contents |
| IDs are what you see instead of frequencies when you monitor a trunking system. |
|
| EDACS IDs come in two formats: AFS and Decimal. |
|
LTR IDs
are in the format A-HH-UUU where A
is the area code (0 or 1), HH is the
home repeater (01-20), and UUU is the
user ID (000-254).
|
![]()
| Understanding the Memory | Contents |
![]()
| Buttons and Inputs | Contents |
|
|
![]()
| Power and Batteries | Contents |
| Press and hold the Power button for about 4 seconds to turn the scanner on. |
| The HomePatrol-1 comes with an AC adapter and a DC adapter for use in you car. |
| The HomePatrol-2 comes with a mini USB cable
to connect to your HomePatrol-2 to your computer or a USB to AC power
adapter (not included). It does not an AC adapter or DC adapter. |
| The HomePatrol also requires 4 AA alkaline or NiMH
rechargeable batteries (included). You can leave them in the scanner and select to recharge them when the HomePatrol is connected to external power. |
|
To Use AC or DC Power with the HP-1: With the HP-1 powered On or Off: 1. Connect HomePatrol to a power source (AC or DC). Turn on the unit if it is not already on. 2. The HP-1 displays a message asking if you want to charge the batteries (if installed). Select No. The scanner will display a power symbol ( |
| To Use USB Power with the HP-2 (only, not the HP-1): |
| With a PC USB Port or USB to AC/DC adapter less than 500mA power output: |
| With the HP-2 powered Off: Plug the mini USB side into the HP-2 and the other end into the USB port. At 'Start Charging' select No. Turn on the scanner. At 'Select USB mode' select 'DC Supply'. With the HP-2 powered On: Plug the mini USB side into the HP-2 and the other end into the USB port. At 'Select USB mode' select 'DC Supply'. At 'Start Charging' select No. |
| With a USB port or USB to AC/DC adapter greater than 500mA power output: |
| With the HP-2 powered Off: Plug the mini USB side into the HP-2 and the other end into the USB port. At 'Start Charging' select No. Turn on the scanner. With the HP-2 powered On: Plug the mini USB side into the HP-2 and the other end into the USB port. At 'Start Charging' select No. |
| Recharging the Batteries |
| The rechargeable batteries included with the HomePatrol are 2300 mAh. You can set how long it will take to recharge the batteries from a drained state to a fully charged state (based on the battery size in mAh) through the Set Charge Time setting in the Advanced Menu. The maximum mAh setting for the HomePatrol is 2300. |
|
When battery power drops below a certain level, a battery low pop-up
displays the following message: “Batteries are low. Replay and Recording disabled. Connect external power to prevent data loss.” The HomePatrol sounds a battery low beep every five seconds. Tap the pop-up screen to close it and stop the battery low beep. |
|
To Recharge the
Batteries in the HP-1: Connect HomePatrol to a power source (AC or DC). Turn on the unit if it is not already on. The HP-1 displays a message asking if you want to charge the batteries. Select Yes. The scanner will display a power symbol ( |
|
To Recharge the
Batteries in the HP-2: There are two different ways you can use the mini USB to USB cable (included) to recharge your HP-2: With the scanner on or off. To charge with scanner when powered on you will need a USB power source great than 500mA output. |
| With a PC USB Port or USB to AC/DC adapter less than 500mA power output: |
| With the HP-2 powered Off: Plug the mini USB side into the HP-2 and the other end into the USB port. At 'Start Charging' select Yes. At the 'Low-Power' warning tap the screen to turn the scanner off. With the HP-2 powered On: Plug the mini USB side into the HP-2 and the other end into the USB port. At 'Select USB mode' select 'DC Supply'. At 'Start Charging' select Yes. At the 'Low-Power' warning tap the screen to turn the scanner off. |
| With a USB Port or USB to AC/DC adapter greater than 500mA power output: |
| With the HP-2 powered On or Off: Plug the mini USB side into the HP-2 and the other end into the USB port. At 'Start Charging' select Yes. The scanner will display a power symbol ( |
| The charging LED on the front of the scanner turns
red while the HP-2 is charging. When charging is complete, the LED turns
green. Note: The HomePatrol retains your selection for 1 hour after you disconnect external power. If you reconnect within that hour, it will automatically resume charging according to your last selection. |
![]()
|
Text Tagging
is fairly straight forward. When ever you see the text field and keyboard select the button in the lower right for the type of characters; uppercase-ABCDEF, lowercase-abcdef, numbers and special characters-123&?@. Tap Space for a space. Tap |
![]()
| Using the Start-up Wizard | Contents |
| The first time you turn on your HomePatrol (or anytime you 'Clear User Data') it will run the startup wizard that will allow you to install the HomePatrol Sentinel software. It will also allow you to set a location by zip code and select channels from the Full Database with the default service types to monitor. To run the startup wizard again anytime, press and hold the Help button. |
| Installing the Sentinel Software |
| HomePatrol's Sentinel Software allows you to manage your profiles, Favorites Lists, the database, and firmware updates/upgrades. To download the latest version of Sentinel go to the HomePatrol TWiki. When you turn the scanner on for the first time (or reset it), it will recommend that you connect the scanner to your computer and install the Sentinel software. This is an optional step. You don't need to remove any previous version of the software. Turn on the scanner. Connect the scanner to your computer using the supplied USB cable. The screen turns white when connected to the computer. HomePatrol will install to your computer like an additional drive. If the setup program doesn't autorun, navigate to the setup.exe file in the Setup folder on the microSD card and double-click it. Disconnect the cable when the installation is complete. |
|
|
|
|
|
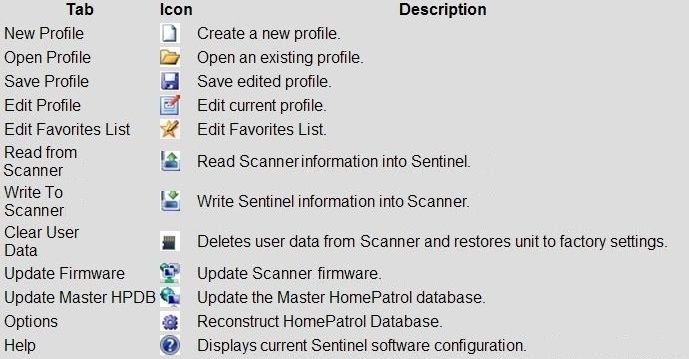
| Sentinel Toolbar and Menus There are also various options for items in their right-click menus. |
| File Menu |
|
New... click to create a new profile.
|
| Edit Menu |
|
Edit Profile...
click to edit the current profile.
|
| View Menu |
|
Motorola/P25 TGID Format
click to select Decimal or
Hexadecimal. |
| HomePatrol Menu |
|
Read
from HomePatrol...
|
| Update Menu |
| Tools Menu |
|
Discovery Log Viewer... |
| Help Menu |
|
Contents shows the
help file. |
|
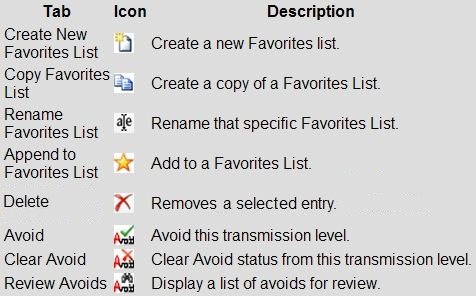
Favorites List Toolbar |
| Updating the Firmware |
| Uniden will release firmware updates to improve functionality, add new features, or address issues found with the existing firmware. Sentinel will need to connect to the Internet to check for the current version. |
|
To Update the HomePatrol Firmware: 1. Plug in the scanner’s AC adapter or ensure that the scanner has fully charged batteries installed. 2. Connect your scanner to the computer using the supplied USB cable and turn the scanner on. If prompted, select 'Mass Storage'. 3. Start Sentinel on your computer. Note: The computer must be connected to the Internet for the following steps. 4. In Sentinel, select Update > Update Firmware… Sentinel checks the web for the latest firmware and writes it to your scanner. 5. When Sentinel completes writing to your scanner, disconnect the USB cable. The scanner then applies the update and reboots. |
| To Use the Extreme Features, you need to update the firmware to at least version 2 first, then buy and apply a registration key available at the HomePatrol TWiki. When you complete the purchase, you will be given a 32-digit key that is specific to the serial number on your scanner. |
|
To apply the key: 1. Turn on the scanner. 2. Select MENU > Advanced Menu > Advanced Option > Register Advanced. 3. Key in the registration key and select ACCEPT. This unlocks all Extreme features. |
| After upgrading to the Extreme
version, the scanner will prompt you to select 'Mass Storage' or 'Serial'
mode when you connect it to a computer. Use 'Mass Storage' mode for
database updates, firmware updates, and connection to the computer for
uploading and downloading profiles. Serial Mode
will be used for audio streaming, raw
data output, and serial control modes. |
| Updating the Database |
| The HomePatrol website updates the database every
week. When you update through Sentinel it checks the website for the
most current database and downloads it to the software. You can then
upload it to the scanner. If you want to submit corrections or additions
to the database got to the
Radio
Reference database and click the Submit Info button. To update the database in Sentinel select Update > Update Master HPDB… Note: Favorites Lists are not updated when channels change in the main database. |
| HomePatrol uses the following databases:
Radio System Database – provided by www.radioreference.com, contains radio system information including frequencies, trunked talk groups, and geographic locations for radio systems across most of North America. ZIP Code Geographic Database – provides geographical coordinates for every zip code in the US and every postal code in Canada. Radio Reference SysID Database – contains system ID and geographic location information for trunked radio systems across North America. City Location Database – includes the center point of most named cities and counties. |
| Using General Help |
| The
Help button provides
information on topics related to each screen you are viewing. Pressing
the little 'book' icon will present the help menu. Pressing
The General Help file is also located on the microSD card (if you plug the scanner into your USB port). Navigate to HP > HomePatrol > firmware and you can open the "HomePatrol_Help_XX_XX_XXXX.hphml" file with WordPad then format it and save it as you please. |
![]()
| A Look at the Display | Contents |
|
|
|
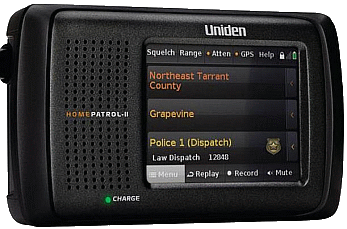
The HomePatrol Main screen is the
screen you will see when scanning. It displays the names of the
transmission you are listening to. From that screen, you can also access other screens that let
you adjust various settings and manage HomePatrol features and settings. |
![]()
| Managing Profiles | Contents |
| A profile contains all your configuration settings as well as all of your Favorites Lists, Avoids, and system settings. If you create a new profile your Favorites Lists will automatically be associated with the new profile. Remember that all Favorites Lists are common to all profiles. Enabling and disabling Favorites Lists within a profile is part of defining a profile. Deleting a profile will not delete the lists associated with a profile. However, deleting a Favorites List will delete it from all profiles. |
| In Sentinel: |
|
To Create a New Profile
Click the New Profile button
|
|
To Open a Profile
Click the Open Profile button
|
| With the Scanner: |
| You automatically start to create a profile once you enter your location. Other settings such as range, service types selected, enabled Favorites Lists, weather settings, display and audio settings also define a profile. The scanner can only contain one profile at a time. Others can be uploaded to the scanner only with the Sentinel Software. |
![]()
| Service Types |
| Not all service types are enabled automatically when you create a new profile or set your first location in the scanner. By default only EMS Dispatch, Fire Dispatch, Law Dispatch, and Multi-Dispatch are enabled. |
| In Sentinel:
Click the Edit Profile button
|
| Check or uncheck service types to enable or disable for the current profile. |
| With the Scanner: Menu > Select Service Types |
|
Scroll up or down
with
|
| Service Type | Description |
| Aircraft | For civilian aircraft and air traffic control operations most typically in the 118-136 MHz and 225-380 MHz bands in AM mode. |
| Business | Most business related entities not covered by other tags. |
| Corrections | Jail/prison operations and other corrections activities, including federal prisons. |
| Emergency Ops | Emergency Operation Centers and similar emergency management or disaster related operations. |
| EMS Dispatch* | Ambulance dispatch, including rescue squads. |
| EMS-Tac | Ambulance on-scene communications, tactical operations and secondary channels. |
| EMS-Talk | Ambulance talk-around, car-to-car and supervisor operations. |
| Federal | All federal government operations (except corrections, traditional law enforcement patrol and fire/EMS operations). |
| Fire Dispatch* | Fire dispatch, including combined fire/ambulance dispatch. |
| Fire-Tac | Fireground, tactical and on-scene communications, including combined fire/ambulance operations. |
| Fire-Talk | Fire talk-around and car-to-car operations, chiefs, supervisors, etc., including combined fire/ambulance operations. |
| Ham | Any amateur radio assignment. |
| Hospital | Ambulance-to-Hospital communications and patient reports. |
| Interop | Interoperability communications, cross-agency communications, mutual aid, etc. |
| Law Dispatch* | Law enforcement dispatch. |
| Law-Tac | Law enforcement tactical, SWAT, on-scene, surveillance and specific sub-agency communications. |
| Law Talk | Law enforcement talk-around, car-to-car and supervisor operations. |
| Media | Newspapers, television and broadcast radio operations. |
| Military | Military operations, e.g., range control, air-to-air combat, etc. |
| Multi-Dispatch* | Combined law enforcement and fire/ambulance dispatch. |
| Multi-Tac | Combined law enforcement and fire/ambulance tactical and on-scene communications. |
| Multi-Talk | Combined law enforcement and fire/ambulance tactical talk-around and car-to-car operations. |
| Public Works | Public agency non-public safety communications. This includes any non-public safety government services, such as trash, streets, roads, sewer, zoos, administration, maintenance, animal control, community initiatives, code compliance, etc. |
| Race Officials | Available for use to identify officials frequencies for racing events. |
| Race Teams | Available for use to identify team frequencies for racing events. |
| Railroad | All common carrier railroad communications. |
| Schools | School-related communications (schools, school buses, football games, etc.). |
| Security | Non-law enforcement security operations, including private security companies, noncommissioned government agency security, school security, etc. |
| Transportation | Public and private bus, taxi, and public passenger rail communications. |
| Utilities | Private electric, water, natural gas, phone, cable TV, etc. operations. |
| Custom 1-8 | (firmware v2 or later) Custom 1 is default for new channels. Custom 2-8 can be used for custom groups of channels in systems, sites, etc.. |
![]()
| Radio Settings |
| Audio Options | Set Auto Shutoff | Avoid (Lockout) Options | Standby Options |
| Display Options | Set Clock | Mute Options | Restore Options |
| Owner Information | Set Charge Time | Replay Options | Version Information |
| Audio Options |
| In Sentinel:
Click the Edit Profile button
With the scanner: Menu > Audio Options |
| Audio AGC
tap to toggle On or Off.
AGC (Automatic Gain Control) attempts
to equalize the audio volume for different channels. Note that AGC cannot compensate for extreme volume differences. Screen Tap tap to select Auto (the scanner sets the tap sound to the master volume level), Soft, Loud, or Off. Hidden Options (HP2 only). These are test setting brought over from the HP-1 that may or may not help with P25 reception. I you aren't having any problem you should not need to adjust these. Press and hold the gray box in the bottom right of the screen. P25 Filter and P25 Mode will appear. Press and hold again and P25 Logging On will appear. See also this post. P25 Filter tap to toggle A or B. B may work better for simulcast systems. P25 Mode tap to toggle Auto, Level 5-13. Allows you to adjust the threshold setting for a better (lower) error rate. P25 Logging Lets you view decoding information under the system name and creates a log file in the HomePatrol/debug folder on the SD card. |
| Display Options |
| In Sentinel:
Click the Edit Profile button
And, View > Motorola/P25 TGID Format And, View > EDACS TGID Format With the scanner: Menu > Display Options |
| Set Contrast tap then tap slider to adjust. |
| Set Backlight Level tap then tap slider to adjust. |
| Auto Dim tap to toggle On or Off. |
| When Auto Dim is on, the display dims 15
seconds after the transmission ends and brightens during a transmission. Auto Dim will also dim the display if there is 15 seconds with no keypad activity. |
| Power Save tap to toggle On or Off. |
|
The scanner
turns off power for 1 second and turns it on
for 300 ms when you monitor a
channel/frequency that has no activity for more than a minute (if it
works like 'Battery Save' on previous scanners). Note: No Icon will appear in the display to tell you if the battery save feature is on or off. |
| Unit ID Display tap to select Mode 1, Mode 2 or Off. |
| Mode 1 - Unit ID information
appears in the second line of the Channel Bar. Mode 2 - Unit ID information appears on the bottom line of the Channel bar. the service type and TGID information will not dispay. |
| Motorola/P25 TGID Format tap to toggle DEC or HEX. |
| EDACS TGID Format tap to toggle DEC or AFS. |
| Font Size
tap to select 8, 9, 10.5, or
12. |
| In Sentinel:
Click the Edit Profile button
With the scanner: Menu > Owner Information > Change |
|
|
| Set Auto Shutoff (scanner only) Allows you to have the radio shut off after a certain amount of time and also set the standby mode. |
|
| Turn Off In: tap + or - to select 5, 10, 15, 30, 45 minutes or 1, 2, or 3 hours. |
| Shutoff Mode:
tap to select All Off, Clock Standby or
WX Standby. |
|
|
| In Sentinel:
Click the Edit Profile button
|
| Time Format tap a/p/24 to select AM/PM or 24hr format. |
| Time Zone tap to select time zone. |
| Daylight Savings Time tap DST: Yes or No. |
| With the scanner: Menu > Advanced Menu > Set Clock |
| At
the blinking prompts type time,
tap to toggle AM
or PM or
24hr format, type
month/day/year, tap
to select
time zone, tap to toggle
DST, tap accept. |
|
|
| Set Charge Time (scanner only) Allows you to set the charge time based on battery capacity (in mAh). Max setting is 2300. |
| With the scanner: Menu > Advanced Menu > Set Charge Time |
| At the blinking prompt enter the battery capacity. Tap accept. |
| Avoid (Lockout) Options Allows you to set default avoid option and review the avoid list. |
| In Sentinel:
Click the Edit Profile button
|
| To Review Avoided
systems, departments, and channels, in the left pane on the main screen
click on the +
next to (or double-click) each system or department/site to expand.
Items highlighted in red are avoided. To Clear any Avoid, right-click any item and select Clear Avoid or select item and click the clear avoid button |
| With the scanner: Menu > Advanced Menu > Avoid Options |
| Default Avoid: tap to toggle Temporary or Permanent. |
| Review Avoid
List
use
|
| In Sentinel:
Click the Edit Profile button
With the scanner: Press and hold Mute or Menu > Advanced Menu > Mute Options |
| Default Mute tap to select 5, 15, 30 seconds or 1, 2 minutes or Permanent (until you tap to unmute). |
| Mute Level tap to select level 0 (full mute), 1, 2, 3, 4, 5, or 6. |
| Silence
tap to select Keytap, Reception or
Both. |
| Replay Options |
| In Sentinel:
Click the Edit Profile button
With the scanner: Press and hold Replay or Menu > Advanced Menu |
| Set Replay Duration tap to select 30, 60, 90, 120, 150, 180, 210, or 240 sec. |
| Review
Recordings
tap to select recordings. Tap to Play,
Delete, or
Rename recording session. |
|
Standby
Options Allows you to set the standby options. The
display will operate for one minute only unless you tap the screen.
Weather Standby may deplete the batteries within 3-6 hours. |
| In Sentinel:
Click the Edit Profile button
With the scanner: Menu > Advanced Menu |
| Default Mode External Power tap to select All Off, Clock Standby or WX Standby. |
|
Notes: If the power goes off then back on
with no batteries installed in Weather Standby Mode, the scanner
will resume in scan mode. If the power goes off then back on with no batteries installed in Clock Standby Mode, the scanner stays off. If the power goes off then back on with batteries installed in either standby mode, the scanner will resume in the 'Default Mode Battery Power' setting. |
| Default Mode
Battery Power
tap to select All Off, Clock Standby or
WX Standby. |
| Restore Options Allows you to clear all user data (full reset) or reset just profile settings to default. |
| In Sentinel:
Click the Clear User Data button
With the scanner: Menu > Advanced Menu |
| Clear User Data (full reset) will delete all favorites lists, reset all profile options to default, clear all avoids, delete all recording sessions, all discovery and analyze logs, and all weather event records. |
| Reset User
Settings
(Scanner Only)
will just reset all profile options to default. |
| Version Information Allows you to view the scanner firmware version, database version, and ESN (serial number) or Sentinel software version. |
| In Sentinel: Help
>
About... With the scanner: Menu > Advanced Menu |
![]()
| Enter Zip Code | Auto-Locate | Set Scan Range | Review/Rename/Change/Delete Location |
| Enter City | Manual Location Input | Save Location | Understanding Range |
| Contents |
| Enter Zip Code will set the center of a zip/postal code as your location and a default scan range of 10 miles. |
| In Sentinel:
Click the Edit Profile button
|
|
To Create a Location click Zip/Postal and enter the zip/postal code then click
OK. Use the drop-down arrow and select the range. Click Append to give this location a name and click OK
to save it. The location in blue type is the current location. |
| With the scanner: Menu > Set Your Location > Enter Zip Code > USA/Canada |
| Enter the zip or postal code and tap
Accept. See below to set the range then name and save the location. |
| Enter City (scanner only) will set the center of a city as your location and a default scan range of 20 miles. |
| Menu > Set Your Location > Enter City |
| Type enough relevant characters to be
able to select your city from a short list (or nothing for the whole
list) and tap Accept.
Example: SPRINGF for Springfield. Scroll down (if you have to) using See below to set the range then name and save the location. |
| Auto-Locate (scanner only) will set the center of the discovered radio tower as your location and a default scan range of 30 miles. |
| Menu > Set Your Location > Auto Locate |
| The Auto Locate feature works by
trying to monitor any Motorola or P25 system in your area that is also
in the RR database. The scanner will then set your location based on the system(s) it receives. See below to set the range then name and save the location. |
| Manual Location Input will set your precise location and a default scan range of 0 miles. |
| In Sentinel:
Click the Edit Profile button
|
| To Create a
Location select the GPS format in GPS Options. Enter the latitude and longitude (remember to include negative - for west) then use the drop-down arrow and select the range. Click Append to give this location a name and click OK to save it. The location in blue type is the current location. |
| With the scanner:
Menu
>
Set Your Location
>
Manual Location Input Tap the GPS format button in the lower right
to select DD.dddd
or DMS. If you make a mistake use |
| For decimal degrees input: Enter the latitude (you need to add 6 decimal places ex: 39123456 for 39.123456) and tap to toggle N/S (north or south) if need be. Enter the longitude (you need to add leading 0's and 6 decimal places ex: 081123400 for 81 12' 34.00), tap to toggle W/E (west or east) if need be, then tap Accept. See below to set the range then name and save the location. |
| For degrees, minutes, and seconds
input: Enter the latitude (you need to add 2 decimal places ex: 40583608 for 40 58' 36.08) and tap to toggle N/S (north or south) if need be. Enter the longitude (you need to add leading 0's and add 2 decimal places ex: 085583608 for 85 58' 36.08), tap to toggle W/E (west or east) if need be, then tap Accept. See below to set the range then name and save the location. |
|
Set Range
lets you override
the default range setting for your current location to
increase or decrease the number of channels you can receive. Actually,
it increases or decreases the number of sites and departments you can
receive when you are scanning from the
Full Database and when you are scanning
Favorites Lists with
Use Location Control enabled. See also Understanding Range. |
| In Sentinel:
Click the Edit Profile button
|
|
To Reset the Range for a Saved
Location you will actually have to delete the
old location and create a new one. |
| With the scanner: Tap the Range button or Menu > Set Your Location > Set Range Tap + or - to set the range. |
|
|
|
1. The range setting will only work with Favorites Lists that have Use Location Control set to On and with Departments/Sites that have locations programmed. Everything in the Full Database also has locations programmed. If you manually program Departments/Sites with no location information included and set 'Use Location Control' to Off, the range setting will have no effect on them because the scanner doesn’t know where they are. 2. You will receive Departments/Sites that have a range equal to your location range setting plus the programmed range of the Departments and Sites. For example, if your location range is set to 10 miles and a Department/Site range is set to 30 miles, and that Department/Site is less than 40 miles away from your current location setting, it will be enabled in your Favorites List according to both range settings.
3. When you plug a GPS device into the scanner, the
scan range is reset to 0 miles by default and will stay there
until you change the range setting. 4. If you use Add Current dB Channels from a list with a 20 mile range (selected location by city) and then set the range to 30 miles, Location Control will not add the other channels included in that extra 10 mile range. |
|
|
| Save Location This will save the current location, the range, and set the location as current for scanning the Full Database and Favorites Lists with Use Location Control enabled. |
|
In Sentinel:
Click the Edit Profile button
|
| With the scanner: Menu > Set Your Location > Save Location |
| Type a name for the location and tap Accept. Tap Listen to exit. |
|
|
| Review/Rename/Change/Delete Location |
| In Sentinel:
Click the Edit Profile button
|
|
To use a different location select
(or right click) the location name and click
Recall. The location in blue type is
the current location. |
| With the scanner: Menu > Set Your Location > Review Location |
|
To review a location tap the location name. |
![]()
| Managing Favorites Lists |
| Contents |
| The easiest way to create a list with
the scanner is to set your
location, range,
service types,
select (or turn off) nationwide systems, and 'Avoid' anything you don't want to
hear from the
Full Database (using the side menus), then create a new
list and use the Add
Current Channels feature to import the channels into the new list.
This also allows you to set up lists for future locations.
Or, in the software, you can use Add Channels On Range for the current location (or specify a location), set the range, service types, and then import channels from the database to a new list. This also allows you to set up lists for other locations. Another way is to create an empty list in the software and append (add) systems, departments, or channels from the Full Database. (All) sites for trunking systems will be brought in with the systems. Notes: 1. Some sites/departments will have a very large programmed range which means you may hear stuff from another state. 2. Some channels will have service types that (according to you) are not correct and you won't want to hear them. 3. You can't edit anything in the database. You'll need to add stuff to a Favorites List to do that. 4. You can't search for unknown TGIDs in trunked systems. And, If you want to program everything manually, use the software to create and edit favorites lists. If you have the Extreme version, you can create empty lists and manually program systems, sites, departments, and channels into the lists using only the scanner. See Programming Systems with the Scanner. |
| Adding Channels to a List |
| In Sentinel: Edit > Add Channels on Range... This feature will allow you to use the current location (or enter a location by zip/postcode or lat/long), enter the range, and the select service types for the channels you want to monitor then add those channels to a new (or different) list. This includes any selected lists and/or the Full Database. |
| Clicking OK will allow you Create a List or Select a List to save the channels in. |
| Notes: Only departments and sites with programmed locations will be added. Any avoided system/site/department/channel (red text) will not be added. |
| With the scanner: Menu > Manage Favorites Lists > Create New List (or select list to add channels to) > Add Current Channels will add all channels from all selected lists (and the Full Database if selected) you are currently monitoring to a new (or different) list. |
| Tap 'Yes' to confirm. Tap 'Use this List' if you want to monitor the new list. |
|
Notes: Any avoided
system/site/department/channel will not be added. When adding channels from the Full Database, only channels that are inside the set range, and from the selected service types are added to the new list. When adding channels from a Favorites List that has 'Use Location Control' is set to 'Yes', only channels that are inside the set range, and from the selected service types are added to the new list. When adding channels from a Favorites List that has 'Use Location Control' is set to 'No', only channels that are from the selected service types are added to the new list. |
| Create a List when you Find a Channel You can create a list and add a channel while scanning. |
| When you are
receiving the channel, tap the channel side menu then
Advanced
>
Add to Favorites List.
The first time you use this option you will see OK and Cancel. Tap OK to continue. Tap New in the lower right, give the list a name, and tap Accept. Use The next time you use this option the scanner will remember the last list you chose and you will see OK, Cancel, and Other List for options. Tap OK to save into the last list saved into or Other List to create another new list. |
| Create a List Manually |
| In Sentinel:
Click the Create New Favorites List button
|
| Type a name and click OK. You now have an empty list. |
| With the scanner: Menu > Manage Favorites Lists > Create New List |
| Type a name and tap Accept. You now have an empty list. |
|
Use Location Control
allows
you to enable or disable channels scanned in the list based on your
location. Actually, it enables/disables Sites and Departments in
Favorites Lists (as long as they have locations programmed) based on
your current location and scan range settings. Location Control is
always enabled when scanning from the
Full Database. To use Location Control, you have to enable it for each Favorites List (default is No). You also need to have locations programmed for sites and departments in each list (you can’t program a location for a system). With 'Use Location Control' set to Yes, the scanner only sees Departments/Sites with programmed locations. Any Department/Site with no location information programmed will not be scanned. If you append (add) a System/Department to a list from the database, the locations will be brought in with each System/Department you append. With Use Location Control set to No, the scanner will enable all Sites and Departments in your Favorites List no matter what the scan range or Site/Department range is set to. You don’t need a GPS to scan by
location if all of the following apply: The scanner then compares your location data with site and department data to determine which channels to scan. Conceivably, you could program everything you want
to hear into one Favorites List and scan just by selecting locations
rather than enabling/disabling lists. If you are traveling long
distances a GPS device would be a better way to go (unless you want to
keep changing your location). |
| In Sentinel:
Click the Edit Profile button
|
| Select each Favorites List (or right click Favorites List) and click on Yes or No next to Use Location Control. |
| With the scanner:
Menu
>
Manage Favorites Lists
|
| Tap to toggle Yes or No . |
| Note: If all your departments/sites don't have locations programmed with Use Location Control set to Yes for your list, you will see All channels that are in range have been avoided... because there are no locations (programmed) to scan. Select Menu then Manage Favorites Lists, select the list and toggle Use Location Control to No . |
| Programming Systems from the Database (Sentinel only) |
| To append (add) a System, Department, or Channel: |
|
Expand the database by clicking the '+' next to each
country/state/province/county. You can then open Nationwide, Statewide,
or County systems and finally select systems and departments. Click
(select) an item in the left pane to view systems/departments/etc. in
the right pane. Right-click and select Append Favorites List... to select a list and click OK to add each system, department, or channel (individual sites can't be added). |
| Program/Edit Other Systems (Sentinel only) |
| Click on the
Edit Favorites List button
|
|
Click the list to select where you want to program a
system (or New Favorites List) and
click
OK. To Create a New System, at the Systems tab, click the append icon To Edit a System, click on the system in the left pane to see System tabs. |
|
Departments tab- allows
you to append
|
|
Sites
tab-
allows you to append
|
|
Unit IDs tab-
allows you to append
|
| Options tab |
|
System Name- type a name. |
| Fleet Map tab- allows you to program a fleet map for Motorola systems. Defaults to S-0 for all blocks (Motorola Type II system). |
|
To Create a New Department,
click on the system in the left pane to select where you want to
create a department and click the
Departments tab. Click
To Edit a Department, click on the department in the left pane to see Department Tabs. |
|
Channels tab-
allows you to append
|
| Options tab |
|
Department Name- type a name. |
|
Location
tab-
allows you to set the location type, latitude,
longitude, and range. Click View > Location Format to select
DMS
or decimal degrees-DEG. You can program both location types but only use one type at a time (1 circle or multiple rectangles). If you set the location type to Circle, you can set the range from the location you want to monitor. If you set the location type to Rectangles, you can append Use longitude1 and latitude1 to specify one corner of the rectangle and longitude2 and latitude2 to specify the opposite corner. |
|
To Create a New Site,
click on the system in the left pane to select where you want to
create a site and click the Sites tab. Click
To Edit a Site, click on the site in the left pane to see Site Tabs. |
|
Frequencies tab-
allows you to append
|
| Options tab |
|
Site name- type a name. |
| Band Plan tab- allows you to select the band type or program a custom band plan for Motorola and P25 systems. |
|
Location
tab-
allows you to set the location type, latitude,
longitude, and range. Click View > Location Format to select DMS
or decimal degrees-DEG. You can program both location types but only use one type at a time (1 circle or multiple rectangles). If you set the location type to Circle, you can set the range from the location you want to monitor. If you set the location type to Rectangles, you can append Use longitude1 and latitude1 to specify one corner of the rectangle and longitude2 and latitude2 to specify the opposite corner. |
|
Channel Name-
when you append a new channel the name is highlighted ready for text
entry. To edit click in the name field twice (not double-click). |
| Review/Edit Channels (scanner only) You can only append single channels, not systems/departments/sites, to favorites lists from the database or, delete single channels from favorites lists (not the database) using the scanner unless you have the extreme version-see Programming Systems with the Scanner. |
| Menu
>
Manage Favorites Lists
|
|
To add a channel from the
database
tap Add Channel. Select the country then
state/province, then county. Select nationwide, statewide, or county systems then select a system, department, and channel. Tap Add Channel. The channel will be added to the last department (?). To delete a channel use |
|
Tip: Pressing and holding
|
| Review Avoids will allow you to review and clear selected or all avoided systems, departments, sites, or channels in a Favorites List or the Full Database. |
| In Sentinel:
Click to select the favorites list or
database entry then click the
Review Avoids button
|
| With the scanner: Menu > Advanced Menu > Avoid Options > Review Avoid List |
| Tap each system,
department, site, or channel to remove the avoid or Clear All Avoids
to remove all. To clear single channel avoids see Edit Channel. |
| Selecting Lists to Scan/Download |
| In Sentinel:
Click the Edit Profile button
|
| Selecting each list (or right click)
then select On or Off next to Monitor or
Download. Selecting Monitor On will also select Download On. Selecting Download Off will also select Monitor Off. Check "Monitor Full Database" if you want to include it with your Favorites Lists. |
| With the scanner: |
|
If you want to scan just the
Full Database,
Menu
>
Manage Favorites List
>
Select Database to Monitor
>
Only Full Database If you want to scan just one list, Menu > Manage Favorites List > (select list) > Use This List If you want to scan multiple lists, Menu > Manage Favorites List > Select Database to Monitor > Use Multiple Lists Use See also Other Option Menu. |
| Import/Export a List (Sentinel only) will allow you to import or save a Favorites List. |
|
To export a list click the
File
>
Export to hpe file...
Select the list you wish to export
and click OK. Select the systems to export and click OK.
Name the list, navigate to a location, and click Save. To import a list click the File > Import from hpe file... Select the list or create a new list (and name) you wish to import into. Navigate to a location containing a hpe file and click Open. |
| Export List to a kml File (Sentinel only) |
|
You can export selected lists to a kml
file that will allow you to see (programmed) locations (circle only) for departments (not
sites) for your current location in programs like
Google
Earth. The feature will only export enabled Favorites Lists (lists with Monitor set to On). |
|
1.
Click the Edit Profile button
|
| Copy a List will allow you to copy and rename a Favorites List. |
| In Sentinel:
Select the list and click the Copy
Favorites List button
|
| Type a name for the new list and click OK. |
| With the scanner: You will actually have to make the list you want to copy as current, create a new list, and then use Add Current Channels to the new list. |
| Tap
Menu
>
Manage Favorites List
>
(select list to copy)
>
Use This List. Tap Menu > Manage Favorites Lists > Create New List Type a name and tap Accept. Tap Add Current Channels. Tap Use This List if you want to set the new list as current. |
| Rename List |
|
|
In Sentinel:
Select the list and click the Rename Favorites List button
|
|
|
Type in a new name and press OK. |
|
|
With the scanner:
Menu
>
Manage Favorites Lists
|
|
|
Type in a new name and tap Accept. |
|
|
Click Edit > Sort Favorites Lists... |
|
|
Select and click
|
| Delete List Remember all Favorites Lists are common to all profiles. Deleting a Favorites List will delete it from all profiles. |
| In Sentinel:
Select the list and click the
Delete button
|
| Press OK to confirm. |
| With the scanner:
Menu
>
Manage Favorites Lists
|
| Tap
Yes to confirm. You can't delete Favorites Lists that are in use. Select and use a list you are going to keep first. |
![]()
| Write To/Read From HomePatrol |
| To Write to HomePatrol
plug the scanner into your computer and select 'Mass Storage' if
prompted. Click the HomePatrol menu in Sentinel and select Write to HomePatrol. Use the write options to erase your favorites lists or update the database in you scanner if desired. Select your microSD card (if you have more than one) and click OK. To Read from HomePatrol plug the scanner into your computer and select 'Mass Storage' if prompted. Click the HomePatrol menu in Sentinel and select Read from HomePatrol. Select your microSD card (if you have more than one) and click OK. It's also a good idea to backup the HomePatrol folder on the microSD card to your computer in case you have to reformat the card. |
![]()
| Scanning |
| To scan your Favorites List just tap the 'Listen' button. |
| Changing Locations |
|
Menu
>
Set Your Location
>
Review Locations
>
(select location) Tap Use Location. |
| Selecting Favorites Lists to Scan |
|
If you want to scan multiple lists,
Menu
>
Manage Favorites List
>
Select Database to Monitor
>
Use Multiple Lists Use If you want to scan just one list, Menu > Manage Favorites List > (select list) > Use This List If you want to scan just the Full Database, Menu > Manage Favorites List > Select Database to Monitor > Only Full Database |
| Selecting Service Types |
| Menu > Select Service Types |
| Scroll up or down
with
|
| Contents |
| Turning Nationwide Systems On/Off You can select Nationwide system only when monitoring from the Full Database. |
|
Menu
>
Advanced Menu
>
Select Nationwide Systems Use |
| Holding on Systems/Departments/Channels |
| To hold on any system, department or channel simply tap it. Tap it again to release hold mode. |
|
System Side Menu When you tap
on the
|
| Avoid Tap to avoid the system then tap OK or Make Permanent or Make Temporary (depending on the default avoid option) or Cancel. |
| Sites (not with Extreme) |
| Gray sites indicate sites enabled by range. Red
(grapefruit?) sites indicate sites disabled by range. Orange sites are avoided
sites. Use Tap Band Plan to view the Band Plan for Motorola/APCO25 systems. Tap Avoid Site (or Stop Avoiding) to set avoid status. Tap Site Frequencies to view the site frequencies. Use |
| Advanced (Extreme only) |
| Edit Current System (programmed systems only, not database systems) |
| See Programming Systems with the Scanner. |
| Site Information |
| Gray sites indicate sites enabled by range. Red
(grapefruit?) sites indicate sites disabled by range. Orange sites are avoided
sites. Use Tap Band Plan to view the Band Plan for Motorola/APCO25 systems. Tap Avoid Site to set avoid status. Tap Site Frequencies to view the site frequencies. Use |
| Analyze System |
| See Trunked System Analyzer. |
| Discovery Mode |
| See Discovery Mode. |
| Info Explains the type of system you are monitoring and shows the number of departments and channels in the system. |
| Prev Selects the previous system in the list. |
| Next Selects the next system in the list. |
| Contents |
|
Department Side Menu
When you tap on the
|
| Avoid Tap to avoid the department then tap OK or Make Permanent or Make Temporary (depending on the default avoid option) or Cancel. |
| Advanced (Extreme only) |
| Edit Current Department (programmed departments only, not database departments) |
| See Edit Department. |
| Info Shows the number of channels in the department. |
| Prev Selects the previous department the system. |
| Next Selects the next department the system. |
|
Channel Side Menu
When you tap on the
|
| Avoid Tap to avoid the channel then tap OK or Make Permanent or Make Temporary (depending on the default avoid option) or Cancel. |
| Advanced |
| Edit Current Channel (Extreme only; programmed channels only, not database channels) |
| See Edit Department. |
| Add to Favorites List (programmed channels only, not database channels) |
| The first time you use this
option you will see OK
and Cancel. Tap OK to continue. Tap New in the
lower right, give the list a name, and tap Accept. Use
The next time you use this option the scanner will remember the last list you chose and you will see OK, Cancel, and Other List for options. Tap OK to save into the last list saved into or Other List to create another new list. |
| Save Sub Audio (conventional channel) will save the CTCSS or DCS tone/code for the channel. Note: the display will not show the tone/code if it is saved(?). |
| Save Talk Group ID (trunking channel) |
| The first time you use this
option you will see OK
and Cancel. Tap OK to continue. Tap New in the
lower right, give the list a name, and tap Accept. Use
The next time you use this option the scanner will remember the last list you chose and you will see OK, Cancel, and Other List for options. Tap OK to save into the last list saved into or Other List to create another new list. |
| Save Unit ID (trunking channel) will save the unit ID to the system. |
| Tap Edit Name to tag the unit
ID. Tap Edit ID to change the ID. Tap Set Alert to select the Alert Tone (1-9). Press Next to select the Alert Level (1-15). Tap Copy ID (Extreme only) to save the unit ID in the copy buffer and allow you to paste it into another system and rename, set alert, etc. To Paste an ID, (Extreme only) tap Menu > Advanced Menu > Advanced Options > Edit Favorites List > (select list) > (select system) > Edit Unit IDs > Paste ID. |
| Info Shows the channel info. |
| Prev Selects the previous channel the department. |
| Next Selects the next channel the department. |
| Contents |
| Using Global Attenuation Tap Atten in scan mode to toggle the attenuator On (red) or Off (white). |
| Setting the Squelch Tap Squelch then + or - to set the squelch. |
| Changing the Range Tap Range then + or - to set the range. (two bars are recommended). |
| Replaying/Recording Transmissions Note: Replay/recording will not start or will end when the batteries become low or are removed from the scanner. |
| HomePatrol’s Replay feature acts as an instant replay of the transmissions you’ve just heard. It will also replay the display. You can set how long a period Replay will record for instant playback. This period can range from 30 seconds to 4 minutes. While you can replay any recording immediately and continue replaying it, you cannot save it for future listening unless you use the Record button. The recording buffer is cleared when you change lists or power cycle the scanner. |
| To Replay
the Recording Buffer
tap Replay.
You can't replay during current transmissions. Use < or > to replay each transmissions for as long as the replay duration setting. A replay screen will display the system/department/channel of the transmission being replayed. To listen to recordings with the scanner press and hold Replay. Tap Review Recordings. To set the replay options press and hold Replay. Tap Set Replay Duration to set. |
| You can also tap the Record button and begin recording the transmission you’re listening to. The scanner will record until you tap Record again to stop. You can then replay, rename, and/or delete sessions later. The recordings are stored on the microSD card. |
| To Record
tap Record then OK. The scanner will also add the replay
recording buffer to the recording. Tap Record again to stop. You can record up to 1000 sessions but the scanner stops recording when microSD card memory falls below 512MB. To listen to recordings with the scanner press and hold Record. Tap recordings to Play, Rename, or Delete. |
| Muting Audio |
| Tap Mute. To set the mute options press and hold Mute |
| Quick Frequency Entry |
|
Menu
>
Advanced Menu
>
Quick Frequency Entry Type in the Frequency you want to monitor then tap Accept. Select the Step Size and Modulation by tapping the corresponding buttons and tap Atten to toggle the attenuator On (red) or Off (white). Use |
| Tap the icon again then Unlock to unlock. |
![]()
| Using the HomePatrol with a GPS | Contents |
| You can connect
the scanner to a compatible GPS device and set the
scanner to automatically lock and unlock departments and sites based on your current
location. This also frees you from having to manually enable and disable
departments and sites as you change locations when using the Full
Database. You will need a
serial cable with a 4-pin mini RS232C plug to connect to the scanner
and a NMEA compatible
GPS device.
ScannerMaster also offers a Universal GPS kit for many different Uniden scanners. When you plug in the GPS you will be able to select Use GPS or Ignore GPS. |
| In Sentinel:
Click the Edit Profile button
|
| Select the Format and Baud Rate from the drop-down menus. |
| With the scanner: Press and Hold GPS or Menu > Set Your Location > Set Up GPS |
|
Location Format toggle to select
DD.dddd or DMS. GPS Baud Rate toggle to select 4800, 9600, 19200, 38400, 57600, or 115200. The last line will show the GPS status; Orange for connecting, Green for connected, or Red for disconnected. |
|
Notes: |
![]()
| Weather Modes |
| Weather Scan |
| With the Scanner:
Menu
>
Weather Mode
>
Monitor NOAA Weather The scanner should find the strongest weather channel. Use |
| In Sentinel:
Click the Edit Profile button
|
| Click
In the right pane, expand the country, then the state/province. Right-click the county/area and click Append to Counties List or click the green arrow at the top then select the list to append to. Select a list or county/area and use the buttons in the left pane to rename, remove, or set a list as active. |
| With the scanner: Menu > Weather Mode > Weather Alert Standby |
| Press the Location button in the
lower right. Alert on Any Tap to have the scanner receive an alert from any location. Create New List allows you to create separate lists and add counties of your choice to each list. Type a name for each new list then tap Accept. |
|
Tap each list for more options. |
|
Use This List will monitor counties in
the list. |
![]()
| Extreme Features | Contents |
| Programming Systems with the Scanner | Analyze System | Discovery Mode |
|
|
|
|
|
Create a
System To Create a new system tap Menu > Advanced Menu > Advanced Option > Edit Favorites List > (select list or create new list) > Create New System Select the system type, type a name, and tap Accept. Edit a System The easiest way to edit a system (you are monitoring) is to tap the system side menu, tap Next/Previous to select the system, tap the Advanced option then Edit Current System. Otherwise you will have to tap Menu > Advanced Menu > Advanced Option > Edit Favorites List > (select list) > (select system) |
| Edit Name type a name, and tap Accept. |
| Edit System Options (trunking only) |
| ID Search
toggles
ID Search On or Off. Set Emergency Alert (Motorola/EDACS) allows you to select the Alert Tone and Alert Volume options. Set Fleet Map allows you to program a fleet map for Motorola systems. Status Bit Yes enables status bits in Motorola systems. P25 NAC Option allows you to set or search for NAC tones for P25 one-trunk systems. |
| Edit Site (trunking only) |
| To Create a New
Site tap Create New
Site,
give it a name and tap Accept. To Edit a Site use |
| Edit Name
type a name and tap Accept. Site Type allows you to select Wide or Narrow for EDACS systems. |
| Edit
Band Plan allows you to select the band type or program a
custom band plan for Motorola and P25 systems. Use |
| Edit Frequency
allows you to create/edit/delete trunking frequencies used for the site. To Create a New Frequency tap Create New Frequency enter the frequency and tap Accept. For EDACS and LTR systems you will then be prompted for the LCN number. To Edit a Frequency use To Delete a Frequency use |
| Modulation
(Motorola/EDACS/LTR)
toggles the modulation. Attenuator toggles attenuation On or Off for the site. |
| Set Location
allows you to set/change the location and range for a circle location and
create/change/delete up to 32 rectangle locations for the site. Tap Circle or Rectangle to select the type of location. |
| To Edit a
Circle tap the Location.
Tap the format button in the lower right to select the format if
needed. See note below for input formats and tap Next. Type in the Range of the circle then tap Accept. To Create a Rectangle tap Create New Location. To Edit a Rectangle use To define the Left Top point of the rectangle. See note below for input formats and tap Next. To define the Right Lower point of the rectangle. See note below for input formats then tap Accept. To Delete a Location use |
|
Formatting: For decimal degrees input- If you make a mistake use Enter the latitude (you need to add 6 decimal places ex: 39123456 for 39.123456) and tap to toggle N/S (north or south) if need be. Enter the longitude (you need to add leading 0's and 6 decimal places ex: 081123400 for 81 12' 34.00), tap to toggle W/E (west or east) if need be. For degrees, minutes, and seconds input- If you make a mistake use Enter the latitude (you need to add 2 decimal places ex: 40583608 for 40 58' 36.08) and tap to toggle N/S (north or south) if need be. Enter the longitude (you need to add leading 0's and add 2 decimal places ex: 085583608 for 85 58' 36.08), tap to toggle W/E (west or east) if need be. |
| LCN Finder
starts the LCN Finder (EDACS/LTR). Delete Site deletes the site. |
|
Edit Department you do not need to create a department for a trunked
system if ID Search is set to On. A Quick
Save Group (department) will be created if you want to store new IDs found while
scanning. To Create a New Department tap Create New Department, give it a name and tap Accept. To Edit a Department use |
| Edit Name type a name and tap Accept. |
| Edit Name type a name and tap Accept. |
| Edit Frequency
(conventional) type a
frequency and tap Accept. Edit Talkgroup ID (trunking) type a talkgroup ID and tap Accept. Type the LCN for (EDACS or LTR) and tap Accept. Type i0 (the letter i, then zero) for a I-Call wildcard ID. |
| Set Audio Type (conventional/Motorola) allows you to set audio decode for conventional and Motorola channels to analog or digital. Use All if you’re not sure. |
| All
will automatically analyze the
signal to determine the squelch mode and code to display if received. Analog will allow you to set a conventional channel to CTCSS/DCS Search or program a tone or code. Will set a Motorola channel to analog. Digital will allow you to set a digital conventional channel to NAC Search or program a NAC code. Will set a Motorola channel to digital. |
| Modulation (conventional) toggles modulation Auto, AM, FM, or NFM for a channel. |
| Attenuator (conventional) toggles attenuation On or Off for a channel. |
| Delay toggles delay 0, 1, 2, 3, 4, 5, 10, 30, -10, or -5 sec. |
| Set Alert
use
|
| Volume Offset toggles volume offset 0, 1, 2, 3, -3, -2, or -1. |
| Set Service Type
use
|
| Copy Channel copies the channel to the channel buffer. |
| Move Channel moves the channel to the channel buffer. |
| Delete Channel deletes the channel. |
| Set Location
allows you to set/change the location and range for a circle location and
create/change/delete a rectangle location for the department. Tap Circle or Rectangle to select the type of location. |
| To edit a Circle tap the Location.
Tap the format button in the lower right to select the format if
needed. See note below for input formats and tap Next. Type in the Range of the circle then tap Accept. To Create a Rectangle tap Create New Location. To Edit a Rectangle use To define the Left Top point of the rectangle. See note below for input formats and tap Next. To define the Right Lower point of the rectangle. See note below for input formats then tap Accept. To Delete a Location use |
|
Formatting: For decimal degrees input- If you make a mistake use Enter the latitude (you need to add 6 decimal places ex: 39123456 for 39.123456) and tap to toggle N/S (north or south) if need be. Enter the longitude (you need to add leading 0's and 6 decimal places ex: 081123400 for 81 12' 34.00), tap to toggle W/E (west or east) if need be. For degrees, minutes, and seconds input- If you make a mistake use Enter the latitude (you need to add 2 decimal places ex: 40583608 for 40 58' 36.08) and tap to toggle N/S (north or south) if need be. Enter the longitude (you need to add leading 0's and add 2 decimal places ex: 085583608 for 85 58' 36.08), tap to toggle W/E (west or east) if need be. |
| Delete Department deletes the department. |
| Edit
Unit IDs (trunking only) To Create a New Unit ID tap Create New Unit ID, give it a name, type next, type the Unit ID Number and tap Accept. To Paste a Unit ID from the ID buffer tap Paste ID. To Edit a Unit ID use |
| Edit Name type a name and tap Accept. |
| Edit Unit ID allows you to change the unit ID number. Type the new Unit ID Number and tap Accept. |
| Set Alert
use
|
| Copy ID copies the ID to the ID buffer. |
| Delete ID
deletes the ID. |
| Copy
System
copies the system and allows you to rename the new system. Type the new
System Name and tap Accept. |
| Delete System deletes the system. |
![]()
| EDACS/LTR LCN Finder |
| System Load/Reception Status | Activity Log | Band Scope |
| Current Activity | Activity Log Viewer | RF Power Plot |
| LCN Monitor | Talk Group Converter | Raw Data Output |
 |
 |
 |
 |
|
LCN Monitor
will display
a scrolling chart over time indicating which Motorola trunking channels
or EDACS/LTR LCN channels have been active or idle over a 2 minute period.
Tap End to return. |
| Plug the scanner into your computer using
the supplied USB cable and select Mass Storage. Click on the Import Discover Log button Expand each collection and click to select each log. |
 |
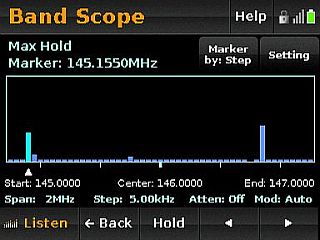 |
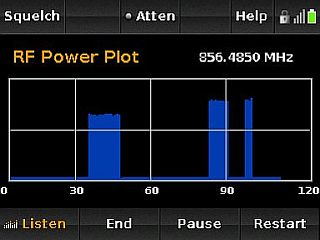 |
| Set Center Frequency sets the frequency in the middle of the band scope. Type the frequency and tap Accept. |
| Set Span
specifies the span of the frequency
range you want to monitor.
Use
|
| Set Step specifies the frequency step you want to use in the span. Tap a Step to select. |
| Attenuator toggle to select On or Off. |
| Modulation toggle to select Auto, AM, FM, or NFM. |
|
Max Hold set to On will freeze the signal strength bars at their strongest signals. Set to Off will reset signal strength bars on every sweep. Toggle to select. |
| Tap Start to start the Band Scope. |
| To hold and
listen to the center frequency tap Hold. Tap Restart
to continue. To move the marker by frequency step (default), use To move the marker by bar tap 'Marker by: Step' to toggle to 'Marker by: Bar'. Use In Search Mode the settings button will allow you to: increase or decrease the span, toggle the step size, toggle Max Hold on or off, toggle attenuation on or off, and adjust the squelch. In Hold Mode the settings button will allow you to: increase or decrease the span, toggle the step size, toggle Modulation, toggle attenuation on or off, and adjust the squelch. Marker as Center resets the span to set the marker as the center frequency. Marker as Peak moves the marker to the strongest signal. Note: The sweep time changes depending on the span and search step size. |
|
Raw Data Output Menu > Advanced Menu > Advanced Option > Analyze System > Raw Data Output Or for Current System, Tap System Side Menu > Advanced > Analyze System > Raw Data Output This feature is used to analyze raw decoded data using 3rd party software. Uniden doesn't support this yet but will provide the output format to 3rd party developers for future applications. |
![]()
| You can create and save 'sessions' with different settings. Every time you start a session you create a 'run' that can later be reviewed in the scanner or the Sentinel software. You can also setup 1 limit search. Note: Discovery Mode will not start or will end when the batteries become low or are removed from the scanner. |
| Trunking Discovery Mode | Conventional Discovery Mode | Review Discovery Mode | Discovery Log Viewer | Limit Search |
| Trunking Discovery Mode allows you to monitor a trunked site, log detailed information, and record the audio for each hit. |
|
In
Sentinel: Click the
Edit Profile button
|
| Click to select Trunk. Click on the append button Click twice (not double-click) in each field to highlight and select the desired options. Upload to the scanner. |
|
With the
Scanner:
Menu
>
Advanced Menu
>
Advanced Option
>
Discovery Mode
>
Trunking Discovery Mode Or for Current System, Tap System Side Menu > Advanced > Discovery Mode > Trunking Discovery Mode |
|
Create
New Session
Create New Settings Tap Select System and type enough relevant characters to be able to select the system from the current Favorites List(s) from a short list, then tap Accept. Tap the System to select it. Use Or for current system, tap Use Current System. Use Edit Session Use |
|
Set Discovery Name type a name and tap Accept. Delay toggles delay 0, 1, 2, 3, 4, or 5 sec. Logging toggle to select All or New to log only new channels. Compare to Database toggle to select On or Off to compare channels with the database. Only new channels will have audio recorded (if enabled). Record Duration toggle to select None, 30, 60, 90, 120, 150, 180, 300, or 600 sec. for maximum recording duration. Time-Out Timer toggle to select Off, 10, 30, or 60 sec. Used to keep a stuck channel from stealing the whole session. System Information displays system info. Delete Session deletes the session. Change System allows you to change the system and site. |
|
Tap Start to begin Discovery Mode To avoid channels tap Hold. Press End to stop. |
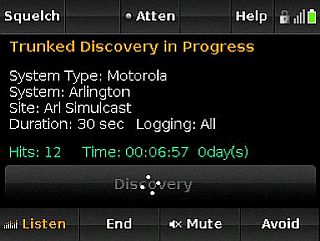 |
|
Tap
Review Run Results to review and listen to
hits. Tap Detail to toggle detail or Summary report. Use
Tap Restart this Run to restart. Tap Resume this Run to resume. Tap Delete this Run to delete. Tap Rename this Run to rename. Tap Run Info and use Tap Back and use Tap Back again to review trunking and conventional results. |
| Conventional Discovery Mode allows you to monitor a range of conventional frequencies, log detailed information, and record the audio for each hit. |
|
In
Sentinel: Click the
Edit Profile button
|
| Click to select Conventional. Click on the append button Click twice (not double-click) in each field to highlight and select the desired options. Upload to the scanner. |
|
With the Scanner:
Menu
>
Advanced Menu
>
Advanced Option
>
Discovery Mode
>
Conventional Discovery Mode Or Tap System Side Menu > Advanced > Discovery Mode > Conventional Discovery Mode |
|
Create
New Session Create New Settings Type a name for the session then tap Accept. Edit Session Use |
|
Set Discovery Name
type a name and tap Accept. Set Limit Frequencies type the Lower Limit then Accept. Type the Upper Limit then Accept. Modulation toggles modulation Auto, AM, FM, or NFM. Step toggles the step size Auto, 5, 6.25, 7.5, 8.33, 10, 12.5, 15, 20, or 25 kHz. Delay toggles delay 0, 1, 2, 3, 4, or 5 sec. Logging toggle to select All or New to log only new channels. Compare to Database toggle to select On or Off to compare channels with the database. Record Duration toggle to select None, 30, 60, 90, 120, 150, 180, 300, or 600 sec. for maximum recording duration. Time-Out Timer toggle to select Off, 10, 30, or 60 sec. Used to keep a stuck channel from stealing the whole session. Delete Session deletes the session. Tap Start to begin Discovery Mode |
| To avoid
channels tap Hold. Press End to stop. |
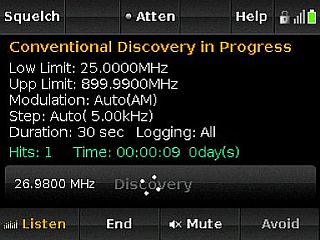 |
|
Tap
Review Run Results to review and listen to
hits. Tap Detail to toggle detail or Summary report. Use
Tap Restart this Run to restart. Tap Resume this Run to resume. Tap Delete this Run to delete. Tap Rename this Run to rename. Tap Run Info and use Tap Back and use Tap Back again to review trunking and conventional results. |
|
Review
Discovery Mode Menu > Advanced Menu > Advanced Option > Discovery Mode > Review Discovery Mode Or Tap System Side Menu > Advanced > Discovery Mode > Review Discovery Mode Tap a run to review the run. |
| Tap
Review Run Results to review and listen to
hits. Tap Detail to toggle detail or Summary report. Use
Tap Delete this Run to delete. Tap Rename this Run to rename. Tap Run Info and use Tap Back and use Tap Back again to review trunking and conventional results. |
|
Discovery Log Viewer
allows you to view Discovery logs in the Sentinel
software. In Sentinel: Tools > Discovery Log Viewer |
| Plug the scanner into your computer using
the supplied USB cable (and select Mass Storage for Extreme users). From the Menu bar select Tools>Discovery Log Viewer... Click on the Import Discover Log button Type a Name for the collection and check Move from HP-1 if you don't want to leave a copy on the microSD card and click OK. Expand the collection in the left pane and click a run to view. The Options button Select a recording and press the play |
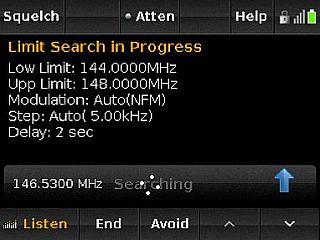 |
|
Limit Search
Allows you to search for active frequencies between a
lower and upper frequency. In Sentinel: Click the Edit Profile button |
| Click to select Limit Search. Select the desired settings. Upload to the scanner. The Avoided Frequencies List will populate with any frequencies you have avoided previously. |
|
Set Limit Frequencies
type the Lower Limit then Accept. Type the Upper Limit
then Accept. Modulation toggles modulation Auto, AM, FM, or NFM. Step toggles the step size Auto, 5, 6.25, 7.5, 8.33, 10, 12.5, 15, 20, or 25 kHz. Delay toggles delay 0, 1, 2, 3, 4, 5, 10, 30, -10, or -5 sec. Review Freq Avoids use |
| Tap Start to begin.
Use Avoid to lockout frequencies. Tap any frequency to hold. Tap use Tap again to release hold mode. |
![]()
| Serial Mode | Contents |
|
The serial mode will be used for audio streaming, raw data output, and serial control modes. Upon release, software to use these functions is not available, however the protocols have been provided to 3rd-party software authors for development. Installing Serial Drivers Before you use the Serial mode, you must install the serial drivers on your PC before you use serial mode for the first time. For Windows XP or Windows Vista, copy the appropriate driver from your HomePatrol’s “USB Driver” directory to a folder on your hard drive (if this directory is not on your HomePatrol-1, you can download the files from http://info.uniden.com/HomePatrol). When you select the serial mode, your computer will ask for the location for the drivers. For Windows XP, select Hp1WinXpCom.inf. For Windows Vista, select Hp1WinVista7Com.inf For Windows 7, copy the Hp1WinVista7Com.inf file to the c:/windows/inf directory. When you select serial mode for the first time, Windows will find and install the driver. When using serial mode, your HomePatrol-1 is assigned a com port number. The assigned com port can differ, depending on which USB port you have connected the USB cable to. |
| Reformatting the MicroSD Card |
SD cards should only be formatted using the special SD Card Formatter. Cards up to 32GB are supported. After formatting, the scanner may not be automatically detected (since it is wiped clean), so you may need to uncheck "Hide empty drives" in (Windows 7) Tools>Folder Options>View before doing the next "Clear User Data" step. Then, you need to "Clear User Data" using Sentinel to restore all HP-1 files and directories to the card. You will also need to "Write to HomePatrol" in the "Scanner" menu to restore your Favorites Lists. |
![]()
| Related Links/Info | Contents |
| How to view these pages in your browsers I have formatted these pages so that you can view them with any monitor, in any browser (Opera, I.E., Foxfire, or Netscape), at any zoom level, and in any screen area size (ex: 1024x768 preferred)-small or large fonts. So if the print is too small, go to the 'view' menu in your browser and adjust it to a bigger level (or smaller if you want to see more on the screen). |
| Determining Type I Motorola fleet maps You can try a method I found at Radio Reference.com. Determining Type I Motorola Fleet Maps. By Dave Goodson. |
| Determining Motorola VHF/UHF Base and Offset Frequencies I have found an explanation at Radio Reference.com that describes how to do this if you don't have the information. The Trunked Radio Systems User’s Page also has an explanation. Look for 'Determining Base and Offset Frequencies for the BC245xlt' by John C. |
| Finding EDACS LCN order EDACS frequencies have to be programmed in LCN (Logical Channel Number) order. I have found a procedure at the Trunked Radio Systems User’s Page which explains how to find the LCN order for an EDACS system if you don't know the order. Look for 'Finding EDACS Logical Channel Numbers' by Todd Hartzel near the bottom of the page. |
| Finding LTR LCN order LTR frequencies have to be programmed into certain channel slots for the system to trunktrack properly. Radio Reference has a good webpage here: Mapping LTR Systems. |
| Decimal/AFS Conversion Chart Here is a Conversion Chart to help convert your IDs. |
| Links |
|
|
|
| eHam.net-reviews |
|
|
| Click here to visit Scanner Master |
![]()
| Common Fleet Maps | Contents |
| These are some common fleet maps to
choose from. In Motorola II systems, all the blocks have
size code S-0. In Type I systems,
size codes are used in different blocks to denote the
maximum number of users in that block. Notice that size
code 12 uses 2 blocks. A Motorola Hybrid system (Type
IIi) has 'blocks' of the system that are Type I
Fleets/Subfleets and Type II talk groups. The maps that are Hybrid systems are in bold. |
| Fleet Map 1 | Fleet Map 2 | Fleet Map 3 | Fleet Map 4 | Fleet Map 5 | Fleet Map 6 | Fleet Map 7 | Fleet Map 8 | ||||||||
| Block | Size Code | Block | Size Code | Block | Size Code | Block | Size Code | Block | Size Code | Block | Size Code | Block | Size Code | Block | Size Code |
| 0 | S-11 | 0 | S-4 | 0 | S-4 | 0 | S-12 | 0 | S-4 | 0 | S-3 | 0 | S-10 | 0 | S-1 |
| 1 | S-11 | 1 | S-4 | 1 | S-4 | 1 | (S-12) | 1 | S-4 | 1 | S-4 | 1 | S-10 | 1 | S-1 |
| 2 | S-11 | 2 | S-4 | 2 | S-4 | 2 | S-4 | 2 | S-12 | 2 | S-4 | 2 | S-11 | 2 | S-2 |
| 3 | S-11 | 3 | S-4 | 3 | S-4 | 3 | S-4 | 3 | (S-12) | 3 | S-4 | 3 | S-4 | 3 | S-2 |
| 4 | S-11 | 4 | S-4 | 4 | S-4 | 4 | S-4 | 4 | S-4 | 4 | S-12 | 4 | S-4 | 4 | S-3 |
| 5 | S-11 | 5 | S-4 | 5 | S-4 | 5 | S-4 | 5 | S-4 | 5 | (S-12) | 5 | S-4 | 5 | S-3 |
| 6 | S-11 | 6 | S-4 | 6 | S-12 | 6 | S-4 | 6 | S-4 | 6 | S-12 | 6 | S-4 | 6 | S-4 |
| 7 | S-11 | 7 | S-4 | 7 | (S-12) | 7 | S-4 | 7 | S-4 | 7 | (S-12) | 7 | S-4 | 7 | S-4 |
| Fleet Map 9 | Fleet Map 10 | Fleet Map 11 | Fleet Map 12 | Fleet Map 13 | Fleet Map 14 | Fleet Map 15 | Fleet Map 16 | ||||||||
| Block | Size Code | Block | Size Code | Block | Size Code | Block | Size Code | Block | Size Code | Block | Size Code | Block | Size Code | Block | Size Code |
| 0 | S-4 | 0 | S-0 | 0 | S-4 | 0 | S-0 | 0 | S-3 | 0 | S-4 | 0 | S-4 | 0 | S-3 |
| 1 | S-4 | 1 | S-0 | 1 | S-0 | 1 | S-0 | 1 | S-3 | 1 | S-3 | 1 | S-4 | 1 | S-10 |
| 2 | S-0 | 2 | S-0 | 2 | S-0 | 2 | S-0 | 2 | S-11 | 2 | S-10 | 2 | S-4 | 2 | S-10 |
| 3 | S-0 | 3 | S-0 | 3 | S-0 | 3 | S-0 | 3 | S-4 | 3 | S-4 | 3 | S-11 | 3 | S-11 |
| 4 | S-0 | 4 | S-0 | 4 | S-0 | 4 | S-0 | 4 | S-4 | 4 | S-4 | 4 | S-11 | 4 | S-0 |
| 5 | S-0 | 5 | S-0 | 5 | S-0 | 5 | S-0 | 5 | S-0 | 5 | S-4 | 5 | S-0 | 5 | S-0 |
| 6 | S-0 | 6 | S-4 | 6 | S-0 | 6 | S-0 | 6 | S-0 | 6 | S-12 | 6 | S-12 | 6 | S-12 |
| 7 | S-0 | 7 | S-4 | 7 | S-0 | 7 | S-4 | 7 | S-0 | 7 | (S-12) | 7 | (S-12) | 7 | (S-12) |
You can tell which block a Motorola ID is
in by its number.
|
|
Thanks to Radio Reference.com for most of this information. |
![]()
| Motorola Type II Special Status Bits | Contents |
| Motorola Type II Smartnet systems use these status bits for
special transmissions such as emergency, patches, DES/DVP
scrambled transmissions, and multiselects. Motorola
trunking radios directly interpret them for their special
functions, thus no difference is noticed by the person
with the radio. The scanner however interprets these
special talk group status bits as different talk groups
entirely. Below is the conversion chart for these special
status bits. |
| TT ID + # Usage | TT ID + # Usage |
| ID+0 Normal Talk group | ID+8 DES/DVP Encryption talk group |
| ID+1 All Talk group | ID+9 DES All Talk group |
| ID+2 Emergency | ID+10 DES Emergency |
| ID+3 Talk group patch to another | ID+11 DES Talk group patch |
| ID+4 Emergency Patch | ID+12 DES Emergency Patch |
| ID+5 Emergency multi-group | ID+13 DES Emergency multi-group |
| ID+6 ? | ID+14 ? |
| ID+7
Multi-select (initiated by dispatcher) |
ID+15 Multi-select DES TG |
| Therefore, if a user was transmitting a multi-select call on talk group 1808, the scanner would actually receive those transmissions on 1815. Some common uses of these status bits are as follows: |
| - | When a user hits their emergency button, all conversations on the talk group revert to the emergency status talk group (ID+2) until the dispatch clears the emergency status. Therefore, if someone hit their emergency button and their radio was on talk group 16, all communications would switch to talk group 18. |
| - | A lot of
Fire and EMS departments dispatch tone-outs and alarms as
Multi-select communications (ID+7). Therefore, if your
fire department dispatch talk group is 1616, and they do
dispatch tone-outs and alarms as Multi-selects, then
those communications will be on talk group 1623. |
| Thanks to the Radio Reference.com for this information. |
![]()
| Last updated August 16, 2024 |