
 |
| Easier to Read Pro-92/A/B/2067 Scanner Manual |
| How do you know if you have a Pro 92, Pro92A, or Pro 92B? |
| Last Updated July 15, 2024 |
![]()
| Contents |
| Introduction | Programming Trunked Systems |
| Main Features | Programming a Fleet Map |
| Scanning Terminology | Common Fleet Maps |
| Understanding Trunking | Programming Offset and Base Frequency |
| Understanding Banks | Programming Talk Group IDs |
| Understanding IDs | Clearing IDs |
| Receive Modes | Scanning Conventional Banks |
| Understanding CTCSS/DCS | Priority Scanning |
| Open and Closed Modes | Scanning and Trunking Banks |
| Keypad and Knob Controls | Changing Open and Closed Modes |
| Setting the Squelch | Locking/Unlocking IDs |
| A Look at the Display | Special Features |
| In Scan Mode | Text Tagging |
| In Receive Mode | Scan/Search/Trunk Delay |
| In Search Mode | Locking Out Channels |
| Using Search Bands | Changing Receive Modes |
| Changing Search Bands | Attenuator |
| Search Band Charts | Turning the Keytone Off and On |
| Re-Programming Search Bands | Backlight |
| Changing Frequency Step | Changing the Display Contrast |
| Search Skip Memory | Keylock |
| Tune Search | Cloning/Uploading/Downloading |
| Programming Conventional Frequencies | Listening to the Weather Band |
| Deleting Frequencies | Receiving SAME Weather Alerts |
| Programming Tone Codes | Scanner Reset |
| Related Links/Info |
![]()
| Introduction | Contents |
| These are another batch of Radio Shack radios that have many fine features for scanning and trunking. However, anyone who has tried to read the manuals that come with the radios know it can be a little hard (if you're lucky) to find, read, and figure out some of the steps, especially in the searching and trunking sections. IMHO it's a mess. |
| I can’t remember everything and find myself referring back to the manual for explanations of procedures and find it frustrating trying to figure out the wording every time. I decided to write and print this for myself to make it easier to use the radio and am happy to share it with you. This should also make it easier for most people to use some of the more advanced features of the radio (and get their money’s worth if you paid full-price for the radio new) as I will try to explain procedures a little more clearly and in a more logical order. Granted, these radios aren't simple so you will have to spend some time on them but this manual will at least make it easier. If you follow the red highlighted text in the programming sections, you should find what you need to know. If you want to find out what's really going on with the radio, read everything else. |
| There are 3 firmware versions of the Pro-92. The first, 1.00, introduced in 1999 as the Pro-92, has sub-audible tone Motorola trunking that had the tendency to loose active transmissions. The second version, 3.25, introduced in mid 2000 as the 92A, fixed that with control-channel trunking. And the third, 3.28, introduced in late 2000 as the 92B, is essentially the same as the 92A with minor SAME weather alert improvements. The 2067 has the 3.25 version of the firmware. You can tell which firmware version you have by turning on the radio and pressing 3 while the 'welcome' screen is displayed. I own a 92B and will assume (from what I've read elsewhere) that all this stuff works for the 92, 92A, and 2067. Featurewise, they are all supposed to be the same radio. |
| I will assume you know how to obtain the basic information from the original manual such as following safety procedures, putting the batteries in, connecting the antenna, finding specs, etc. and concentrate on the main functions of the scanner. |
| Some of the better features of these radios are the ability to decode CTCSS and DCS tones and trunk LTR systems. The best one, in my opinion, is the ability to configure everything in the freeware, on the computer, and then just shoot it to the radio (with a one-way cable) or back to the computer (with a two-way cable). Much easier to work with the keyboard and see the monitor. If you like to search, the radio comes with 10 (2067) 60 (92A/B) pre-programmed searches that are changeable and, with the freeware, you can program and store up to 100. While you can change the step sizes of (just) the search bands. With the freeware you can adjust the scan delay of a channel or delay in search bands to just about anything you would ever need (.4-25 secs). Text tagging is great but a lot of finger work if you don't have the freeware. The per channel attenuation is also a good feature. Another cool trick is that you can re-program the weather channels (with the freeware) and use them as a mini-bank of 10 channels. Although it doesn't mention it in the manual, the handhelds do have a battery saver feature after 5 seconds if there is no activity in the radio and the priority function is off. |
| Now, on the flip
side, there are some pretty annoying things about these
radios too. The RS manual says you cannot lock out IDs in
open mode but I have found a way, here. Any IDs that are locked out (in
the ID list) will still be heard in open mode. They
really won't be locked out until you close the bank. But
when you close the bank, the scanner only receives IDs
that are programmed into the ID list (and not
locked out). They will not tune to any of the splinter
frequencies in the VHF range (except the 108-137 air
band) like 151.0125 (it accepts it as 151.01). No
auto-resume when you turn the radio on; you have to wait
for the 'welcome' screen to disappear before you hit the
scan button to start scanning. You have to put the
scanners in manual mode before you change
between open and closed modes. You have to press FUNC
then TUNE to pause a search; MANUAL just puts it in
manual mode at the last channel scanned. Not real safe
for driving down the road with your 2067 mobile
installed. Why this scanner needs 6 batteries when all
the others only need 4 is a mystery to me. Scans a little
slow for the 21st century too although it trunks just as
fast as my 95 (with no conventional channels programmed).
Unless you text tag the IDs with the AFS format
ID, you can only view them in decimal format (with the
freeware you can at least program them in decimal
format). The backlight could also be about 10 times
brighter. The radios are '2 steps forward and 3 steps
back'. An overview of the features can also be viewed at my Trunking Radio Comparison Chart page. |
| These radios also have freeware that will enhance and/or enable other features not possible with just the keypad and have been noted inside this manual. You can re-tag the 'welcome' screen with 4 lines of your own text, adjust the scan and trunk rescan delay, adjust the length of time the backlight will stay on (or keep it on), change the keypad tone, view your EDACS IDs in AFS format (only in the program), re-program the weather bank, program (or re-program) up to 100 search bands, and most importantly, back-up and save all your frequencies as a file. My opinion is get the Win92 freeware if you have a lot of frequencies. With all the features and setting in these new fangled devices it will save you hours of programming and frustration. It should also be easier to figure out the freeware than the keypad sequences. Alpha tagging is great but much easier with the freeware. Because of the limited amount of keys on the radios, programming a 3 letter word takes about 20 keystrokes on my Pro-92, if you can remember the sequence and don't make a mistake, after you program the bank name. See what I mean? Get the freeware. You just have to dish out 20 bucks or so for a cable and there are plenty of newsgroups on the Net about these radios to help you hook up to the computer and work the software. You can find it here: Win92. |
| All in all, they
will compliment your scanner collection (provided you
have one). You will also need a better antenna as the stock antennas aren't fabulous. Scanner Master has a large selection of quality antennas. |
| I hereby absolve myself from anything that happens to anyone or the scanner as a result of the information you will be reading. You are welcome to copy and/or print these pages and use them in the scanning hobby as long as you don't change, redistribute, or charge/accept money for them. |
| Check back often as this document will be updated and revised from time to time. I have tried the best I can to make sure everything is accurate here but if I missed a step or you see something that's obviously wrong, please email me. |
![]()
| Main Features | Contents |
| Multi-System Trunking - you can track Motorola, EDACS (GE/Ericsson), and E.F. Johnson LTR trunking systems letting you hear more calls than many standard trunking scanners. |
| CTCSS and DCS Tone Decode - decodes and displays Continuous Tone Code Squelch System tones being transmitted and plays Digital Coded Squelch being received. |
| 10 Channel Storage Banks - you can store up to 500 channels in 10 banks of 50 channels each. |
| Simultaneous Trunk and Scan - scans conventional and trunked frequencies together at the same time. |
| 12 Character, 4-line, Dot Matrix Text Display - lets you input a text label for each channel, bank, search bank, talkgroup ID, (or weather channel with freeware) so you can easily identify the transmission. |
| 10 Search Banks with 10-(2067/92A?) 60-(92/92B) pre-programmed Search Ranges - lets you search for transmissions within preset frequency ranges or within ranges you set, to reduce search time and select interesting frequencies more quickly. You can also program 90 (2067/92A?) 40 (92/92B) more (with optional freeware) for a total of 100 to select from (10 at a time). |
| Adjustable Step Sizes in Search Mode- lets you change the step size of the search ranges. |
| 500 Search Lockouts- 50 per band for each of the 10 search bands. |
| Attenuation - lets you program attenuation (per channel or search band) to reduce the scanner's sensitivity to strong local signals, to reduce interference or noise caused by these signals. |
| Data Cloning - lets you transfer the programmed data to another PRO-92 or PRO-2067 scanner. You can also upload or download the programmed data to or from a PC using an optional PC cable and freeware. |
| Mini Scan Bank - with optional freeware and cable, you can program and use the 10 weather channels just like a (conventional) scan bank setting the delay, receive mode (AM/FM only), text tag, and attenuation. |
| HyperSearch and HyperScan - searches at up to 50 steps per second and scans up to 25 channels per second. |
| 10 ID-Storage Banks - lets you store and/or lock out (locked out scanning in closed mode only)100 IDs in each bank for a total of 1000 ID's. |
| 500 Channel Lockouts - lets you lockout up to 50 channels in each bank. |
| Weather Alert - can be set to automatically sound the alarm tone to advise of hazardous weather conditions when it detects the alert signal on the local National Oceanic and Atmospheric Administration (NOAA) weather channel during priority operation. Displays the weather event text with four alert levels so you can see and hear the reason for the alert. |
| Display Backlight - allows you to view display in dimly lit areas, adjustable display time with freeware. |
| Triple-Conversion Circuitry - virtually eliminates (depending on your location) any interference from IF (intermediate frequency) images, so you hear only the selected frequency. |
| Three Power Options (92/A/B) - lets you power the scanner using internal batteries; alkaline, Ni-Cad, or Ni-MH; external AC power using an optional 9 volt 300-mA AC adapter/charger (and RS ‘type B’ adaptaplug); or DC power using an optional 9 volt DC cigarette-lighter power cable. |
| Scan/Search/Trunk Delay - 2 second (adjustable with optional freeware and cable) scan and search delay before moving to another channel, frequency, or trunking system so you can hear more replies that are made on the same transmission. |
| 1 Priority Channel - lets you program one conventional channel and then have the scanner check that channel every 2 seconds while it scans the bank, so you don't miss transmissions on those channels. |
| Manual Access - lets you directly access any channel or frequency. |
| Key Lock - lets you lock the scanner's keys to help prevent accidental changes to the scanner's programming. |
| Battery Low Alert (92/A/B) - warns you when battery power gets low by beeping about every 10 seconds. |
| Key Confirmation Tones - the scanner sounds a tone when you press a key, perform an operation correctly, and an error tone if you make an error. Can be turned off. Tone can be changed with freeware. |
| Memory Backup - keeps the frequencies stored in memory for an extended time if the radio loses power. |
Your scanner can receive these bands:
| Frequency Range | Step Size (kHz) | Mode | Band | Frequency Range | Step Size (kHz) | Mode | Band |
| 29-50 | 5 | VHF Lo Band | 406-420 | 12.5 | Federal Government | ||
| 50-54 | 5 | 6-Meter Ham Band | 420-450 | 12.5 | 70-cm Ham Band | ||
| 108-137 | 12.5 | Aircraft Band | 450-470 | 12.5 | UHF Standard Band | ||
| 137-144 | 5 | Military Land Mobile | 470-512 | 12.5 | UHF "T" Band | ||
| 144-148 | 5 | 2-Meter Ham Band | 806-824 | 12.5 | Public Service "800" Band | ||
| 148-174 | 5 | VHF Hi Band | 849-869 | 12.5 | Public Service "800" Band | ||
| 380-406 | 12.5 | Military Aircraft | 894-960 | 12.5 | UHF Hi, 33-cm Ham Band |
![]()
| Scanning Terminology | Contents |
|
| Scanning- the process of stepping through conventional channels in scan banks. |
| Trunktracking (open mode)- the process of searching for all active talkgroup IDs in trunked systems, in scan banks. |
| Trunkscanning (closed mode)- the process of stepping through programmed talkgroup IDs in ID lists, in trunked systems, in scan banks. |
| Open and Closed Modes- You search all IDs in Open mode or just programmed IDs in Closed mode. |
| Searching- the process of searching for active frequencies in pre-programmed service searches, programmed frequency bands, or the limit search. |
| Manual Mode- used for browsing and monitoring a channels. |
| Program Mode- used for storing frequencies, limit searches, priority channels, trunking frequencies/systems/fleet maps, and talkgroup ID lists. |
| Trunk Mode- used for trunking and programming trunking frequencies and functions. |
| Clone Mode- used for cloning scanners and uploading/downloading to/from scanners using a computer. |
| At certain times, the radio can be in more than one mode at a time such as program and trunk mode to program trunked functions. |
![]()
| Understanding Trunking | Contents |
|
Trunking systems let a large group of 2-way radio users (or even
different groups of 2-way radio users) efficiently use a set of
frequencies. Instead of selecting a specific frequency for a transmission,
the user’s radio selects a programmed trunking bank in the system when
that user presses their PTT (push to talk) button. The trunking system
automatically transmits the call on the first available frequency, and
also sends (on a different frequency called a Data or Control channel) a
code that uniquely identifies that transmission as a talkgroup ID (or just
ID.) So when you are trunktracking a system, you are listening to active
IDs transmitting in the system (each using the first available frequency
in the system.) Trunking systems in general allocate and use fewer
frequencies among many different users. Since the trunking system might send a call and its response on different frequencies, it is difficult to listen to trunked communications using a conventional scanner. These scanners let you monitor the control channel frequency so you can hear calls and responses for users and more easily "follow" conversations than with a conventional scanner. These scanners trunktrack the following types of systems: |
|
|
| When you
program Motorola and EDACS system frequencies into the scanner, one
frequency is the control (or data) channel, and the rest are voice
frequencies shared by all the users. There may be 3 or 4 frequencies
assigned as (primary or alternate) control channels but only one control
channel will be active at a time. EDACS systems need all the frequencies for the
system programmed and in the correct LCN (Logical Channel Number)
order. The control channel is continually transmitted to the field units and has a sound similar to listening to a boat engine over the phone (in manual mode; you won't hear this when you are trunking the system.) This control channel is also a good check to see if you can trunktrack the system. If you can't hear a control channel when you step through the trunking frequencies (in manual mode), you either don't have all the frequencies or are too far away to receive the control channel and the system. Motorola systems are limited to a maximum of 28 frequencies per system or site. Ericsson EDACS systems are limited to 25 frequencies per system or site. Motorola and EDACS systems can be either analog, digital, or mixed (digital and analog talkgroups). These scanners can't monitor digital systems. LTR systems work a little differently. LTR systems typically do not have a dedicated control channel. This type of system encodes all trunking information as digital subaudible data that accompanies each transmission. Each repeater has its own controller, and all of these controllers are synchronized together. Even though each controller monitors its own channel, one of the channel controllers is assigned to be a master that all controllers report to. Each of these controllers sends out a data burst approximately every 10 seconds so that the subscriber units know that the system is there. This data burst is not sent at the same time by all the channels, but happens randomly throughout all the system channels. If you listen to the frequencies of an LTR system in manual mode (not trunking), on every channel in the system you will hear this data burst that will sound like a short blip of static like someone keyed up and unkeyed a radio within about 500 msec. LTR systems are limited to 20 frequencies per system. Trunkscanning is basically scanning IDs that are programmed into ID locations (same concept as frequencies into channels.) You can then trunkscan just the programmed IDs. Trunktracking is searching for all IDs in a system (same concept as searching for frequencies in a band). |
| Radio Reference.com has an excellent page explaining the various types of trunking systems in more detail here. |
![]()
| Understanding Banks | Contents |
| Channel Storage Banks |
| The radios have 10 banks of 50 channels. Channel numbering starts with 000 and goes to 049 in the first bank. Banks number 0-9 (949 is the last channel in the last bank). You can also program your trunking frequencies and conventional frequencies into the same bank as well to utilize channel space better. |
| Use each channel-storage bank to group frequencies, such as those for police, fire, ambulance, aircraft, and/or trunking systems. For example, your police department might use 20 frequencies while the fire department uses 15 and a trunked EMS systems uses 5 trunked frequencies. You could program the EMS frequencies starting with channel 000, (the first channel in bank 0), the police frequencies starting with channel 005, and the fire department frequencies starting with channel 025. Or, the channels could be programmed in any order. (EDACS systems have to start at channels 001, 101, 201, etc. and follow a LCN order). |
| For each trunking
bank, you can put in one EDACS system (with conventional
frequencies), or one Motorola system and/or an
LTR system (with conventional frequencies). However, if
you store a Motorola system and an LTR system in one
bank, the bank mode has to be set to MO
(Motorola). If it is set to LT (LTR), the Motorola
control channel will break the squelch and hang the
scanner on that channel. Also, (1) if you
scan this bank in open mode, you will hear all MO and LTR
IDs. |
| Tip: Theoretically, you could also program more than one trunking system into a bank as long as you could only monitor one at a time, in different locations, far enough apart, so the system you are monitoring wouldn't interfere with the other system (which would confuse the radio). But remember, the scanner can only decode one type of ID (MO, ED, LT) per bank. And, more than one LTR system could be put into a bank because there are no control channels. The only disadvantage there would be if both systems used the same ID, you couldn't tell which system you are hearing. |
| Search Bands |
| This scanner is able to search up to 10 search bands at a time. You can also replace a band with one of the 60 pre-programmed service bands. You can increase the number of pre-programmed frequency ranges your scanner can receive (up to 100) using the Win92 freeware and an optional PC cable. See Cloning/Uploading/Downloading. |
![]()
| Understanding IDs | Contents |
| Motorola IDs come in two formats: Type I and Type II. Each format displays and uses Talk Group IDs in slightly different ways. Type I/II hybrid systems use both Type I and Type II formats for Talk Group IDs. |
|
| EDACS IDs come in two formats: AFS (Agency-Fleet-Subfleet) and Decimal. (These radios only display Decimal). |
|
| LTR IDS are in the format A-HH-UUU where A is the area code (0 or 1), HH is the home repeater (01-20), and UUU is the user ID (000-254). |
![]()
| Receive Modes |
| Each channel can have its own receive mode: AM, FM, (FM) PL (private line), (FM) DL (digital private line), (FM) ED (EDACS), (FM) MO (Motorola), or (FM) LT (LTR). |
| If the receive mode of the channel is set to PL, PL codes appear in the format xxx.x, where xxx.x is a frequency in Hz. |
| If the receive mode of the channel is set to DL, DPL codes appear in the format Dxxx, where xxx is an octal code. |
| AM - Receives AM transmissions. | MO - Receives Motorola IDs. |
| FM - Receives FM transmissions. | ED - Receives EDACS IDs. |
| PL - Receives CTCSS tones. | LT - Receives LTR IDs. |
| DL - Receives DPL (digital private line) tones. |
![]()
| Understanding CTCSS/DCS | Contents |
| Continuous Tone
Coded Squelch System (CTCSS) and Digital Coded Squelch
(DCS) are two methods used to prevent interference by
other radio communications. Your scanner can receive
transmissions that use these codes (or more commonly
referred to as tones). PL and DPL systems all use some form of coded squelch. Coded squelch techniques involve the transmission of a special 'code' signal along with the audio of a radio transmission. A receiver with coded squelch only activates when the received signal has the correct 'code'. This lets many users share a single frequency, and decreases interference caused by distant transmitters on the same channel. In all major metropolitan areas of the United States, every available radio channel is assigned to more than one user. Public safety radio systems on the same frequency are usually set up at a distance of 40 miles apart, or more. This means that you may hear transmissions from a distant system when your local system is not transmitting. By programming the PL tone for a local channel, and operating the bank in closed mode, the scanner will not stop on transmissions from the distant system. With few exceptions, such as the VHF Aircraft and Marine bands, almost every other VHF or UHF radio system uses some form of coded squelch. By far, PL is the most popular mode among non-trunked systems. For more information visit Radio Reference's respective pages on CTCSS and DCS. |
![]()
| Open and Closed Modes |
| Each channel bank can be set to open or closed mode. |
| In
open mode the scanner will receive: (1) all channels in AM and FM modes, that are not locked out. (2) all channels (and tones) in PL or DL modes, that are not locked out. (3) all IDs in MO, ED, and LTR modes, even if they are locked out in the ID list. |
| In
closed mode the scanner will receive: (1) all channels in AM and FM modes, that are not locked out. (2) only channels in PL and DL modes that are programmed with a tone, that are not locked out. (3) only IDs in MO, ED, and LTR modes that are programmed into the ID list, and not locked out in the ID list. |
| In other words, |
| If you
want to hear all PL and DPL transmissions, set
the mode of the channel to PL or DL, and scan in open
mode. If you only want to hear transmissions
coded with a specific PL or DPL tone, set the
mode of the channel to PL or DL, program the tone for the
channel, then scan in closed mode. If you want to hear all IDs, scan in open mode. If you want to hear specific IDs, program them into the scan lists and scan in closed mode. If you want to hear specific IDs and not hear other IDs, program them into the scan lists, lock out the ones you don't want to hear, then scan in closed mode. |
![]()
| Keypad and Knob Controls | Contents |
| Your scanner's keys might seem confusing at first, but this information should help you understand each key's function. |
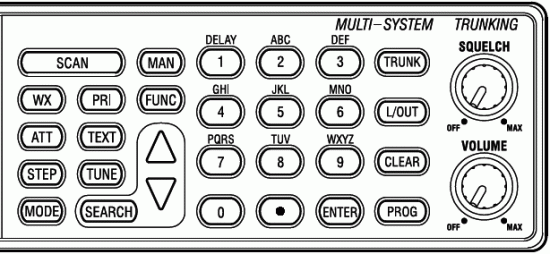 |
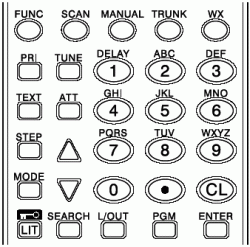 |
| Key | Function(s) |
| FUNC (Function) | Lets you use various functions by pressing this key in combination with other keys. |
| SCAN | Scans the stored channels in scanning mode and resumes scanning. |
| MANUAL | Stops scanning; lets you directly enter a channel number or frequency; steps to next channel in manual mode. |
| TRUNK | Automatically stores a trunking ID or tone code and holds the trunking ID while scanning. Puts scanner in trunk mode. |
| WX (Weather) | Scans the weather channels. |
| PRI (Priority) | Turns the priority function on or off. |
| TUNE | Allows you to tune to a frequency along with ▼ or ▲. |
| DELAY (1) | Programs a 2-second delay for the selected channel/search bank. |
| TEXT | Lets you input text. |
| ATT (Attenuate) | Turns the attenuation on or off. |
| STEP | Changes the frequency step during search. |
| ▼ or ▲ | Selects the scan (up only) or search direction; steps up or down through options during programming. |
| MODE | Changes the receive mode (AM, FM, PL, DL, MOT, ED, or LT). |
|
|
Locks the keypad to prevent accidental program changes; turns on/off the display backlight. |
| SEARCH | Starts searching the search banks |
| L/OUT | Locks/unlocks selected channels, frequencies, and IDs. |
| PGM (Program) | Puts scanner in program mode; steps to next channel in program mode. |
| ENTER | Completes the entry of channels, frequencies, block sizes, IDs, and text. |
| CL (Clear | Clears an entry. |
| . (decimal) | Enters a decimal point in programming, space in text tagging, or hyphen in ID programming. |
| Number Keys | Enter a channel or a frequency; select which banks to scan in scanning mode; select which banks to search in search mode; enter numbers or characters for programming text. |
![]()
| Turning On The Scanner And Setting the Squelch | Contents |
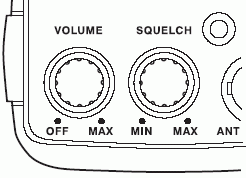 |
|
![]()
| A Look at the Display | Contents |
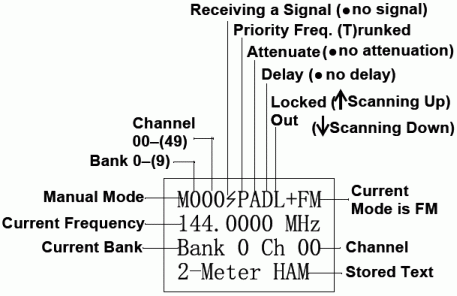
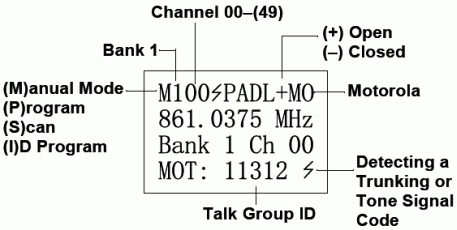
| The display has indicators that show the scanner's current operating status. The display information helps you understand how your scanner operates. |
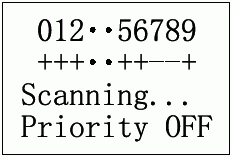
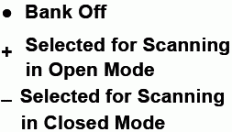 |
| In Scan Mode |
|
|
| In Receive Mode |
 |
|
| If the receive mode of the channel is AM or FM, the bank name appears (if programmed). |
| If the
receive mode of the channel is PL or DL, in scan mode P/L or
DPL: none appears or the tone
if one is received. In manual
mode, P/L or DPL: none
appears until a tone is received. The tone will stay in
the display until a different tone is received. In
program mode, P/L or DPL: none
or the stored tone appears. A
|
| If the
receive mode of the channel is MO, in scan mode the ID
# (or tag if programmed)
appears. In manual mode, MOT: none appears
until an ID is received. The ID # (or name
if programmed) will stay in the display until a different
ID is received. If it is the control channel, MOT:
CNTRL, (or ID # if receiving)
appears. In program mode, MOT: none appears.
A
|
| If the
receive mode of the channel is ED, in scan mode the ID
# (or tag if programmed)
appears. In manual mode, ED: none
appears. If it is the control channel, ED: CTL-xx
(LCN of the control channel), will appear until there is
activity, then xx-xxxx appears as LCN (Logical
Channel Number)-AFS ID and will 'flicker' if
multiple IDs are received. In program mode, ED: none
appears. A
|
| If the
receive mode of the channel is LT, in scan mode the ID
# (or tag if programmed)
appears. In manual mode, LT:
none appears until an ID is received. The ID
# (or tag if programmed) will
stay in the display until a different ID is received.
In program mode, LT: none appears.
A
|
| Low battery! blinks when the scanner's battery is low. |
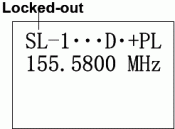
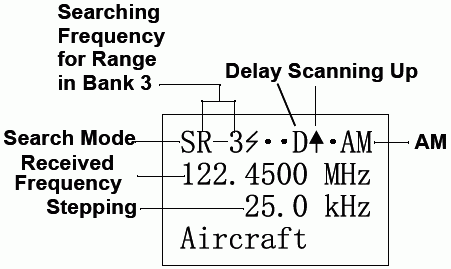
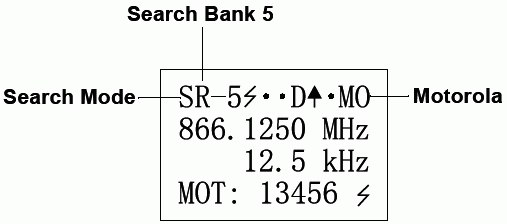
| In Search Mode | Contents |
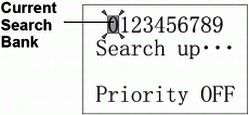 
  |
|
| If the
receive mode of the band is PL or DL, P/L or
DPL: none appears or the tone
if one is received. A
|
| If the
receive mode of the band is MO, an ID #
may appear. If it is a control channel, MOT:
CNTRL, (or an ID # if
receiving) appears. A
|
| If the
receive mode of the band is ED, an ID #
may appear. If it is a control channel, ED:
CTL-xx (LCN of the control channel), will appear
until there is activity, then xx-xxxx
appears as LCN (Logical Channel Number)-AFS ID and will 'flicker' if
multiple IDs are received. A
|
| If the
receive mode of the band is LT, an ID #
appears. A
|
| Low battery! blinks when the scanner's battery is low. |
| Receiving In a Tune Search | Contents |
| 1st Line |
| TUNE appears in the top left. |
| A
|
| P will appear if the priority feature is on. |
| A will appear if the search is attenuated. |
| MO, ED, LT, PL, DL, FM, or AM will appear in the top right to show the receive mode of the search. |
| 2nd Line |
| 0000.0000 shows the frequency in MHz. |
| 4th Line |
| If the
receive mode of the frequency is PL or DL, P/L or
DPL: none appears or the tone
if one is received. A
|
| If the
receive mode of the frequency is MO, an ID #
may appear. If it is a control channel, MOT:
CNTRL, (or an ID # if
receiving) appears. A
|
| If the
receive mode of the frequency is ED, an ID #
may appear. If it is a control channel, ED:
CTL-xx (LCN of the control channel), will appear
until there is activity, then xx-xxxx
appears as LCN (Logical Channel Number)-AFS ID and will 'flicker' if
multiple IDs are received. A
|
| If the
receive mode of the frequency is LT, an ID #
may appear. A
|
| Low battery! blinks when the scanner's battery is low. |
![]()
| Using Search Bands | Contents |
| The search bank is divided into 10 search bands. You can select from 10 (2067/92A?) 60 (92/92B) pre-programmed search bands in the scanner. With the Win92 freeware, you can program an additional 90 (2067/92A?) 40 (92/92B) search bands for a total of 100, re-program them, or sort them any way you like. You can also change the search band’s search ranges manually. It is also possible to change the step size, receive mode, delay, attenuation, and text tag the search bands. |
| Or, you can search up or down from a specific frequency using a Tune search. See Tune Search. |
| To start searching, press SEARCH. You will see the numbered search bands with the cursor over the active band. |
 |
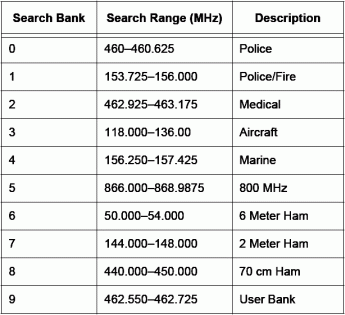
| The scanner contains these pre-programmed search ranges, stored in search bands (0–9). |
 |
|
| To turn the delay on or off for a band, quickly press FUNC then DELAY while a frequency is displayed. See Scan/Search/Trunk Delay. |
| Tip: It's a good idea to have the delay turned on for searching so you will be able to get to the radio in time to save freqs, change receive mode, step size, etc. See Scan/Search/Trunk Delay. |
| To change the step size for the band, quickly press STEP while a frequency is displayed. See Changing Step Size. |
| To attenuate a band, quickly press ATT while a frequency is displayed. See Using the Attenuator. |
| To change the receive mode for the band, quickly press MODE to select a different mode while a frequency is displayed. See Changing Receive Modes. |
| To exit searching, press MANUAL. |
| Changing Search Bands |
| You can replace a search band with one of the pre-programmed ranges below. |
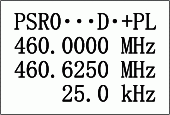
| 1. In manual mode, press FUNC then SEARCH to enter search program mode. PSR and the search band number of the current range appear in the display. |
| 2. Press ▼ or ▲ to select the search band you want to change. |
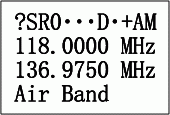
| 3. Press FUNC then 5. ?SR and a numbered search band appear in the display. |
| 4. Press ▼ or ▲ to select the pre-programmed search range then press ENTER. |
| Press MANUAL to exit programming or SEARCH to resume searching. |
 |
![]()
| Search Band Charts | Contents |
| The following list shows the 60 pre-programmed search bands. |
|
|
|
![]()
| Re-Programming Search Bands | Contents |
| 1. In manual mode, press FUNC then SEARCH to enter search program mode. PSR and the search band number of the current range appear in the display. |
| 2. Press ▼ or ▲ to select the search range you want to re-program. |
| 3. Enter the lowest frequency of the search range then press ENTER to store it. |
| 4. Enter the highest frequency of the search range then press ENTER to store it. |
Valid frequency steps
|
| Note: The scanner automatically rounds (down) the entered number to the nearest valid frequency. For example, if you enter 151.4375 (MHz), your scanner accepts it as 151.435. |
| Note: If you enter a higher frequency first then enter a lower frequency, the scanner automatically exchanges the frequencies on the display. It displays the lower frequency first and the higher frequency second. |
| Note: You cannot span across valid frequency bands (ex: 150-860). When manually setting search ranges, if you enter frequencies on different bands, the scanner does not accept the entry. |
| To turn the delay on or off for the band, press FUNC then DELAY. |
| To change the step size for the band, press STEP until the desired size is selected. |
| To attenuate the band, press ATT. |
| To change the receive mode of the band, press MODE until the desired mode is selected. |
| To text tag the search band see Text Tagging a Search Band. |
| Press MANUAL to exit programming or SEARCH to resume searching. |
| Changing the Step Size of a Search Band |
| Changeable frequency steps |
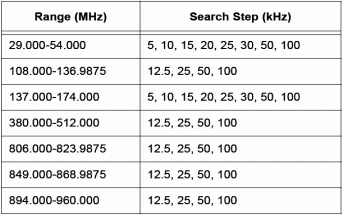 |
| The scanner searches at a preset frequency step for each frequency range. Follow these steps to change the step size in a specific band. |
| In manual mode, press FUNC then SEARCH. Press ▼ or ▲ to select a search band. |
| Press STEP to select the desired step size. |
| Press MANUAL to exit programming or SEARCH to resume searching. |
| While searching, quickly press STEP while a frequency is displayed. Or, break the squelch to pause the search, press STEP to change the step size, then turn the squelch back to resume the search. |
![]()
| Search Skip Memory | Contents |
| To skip a frequency while searching, quickly press L/OUT while the frequency is displayed. The scanner will lock out the frequency and continue searching. Or, break the squelch so you can see the frequency you want to lock out, press L/OUT to lock out the frequency and turn the squelch back to resume searching. |
| Note: If you try to skip more than 50 frequencies, Memory full! appears in the display. |
| Note: If you happen to lock out all the frequencies in the search band and are searching just that band All ranges Locked out! appears. |
| To view the lock out list or clear a single frequency, In manual mode press SEARCH. Press FUNC then L/OUT. (You can also press FUNC then L/OUT while you are searching the band if you are quick enough before the search moves to the next band). A locked out frequency and Lockout list appear in the display. Press FUNC then ▼ or ▲ (each time) to select the search band. If no channels are locked out in the band then L/O list is empty appears. Press ▲ to find the frequency then press CL to unlock the frequency. When all frequencies are unlocked, L/O list is empty will appear in the display. Press SEARCH to exit the lock out review list and resume searching. |
 |
| To clear all the skip frequencies in a band, In manual mode press SEARCH. Press FUNC then L/OUT. (You can also press FUNC then L/OUT while you are searching the band if you are quick enough before the search moves to the next band). A locked out frequency and Lockout list appear in the display. Press FUNC then ▼ or ▲ (each time) to select the search band. If no channels are locked out in the band then L/O list is empty appears. Press FUNC then 4. Confirm list clear? 1=YES. Press other key for NO. appears in the display. Press 1 to clear all the locked out frequencies or any other key to cancel. List cleared briefly appears in the display then L/O list is empty appears. Press SEARCH to exit the lock out review list and resume searching. |
| Note: If all the frequencies in a search band are locked out you can't clear all the frequencies at the same time. |
![]()
| Tune Search |
| To start a searching at a specific frequency, press TUNE. TUNE and the last tuned frequency appear in the display. Enter the frequency where you want the scanner to start searching then press ENTER. |
| Press ▼ or ▲ to move up or down one step. Press and hold ▼ or ▲ to move faster. |
| To move up or down in 1 MHz steps, press FUNC then ▼ or ▲ (each time). |
| Note: You cannot change the step size in a tune search. |
| To attenuate a search, press ATT. See Using the Attenuator. |
| To change the receive mode, press MODE until the desired mode is selected. See Changing Receive Modes. |
| To automatically save a frequency, (into scan bank 9 only) press FUNC then ENTER. Stored @ 9xx (the first empty channel number) briefly appears on the bottom line showing the location. Bank 9 full appears if the bank is full. |
| Note: The receive mode and attenuate setting will be saved with the frequency. |
| To exit searching, press MANUAL. |
![]()
| Programming Conventional Frequencies | Contents |
| You can program trunking frequencies and conventional frequencies into the same bank to utilize channel space better. That way, you don’t have to waste a whole bank on a trunking system that has only 5 channels. I typically put my trunking frequencies in (for each trunking system) starting at the beginning of the banks (000,100, 200, etc.) because you probably won't have more than 25 of those, and then fill up the banks with conventional frequencies. EDACS frequencies have to start at 001, 101, 201, etc., you can still use 000, 100, etc. for a conventional frequency. See Programming Trunking Systems. |
| 1. In manual mode, select the channel by entering the bank number and channel number then press MANUAL to advance to the channel. You have to be in manual mode to enter a channel number. (for those of you familiar with the older RS radios where you could enter a channel number in program mode). |
| Note: You may also change banks by pressing FUNC then ▼ or ▲ (each time) and change channels by pressing ▼ or ▲. |
| To clear a channel, press FUNC then CL. (You will have to reset the receive mode). |
| 2. Press PGM to put the scanner in program mode. |
| 3. Press MODE until the desired receive mode, FM, AM, PL (private line), or DL (digital private line) will appear in the top right of the display. This will stay as default while you are programming. |
| 4. Use the number keys and decimal point key to enter the frequency you want to store. If you make a mistake press CL to delete the last digit or press and hold CL to clear all the digits. Press ENTER to store the frequency. |
| Note: If you entered an invalid frequency (not in the receiver's range), Invalid Freq appears and the scanner beeps. |
| Note: The scanner automatically rounds (down) the entered number to the nearest valid frequency. For example, if you enter 151.4375 (MHz), your scanner accepts it as 151.435. |
| To set the delay for the channel, press DELAY to toggle the delay feature on or off. See Scan/Search/Trunk Delay. |
| To set the attenuation for the channel, press ATT to toggle the attenuator on or off. See Using the Attenuator. |
| To program the PL or DL tone for the frequency, (make sure the channel mode is set to PL or DL) Press STEP (or press and hold; faster) until you find the desired tone. See Programming Tone Codes. |
| To program text for the bank, see Text Tagging a Bank. |
| To program text for the channel, see Text Tagging a Channel. |
| 5. Press PGM which advances to the next channel. Program the remaining channels the same way (step 4). |
| Note: The receive mode changes to the previously programmed mode while programming the next channel but will restore the default mode after you hit enter to store it (??). |
| 6. To program any other channel, return to step 1. |
|
Press MANUAL to exit programming or SCAN to start scanning. |
| Valid frequency steps | |
| 29-54 | 5.0 |
| 108-137 | 12.5 |
| 137-174 | 5.0 |
| 380-512 | 12.5 |
| 806-960 | 12.5 |
![]()
| Programming Tone Codes |
| See Understanding CTCSS/DCS. |
| 1. In manual mode, select the channel by entering the bank number and channel number then press MANUAL to advance to the channel. |
| Note: You may also change banks by pressing FUNC then ▼ or ▲ (each time) and change channels by pressing ▼ or ▲. |
| 2. Press PGM to put the scanner in program mode. Make sure the channel mode is set to PL or DL. |
| 3. Press STEP (or press and hold; faster) until you find the desired tone. |
| Press MANUAL to exit programming. |
| Note: When stopped on an active conventional channel while scanning, you can press MODE to cycle through the valid modes for that channel, including CTCSS and DCS. This will reset any stored CT or DC code to the search code mode, allowing you to easily check for other CT or DC codes that may be present on the frequency. |
![]()
| Programming Trunking Systems | Contents |
| Valid Trunking Frequencies: |
| Motorola Type II-IIi-LTR Systems: | Motorola Type I Systems: | Ericsson EDACS Systems: |
| 137-174 MHz | 806-900 MHz (except cell) | 380-512 MHz |
| 380-512 MHz | 806-900 MHz (except cell) |
| 851-869 MHz (except cell) | 900-956 MHz |
| 935-940 MHz |
| You can program trunking frequencies and conventional frequencies into the same bank to utilize channel space better. That way, you don’t have to waste a whole bank on a trunking system that has only 5 channels. I typically put my trunking frequencies in (for each trunking system) starting at the beginning of the banks (000,100, 200, etc.) because you probably won't have more than 25 of those, and then fill up the banks with conventional frequencies. EDACS frequencies have to start at 001, 101, 201, etc., you can still use 000, 100, etc. for a conventional frequency. |
| 1. In manual mode, select the channel by entering the bank number and channel number then press MANUAL to advance to the channel. You have to be in manual mode to enter a channel number. (for those of you familiar with the older RS radios where you could enter a channel number in program mode). |
| Note: You may also change banks by pressing FUNC then ▼ or ▲ (each time) and change channels by pressing ▼ or ▲. |
| Note:
If you are programming a Motorola UHF-Lo (380-512 MHz)
trunked system, leave channel x00 empty for the base
frequency. See Programming Offset and Base Frequency. |
| Note: EDACS frequencies have to start in channel 001,101,201, etc., and have to be programmed in LCN (Logical Channel Number) order. See Finding LCN Order. Motorola, LTR, and conventional frequencies can be programmed in any order. You can still use 000, 100, etc. for a conventional frequency. |
| To clear a channel, press FUNC then CL. (You will have to reset the channel mode). |
| 2. Press PGM then TRUNK. You will see the ID list. |
| 3. Press MODE until the desired mode, LT for LTR systems; MO for Motorola systems; or ED for EDACS systems appears in the top right of the display. This sets the talk group ID decoding method for the bank. This will also stay as default while you are programming. |
| 4. Press PGM. Press MODE until the desired receive mode, LT for LTR systems; MO for Motorola systems; or ED for EDACS systems appears in the top right of the display. This sets the talk group ID decoding method for the channel. If the channel mode and bank mode are the same, you will see a T in the top line of the display (and you're going to program the trunk system correctly). |
| 5. Use the number keys and decimal point key to enter the frequency you want to store. If you make a mistake press CL to delete the last digit or press and hold CL to clear all the digits. Press ENTER to store the frequency. |
|
|||||||||
|
| To set the attenuation for the channel, press ATT to toggle the attenuator on or off. See Using the Attenuator. |
| To program text for the bank, see Text Tagging a Bank. |
| To program text for the channel, see Text Tagging a Channel. |
| 6. Press PGM which advances to the next channel. Program the remaining channels the same way (step 5). |
| Note: The receive mode changes to the previously programmed mode and you will loose the 'T' while programming the next channel but will restore the default mode after you hit enter to store it (??). |
| Press MANUAL to exit programming or SCAN to start scanning. |
| To program IDs into the lists see Programming Talk Group IDs. |
| If you programmed a Motorola Type I or Type IIi system see Programming a Fleet Map. |
| If you programmed a UHF-Lo Motorola system see Programming Offset and Base Frequency |
![]()
| Programming a Fleet Map | Contents |
| Motorola Type I or Type IIi systems require you to program a fleet map. This allows you to receive the talkgroup IDs correctly. If you don’t know which fleet map to use, you can try a method I found at Radio Reference.com. Since it is rather lengthy, I will just give you the link. Determining Type I Motorola Fleet Maps by Dave Goodson. If you know the fleet map by name, E1P1, E1P2, etc., I have listed 16 pre-set fleet maps so you can see the size codes. |
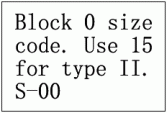
| 1. In manual mode, press FUNC then ▼ or ▲ (each time) to select (any channel) in the bank you wish to program a fleet map in. |
| 2. Press PGM then TRUNK. You will see the ID list. |
 |
|
| S-12 can only be assigned to Blocks 0, 2, 4 or 6. |
| S-13 can only be assigned to Blocks 0 and 4. |
| S-14 can only be assigned to Block 0. |
| Since these size codes require multiple blocks, you will be prompted for the next available block. For example, if you assign Block 0 as S-12, the scanner prompts you for block 2, the next block available, instead of block 1. If you assign Block 0 as S-14, you would not see another prompt because S-14 uses all available blocks. |
| Press MANUAL to exit programming or SCAN to start scanning. |
| Fleet Maps | Contents |
| In Motorola II systems (no programming the fleet map required), all the blocks have size code, S0, which has a size limitation of 512 radios. In Type I systems, size codes are used in different blocks to denote the maximum number of users in that block. Notice that size code S-12 uses 2 blocks. A Motorola Hybrid system (Type IIi) has 'blocks' of the system that are Type I Fleets/Subfleets and Type II talkgroups. The maps that are Hybrid systems are in bold. |
| E1P1 | E1P2 | E1P3 | E1P4 | E1P5 | E1P6 | E1P7 | E1P8 | ||||||||
| Block | Size Code | Block | Size Code | Block | Size Code | Block | Size Code | Block | Size Code | Block | Size Code | Block | Size Code | Block | Size Code |
| 0 | S-11 | 0 | S-4 | 0 | S-4 | 0 | S-12 | 0 | S-4 | 0 | S-3 | 0 | S-10 | 0 | S-1 |
| 1 | S-11 | 1 | S-4 | 1 | S-4 | 1 | (S-12) | 1 | S-4 | 1 | S-4 | 1 | S-10 | 1 | S-1 |
| 2 | S-11 | 2 | S-4 | 2 | S-4 | 2 | S-4 | 2 | S-12 | 2 | S-4 | 2 | S-11 | 2 | S-2 |
| 3 | S-11 | 3 | S-4 | 3 | S-4 | 3 | S-4 | 3 | (S-12) | 3 | S-4 | 3 | S-4 | 3 | S-2 |
| 4 | S-11 | 4 | S-4 | 4 | S-4 | 4 | S-4 | 4 | S-4 | 4 | S-12 | 4 | S-4 | 4 | S-3 |
| 5 | S-11 | 5 | S-4 | 5 | S-4 | 5 | S-4 | 5 | S-4 | 5 | (S-12) | 5 | S-4 | 5 | S-3 |
| 6 | S-11 | 6 | S-4 | 6 | S-12 | 6 | S-4 | 6 | S-4 | 6 | S-12 | 6 | S-4 | 6 | S-4 |
| 7 | S-11 | 7 | S-4 | 7 | (S-12) | 7 | S-4 | 7 | S-4 | 7 | (S-12) | 7 | S-4 | 7 | S-4 |
| E1P9 | E1P10 | E1P11 | E1P12 | E1P13 | E1P14 | E1P15 | E1P16 | ||||||||
| Block | Size Code | Block | Size Code | Block | Size Code | Block | Size Code | Block | Size Code | Block | Size Code | Block | Size Code | Block | Size Code |
| 0 | S-4 | 0 | S-0 | 0 | S-4 | 0 | S-0 | 0 | S-3 | 0 | S-4 | 0 | S-4 | 0 | S-3 |
| 1 | S-4 | 1 | S-0 | 1 | S-0 | 1 | S-0 | 1 | S-3 | 1 | S-3 | 1 | S-4 | 1 | S-10 |
| 2 | S-0 | 2 | S-0 | 2 | S-0 | 2 | S-0 | 2 | S-11 | 2 | S-10 | 2 | S-4 | 2 | S-10 |
| 3 | S-0 | 3 | S-0 | 3 | S-0 | 3 | S-0 | 3 | S-4 | 3 | S-4 | 3 | S-11 | 3 | S-11 |
| 4 | S-0 | 4 | S-0 | 4 | S-0 | 4 | S-0 | 4 | S-4 | 4 | S-4 | 4 | S-11 | 4 | S-0 |
| 5 | S-0 | 5 | S-0 | 5 | S-0 | 5 | S-0 | 5 | S-0 | 5 | S-4 | 5 | S-0 | 5 | S-0 |
| 6 | S-0 | 6 | S-4 | 6 | S-0 | 6 | S-0 | 6 | S-0 | 6 | S-12 | 6 | S-12 | 6 | S-12 |
| 7 | S-0 | 7 | S-4 | 7 | S-0 | 7 | S-4 | 7 | S-0 | 7 | (S-12) | 7 | (S-12) | 7 | (S-12) |
| Size Code | Fleets | Sub Fleets | Number of Blocks | Number of Talkgroups per Block | Max IDs per Talkgroup | Max Radios per Block |
| S0 | N/A | N/A | N/A | N/A | N/A | 512? |
| S1 | 128 | 4 | 1 | 512 | 16 | 16 |
| S2 | 16 | 8 | 1 | 128 | 64 | 64 |
| S3 | 8 | 8 | 1 | 64 | 128 | 128 |
| S4 | 1 | 16 | 1 | 16 | 512 | 512 |
| S5 | 64 | 4 | 1 | 256 | 32 | 32 |
| S6 | 32 | 8 | 1 | 256 | 32 | 32 |
| S7 | 32 | 4 | 1 | 128 | 64 | 64 |
| S8 | 16 | 4 | 1 | 64 | 128 | 128 |
| S9 | 8 | 4 | 1 | 32 | 256 | 256 |
| S10 | 4 | 8 | 1 | 32 | 256 | 256 |
| S11 | 2 | 16 | 1 | 32 | 256 | 256 |
| S12 | 1 | 16 | 2 | 8 | 1024 | 512 |
| S13 | 1 | 16 | 4 | 4 | 2048 | 512 |
| S14 | 1 | 16 | 8 | 2 | 4096 | 512 |
| You can tell which block a Motorola ID is in by its number. |
| Block | Lower ID# | Upper ID# |
| 0 | 0000 | 8191 |
| 1 | 8192 | 16383 |
| 2 | 16384 | 24575 |
| 3 | 24576 | 32767 |
| 4 | 32768 | 40959 |
| 5 | 40960 | 49151 |
| 6 | 49152 | 57343 |
| 7 | 57344 | 65535 |
Thanks to Radio Reference.com for most of this information. |
![]()
| Programming the Offset and Base Frequency | Contents |
| To properly track Motorola UHF-Lo (380-512 MHz) trunked systems, you must program the applicable offset and base frequency for each system. This can be done after you program the trunking frequencies and system. If you don't know the offset and base frequency, I have found an explanation at the Trunked Radio Systems User’s Page. Look for 'Determining Base and Offset Frequencies for the BC245xlt' by John C. There is another explanation at Radio Reference.com. The RS manual states that you can trunk the system without programming the offset and base frequency but the scanner might (will) display the wrong IDs. |
|
The scanner automatically decodes subaudible data it receives in the VHF (137-174) band. If you try to enter an offset frequency in the VHF and UHF-Hi bands (137–174 and 806–960 MHz), the scanner will ignore the entry. |
|
To program the offset and base frequency: |
|
1. In manual mode, select channel x00 (the first channel) in the bank you want to program the trunk system in. Press MANUAL to advance to the channel. |
|
2. Press PGM then enter the base frequency of the trunk system. Press ENTER to store the frequency. Press PGM(PROG) again to advance to the next channel. Store the remaining frequencies the same way. |
|
3. Press TRUNK to put the scanner in trunk mode after you have programmed the last channel. You will see the ID list. |
|
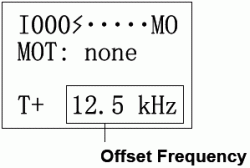
4. Press MODE. MOT: none should appear in the display. |
| 5. Press FUNC then 9 (each time) to select the offset frequency |
| Press MANUAL to exit programming or SCAN to start scanning. |
 |
![]()
| Programming Talk Group IDs | Contents |
| You must first program the trunking system before you can program the IDs. Your scanner has an ID list where you can store IDs for the trunking system. Each list can contain up to 100 IDs. If you use all the banks as trunking banks, you can store up to 1000 IDs. In closed mode, you can trunkscan the IDs just like channels in a bank. If you have more than 100 IDs for a system, or want another list and have an extra bank in your scanner, program the trunked system into 2 banks (and turn the trunk rescan delay off for the first bank). You could then turn each list on or off by turning each bank on or off. |
| This is also where they need a firmware upgrade. You can lock out an ID only after you have programmed it into a list. This can be a pain if you are trying to search for IDs in open mode. If you have a pesky telemetry ID popping in every 5 seconds, the only way to get rid of it is to first program it into the ID list, lock it out there, then scan the bank in closed mode. But, the scanner only receives programmed IDs in closed mode. |
| To automatically store an ID into the first available ID location while trunking, quickly press TRUNK. ID stored briefly appears at the bottom of the display. If the ID has previously been stored (or programmed), Was stored briefly appears at the bottom of the display. If you try to enter more than 100 IDs in a bank, Memory Full! appears. |
| To Select an ID Location: |
| 1. In manual mode press PGM then TRUNK. Press FUNC then ▼ or ▲ (each time) to select the bank where the ID is. You will see the bank number (I0xx-I9xx) and the ID# (Ix00-Ix99) on the top line (Ex: I500). |
| 2. Select the ID# (Ix00-Ix99) by pressing ▼ or ▲ (or press and hold; faster, just like channels). |
| To Manually Store an ID: |
| To enter a Motorola Type II ID, enter the ID then press ENTER to store the ID. |
| To enter a Motorola Type I ID, enter the fleet# then press the decimal point to enter a hyphen, then enter the sub-fleet#. Press ENTER to store the ID. |
| To enter an EDACS ID, enter the ID (in decimal format only) then press ENTER to store the ID. (You don't have to enter leading zeros). |
| If you are one of the poor souls that have all your EDACS IDs saved in AFS format (like me), here is a Conversion Chart to help convert them. |
| To enter an LTR ID, enter the ID (no hyphens) then press ENTER to store the ID. |
| Press ▲ to move to the next ID location and enter the next ID. |
| To
Text Tag An ID, Press TEXT. Move the cursor to
the position you want using ▼ to move right, or ▲ to move left, then skip to Entering Characters. |
| To
Lock or Unlock an ID, press L/OUT. L
will appear in the display if the ID is locked out. See Locking/Unlocking IDs. |
| Press MANUAL to exit programming or SCAN to start scanning. |
| Clearing IDs |
| To clear a single ID: |
| 1. In manual mode press PGM then TRUNK. Press FUNC then ▼ or ▲ (each time) to select the bank where the ID is. You will see the bank number (I0xx-I9xx) and the ID# (Ix00-Ix99) on the top line (Ex: I500). |
| 2. Select the ID# (Ix00-Ix99) by pressing ▼ or ▲ (or press and hold; faster, just like channels). |
| 3. Press FUNC then CL. Press MANUAL to exit programming or SCAN to start scanning. |
| To clear all IDs in a bank: |
| 1. In manual mode press PGM then TRUNK. Press FUNC then ▼ or ▲ (each time) to select the bank where the IDs are. You will see the bank number (I0xx-I9xx) and the ID# (Ix00-Ix99) on the top line (Ex: I500). |
| 2. Press FUNC then 3. Confirm list clear ?1=YES Press other key for NO. appears. Press 1 to clear the list. Then the ID list will re-appear. Press MANUAL to exit programming or SCAN to start scanning. |
![]()
| Scanning Conventional Banks | Contents |
| The
scanner won't scan unless frequencies are first
programmed into the channels. See Programming Conventional Frequencies. |
| Press SCAN to start scanning. |
| Select any combination of banks to scan by pushing the number keys that correspond to the banks. Numbers appear at the top of the display showing the currently selected banks being scanned. The scanner scans (up/forward only) through all the channels in the bank and moves to the next bank. The cursor blinks under the bank number when the scanner scans the channels in that bank. If the scanner finds an active channel, it stops on it. When the transmission ends, the scanner resumes scanning. If it is a long transmission, (such as a Ham rag chewing) and you want to move on, press SCAN again to resume scanning. The scanner won't scan channels that are locked out or have 0 as the frequency. |
| If the scanner picks up an unwanted partial frequency, turn SQUELCH clockwise to decrease the scanner's sensitivity and mute the scanner so it will continue scanning. |
| To listen to a weak or distant frequency, turn SQUELCH counter-clockwise. |
| To turn banks on or off while scanning, press the number key, 0-9 that corresponds to the bank you want to turn on or off. You cannot turn off all banks. One bank must always be active. |
| To open
or close a bank, press MANUAL. Press FUNC
then ▼ or ▲ to select the bank you want
to open or close. Press FUNC then 2 to
toggle between
open and closed modes. Press SCAN to
resume. See Changing Open and Closed Modes. |
| To pause on a channel, quickly press MANUAL while the channel is displayed. Press SCAN to resume. |
| To lock out a channel, quickly press L/OUT while the channel is displayed. If you lock out a trunking channel, the trunking system won't trunktrack properly. See Locking-out Channels. |
| To turn
the delay on or off for a channel, quickly press DELAY
while the channel is displayed. See Scan/Search/Trunk Delay. |
| To attenuate a channel, quickly press ATT while the channel is displayed. See Using the Attenuator. |
| To change
the receive mode of a channel, quickly press
MODE while the channel is displayed. See Changing Receive Modes. |
| To set a
channel as the priority channel, quickly press FUNC
then PRI while the channel is displayed.
See Priority Scanning. |
| To store
a PL or DPL tone, (only if the receive mode for the channel is
set to PL or DL) quickly press TRUNK while the
channel and the tone is displayed. Code
stored briefly appears on the bottom line
(presumably until you store or program another code). See Understanding CTCSS/DCS and Understanding Receive Modes. |
| To exit scanning, press MANUAL. |
| Priority Scanning | Contents |
| You can
program one conventional channel or a weather
channel as a priority channel. With the priority feature,
you can scan through the programmed banks (or search
through search banks) without missing a call on a
specific conventional channel. When a channel is
selected as the priority channel and priority is turned
on, the scanner checks that channel every 2 seconds, and
stays on the channel if there is activity until the
activity stops even if the bank is closed or the bank for
the channel is turned off. If a weather channel is programmed,
the scanner will monitor SAME weather alerts. The priority feature also
works in Search, Manual, and Program modes. The priority feature will not check the priority channel while receiving Motorola or EDACS frequencies. It will annoyingly interrupt LTR frequencies being received every 2 seconds to check and go to the priority channel if it is active. The scanner is preset to select Channel 00 in Bank 8 as the priority channel. |
| To change the priority channel, in manual mode, enter the bank number and channel number then press MANUAL again to advance to the channel. Press FUNC then PRI. Pri will appear to the right of the channel. |
| Note: You cannot program a channel which has a receive mode of MO, ED, or LT as the priority channel. |
| To change the priority channel while the scanner is scanning, when the scanner stops on an active channel, quickly press FUNC then PRI before it continues scanning again. |
| To program a weather channel as the priority channel, press WX. Select the weather channel you want to use as the priority channel then press FUNC and PRI. Press MANUAL or SCAN to exit. You will see Priority WX while scanning or searching when the priority feature is turned on. If you program a weather channel as the priority channel, the scanner goes in the priority channel only when the scanner detects the weather alert tone. See Receiving SAME Weather Alerts. |
| To turn
on the priority feature, press PRI. P
appears in the top line while receiving (any channel) and
Priority ON appears in the bottom line
while scanning and searching.
|
| To turn off the priority feature, press PRI. |
![]()
| Scanning and Trunking Banks | Contents |
| You can
trunktrack a selected bank only after you have programmed
the frequencies and trunking system for that
bank. See Programming Trunked Systems. |
| Your scanner automatically mutes the audio during trunking when it decodes control channel data. However, it is recommended that (in manual mode) you turn SQUELCH clockwise and leave it set to a point just after the hissing sound stops. This lets the scanner quickly acquire the data channel. |
| If you have a trunk system programmed (correctly) into a bank with conventional frequencies, the scanner will scan and trunktrack. You can't make it only scan or only trunktrack the bank (unless you lock out those frequencies you don't want scanned or trunktracked). |
| Press SCAN to start scanning. |
| Select any combination of banks to scan by pushing the number keys that correspond to the banks. Numbers appear at the top of the display showing the currently selected banks. The cursor blinks under the bank number when the scanner scans the channels in that bank. If the scanner finds an active channel or ID, it stops on it. When the transmission ends, the scanner resumes scanning. If it is a long transmission, (such as a Ham rag chewing) and you want to move on, press SCAN again to resume scanning. The scanner won't scan channels that are locked out or have 0 as the frequency. See How the Scanner Scans and Trunks. |
| If the scanner picks up an unwanted partial station, turn SQUELCH clockwise to decrease the scanner's sensitivity and mute the scanner so it will continue scanning. |
| To listen to a weak or distant station, turn SQUELCH counter-clockwise. |
| To turn banks on or off, press the numbered keys to turn the desired bank on or off. |
| To open or close a bank, press MANUAL. Press FUNC then ▼ or ▲ to select the bank you want to open or close. Press FUNC then 2 to toggle between open and closed modes. Press SCAN to resume. See Changing Open and Closed Modes. |
| To pause on a conventional channel, quickly press MANUAL while the channel is displayed. Press SCAN to resume. |
| To pause on an ID, quickly press and hold TRUNK. ID hold mode briefly appears in the display then the ID. ID hold mode returns if the transmission stops. Press SCAN to resume. |
| To lock out a conventional channel, quickly press L/OUT while the channel is displayed. See Locking-out Channels. |
| To lock out an ID, (you have to store the ID first), quickly press FUNC then TRUNK while the ID is displayed. ID locked briefly appears on the bottom line. See Locking/Unlocking IDs. |
| To turn
the delay on or off for a conventional channel, quickly press DELAY while
the channel is displayed. See Scan/Search/Trunk Delay. |
| To turn
the delay on for a trunking system, quickly press DELAY
while any channel in the trunking system is
displayed. See Scan/Search Delay. |
| To attenuate a channel, quickly press ATT while the channel is displayed. See Using the Attenuator. |
| To change the receive mode of a channel, quickly press MODE while the channel is displayed. If you change the mode of a trunking channel, the trunking system may not trunktrack properly. See Changing Receive Modes. |
| To set a conventional
channel as the priority channel, quickly press FUNC
then PRI while the channel is displayed.
See Priority Scanning. |
| To store
a PL or DPL tone, (only if the receive mode for the channel is
set to PL or DL) quickly press TRUNK while the
channel and the tone is displayed. Code
stored briefly appears on the bottom line.
(presumably until you store or program another code). See Understanding CTCSS/DCS and Understanding Receive Modes. |
| To store
an ID into the first available ID location, quickly press
TRUNK while
the ID is displayed. ID stored briefly
appears on the bottom line. If the ID has previously been
stored (or programmed), Was stored will
briefly appear on the bottom line. See Automatically Storing IDs. |
| To exit trunking and scanning, press MANUAL. |
| Note: If you consistently miss responses when trunking a Motorola Type I system, try changing the fleet map being used. See Programming a Fleet Map. |
| While trunking, you may not know which agency, fleet, or talk group the talk group IDs are assigned to until you listen a while. You can determine the type of agency you are listening to after a short while by matching the IDs with the transmission you hear. You can then program them into ID lists. See Programming Talk Group IDs. Determining the service associated with a talk group ID might take awhile, finding IDs is half the fun. |
![]()
| Changing Open and Closed Modes | Contents |
| Each channel bank can be set to open or closed mode. |
| In
open mode the scanner will receive: (1) all
channels in AM and FM modes, that are not locked out. |
| In
closed mode the scanner will receive: (1) all
channels in AM and FM modes, that are not locked out. |
| To open or close a bank, in manual mode, press FUNC then ▼ or ▲ (each time) to select the bank you want to open or close. Press FUNC then 2 to toggle between open and closed modes. |
| Press MANUAL to exit programming or SCAN to resume. |
![]()
| Locking/Unlocking IDs | Contents |
| You can lock out IDs you don't want to hear such as telemetry, MDT's, dog catcher, etc. |
| To lock out an ID while scanning in closed mode, quickly press FUNC then TRUNK while the ID is displayed. |
| To lock out an ID while scanning in open mode, quickly press and hold TRUNK while the ID is displayed to pause on the ID. Press FUNC then TRUNK when the ID is displayed to store the ID. ID stored briefly appears (or was stored if it's already programmed). Press FUNC then TRUNK while the ID is displayed again to lock out the ID. ID locked briefly appears. The ID will only be locked out while trunking in closed mode. Granted, this feature is useless for those of us who know which IDs they want (and don't want) to hear, or to simply lock out an ID and scan the rest, but great if you don't know the IDs for the system as you can then later close the bank and hear just the IDs you have stored. |
| To lock or unlock an ID manually: |
| 1. In manual mode press PGM then TRUNK. Press FUNC then ▼ or ▲ (each time) to select the bank where the ID is. You will see the bank number (I0xx-I9xx) and the ID# (Ix00-Ix99) on the top line (Ex: I500). |
| 2. Select the ID# (Ix00-Ix99) by pressing ▼ or ▲ (or press and hold; faster, just like channels) then press L/OUT to lock or unlock the ID. An L will appear to the right on the top line if the ID is locked out. |
| Press MANUAL to exit programming. |
| To view all locked out IDs in a bank: |
| 1. In manual mode press PGM then TRUNK. press FUNC then ▼ or ▲ (each time) to select the bank where you want to view the locked out IDs. You will see the bank number (I0xx-I9xx) and the ID# (Ix00-Ix99) on the top line (Ex: I500). |
| 2. Press FUNC then L/OUT (each time) to view the locked IDs. You can press L/OUT to lock or unlock the ID. An L will appear to the right of the ID# if the ID is locked out. |
| Press MANUAL to exit programming. |
| Note: You cannot unlock all IDs at one time. |
![]()
| Special Features |
| Text Tagging | Contents |
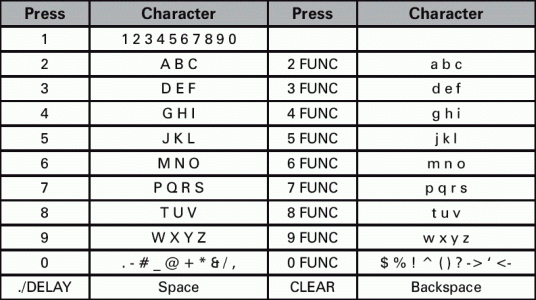
| You can program text tags (up to 12 characters) for each search band, channel, bank, or ID. With the freeware you can text tag the weather channels. Each character is associated with one of the number keys on the keypad. The text tag for the search band or scan bank is not displayed if the receive mode is set to PL or DL. |
| To Text Tag a Search Band: |
| 1. In manual mode press FUNC then SEARCH. Press ▼ or ▲ to select a search band. |
| 2.
Press TEXT twice. Move the cursor to
the position you want using ▼ to move right, or ▲ to move left, then see Entering Characters. |
| To Text Tag a Bank or Channel: |
| 1. In manual mode, select a channel (or any channel if you are tagging a bank) by entering the bank number and channel number then press MANUAL to advance to the channel. |
| 2. Press PGM. |
| To tag a bank, press FUNC then
6. Move the cursor to the position you want
using ▼ to move right, or ▲ to move left, then see Entering Characters. |
| To tag a channel, press TEXT. Move the cursor to
the position you want using ▼ to move right, or ▲ to move left, then see Entering Characters. |
| To Text Tag an ID: |
| 1. In manual mode, press FUNC then ▼ or ▲ (each time) to select the bank where the ID is. |
| 2. Press PGM then TRUNK. You will see the bank number (I0xx-I9xx) and the ID# (Ix00-Ix99) on the top line (Ex: I500). |
| 3. Select the ID location by pressing ▼ or ▲ (or press and hold; faster, just like channels). |
| 4. Press TEXT. Move the cursor to the position you want using ▼ to move right, or ▲ to move left. See below to enter characters. |
| Entering Characters: |
|
||||
 |
| Scan/Search/Trunk Delay | Contents |
| Sometimes a user might pause before replying to a transmission. To keep from missing a reply on a specific channel or frequency, you can turn on a 2-second delay for any conventional channel or each search band. Setting the delay for Motorola and EDACS trunking channels actually sets the length of time the scanner monitors the trunking system, not the ID. The scanner continues to monitor the channel, frequency, or trunking system for an additional 2 seconds after the transmission stops before resuming when the delay feature is turned on. |
| To turn the delay on or off for a search band: |
| While the scanner is searching, press FUNC then DELAY while a frequency is displayed or, break the squelch to pause the search, press FUNC then DELAY, then turn the squelch back. D will appear on the top line of the band's display when the when the delay is on. |
| To turn the delay on or off for a conventional channel: |
| Select the channel in manual or program mode, then press FUNC then DELAY to turn the delay on or off. D will appear on the top line of the channel's display when the when the delay is on. |
| If the scanner is scanning and stops on the channel, quickly press FUNC then DELAY before the transmission ends. D will appear on the top line of the channel's display when the when the delay is on. |
| To turn the delay on or off for a trunking system: |
| Setting the delay for Motorola and EDACS trunking channels actually sets the length of time the scanner monitors the trunking system, not the ID (then useless if you are just trunking one system) so you only have to set the delay in one channel of the trunked system. The Win92 freeware allows you to change the length of this delay (from the default of 2 seconds) and calls it 'trunk rescan delay' The delay for LTR trunking channels works like the delay for conventional channels. |
| To turn the delay on, in manual or program mode, press FUNC then ▼ or ▲ (each time) to select the bank then press ▼ or ▲ to select any channel (preferably the first trunked channel to remember where the delay is set so you know where to go to turn it off). Press FUNC then DELAY to turn on the delay on for the channel (and system). D will appear on the top line of that channel's display when the when the delay is on. |
| To turn the delay off, in manual or program mode, select the channel you set the delay in by entering the bank number and channel number then press MANUAL to advance to the channel. Press FUNC then DELAY to turn the delay off for the channel (and system). Make sure all of the trunking frequencies in the system have the delay turned off. |
| Locking Out Channels |
| You can keep the scanner scanning by locking out channels that have a continuous transmission, such as a weather channel. |
| To lock out a conventional channel, select the channel in manual or program mode then press L/OUT. L will appear on the top line of the channel's display when the when the channel is locked out. Press MANUAL to exit. |
| Note: if you lock out a trunking channel, the trunking system won't trunktrack properly. |
| If the scanner is scanning and stops on an active channel, quickly press L/OUT before it continues scanning again. The scanner will lock out the channel and automatically resume scanning. |
| To remove the lock out from a channel, select the channel in manual or program mode, then press L/OUT. L disappears from the channel's display. Press MANUAL to exit. |
| To view all locked out channels, in manual or program mode, press FUNC then L/OUT (each time) to step through the locked out channels. If there are no locked out channels, the scanner will just beep. Press L/OUT to unlock a channel. Press MANUAL to exit. |
| Note: You can still select and monitor locked out channels in manual and program modes. |
| Changing Receive Modes |
| The scanner is preset to the most common AM or FM receive mode for each frequency range. The preset mode is correct in most cases. However, some amateur radio transmissions, military, and trunked systems do not operate in the preset mode. If you try to listen to a transmission when the scanner is not set to the correct receive mode, the transmission might sound weak or distorted. See Receive Modes. |
| To change the receive mode of a search band, quickly press MODE while a frequency is displayed. Or, break the squelch to pause the search, press MODE until the desired mode is selected, then turn the squelch back to resume searching. |
| To change the receive mode of a channel, select the channel in manual or program mode then press MODE until the desired mode is found. The mode will appear on the top right in the channel's display. |
| If the scanner is scanning and stops on an active channel, quickly press MODE until the desired mode is selected. The mode will appear in the top right of the channel's display. |
| Note: The text tag for the search band or scan bank is not displayed if the receive mode is set to PL or DL. |
| Using the Attenuator |
| To reduce interference or noise caused by strong signals, you can reduce the scanner's sensitivity to these signals by attenuating any channel or search band. |
| To attenuate a search band, quickly press ATT while a frequency is displayed. Or, break the squelch, press ATT, then turn the squelch back to resume searching. An A will appear on the top line of the band's display when the attenuation is on. |
| To attenuate a channel, select the channel in manual or program mode, then press ATT to turn the attenuation on or off. An A will appear on the top line of the channel's display when the attenuation is on. |
| If the scanner is scanning and stops on an active channel, quickly press ATT to attenuate the channel. An A will appear on the top line of the channel's display when the attenuation is on. |
| Turning The Keytone Off/On | Contents |
| You have the option of turning the key conformation tone off or on (to confirm that the keys have been pressed). The keypad area is kind of small so some of us with big fingers, afraid that they have pressed more than one key at a time, might appreciate this. |
| With the Win92 freeware, you can adjust the tone from 300Hz to 10000Hz. |
| To turn the keytone off, turn off the scanner. Turn on the scanner and press 2 while the welcome screen is displayed. Key-tone ON will briefly appear. |
| To turn the keytone on, turn off the scanner. Turn on the scanner and press 1 while the welcome screen is displayed. Key-tone OFF will briefly appear. |
| Using The Display Backlight |
| You can turn on the display's backlight for viewing in dimly lit areas (although it's not all that bright). |
| With the Win92 freeware, you can adjust the backlight to stay on longer or continuously (set to 0). |
| To turn
on the display light for easier viewing
at night, press
|
| To turn
off the light sooner, press
|
| Changing the Display Contrast |
| In manual mode, press FUNC then 9. Use Up/Down keys to set contrast appears. Press ▼ or ▲ to select the contrast then press ENTER. |
| Using The Keylock |
| Once you program
your scanner, you can protect it from accidental program
changes by turning on the key lock feature. When the
keypad is locked, the only controls that operate are FUNC,
SQUELCH, and VOLUME.
|
| To turn
on the keylock, press FUNC
then
|
| To turn
off the keylock, press FUNC
then
|
| Cloning/Uploading/Downloading |
| You can transfer the programmed data to and from another Pro-92/A/B/2067 scanner using the clone cable with a 1/8 -inch mono plug on both ends. You can also upload data from your computer to the scanner with an (optional) one-way cable, or upload/down data to/from your computer with an (optional) two-way cable (or optional USB cable) and the Win92 freeware. |
| To clone one scanner to another, turn on both scanners. Connect the interface cable to the PC/IF jack on each scanner. *CLONE MODE* UP to send, remove cable to exit appears on both scanners. Press ▲ on the sending scanner. Confirm send data? 1= YES Press other key for NO appears. Press 1 to send or any other key to cancel. *CLONE MODE* Receiving... and a progress bar will appear while transferring. When the transfer is complete, *CLONE MODE* UP to send, remove cable to exit will re-appear and you can disconnect the cables. |
| To upload/download to/from your computer, open the .spg file with Win92, turn on the scanner, connect the interface cable to the PC/IF jack on the scanner. Click on 'Scanner' in the menu bar of the Win92 Freeware then 'Upload to Scanner' or 'Download from Scanner'. *CLONE MODE* Receiving... and a progress bar will appear while transferring. When the transfer is complete, *CLONE MODE* UP to send, remove cable to exit will re-appear and you can disconnect the cable. |
| Listening to the Weather Band |
| To hear your local forecast and regional weather information, press WX. The scanner will scan through the weather channels and stop within a few seconds. If it is a weak signal, press WX again to find a stronger channel. |
| To program a weather channel as the priority channel, press WX. Select the weather channel you want to use as the priority channel then press FUNC and PRI. You will see Priority WX while scanning when the priority feature is turned on. If you program a weather channel as the priority channel, the scanner stays in the priority channel only when the scanner detects the weather alert tone. |
| Note: With the Win92 freeware, you can re-program and use the 10 weather channels just like a (conventional) scan bank setting the delay, receive mode (AM and FM only), attenuation, and text tag the channel. |
| Receiving SAME Weather Alerts | Contents |
| The weather service precedes each weather alert with a digitally encoded SAME (Specific Area Message Encoding) signal, then a 1050 Hz tone. You can set the scanner to decode and display the SAME message when an alert is broadcast. Then if you are monitoring a weather channel with a digitally-encoded SAME signal when an alert is broadcast, the scanner will show the type of alert being broadcast (such as Warning, Watch, Statement, or Test Message[?] or Unknown Message if it does not recognize the event code). The scanner does not display the actual messages. It uses only the alert portion of the SAME signal (Warning, Watch, Statement, or Test Message). |
| To turn on the weather alert, while listening to a weather channel, press FUNC then WX. DIG WX STBY and CANCEL: F+WX appear. The scanner's sound will mute and wait for a tone. It will not scan, trunk, or do anything but wait for a tone while the alert is set. |
| To turn off the weather alert, press FUNC then WX. DIG WX STBY and CANCEL: F+WX disappear. The scanner will resume receiving the weather channel. |
| To receive a weather alerts and still scan or search, set the weather channel as the priority channel. See Priority Scanning. |
| Note: Because priority does not work while trunking, you may not receive a SAME alert if you are receiving a trunked channel. Use stand-by mode to be sure to receive any SAME alerts. |
| Scanner Reset |
| If the scanner's display locks up or does not work properly after you connect a power source, you might need to reset or initialize it. If you have problems with the scanner, first try to reset it to retain the memory. |
| To reset the scanner, turn off the scanner then turn it back on. Insert a pointed object, such as a straightened paper clip, into the reset opening to the right of the power jack on the side of the scanner. Then gently press and release the reset button inside the opening. |
| To initialize the scanner, turn off the scanner then turn it back on. Press 0 then 1 when the welcome screen appears. Initializing Please Wait appears for about 20 seconds or so. Do not turn off the scanner while it is initializing. The display should then show M000 on the top line and Bank 0 CH 00. |
| Warning: Initializing the scanner will clear all channel memories and revert it the state it was in right out of the box. |
![]()
| Related Links/Info | Contents |
| How to tell if you have a 92, 92A, or 92B model |
| On the back of the scanner is the model number, 20-522. If there is an "A" in a box next to the number, it's a 92A. if there is a "B" in a box next to the number, It's a 92B. |
| How to view these pages in your browsers |
| I have formatted these pages so that you can view them with any monitor, in any browser (Opera, I.E., or Netscape), at any zoom level, and in any screen area size (ex: 600x800)-small or large fonts. So if the print is too small, go to the 'view' menu in your browser and adjust it to a bigger level (or smaller if you want to see more on the screen). |
| How the scanner trunks and scans |
| The scanner scans through all the conventional channels first, and then the trunking frequencies. If there is no activity (there can be activity in closed mode you won't hear, any active locked out IDs) in the trunking system, the scanner moves to the next bank. When there is no activity in the trunking system for 2 seconds, the scanner moves to the next bank and repeats this process. If you have the freeware, you can change the 2 second delay (called the 'trunk rescan delay') to make it shorter or longer. |
| Finding EDACS LCN order |
| EDACS frequencies have to be programmed in LCN (Logical Channel Number) order. I have found a procedure at the Trunked Radio Systems User’s Page which explains how to find the LCN order for an EDACS system if you don't know the order. Look for 'Finding EDACS Logical Channel Numbers' by Todd Hartzel near the bottom of the page. |
| Checking the fleet map |
 |
|
| Determining Type I Motorola Fleetmaps |
| You can try a method I found at Radio Reference.com. Determining Type I Motorola Fleet Maps. By Dave Goodson. |
| Determining Base/Step/Offset for VHF/UHF Motorola Systems |
| I have found an explanation at Radio Reference.com that describes how to do this if you don't have the information. The Trunked Radio Systems User’s Page also has an explanation. Look for 'Determining Base and Offset Frequencies for the BC245xlt' by John C. |
| Decimal/AFS Conversion Chart |
| Here is a Conversion Chart to help convert your IDs. |
| Finding and reading the date code |
| The date code or date of manufacture is located inside the battery compartment or on the bottom of the 2067. You will see two numbers then a "A" then two more numbers. The first two numbers are the month and the last two are the year. Ex: 04A02 is April of 2002. |
| Newsgroups and Forums |
| You will have to register for the groups. |
| Radio Reference Radio Shack Scanners Forum | Radio Reference Forums |
| Links |
| Radio Reference.com | Radio Reference Data Base |
| Radio Reference Pro 92 Wiki |
eHam.net-reviews |
| Radio Reference Pro 2067 Wiki |
| Software |
| Starrsoft.com-Win92-for the Pro 2067 also | tk92-for Linux, Mac OS X, BSB, Windows, etc. |
![]()
| Last updated July 15, 2024 |