| Easier to Read UBC3500XLT Scanner Manual |
Printed Manual available at Amazon |
| Home |
Last Updated August 18, 2024 |
![]()
| Contents |
| Overview | Scanning 'Systems' |
| Main Features | Viewing Tags or Frequencies |
| Scanning Terminology | Turning System Quick Keys On/Off |
| Understanding Dynamic Memory | Turning Group Quick Keys On/Off |
| Understanding Quick Keys | Holding... |
| Simplex and Repeater Systems | Lockout... |
| Understanding CTCSS/DCS | Storing... |
| Turning on the Scanner/Setting the Squelch/Volume | Attenuation |
| Selecting a Band Plan | Changing Priority Modes |
| Navigating the Menu | Changing Close Call Modes |
| Menu Outline | Locking/Unlocking Systems/Searches |
| Keypad and Knob Controls | Locking/Unlocking Groups |
| A Look at the Display | Locking/Unlocking Channels |
| **Settings Menu** | **Search/Close Call Options Menu** |
| Cloning | Broadcast Screen |
| Locking/Unlocking the Keypad | **Search For... Menu** |
| Viewing Battery Level | Service Search |
| Scanner Reset | Custom Search |
| Planning 'Systems' | Search and Store |
| Worksheets | Searching |
| Entering Text | Quick Search |
| Program 'Systems' | Storing a Displayed Frequency |
| Edit System Name | Reviewing Locked out Frequencies |
| Copying/Deleting Systems | **Close Call Menu** |
| **Edit 'System' Options Menu** | Close Call Only |
| Creating 'Groups' | Close Call Auto Store |
| **Edit Group Menu** | Close Call Hits |
| Programming Freqs into 'Groups' | **Tone-Out For... Menu** |
| Quickly Storing a Frequency | Related Links/Info |
| Programming Frequencies |
| **Edit Channel Options Menu** |
| Priority/Priority Plus Scan |
![]()
| Overview | Contents |
| Again, the manual is like trying to set a watch made in China. My biggest gripe is that is doesn't follow the menu of the radio. So, I have written this manual for myself so I can actually use the scanner and will share it with you. |
| As you have found out by now, this is a whole different animal as far as scanners go. I have tried to write my manual to follow the menu sequences as closely as possible so you can find things a little easier in the radio. |
| It does
have some cool new features: Scan and Search, Close
Call, Dynamic
Memory, an
adjustable 'Hold (scan) time' for each system and search
band, Auto Store (actually an old feature
brought back), signal strength bars, numeric
battery meter, and the ability to hold about 1600 tagged
channels. You can store up to 400 different systems (if
there is enough memory). The 'Automatic Channel Setup'
allows you to enter a frequency without having to change
a step size setting. The Fire Tone-Out sounds like something to
try out. The 'Custom Screen' for Close Call is a plus
if you live in a busy area. With all of the alerts
offered with the radios, the 'Custom
Alert'
feature is nice too. And, of course, computer
upload/download/clone and control. The 'quick keys' allow you to scan any combination of systems. There doesn't seem to be a limit to how many priority channels you can program. The sound quality is great for a 'mini' scanner. When 'tone search' is enabled for searching or for a channel, it will search for CTCSS and DCS tones, not just one or the other. The Close Call feature will run in the background while scanning and/or searching. An AC adapter, computer cable, and batteries come with the scanner. Another recommendation is the freeware FreeSCAN, a 'must have' for the radio. |
| Now the annoying
stuff. Dynamic Memory has its drawbacks because you have
to build everything then program it. Press and
hold for 2 seconds to turn the scanner on?? Press
and hold Func then tap the scroll control to adjust the
squelch?? Why the SMA antenna all of a sudden? No belt
clip; a knob screwed to the back of the scanner to slide
a cumbersome rotating clip. Alpha tagging is best left to
the software. The channels aren't numbered so they can be
hard to find if you have a lot of them in a group. The
squelch tail is long giving a distinct 'chop' at the end
of transmissions; not the nice clean 'click' of my
Pro-97. There is no 'per channel' delay; you must set the
delay for the whole system (all groups, all channels).
The bottom-lit display isn't as bright as my BC246T or
Pro 97. The keypad is probably brighter. An overview of the features can also be viewed at my Conventional Scanner Comparison Chart page. |
| For those of you who are new to dynamic memory, or haven't had a scanner in the last 10 years it is a good idea to read the section on that topic. |
| I will assume you know how to obtain the basic information from the original manual such as following safety procedures, putting the batteries in, connecting the antenna, finding specs, etc. and concentrate on the main functions of the scanner. |
| I hereby absolve myself from anything that happens to anyone or the scanner as a result of the information you will be reading. You are welcome to copy and/or print these pages and use them in the scanning hobby as long as you don't change, redistribute, or charge/accept money for them. I have tried the best I can to make sure everything is accurate here but if I missed a step or you see something that's obviously wrong, please email me. |
| Check back often as this document will be updated and revised from time to time. |
![]()
| Main Features | Contents |
| Dynamically Allocated Channel Memory - organized into 'Systems', 'Groups' (within systems), and channels (within groups). As many channels as memory allows. Typically about 1600 channels with alpha tags. |
| 100 Quick Keys - you can set the scanner so you can select a system or group (or systems or groups) by pressing a single key. This makes it easy to listen to or quickly turn off those systems or groups you don't want to scan. |
| Close Call RF Capture Technology - lets you set the scanner so it detects and provides information about nearby radio transmissions. Close Call 'Do-not-Disturb' checks for Close Call activity in between channel reception so active channels are not interrupted. |
| Scan and Search Operation - lets you include selected service/custom search ranges during scan operation. |
| Fire Tone-Out Standby - lets you set the scanner to alert you if a two-tone sequential page is transmitted. You can set up to 10 settings (transmit frequency, tone frequencies) then select one for standby monitoring. |
| Signal Strength Meter - shows the signal strength for the more powerful transmissions. |
| Battery Meter - shows the battery strength. |
| Air Service Search - frequencies are preset in the air band to make it easy to find specific transmissions. |
| 10 Custom Searches - lets you program up to 10 custom search ranges. |
| Quick Search - lets you search from the currently-tuned frequency if you are searching a system. |
| AGC - helps automatically balance the volume level between different radio systems. |
| Custom Screen - allows you to program the scanner to ignore hits on 10 custom frequency ranges the scanner will ignore during Close Call or search operation. |
| Automatic Channel Setup - accepts frequencies on any valid channel step, even if it does not fall within the band plan's default step. |
| Adjustable Channel/Frequency Step - allows you to set the step (5, 6.25, 7.5, 8.33, 10, 12.5,15, 20, 25, 50 or 100 kHz) of each channel or search band or select auto mode. |
| Search and Store - scanner can be set to automatically store all active frequencies from a service or limit search in a system you select. |
| Priority/Priority Plus Scan - priority channels let you keep track of activity on your most important channels while monitoring other channels for transmissions and you can scan just the priority channels. |
| CTCSS/DCS Search - lets you search for CTCSS or DCS tones when it finds an active frequency in search and close call modes. |
| Adjustable Hold (Scan) Time per System/Search - allows you to adjust the length of time spent scanning each system. |
| CTCSS and DCS Tone Decode - decodes and displays Continuous Tone Code Squelch System tones being transmitted and plays Digital Coded Squelch being received. Also, a tone code only receive option (per channel). |
| Text Tagging - you can name each system, group, channel, custom search range, and Tone-Out using up to 16 characters per name. |
| Custom Alerts - for each alert in the scanner (such as channel alert, Close Call alert, emergency alert), you can select from 9 different tone patterns and also set the alert volume level independently from the main volume level. |
| Adjustable Scan/Search Delay - from 1 to 5 seconds or off (per system or search). |
| Attenuator - you can set the scanner's attenuator to reduce the input strength of strong signals by about 25 dB per channel, search band, or close call band. |
| Repeater Find - You can set the scanner so it switches to the input frequency on a repeater system. |
| Data Skip - allows your scanner to skip unwanted data transmissions and reduces birdies. |
| Duplicate Frequency Alert - alerts you if you try to enter a duplicate name or frequency already stored in the scanner. |
| Search Lockouts - you can lock out up to 200 frequencies in search or close call search. |
| PC Control/Clone - you can transfer data to and from your scanner or another scanner and your personal computer, and control the scanner using a computer. |
| Low Battery Alert - the scanner alerts you if the batteries need to be recharged or replaced. |
| Battery Saver - you can set the scanner so it reduces the amount of power it needs if there are no transmissions. |
| Key Lock - you can deactivate the scanner's keys to help prevent accidentally changing the scanner's programming. |
![]()
| Scanning Terminology | Contents |
| Channel- a programmed frequency location. |
| Scanning- the process of stepping through conventional channels in groups, which are in programmed 'systems'. |
| Searching- the process of searching for active frequencies in quick search, service, custom search, Close Call search, Search and Store, or close Call Auto Store. |
| Function Mode- the mode the radio is in when it's waiting for another key press or scroll. |
| Hold Mode- used for monitoring a single channel, frequency, or Close Call Hit. |
| Menu Mode- used for programming frequencies, systems, groups, and other 'system' settings. |
| Tone-Out Mode- the mode the radio is in when it's monitoring paging tones. |
![]()
| Understanding Dynamic Memory | Contents |
| The scanner's memory is organized in an architecture called Dynamic Allocated Channel memory. This type of memory is organized differently and more efficiently than the bank/channel architecture used by traditional scanners. Dynamic Allocated design matches how radio systems actually work much more closely and make it easier to determine how much memory you have used and how much you have left. No memory space is wasted. |
![]()
| Simplex and Repeater Systems | Contents |
| Simplex systems use a single frequency for both transmit and receive. Most radios using this type of operation are limited to line-of-sight operation. This type of radio is frequently used at construction job sites, and with inexpensive consumer radios such as GMRS/FRS radios. The range is typically 1-8 miles, depending upon the terrain and many other factors. |
| Repeater systems use two frequencies: one transmits from the radio to a central repeater; the other transmits from the repeater to other radios in the system. With a repeater based system, the repeater is located on top of a tall building or on a radio tower that provides great visibility to the area of operation. When a user transmits (on an input frequency), the signal is picked up by the repeater and retransmitted (on an output frequency). The user's radios always listen for activity on the output frequency and transmit on the input frequency. Since the repeater is located very high, there is a very large line of sight. Typical repeater systems provide coverage out to about a 25-mile radius from the repeater location. |
![]()
| Understanding CTCSS/DCS | Contents |
| Continuous Tone
Coded Squelch System (CTCSS) and Digital Coded Squelch
(DCS) are two methods used to prevent interference by
other radio communications. Your scanner can receive
transmissions that use these codes (or more commonly
referred to as tones). CTCSS and DCS systems all use some form of coded squelch. Coded squelch techniques involve the transmission of a special 'code' signal along with the audio of a radio transmission. A receiver with coded squelch only activates when the received signal has the correct 'code'. This lets many users share a single frequency, and decreases interference caused by distant transmitters on the same channel. In all major metropolitan areas of the United States, every available radio channel is assigned to more than one user. Public safety radio systems on the same frequency are usually set up at a distance of 40 miles apart, or more. This means that you may hear transmissions from a distant system when your local system is not transmitting. By programming the CTCSS tone for a local channel the scanner will not stop on transmissions from the distant system. With few exceptions, such as the VHF Aircraft and Marine bands, almost every other VHF or UHF radio system uses some form of coded squelch. By far, CTCSS is the most popular mode among non-trunked systems. For more information visit Radio Reference's respective pages on CTCSS and DCS. |
![]()
| Turning on the Scanner/Setting the Squelch/Volume | Contents |
|
Press and hold
|
| Right away you may want to check these settings in the 'Settings' menu. Set Backlight, Adjust Key Beep, Adjust Contrast, and Set Serial Port (if you plan to upload/download). |
| You will only be able to do a service search, custom search, search and store, close call search, or close call auto store until you program systems. |
![]()
| Selecting a Band Plan |
| The charts below
identify the scanner band plans, the frequency range, the
modulation mode and the default step size settings. To Change the Band Plan: 1. Make sure the power is turned off. 2. While holding down 1, 2 or 3 (corresponding number of the band plan), turn on the scanner. |
| The modulation
settings for the channels/frequencies in the above
receive bands are default settings. The user can change
the modulation to AM/FM/NFM/WFM or AUTO for each
channel or custom (not service) search band. There is no step selection for programming channels because the scanner will automatically accept any available step size. |
|
Band Plan 1 |
Band Plan 2 |
Band Plan 3 |
|||||||||||
|
Frequency (MHz) |
Modulation | Step (kHz) |
Frequency (MHz) |
Modulation | Step (kHz) |
Frequency (MHz) |
Modulation | Step (kHz) | |||||
| Lower | Upper | Lower | Upper | Lower | Upper | ||||||||
| 25.000 | 29.995 | FM | 5 | 25.000 | 49.995 | FM | 5 | 25.000 | 29.995 | FM | 5 | ||
| 30.000 | 79.9875 | FM | 12.5 | 50.000 | 84.010 | FM | 5 | 30.000 | 79.99375 | FM | 6.25 | ||
| 80.000 | 82.990 | FM | 10 | 84.015 | 87.295 | FM | 20 with 15kHz Offset |
80.000 | 82.99375 | FM | 6.25 | ||
| 83.000 | 87.2875 | FM | 12.5 | 87.300 | 107.950 | FMB | 50 | 83.000 | 87.29375 | FM | 6.25 | ||
| 87.300 | 107.950 | FMB | 50 | 108.000 | 136.9875 | AM | 12.5 | 87.300 | 107.950 | FMB | 50 | ||
| 108.000 | 136.9875 | AM | 12.5 | 108.000 | 136.99166 | AM | 8.33 | 108.000 | 136.9875 | AM | 12.5 | ||
| 108.000 | 136.99166 | AM | 8.33 | 137.000 | 143.995 | FM | 5 | 108.000 | 136.99166 | AM | 8.33 | ||
| 137.000 | 137.995 | FM | 5 | 144.000 | 145.9875 | FM | 12.5 | 137.000 | 137.995 | FM | 5 | ||
| 138.000 | 157.9875 | FM | 12.5 | 146.000 | 155.990 | FM | 10 | 138.000 | 157.99375 | FM | 6.25 | ||
| 158.000 | 160.590 | FM | 10 | 156.000 | 157.425 | FM | 12.5 | 158.000 | 160.59375 | FM | 6.25 | ||
| 160.600 | 162.5875 | FM | 12.5 | 157.4375 | 160.5875 | FM | 12.5 | 160.600 | 162.59375 | FM | 6.25 | ||
| 162.600 | 173.990 | FM | 10 | 160.600 | 162.025 | FM | 12.5 | 162.600 | 173.99375 | FM | 6.25 | ||
| 174.000 | 215.950 | WFM | 50 | 162.030 | 173.990 | FM | 10 | 174.000 | 215.950 | WFM | 50 | ||
| 216.000 | 224.995 | FM | 5 | 174.000 | 215.950 | WFM | 50 | 216.000 | 224.995 | FM | 5 | ||
| 225.000 | 399.950 | AM | 50 | 216.000 | 224.995 | FM | 5 | 225.000 | 399.950 | AM | 50 | ||
| 400.000 | 405.9875 | FM | 12.5 | 225.000 | 399.950 | AM | 50 | 400.000 | 405.9875 | FM | 12.5 | ||
| 406.000 | 439.99375 | FM | 6.25 | 400.000 | 405.9875 | FM | 12.5 | 406.000 | 439.99375 | FM | 6.25 | ||
| 440.000 | 465.995 | FM | 5 | 406.000 | 439.99375 | FM | 6.25 | 440.000 | 465.99375 | FM | 6.25 | ||
| 466.000 | 469.990 | FM | 10 | 440.000 | 449.99375 | FM | 6.25 | 466.000 | 469.99375 | FM | 6.25 | ||
| 470.000 | 512.000 | FM | 6.25 | 450.000 | 469.990 | FM | 10 | 470.000 | 512.000 | FM | 6.25 | ||
| 806.000 | 960.000 | FM | 12.5 | 470.000 | 512.000 | FM | 6.25 | 806.000 | 960.000 | FM | 12.5 | ||
| 1240.000 | 1300.000 | FM | 12.5 | 806.000 | 960.000 | FM | 12.5 | 1240.000 | 1300.000 | FM | 12.5 | ||
| 1240.000 | 1300.000 | FM | 12.5 | ||||||||||
![]()
| Navigating the Menu |
| The scanner's menu lets you select options that let you set up and use the scanner. To use the menu, press the Menu button on the left side of the scanner. To select a menu item, rotate the scroll control clockwise or counterclockwise. The currently-selected menu item is highlighted with a bar on the display. When the menu item you want to select is highlighted, press E/yes or the scroll control to select it. To back up a level, press Menu. To exit the menu press L/O or Scan. To see a complete outline of the menu go here. |
![]()
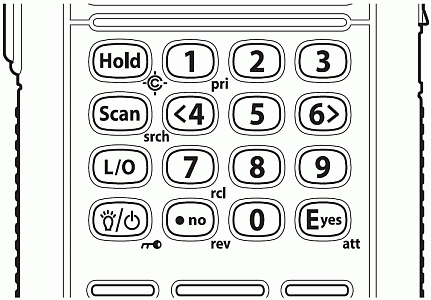
| Keypad and Knob Controls | Contents |
|
| Key | Function(s) |
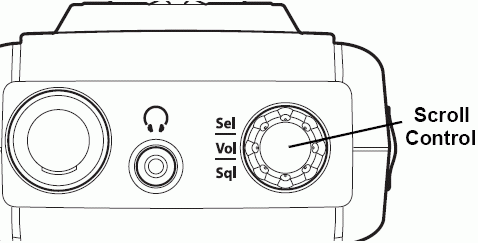
| Scroll Control, Sql, Vol |
Press to select a menu item or save an entry in Menu Mode. Press once then turn to adjust volume level and view battery info in Scan Mode. Turn to select scan/search direction and to continue scan/search in Scan/Search Modes. Turn to select channel or frequency in Scan/Search Hold Modes. Turn to scroll to a menu item in Menu Mode. Turn to select Tone-Outs in Tone-Out Mode. Turn to select characters when editing text. Press and hold Func then Vol to adjust squelch in Scan Mode. |
| Menu | Press to enter Menu Mode. Press to return to previous menu. Press and hold Func then Menu to go to the 'Edit' menu for the current system in Scan Mode. Press and hold Func then Menu to go to the 'Search for...' menu in Search Mode. Press and hold Func then Menu to go to the 'Close Call' menu in Close Call Only Mode. Press and hold Func then Menu to go to the 'Tone-Out for...' menu in Tone-Out Mode. |
| Func | Press and hold to enter Function mode. |
| Hold/ |
Press to hold on a
channel, frequency, search, Close Call hit, or Tone-Out search. Press
again to resume. Press to recall the last Close Call Hit in Close Call Only Mode. Press and hold Func then Hold/ |
| Scan/Srch | Press to
start/continue/resume scanning in Scan Mode. Press and hold Func then Scan/Srch to start/continue/resume searching in Search Mode. Press and hold Func then Scan/Srch to start a 'quick search' at the current frequency while scanning a system in Scan Mode. |
| L/O | Press to lockout a channel in Scan
Mode. Press to lockout a frequency in Search Mode. Press and hold to unlock (and enable) all groups and channels in a system in Scan Hold Mode. Press and hold to unlock all frequencies of all search ranges/Close Call in Search Hold Mode. Press and hold Func then L/O to lockout a system/search in Scan Mode. Press and hold Func then L/O to review and unlock search frequencies in Search/Close Call Only Modes. Press to exit Menu Mode or return to the last mode. |
|
|
Press
and hold for more than 2 seconds to turn the scanner on
or off. Press to turn the display backlight on or off. Press and hold Func then |
| Number Keys | Enter any frequency to go directly to in Scan/Search
Hold Modes. Press 1-9 to toggle single-digit system quick keys on or off in Scan Mode. Press 0-9 to toggle custom searches on or off in Search Mode. Press <4 to move the cursor to the left when editing text. Press 6> to move the cursor to the right when editing text. Press and hold Func then 1(Pri) to toggle priority modes in Scan Hold Mode. Press and hold Func then 0-9 to toggle group quick keys on or off in Scan Mode. Press and hold Func then 5 to toggle between frequency or text display in Scan Hold Mode. Press and hold Func then 7 to scroll to a system/group/channel in Scan Hold Mode. |
| (.)no /rev | Press
to cancel an error or warning message. Press before entering a 2-digit system quick key to turn on or off in Scan Mode. Press to enter a decimal point for a frequency while programming. Press twice to delete current character when editing text. Press 3 times to delete all characters when editing text. Press and hold Func then press and hold (.)no/rev to view the repeater frequency in Scan/Search/Close Call Only Hold Modes. |
| E/yes(att) | Press to select a
menu item or save a name in Menu Mode. Press to enter the Menu mode for a displayed channel in Scan Mode. Press to enter the Menu mode for the current Tone-Out in Tone-Out Mode. Press to 'quick store' a frequency in Search/Close Call Only Modes. Press and hold Func then E/yes(att) to toggle the attenuator on/off for a channel in Scan Hold Mode. Press and hold Func then E/yes(att) to toggle the attenuator on/off in Search/Close Call Only/Tone-Out/Modes. |
![]()
| A Look at the Display | Contents |
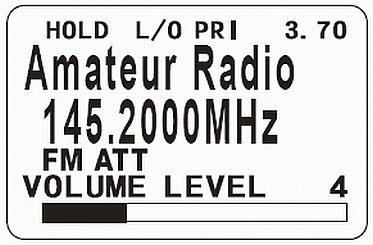
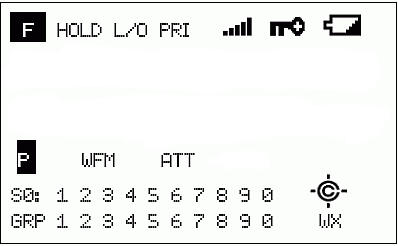 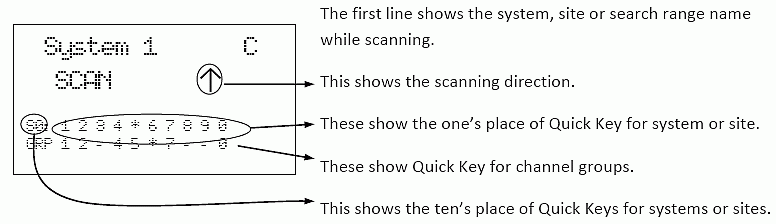 |
| The display has indicators that show the scanner's current operating status. The display information helps you understand how your scanner operates. |
| Top Line |
|
DSKP appears when data skip is on in Scan/Search Modes. HOLD appears in Hold Mode. L/O appears if the system/group/channel/frequency/search is locked out in Hold Mode. PRI appears in priority mode and blinks in priority plus mode in Scan Mode. shows the battery level when you press Vol in Any Mode. |
| 2nd Line |
| shows
the name of the currently scanned system in Scan Mode. shows the name of the currently searched custom/service search in Search Mode. will alternate the system name and channel group name for a system in Receiving or Hold Modes. |
| 3rd Line |
| will scroll 'SCAN' and show an up or down arrow to indicate the scan
direction in Scan Mode. will scroll the search frequency range/channels and an up or down arrow to show the scan direction in Search Mode. shows the frequency (or text tag if programmed) for a channel in Receiving or Scan Hold Modes. shows the search frequency in Receiving or Search Hold Modes. shows the frequency in Receiving or Search Hold Modes. will scroll SEARCH in Close Call Only Mode. |
| 4th Line |
|
shows the receive modulation of the channel in Receiving or Hold Modes. shows the receive modulation of the custom/service search in Search Mode. ATT appears if the channel/search is attenuated in Receiving or Hold Modes. shows the tone code (if received) for a frequency if programmed and blinks in CTCSS/DCS search mode in Receiving or Hold Modes. |
| 5th Line |
| S0-9:
shows the first digit of
(systems assigned to) the
currently scanned
quick key on the left with the blinking
second digit (1-0) on the right
in Scan
or Receiving Modes. In Hold Mode, only (systems assigned to) the current quick key appears. |
| a non-blinking
number on the right indicates the quick key is enabled waiting to
be scanned. a - (dash) means nothing is assign to the quick key. an * (asterisk) means the quick key is turned off. |
|
SCR appears if one or more broadcast/custom screen bands is turned on in Receiving or Search Modes. REP appears if Repeater Find is turned on in Receiving or Search Modes. shows the volume level is ready to adjust if you press Vol. shows the squelch is ready to adjust if you press and hold Func then Vol. |
| 6th Line |
| GRP
shows the group quick keys (1-0) for each system
with
(groups assigned to) the
currently scanned
quick key blinking
in Scan
or Receiving Modes. In Hold Mode, only (groups assigned to) the current quick key appears. |
| a non-blinking
number on the right indicates the quick key is enabled waiting to
be scanned. a - (dash) means nothing is assign to the quick key. an * (asterisk) means the quick key is turned off. |
![]()
| Settings Menu |
| To
Edit Settings: Press Menu. Scroll to 'Settings' and press E/yes. Scroll to the setting and options below and press E/yes. Press Scan/Srch to return to scanning when done with editing. |
| Set Backlight | PC Control | ||
| Adjust Key Beep | Cloning | Locking/Unlocking the Keypad | |
| Set Battery Save | See Scanner Info | Viewing Battery Level | |
| Set Audio AGC | % Memory Used | Scanner Reset |
| Adjust Contrast | Firmware Version |
| Contents |
|
Set Backlight To use the backlight press
|
| Scroll
to 'Set Backlight' and press E/yes. Scroll to 1 of the 5 settings and press E/yes to save and exit. 10 sec - The backlight stays on for 10 seconds after you press 30 sec - The backlight stays on for 30 seconds after you press Squelch - The backlight turns on when the squelch opens then stays on for 5 seconds. Keypress - The backlight turns on when any key is pressed then stays on for 10 seconds. Infinite - The backlight turns on when you press |
| Adjust Key Beep This setting turns the key beep on or off and adjusts the volume level. |
| Scroll
to 'Adjust Key Beep' and press E/yes. Scroll to 1 of 3 settings and press E/yes: Auto - the scanner automatically sets the key beep to match the master volume setting level you select. Level 1-15 - the scanner lets you select a key beep level. You can choose any of 15 different key beep levels. Off - the scanner turns the key beep off. Press Scan to exit. |
| Scroll
to 'Set Battery Save' and press E/yes. Scroll to On or Off and press E/yes. Press Scan to exit. |
| Set Audio AGC This setting helps balance the audio level you hear as you listen to different radio sources so you can hear them at a similar volume. |
| Scroll
to 'Set Audio AGC' and press E/yes. Scroll to On or Off and press E/yes. Press Scan to exit. |
| Adjust Contrast This setting controls the display's contrast (how light or dark it appears). |
| Scroll
to 'Adjust Contrast' and press E/yes. At 'Contrast 1-15' scroll to the preferred contrast level and press E/yes. Press Scan to exit. |
| Scroll
to 'PC Control' and press E/yes.
Scroll to Off, 9600, 19200, 38400, 57600, or 115200 and press E/yes. Press Scan to exit. |
| Contents |
| For
each scanner, press Menu. Scroll to 'Xfer
Information' and press E/yes. Scroll to 'Wired Clone' and press E/yes. Scroll to 'Master' and press E/yes for the source scanner. Scroll to 'Slave' and press E/yes for the destination scanner. When you are ready to clone the scanner, press Scan on the slave scanner first, then Scan on the master scanner. The master scanner checks the connection between the two scanners, then transfers its data to the slave scanner. When the transfer is complete, 'Complete' appears on both scanners. If the transfer did not work, 'Error' appears on the master scanner. Press Scan to exit. |
| See Scanner Info |
| % Memory Used This setting lets you view the amount of memory left in the scanner. |
| Scroll
to 'See Scanner Info' and press E/yes.
Scroll to '% Memory Used' and press E/yes. Press Scan to exit. |
| Firmware Version Allows you to view the firmware version. |
| Scroll
to 'See Scanner Info' and press E/yes.
Scroll to 'Firmware Version' and press E/yes. Press Scan to exit. |
| Locking/Unlocking the Keypad: |
| Hold
on any channel. Press Func then
|
| Scanner Reset: To initialize the scanner's memory, turn off the scanner. Then press 2, 9, and Hold while turning it on. |
| Important! This deletes all preprogrammed data. You cannot restore preprogrammed data that has been deleted. |
![]()
| Planning Systems and Groups | Contents |
| Planning your
systems will be very important even if you do have the
software. Organizing your Quick Keys will be the hardest part of the planning.
You can assign quick keys and copy and paste most of the
freqs, and alpha tags easily into the software. I like to scan by general interest so I set my system quick keys accordingly; 1-Public Safety systems, 2-Air, 3-Military, 4-Federal, etc. Then I will nest my groups (ex: Fire, Police, EMS) within the systems, and give them all group quick keys. Unless you always want a group or system on, assign it a quick key; it's easier to turn the quick key off than to lockout or unlock the group or system (IMHO). So, you have to figure out which systems and groups to assign to your quick keys so you can scan them without a table of contents and with some sort of logic you can remember. Use the worksheets below to help you plan your systems and groups. Alerts You can program your scanner to alert you when, a channel is received, you receive a Close Call hit, or you receive a Tone-Out hit. For each alert in the scanner, you can select from 9 different tone patterns, and 15 volume settings. |
| Worksheets |
| I have put together complete worksheets ready to print to help you plan your systems, Close Call, and Fire Tone-Out, etc. settings. Even if you don't fill them out, they are a good check list for programming. |
| PDF Worksheets |
![]()
| Entering Text | Contents |
| To program text you must first program the system, group, channel, or custom search. There are links to refer you back here when you have finished programming. |
| To enter a letter, turn the scroll control
until the character you want appears. (character order clock-wise is upper-case, lower-case, numbers, then special characters). To enter a decimal point, press (.)no. To move the cursor to the right, press 6>. To move the cursor to the left, press <4. To clear a character or enter a space, press (.)no twice. To clear all characters, press (.)no 3 times. Press E/yes when finished to exit. Press the 'Back' button in your browser to return to programming. |
![]()
| Programming Systems | Contents |
| You
have to create systems first, create groups in the
systems, create channels in the groups, then
program your frequencies into the channels. Or, you can
Quick store Frequencies. You can store up to 200
systems, up to 20 groups per system, and up to 200
channels per group. Total channels are limited to about
2500. Channels that have text tags use more memory than
those that do not. If you use a text tag for every
channel, total channels are about 1600. One suggestion; assign every group and every system to a quick key. You can assign as many systems you want to a system quick key and as many groups you want to a group quick key. That way you can just turn systems and groups on and off and not have to worry about locking them out. If you don't assign a system or group to a quick key, you have to lock it out if you don't want to scan it. Use the worksheets to help you program your systems and groups. |
| To Create a New System, press Menu. At 'Program System' press E/yes. |
| At 'Select
System' scroll to 'New System'
and press E/yes. At 'Edit Name' press E/yes. See Entering Text. Then see Editing System Options to customize the system. Then see Creating Groups. Then see Programming Channels to program frequencies. |
| To Edit the System Name, press the Menu button. At 'Program System' press E/yes. |
| At 'Select
System' scroll to the system that you want to
assign a name to and press E/yes. At 'Edit Name' press E/yes. See Entering Text. Press Scan to exit. |
| To Copy a System, press Menu. At 'Program System' press E/yes. |
| At 'Select
System' scroll to the system you want to copy
and press E/yes. Scroll to 'Copy System' and press E/yes. At 'New Sys Name?' enter the name of the new copied system. Press Scan to exit. Copying a system will copy all groups, channels, and settings including quick key assignments. |
| To Delete a System, press Menu. At 'Program System' press E/yes. |
| At 'Select
System' scroll to the system you want to delete
and press E/yes. Scroll to 'Delete System' and press E/yes. At 'Confirm Delete?' press E/yes. Press Scan to exit. |
![]()
| Editing System Options Menu |
| Once you have your Systems
Created you
can configure your System options. |
|
To Edit System Options
press Menu.
At 'Program System' press E/yes.
At 'Select System' scroll to the system
that you want to edit and press E/yes. Scroll to 'Edit Sys Option' and press E/yes. Scroll to the options below and press E/yes. Press Scan/Srch to return to scanning when done with editing. |
| Set Quick Key | Set Lockout | Set Hold Time | Set Delay Time | Set Data Skip |
| Contents |
| Set Quick Key assigns a system to a quick key and will be scanned when the key is turned on. The default setting is no quick key. |
| Scroll
to 'Set Quick Key' and press E/yes. Scroll to the quick key number (or . for no quick key) you want to assign to the system and press E/yes to save and exit. |
| Note: Pressing the first number of a 2-digit quick key will get you closer, 1 for 10, 2 for 20, etc. |
| Set Lockout determines whether a system will be scanned or not even if the quick key for the system is turned on. The default setting is Unlocked. |
| Scroll
to 'Set Lockout' and press E/yes. Scroll to 'Locked' or 'Unlocked' and press E/yes to save and exit. |
| Set
Hold Time sets (in seconds) the amount of time the
scanner will scan the system before moving on to the next
(unlocked) system. All unlocked channels will be scanned
at least once regardless of this setting. The scanner
moves to the next system after the hold time expires, any
current transmission ends, and the channel delay time
expires. The default setting is 2 seconds for each
system. Tip: set your systems to 0. |
| Scroll
to 'Set Hold Time' and press E/yes. Enter the hold time (0-255 seconds) you desire and press E/yes to save and exit. |
| Set Delay Time for the system sets (in seconds) the amount of time the scanner stays on a channel after the transmission has ended before resuming scanning. This setting applies to all channels in the system. You cannot set the delay on a 'per channel' basis. The default setting is 2 seconds. |
| Scroll
to 'Set Delay Time' and press E/yes. Scroll to the desired delay time (1-5 seconds or Off) and press E/yes to save and exit. |
| Set Data Skip sets what the scanner does when it receives a data signal. With the setting set to on, the scanner stops briefly on the channel, but then immediately resumes scanning automatically. With the setting set to off, the scanner remains on the channel until the transmission stops. The default setting is Off . |
| Scroll
to 'Set Data Skip' and press E/yes. Scroll to On or Off and press E/yes to save and exit. |
![]()
| Creating Groups |
| Once you have your Systems
Created and
your Systems Options configured you can create
your groups. |
| To Create a New Group press Menu. At 'Program System' press E/yes. |
| At 'Select
System' scroll to system where you want to
create a group and press E/yes. Scroll to 'Edit Group' and press E/yes. At 'Select Group' scroll to 'New Group' and press E/yes. At 'Edit Name' press E/yes. See Entering Text. Press Menu and scroll to 'New Group' to create more groups. Continue at 'Edit Name' below. Then see Programming Channels to program frequencies. |
| Edit Name | Edit Channel | Set Lockout |
| Set Quick Key | Delete Group |
| Contents |
| Edit Name allows you to change the name of a group. |
| At 'Edit Name' press E/yes. See Entering Text. |
| Set Quick Key sets the quick key for the group. |
| Scroll
to 'Set Quick Key' and press E/yes. Scroll to or enter the quick key number (0-9 or . for no quick key) you want to assign to the group and press E/yes to save and exit. |
| Edit
Channel creates channels and edits channel options. See Programming Channels. |
| Delete Group deletes a group. |
| Scroll
to 'Delete Group' and press E/yes. At 'Confirm Delete?' press E/yes to save and exit. |
| Set Lockout locks or unlocks a group. |
| Scroll
to 'Set Lockout' and press E/yes. Scroll to 'Unlocked' or 'Lockout' and press E/yes to save and exit. |
![]()
| Programming Channels into Groups | Contents |
| Once you have your Systems Created, Systems Options configured, Groups Created, you can (finally) program your channels. Channels are not numbered in the scanner. |
| Quickly Storing a Frequency |
| To
Program a Frequency into a 'Quick Save Group' in a 'Quick
Save System',
in scan mode press Hold to hold on any
channel. Enter the frequency and press E/yes. At 'Quick Freq Save?' press E/yes. |
| Note: If the frequency is already stored in the group, 'Frequency Exists Accept? (Y/N)' appears. Press (.)no to return. |
| The
scanner will save the frequency in a (created) group
called 'Qck Save Grp' in a (created)
system called 'Qck Save Cnv Sys' (with
no quick keys assigned) and you will be at the 'Edit Channel' menu to complete the settings for the new
channel. If you don't want to edit the channel settings
or are done editing the channel, press L/O
to return to 'Hold' to enter another
frequency or Scan to exit. Then see Edit Systems Options to customize the group and system. |
| To
Program a Frequency into an Existing Group, in scan mode press Hold to
hold on any channel. Enter the frequency and press E/yes. At 'Quick Freq Save?' press (.)no. At 'Select System' scroll to the system where you want to store the frequency and press E/yes. At 'Select Group' scroll to the group where you want to store the frequency and press E/yes. |
| Note: If the frequency is already stored in the group, 'Frequency Exists' Accept? (Y/N)' appears. Press (.)no to return. |
| After storing the frequency, you will be at the 'Edit Channel' menu to complete the settings for the new channel. If you don't want to edit the channel settings or are done editing the channel, press L/O to return to 'Hold' to enter another frequency or Scan to exit. |
| Manually Programming Channel Frequencies | Contents |
| To
Program a New Channel, press Menu. At 'Program
System' press E/yes. At 'Select System' scroll to system where you want to program a channel and press E/yes. Scroll to 'Edit Group' and press E/yes. At 'Select Group' scroll to the group that you want to program the channel in and press E/yes. Scroll to 'Edit Channel' and press E/yes. At 'Select Channel' scroll to 'New Channel' and press E/yes. At 'Input Frequency' enter the frequency and press E/yes. |
| Note: If the channel is already stored in the group, Frequency Exists Accept? (Y/N)' appears. Press (.)no to return. |
| At 'Edit
Name' press E/yes. See Entering
Text. Press Menu to return to 'Select Channel'. Scroll to 'New Channel' and press E/yes. Program the rest of the channels the same way. Then see Edit Channel Options to customize the channel. |
![]()
| Edit Channel Options Menu |
| Once you have your Systems built , systems options configured, groups built, and your channels programmed, you can set your channel options. |
| To
Edit Channel Options: Press Menu. At 'Program System' press E/yes. At 'Select System' scroll to the system that contains the channel and press E/yes. Scroll to 'Edit Group' and press E/yes. At 'Select Group' scroll to the group that has the channel you want to edit and press E/yes. Scroll to 'Edit Channel' press E/yes. At 'Select Channel' scroll to the channel you want to edit and press E/yes. Or, while scanning, Press Hold to hold on any channel. Press and hold Func then press 7/Rcl. At 'Select System' scroll to system that contains the channel and press E/yes. At 'Select Group' scroll to the group that contains the channel and press E/yes. At 'Select Channel' scroll to the channel and press E/yes twice. You can also edit any displayed channel in scan mode by pressing E/yes. Scroll to the options below and press E/yes. Press Scan/Srch to return to scanning when done with editing. |
| Edit Name | Copy/Paste Channel | Set Modulation |
| Set Priority | Edit Frequency | Set Attenuator |
| Set Alert | Set CTCSS/DCS | Set Lockout |
| Delete Channel |
| Contents |
| Edit Name The channel name appears on the second line of the display when the scanner stops on a channel. If you do not enter a channel name, the scanner displays the frequency for systems when it stops on a channel. |
| Scroll
to 'Edit Name' and press E/yes.
See Entering Text. Press Scan to exit or Menu to return. |
| Channel Priority This setting
controls whether the scanner treats the channel as a
priority channel while scanning. There doesn't seem to be
a limit to how many channels you can set. When you turn
on the Priority feature, the channel(s) will be scanned
every 2 seconds. P appears at the end of
the default (not the tagged) name in the display to
denote the channel is a priority channel. The default setting is off. |
| Scroll
to 'Set Priority' and press E/yes. Scroll to On or Off and press E/yes to save and exit. |
| Channel Alert This setting controls whether the scanner will alert you when the channel becomes active. The default setting is off. |
| Scroll
to 'Set Alert' and press E/yes. Scroll to the alert (Alert 1-9 or Off) and press E/yes. |
| At 'Set Level' scroll to 'Level 1-15 or Auto' (the scanner sets the alert beep to the master volume level) and press E/yes. |
| Deleting Channels |
| Scroll
to 'Delete Channel' and press E/yes. At 'Confirm Delete?' press E/yes to save and exit. |
| Copying/Pasting Channels The scanner can copy a channel (and all its settings) into a copy buffer to paste into the same system (in a different group) or a group in another system. |
| Scroll
to 'Copy Channel' press E/yes
to save to the channel buffer. To Paste the Channel, press Menu until 'Select System' appears. At 'Select System' scroll to system where you want to paste the channel and press E/yes. Scroll to 'Edit Group' and press E/yes. At 'Select Group' scroll to the group that you want to paste the channel in and press E/yes. Scroll to 'Edit Channel' and press E/yes. At 'Select Channel' scroll to 'Paste Channel' and press E/yes to save and exit. |
| Edit Frequency | Contents |
| Scroll to 'Edit Frequency' and press E/yes. Enter the frequency and press E/yes to save and exit. |
| Set CTCSS/DCS |
| This setting controls how a subaudible CTCSS or DCS is used for the channel. The default setting is Off. See Understanding CTCSS/DCS. |
| Scroll
to 'Set CTCSS/DCS' and press E/yes. Scroll to 1 of 5 options and press E/yes to save and exit: Off - any signal opens squelch. Search - the scanner searches for and displays any CTCSS or DCS tone that accompanies the transmission. CTCSS - the scanner only opens squelch if the CTCSS tone you select is also present with the signal. Scroll to the desired CTCSS tone you want present with the signal. Press E/yes to save and exit. DCS- the scanner only opens squelch if the DCS code you select is also present with the signal. Scroll to the desired DCS code you want present with the signal. Press E/yes to save and exit. Set Lockout - the scanner does not stop on the channel if the tone/code you select is present. Scroll to 'CTCSS or DCS' and press E/yes. Scroll to the desired tone/code you want locked out. Press E/yes to save and exit. |
| Set Modulation This setting selects the modulation used for setting the channel. The default setting is auto. |
| Scroll
to 'Set Modulation' and press E/yes. Scroll to Auto, AM, FM, NFM, WFM, or WFM(Broadcast) and press E/yes to save and exit. |
| Set Attenuator This setting controls whether the scanner attenuates signals on this channel by about 25 dB. The default setting is off. |
| Scroll
to 'Set Attenuator' and press E/yes. Scroll to On or Off and press E/yes to save and exit. |
| Note: You can also do this by quickly pressing Func then E/yes(att) while receiving the channel in scan mode. |
| Set Lockout |
| Scroll
to 'Set Lockout' and press E/yes. Scroll to On or Off and press E/yes to save and exit. |
![]()
| Priority/Priority Plus Scan | Contents |
| To use the priority feature, you must first set your priority channels. |
| To Turn the Priority Feature On, press Hold to hold on any channel then press and hold Func then press 1/Pri (each time) to select one of two priority modes or off. |
| Off - scans normally with no priority. | |
| On
- while
scanning a system, the scanner interrupts every 2 seconds
and checks the priority channels in each system. Priority channels in systems with lower 'system quick keys' (starting with 1) have highest priority. Pri appears in the display when you select this mode. |
| Plus On - the scanner only scans the priority channels. Pri flashes in the display when you select this mode. |
| Press Scan to resume scanning. |
| Or, in scan mode press Menu.
Scroll to 'Set Priority' and press E/yes. Scroll to the mode you want to use and press E/yes. |
| Press Scan to resume scanning. |
| Note: The quick keys for the system(s) and group(s) containing the priority channel(s) have to be turned on (and groups and systems have to be unlocked) or the scanner will display Priority Scan No Channel. |
![]()
| Scanning Systems | Contents |
| With all previous scanners, you
selected banks to scan that had channels stored in them. With this
scanner, you select 'System Quick Keys' to scan that have 'Systems'
assigned to them. So, now you turn 'System Quick Keys' on and
off and 'Group Quick Keys' on and off (within each 'System').
Turning quick keys on and off for systems/groups is not the same as
locking and unlocking systems/groups. You can still do that separately
(if you really want to confuse yourself). See also Understanding Quick Keys.
First, (unlocked) systems belonging to Quick Key 1
are scanned. Then systems that belong to Quick Key
2,…,9,0,11,…19,10,21,……,99,90 are scanned in order. Systems with
the same quick key are scanned in order of creation. Systems with
no quick key are scanned last and in order of creation (including
created 'Quick Save' systems). Groups within
the systems are scanned with the same rules. Channels
within the groups are scanned in order of creation. You can also unlock any service or custom search to include it while scanning. Service search bands and custom searches don't have quick keys and can be only locked or unlocked. |
| Press Scan. The scanner scans a system for the duration you set using the 'system hold time' option. The scanner moves to the next system after the hold time expires, the current transmission ends, and the channel delay expires. All (unlocked) channels are scanned at least one time regardless of the hold time setting. Then all unlocked searches are run for the duration you set using the 'set hold time' option. |
|
Notes:
If no systems are programmed, or all systems (or groups
in a system) are locked out or turned off, 'Nothing
to Scan' appears. Turn on a system quick key or unlock a
system to scan. If you turn off all groups in a system you will not
be able to turn any back on and also see 'Nothing
to Scan'. In that
case, while in Scan mode, press and hold Func-don't
let go. Scroll to the system then press the number of the group quick
key(s) you want to enable then let go of Func. |
|
|
To continue scanning (move on to the next channel) press Scan/Srch or turn the scroll control. |
|
|
To change the scan or search direction turn the scroll control backward or forward. |
|
To toggle between frequency and text display Hold on any channel and press Func then 5. Press Hold to resume. |
|
To toggle System Quick Keys on or off for a single digit system, press the number key assigned to the system. To turn a double-digit system on or off, Press (.)No first then enter the 2 digits. |
|
To toggle Group Quick Keys on or off while scanning the system, quickly press and hold Func then press the number key assigned to the group. |
|
|
To toggle
Group Quick Keys on or off in
another system press
and hold Func-don't let go. |
|
To hold on a channel press Hold. To step through channels, turn the scroll control backward or forward. Press Hold to resume. |
|
|
To hold on any specific frequency Hold on any channel in a system. Enter the new frequency and press Hold. Press Scan/Srch to exit. |
|
|
To hold on the current system press and hold Func-don't let go. (You won't see tags). Scanning resumes 2 seconds after you release the Func button. |
|
|
To edit the current channel press E/yes. |
|
To lockout a channel or frequency quickly press L/O. |
|
|
To lock or unlock a group Hold on any channel or frequency. Press and hold Func then 7/Rcl. At 'Select System' scroll to system that contains the group and press E/yes. At 'Select Group' scroll to the group you want to lock/unlock then press and hold Func then L/O. Press Scan to resume scanning. See also Locking/Unlocking Groups. |
|
|
To lockout a system/search while receiving the system/search, quickly press Func then L/O. |
|
To store a search frequency press E/yes. Then see Storing a Displayed Frequency. |
|
To toggle attenuation for a channel on or off quickly press and hold Func then press E/yes(att) while the channel is in the display. (Or hold first). |
|
|
To toggle attenuation for a search on or off quickly press and hold Func then press E/yes(att) while searching. (Or hold first). |
|
|
To check for a repeater frequency on a channel quickly press and hold Func then press and hold .no(rev). (Or hold first). |
|
To toggle Priority Modes press Hold to hold on any channel then press and hold Func then 1/Pri. Press Hold to resume. |
|
To toggle Close Call modes press and hold Func then press Hold/ |
|
|
To view a Close Call hit (CC Override On) press any key to view the frequency (even if it's gone). |
|
|
To view and listen to a Close Call hit (CC Override Off) press E/yes to listen to and view the frequency (only if it's still there). |
|
|
To unlock a channel Hold on any channel or frequency. Press and hold Func then 7/Rcl. At 'Select System' scroll to system that contains the channel and press E/yes. At 'Select Group' scroll to the group that contains the channel and press E/yes. At 'Select Channel' scroll to the channel you want to lock/unlock then press and hold Func then L/O. Press Scan to resume scanning. See also Locking/Unlocking Channels. |
|
|
To unlock a system/search press and hold Func-don't let go then scroll to the system/search and press L/O. Releasing Func will return to scanning. See also Locking/Unlocking Systems/Searches. |
|
|
To unlock search frequencies press and hold Func then L/O while searching. Scroll to the frequency and press E/yes to unlock. |
![]()
| Locking/Unlocking Systems and Searches | Contents |
| Remember, unlocking or
locking out a system is not the same thing as enabling/disabling it (turning
the quick key on or off). |
| To Lock out a
System (or a search set to search with scan) in Scan Mode
While receiving the system/search, quickly press
and hold Func then L/O. Or, Hold on any channel/frequency. Press and hold Func then 7(rcl). Scroll to the system/search you want to lockout and press and hold Func then L/O. Or, use the Menu to drill down to the system/search options and lock it out there. See 'Edit System Options', 'Edit Service Search', or 'Edit Custom Search'. |
| To Unlock a
System (or a search set to search with scan) in Scan Mode press Hold to hold on any
channel. Press and hold Func then press 7/rcl. At 'Select System' scroll to the system/search you want to unlock. Press and hold Func then L/O to unlock the system/search. Press Scan/Srch to return. Or, use Menu to drill down to the system/search options and unlock it there. See 'Edit System Options', 'Edit Service Search', or 'Edit Custom Search'. |
| To Unlock All
Systems, Groups, Channels, and Searches in scan mode
press Hold to hold on any channel. Press and hold Func then press and hold L/O until 'Unlock All Systems?' appears. Press E/yes. |
![]()
| Locking/Unlocking Groups |
| Remember, unlocking or
locking out a group/car is not the same thing as enabling/disabling it (turning
the quick key on or off). |
| To Lock out or
Unlock a Group in Scan Mode
press Hold to hold on any
channel. Press and hold Func then press 7/rcl. At 'Select System' scroll to the system that contains the group and press E/yes. At 'Select Group' scroll to the group you want to lock or unlock. Press and hold Func then L/O to lock or unlock the group. Press Scan to exit. |
| Or, use Menu to drill down to the group options and lock/unlock it out there. See 'Edit Group Options'. |
![]()
| Locking/Unlocking Channels | Contents |
| To Lock out a Channel while Scanning quickly press L/O when the channel appears in the display. |
| Or, quickly press Hold to hold on the channel. Press L/O. |
| Or, quickly press E/yes
to go to the menu for that channel. Scroll to 'Set Lockout' and press E/yes. Scroll to 'Lockout' and press E/yes. |
| Or, use Menu to drill down to the channel options and lock it out there. See 'Edit Channel Options'. |
| To Unlock a Single
Channel in
Scan Mode press Hold
to hold on any channel. Press and hold Func then press 7/rcl. At 'Select System' scroll to system that contains the channel and press E/yes. At 'Select Group' scroll to the group that contains the channel and press E/yes. At 'Select Channel' scroll to the channel and press and hold Func then L/O to unlock the channel. |
| Or, use Menu to drill down to the channel options and unlock it there. See 'Edit Channel Options'. |
| To Unlock All Channels in a
Conventional System in Scan Mode
press Hold
to hold on any channel in the system. Press and hold L/O until 'All Unlocked' appears. Press Hold or Scan/Srch to resume scanning. Note: This will also enable all your groups (turn the quick keys on). |
![]()
| Search/Close Call Options Menu |
| These are the settings you should look at before you perform a quick search, close call search, search and store, or close call auto store. |
| To
Edit Search and Close Options: Press Menu. Scroll to 'Srch/CloCall Opt' and press E/yes. Scroll to the options below and press E/yes. Press Scan/Srch to return to scanning when done with editing. |
| Freq Lockouts | Repeater Find | Set Delay Time | Set Attenuator | Set Step |
| Broadcast Screen | Max Auto Store | Set Modulation | Set Data Skip | Air Band Step |
| CTCSS/DCS Search |
| Contents |
| Freq Lockouts Allows you to review locked out frequencies or unlock all frequencies for Searching and Close Call search. |
| Unlocking
All Frequencies: At 'Freq Lockouts' press E/yes. At 'Unlock All' press E/yes. At 'Confirm?' press E/yes to save and exit. Press Menu to return or Scan/Srch to exit. |
| Reviewing Locked Out Frequencies: At 'Freq Lockouts' press E/yes. Scroll to 'Rvw Search L/O' and press E/yes. If no frequencies are locked out, you will see 'Nothing Locked'. Scroll to the frequency and press E/yes to unlock. Press Menu to return or Scan/Srch to exit. |
| Broadcast Screen This setting determines whether the scanner automatically ignores transmissions that are on common broadcasts, paging systems, and other annoyance radio sources during Custom Search, Quick Search, and Close Call Search. |
| Scroll
to 'Broadcast Screen' and press E/yes. Scroll to 1 of 4 options and press E/yes. 1. Set All Bands On - turns on broadcast screen on for all custom bands. Press Menu to return. 2. Set All Bands Off - turns off broadcast screen off for all custom bands. Press Menu to return. 3. Program Band - then scroll to the custom band (1-10) and press E/yes. |
| At 'Set
Lower Limit' enter the lower limit of the
frequency range and press E/yes. At 'Set Upper Limit' enter the upper limit of the frequency range and press E/yes. Scroll to the next band and repeat. Press Menu to return. |
| 4. Set Each Band - then scroll to each band and press E/yes to turn off or on. |
| Band
1-10 - the
scanner skips known frequencies for custom broadcast
ranges. Press Menu twice to return. |
| CTCSS/DCS Search This setting controls whether the scanner will search for a subaudible tone when it stops on a transmission during Searching and Close Call search. The default setting is Off. |
| Scroll
to 'CTCSS/DCS Search' and press E/yes. Scroll to On or Off and press E/yes to save and exit. |
| Repeater Find This feature sets whether the scanner tries to tune to a repeater output frequency when it detects a transmission on a repeater input frequency in Search and Close Call modes. Since you can normally only hear one side of a conversation when you listen to an input frequency transmission, turning this feature on can let you hear both sides of the conversation on the output frequency. If the scanner detects the transmission on the output frequency, it beeps and 'Repeater Found' appears, and it remains on the output frequency until transmissions end. The default setting is off. |
| Scroll
to 'Repeater Find' and press E/yes. Scroll to On or Off and press E/yes to save and exit. |
| Contents |
| Max Auto Store This value sets how many hits the scanner will automatically store when it is in either Search and Store or Close Call Auto Store mode. When the scanner reaches the maximum number of hits you set, it stops the auto-store operation. |
| Scroll
to 'Max Auto Store' and press E/yes. Use the number keys to enter a value from 1-255, then press E/yes to save and exit. |
| Set Delay Time This setting determines how long the scanner waits after a transmission ends before resuming Quick Search and Close Call Search operations. The default setting is 2 seconds. |
| Scroll
to 'Set Delay Time' and press E/yes. Scroll to 1, 2, 3, 4, 5, (seconds) or Off to set the delay then press E/yes to save and exit. |
| Set Modulation This setting controls the modulation type used for Quick Search and Close Call Search operations. |
| Scroll
to 'Set Modulation' and press E/yes. Scroll to Auto, AM, FM, NFM, WFM, or WFM(Broadcast) to choose the modulation then press E/yes to save and exit. |
| Set Attenuator This setting controls the attenuator for Quick Search and Close Call Search operations. Turn on this setting if you are near other strong signal sources to attenuate about 25dB. Attenuation sometimes helps to reduce interference and desensitization that strong signals create. The default setting is Off. |
| Scroll
to 'Set Attenuator' and press E/yes. Scroll to On or Off then press E/yes to save and exit. |
| Set Data Skip This setting controls how the scanner behaves when it detects a data transmission during Quick Search and Close Call Search operations. The default setting is Off. |
| Scroll
to 'Set Data Skip' and press E/yes. Scroll to On or Off then press E/yes to save and exit. |
| Note: If you are trying to test the Close Call feature with a nearby transmitter and you do not talk into the transmitter, the scanner will detect this as data and will skip the frequency when Data Skip is on. |
| Set Step This setting selects the frequency step used for Quick Search. The default setting is Auto. |
| Scroll
to 'Set Step' and press E/yes. Scroll to Auto, 5, 6.25, 7.5, 8.33, 10, 12.5, 15, 20, 25, 50, or 100 to set the step then press E/yes to save and exit. |
| Air Band Step This setting selects the frequency step used for the Air Service Search. |
| Scroll
to 'Air Band Step' and press E/yes. Scroll to 8.33 or 12.5 to set the step then press E/yes to save and exit. |
![]()
| Search For... Menu |
| Important! There are many
options and setting in Search/Close Call Options that affect and compliment the settings
for searching. Please review those first. Note: The items below (in Blue) do not follow the radio's menu order because (IMHO) they should be in the following order to properly setup and use the Search features. |
| Edit Service Search | Quick Search | |
| Service Search | Searching | |
| Edit Custom Search | Storing a Displayed Frequency | |
| Custom Search | Reviewing Locked out Frequencies | |
| Search and Store |
| Contents |
| Edit Service Search |
| To
Edit a Service Search, press and hold Func
then press Scan/Srch. At 'Quick
Search?' press (.)no. Or, Press Menu. Scroll to 'Search For...' and press E/yes. Scroll to 'Edit Service' and press E/yes. Scroll to the service search you want to edit and press E/yes. |
| Scroll
to Set
Delay Time and press E/yes. Scroll to 1, 2, 3, 4, 5, seconds or Off to set delay and press E/yes. Scroll to Set Attenuator and press E/yes. Scroll to On or Off and press E/yes. Scroll to Search with Scan and press E/yes |
| Scroll to
Set Lockout and press E/yes. (Used for 'Search with
Scan' only). Scroll to 'Unlocked', 'Temporary L/O', or 'Lockout' and press E/yes to save and exit. Scroll to Set Hold Time and press E/yes. Enter the hold time (0-255 seconds) you desire and press E/yes to save and exit. |
| Press Menu and scroll to another service search and repeat the previous steps or press L/O to exit. |
| Service Search |
| The Service Search lets you quickly select and search the scanner's preprogrammed frequencies. |
| To
start a Service Search, press and hold Func
then press Scan/Srch. At 'Quick
Search?' press (.)no. Or, Press Menu. Scroll to 'Search For...' and press E/yes. Scroll to 'Service Search' and press E/yes. Scroll to 'Air' and press E/yes to start searching. Then see Searching. |
| Edit Custom Search |
| You can edit the 10 custom search ranges. The default custom search range names appear as Custom 1, Custom 2, and so on. |
| To
Edit a Custom Search, in scan mode Press and hold Func
then press Scan/Srch. At 'Quick Search?' press (.)no. At 'Search for...' scroll to 'Edit Custom' and press E/yes. Scroll to the custom search you want to edit (1-10) and press E/yes. |
| Scroll
to Edit
Name and press E/yes.
See Entering Text. Scroll to Edit Srch Limit and press E/yes. At 'Set Lower Limit', enter the lower limit of the search range and press E/yes. At 'Set Upper Limit', enter the upper limit of the search range and press E/yes. Scroll to Set Delay Time and press E/yes. Scroll to 1, 2, 3, 4, 5, seconds or Off to set delay and press E/yes. Scroll to Set Modulation and press E/yes. Scroll to Auto, AM, FM, NFM, or WFM the set the modulation and press E/yes. Scroll to Set Attenuator and press E/yes. Scroll to On or Off to set the attenuation and press E/yes. Scroll to Set Data Skip and press E/yes. Scroll to On or Off to turn Data Skip on or off and press E/yes. Scroll to Set Step and press E/yes. Scroll to Auto, 5, 6.25, 7.5, 8.33, 10, 12.5, 15, 20, 25, 50, or 100 to set the step size and press E/yes. Scroll to Search with Scan and press E/yes. |
| Scroll to 'Set lockout' and press E/yes. Scroll to Lockout or Unlocked and press E/yes. Press Menu to return. Scroll to 'Set Hold Time' and press E/yes. Enter the Hold time in seconds and press E/yes. Press Menu to return. Press Scan to exit. |
| Press Menu and scroll to another custom search and repeat the previous steps or press Scan to exit. |
| Contents |
| Custom Search |
| The Custom Search lets you search the scanner's 10 programmed frequency ranges. To re-program the ranges see Editing a Custom Search. |
| To
start a Custom Search, in scan mode Press and hold Func
then press Scan/Srch. At 'Quick Search?' press (.)no. At 'Search for...' scroll to 'Custom Search' and press E/yes to start searching. Then see Searching. |
| Search and Store |
| Let's you search and store frequencies in a custom search range or in a service search range into a system. To store frequencies you find during Search and Store, you must first select a system where the frequencies will be stored. You will not hear any audio in this mode. |
|
To Search and Store
Frequencies, in scan mode Press and
hold Func then press Scan/Srch. At 'Quick Search?' press (.)no. At 'Search for...' scroll to 'Search and Store' and press E/yes. At 'Select Store Sys' scroll to the system you want to store the frequencies in and press E/yes. At 'Select Range' scroll to the 'service search' or to 'custom search' to select where to search from and press E/yes. If you select custom search, all enabled custom search ranges will be searched for frequencies. Start a custom search and disable search ranges you don't want searched first. See Custom Search. Press Scan to exit. |
| Notes: The quick key for the system must be turned on (if one is assigned to the system) and not locked out to select the system to store frequencies in otherwise you will see 'System Locked'. If no systems are programmed 'No System Stored' appears. |
| When you select a service search or custom search range(s), the scanner looks for active frequencies within the range(s) and 'Search and Store' appears on the display's lower line and the system name and search range name(s) appear on the display's upper line. When the scanner finds an active transmission, it checks to see if the frequency has already been stored in the system ('Memory Check' in the display). If the frequency has already been stored, the scanner continues to search. If the frequency has not been stored, it stores the frequency into a (created) group named 'Found Channels', then resumes searching. 'Limit Reached' will appear in the display when the Max Auto Store value is reached. |
| Tip: Before you start Search and Store, run the custom search or service search first to lock out the birdies, data, noise, etc. channels. This will prevent the scanner from stopping on them and doing a memory check each time it passes. |
| Quick Search |
| Quick Search lets you search from the currently-tuned frequency if you are scanning a system or enter a frequency to start searching from. |
| To
start searching at the current frequency: Press and hold Func then press Scan/Srch. At 'Quick Search?' press E/yes to start searching. Then see Searching. To start searching at a specific frequency while scanning or searching, press Hold to hold on any channel or frequency. Enter the new frequency you wish to start at then press Hold to set the new starting frequency. Press Hold again to release hold mode and start searching. Then see Searching. |
| Contents |
| Searching |
| To hold on a frequency, press Hold. Press Hold to resume. |
| To step through the frequencies, turn the scroll control back or forward while in hold mode. Press Hold to resume. |
| To toggle search bands on or off (custom search), press the number key of the search band. |
| To toggle a service search on or off, press and hold Func-don't let go. Scroll to the service search and press L\O to unlock. |
| To change search direction or continue searching, turn the scroll control back or forward. |
| To step through the frequencies, press Hold. Turn the scroll control back or forward while in hold mode. Press Hold to resume. |
| To lock out a frequency, press L/O then E/yes to confirm. |
| To unlock frequencies press and hold Func then L/O while searching. Scroll to the frequency and press E/yes to unlock. |
| To attenuate a search, press and hold Func then press E/yes(att). |
| To check for a repeater frequency press Hold to hold on the frequency then press and hold .no(rev). Press Hold to resume. |
| To save a frequency, press Hold to hold on the frequency. See Storing Displayed Frequency. |
| To
toggle Close Call modes, press and
hold Func then Hold/ |
| Storing a Displayed Frequency (while searching) |
| To
program a displayed frequency into an existing group, quickly press E/yes.
At 'Quick Freq Save?' press (.)no. At 'Select System' scroll to the system where you want to store the frequency and press E/yes. At 'Select Group' scroll to the group where you want to store the frequency and press E/yes. After storing the frequency, you will be at the 'Edit Channel' menu to complete the settings for the new channel. If you don't want to edit the channel settings or are done editing the channel, press L/O to return to searching. |
| Note: If the frequency is already stored in the group, 'Frequency Exists' Accept? (Y/N)' appears. Press No to return to searching (or search hold) or E/yes to go to the 'Edit Channel' menu. |
| To
program a displayed frequency into a 'Quick Save Group'
in a 'Quick Save System', quickly press E/yes. At 'Quick Freq Save?' press E/yes. The scanner will save the frequency in a (created) group called 'Qck Save Grp' in a (created) system called 'Qck Save Cnv Sys' (with no quick key assigned) and you will be at the 'Edit Channel' menu to complete the settings for the new channel. Then see Creating Groups and Edit Systems Options to customize the group and system. If you don't want to edit the channel settings or are done editing the channel, press L/O to return to searching. |
![]()
| Close Call Menu |
| Your scanner's Close
Call feature lets you set the scanner so it detects, alerts you to, and
displays the frequency of a nearby strong radio transmission. You can
set the scanner so the Close Call feature checks for a Close Call hit
every 2 seconds in the background while you are scanning or searching or use Close Call only mode. 'Close Call Do-Not-Disturb'
will only check for close call signals when you are not receiving
transmissions. You can also set the frequency band(s) where
you want the scanner to look for transmissions. When the scanner detects
a Close Call hit, it alerts you according to the Override and Alert
settings. You can also set the scanner to Auto Store Close Call hits.
The system 'Close Call' is created when you run a Close Call Auto Store. The Close Call feature works well for locating the source of strong local transmissions such as mobile and handheld two-way radios in areas with no other strong transmission sources. Several factors affect Close Call performance. Performance is increased with higher transmit power, receive antenna tuned to the target band, and a low background RF level. Other than the antenna, you have no control over these factors, but they explain why performance might vary by both location and time. The Close Call feature works better with some types of transmissions than others. It might not correctly display frequency information for transmitters using a highly directional antenna (such as an amateur radio beam antenna) or if there are many transmitters operating at the same time in the same area. |
| To
Edit Close Call Options: Press Menu. Scroll to 'Close Call' and press E/yes. Scroll to the options below and press E/yes. Press Scan/Srch to return to scanning when done with editing. Important! There are many options and settings in Search/Close Call Options that affect and compliment the settings for Close Call. Please review those first. Note: The items below (in Blue) do not follow the radio's menu order because (IMHO) they should be in the following order to properly setup and use the Close Call features. |
| Select Beep | CC DND (do not disturb) | Using Close Call Modes | ||
| Set CC Pause | CC Priority | Managing Close Call Hits |
| Contents |
| Set CC Bands Lets you select the Close Call bands to be searched or auto stored. The Close Call feature does not work for frequencies greater than 956 MHz. |
| Scroll
to 'Set CC Bands' press E/yes. Scroll to each band you want searched (or not searched) and press E/yes. Scroll to On or Off and press E/yes. Press Scan to exit. |
| VHF Low 1- 25-54MHz | VHF High 2- 225-320 MHz | |
| VHF Low 2- 54-108 MHz | UHF- 320-512 MHz | |
| Air Band- 108-137 MHz | 800MHz+- 806-1300 MHz | |
| VHF High 1- 137-225 MHz |
|
Set
CC Alert/Beep/Pause Lets you select how the scanner alerts you
when it receives a Close Call signal. Pause lets you
select how long the scanner waits after a hit before it
returns to the previous operation. See also Close Call Hits. |
| Scroll
to 'Set CC Alert' press E/yes. At 'Set CC Alert' scroll to 'Select Mode' press E/yes. At 'Select Mode' scroll the mode you prefer and press E/yes. |
| Beep, the scanner beeps when it
receives a Close Call signal. Light, the backlight turns on when it receives a Close Call signal. Beep+Light, the scanner beeps and the backlight turns on when it receives a Close Call signal. None, the scanner does not alert. |
| Scroll to 'Select Beep' and press E/yes. |
| At 'Select Beep' scroll to 'Alert 1-9 or Off' and press E/yes. |
| At 'Set Level' scroll to 'Level 1-15 or Auto' (the scanner sets the alert beep to the master volume level) and press E/yes. |
| Scroll to 'Set CC Pause' and press E/yes. |
| Scroll to '3, 5, 10, 15, 30, 45, 60 sec, or Infinite' and press E/yes. |
| Press Menu to return. |
| Set CC Override Lets you select how the Close Call feature works while scanning or searching (or doing anything else). |
| Scroll
to 'Set CC Override' press E/yes. Scroll to On or Off and press E/yes. Press Scan to exit. See also Close Call Hits. |
| With
this feature on,
when the scanner detects a Close Call signal while
scanning, the scanner overrides the current channel and
goes to the Close Call hit. 'CC Found!'
and 'Press Any Key' appear for the
length of time set in Close Call Pause (see Set
CC Alert). With this feature off, when the scanner detects a Close Call signal while scanning, 'CC Found!' and 'E to Listen' appear for the length of time set in Close Call Pause (see Set CC Alert). |
| Set Close Call Mode Selects the Close Call mode when scanning
or searching (or doing anything else). You can also do this by
pressing and holding Func then pressing
Hold while scanning or searching. See also Close Call Hits. |
| Scroll to 'Set
CC Mode' and press E/yes. Scroll to 1 of 3 modes and press E/yes to save and exit. Off- Close Call is turned off. CC DND- Close Call checks for frequencies every two seconds between transmissions. Pri- Close Call checks for frequencies every two seconds. |
| Close Call Only This setting puts the scanner in Close Call Only mode. The scanner will not scan or search. |
| At 'Close Call Only' press E/yes. |
| CC Auto Store Allows you to automatically store Close Call hits into channels. If you turn this feature on, the scanner mutes, starts Close Call Only mode, and stores any Close Call hits from the bands selected in 'Set CC Bands' up to the maximum you specified in the 'Max Auto Store' setting. The scanner looks for active frequencies within the bands(s) and 'Search and Store' appears on the display. When the scanner finds an active transmission, it checks to see if the frequency has already been stored. If the frequency has not been stored, it stores the frequency into a (created) group named 'Found Channels' in a (created) system called 'Close Call' then resumes searching. If the frequency has already been stored, the scanner continues to search. This new system and group have the same options as any conventional system/group and can be edited the same way. See also Broadcast Screen. |
| Scroll
to 'CC Auto Store' press E/yes. 'Limit Reached' will appear in the display when the Max Auto Store value is reached. Press Scan to exit. |
![]()
Managing Close Call Hits |
Contents |
| In Close Call Only Mode: |
| When the scanner detects a
Close Call signal, 'CC Found!'
and 'Press Any Key' appear for the
length of time set in Close Call Pause (or until the signal is lost if longer). Press any key (except Hold) to display the frequency for the delay time set in Search/Close Call Options (even if it's gone). |
| To hold on a CC hit press Hold. Press Hold again to resume. See Close Call Hold Mode. |
| To store a frequency press 'Any key' then E/yes then see Storing a Displayed Frequency. |
| To cancel a CC hit turn the scroll control. |
| To lock out the frequency press L/O. |
| To view the last CC hit press Hold. Press Hold again to resume. | |
| To toggle the attenuation on or off (for all bands) press and hold Func then E/yes(att). | |
| To exit CC only press Scan. |
|
While
Scanning or Searching with Close Call Override set to
On, when the scanner detects a
Close Call signal, the scanner overrides the current audio and goes to the Close Call hit. 'CC Found!' and 'Press Any Key' appear for the length of time set in Close Call Pause (or until the signal is lost if longer). If you do not press 'Any Key', the scanner will return to scanning after 'pause' times out. Press any key (except Hold) to listen to and display the frequency for the delay time set in Search/Close Call Options (even if it's gone). Quickly press Hold to stay on the frequency. Press Hold again to resume. |
| While
Scanning or Searching with Close Call Override set to
Off, when the scanner detects a
Close Call signal, the scanner does not override the current audio. 'CC Found!' and 'E to Listen' appear for the length of time set in Close Call Pause. If you do not press E/yes, the scanner will return to scanning after 'pause' times out. Press E/yes to listen to and display the frequency for the delay time set in Search/Close Call Options (only if it's still there). Quickly press Hold to stay on the frequency. Press Hold again to resume. |
| While in Hold Mode: |
| To store a frequency press E/yes then see Storing a Displayed Frequency. | |
| To lock out the frequency press L/O. |
| To start a 'Quick Search' at the current frequency turn the scroll control then press Hold. |
| To check for a repeater frequency quickly press Hold to hold on the frequency. Press and hold Func then press and hold .no(rev). Press Hold to resume. |
![]()
| Using Fire Tone-Out | Contents |
| The scanner can be set to respond to fire Tone-Outs, a system comprised of standardized two-tone sequential paging, short one-tone paging, and long group tone paging. You can save up to 10 settings. When you select a setting in standby mode, the scanner also monitors for any other setting that uses the same transmit frequency, modulation, and attenuation settings. |
| Setting up Tone-Out |
| Press Menu.
Scroll to 'Tone-Out for...' and press E/yes. Scroll to 'Tone-Out Setup' and press E/yes. Scroll to 'Tone-Out 1' and press E/yes. At 'Edit Name' press E/yes. See Entering Text. Scroll to 'Set Frequency' press E/yes. |
| At 'Edit
Frequency' press E/yes. Enter
the frequency to monitor for Tone-Out and press E/yes
to save and exit. Scroll to 'Set Modulation' and press E/yes. Scroll to Auto, FM, or NFM and press E/yes to save and exit. Scroll to 'Set Attenuator' and press E/yes. Scroll to On or Off and press E/yes to save and exit. Press Menu to return. |
| Scroll to 'Set Tone' and press E/yes. |
| Notes:
For two-tone pages, enter the values for tone A and tone
B. For one-tone pages using short tones of less than 3.75 seconds, enter value for tone A, and 0 for B. For long-tone pages, such as group pages of more than 3.75 seconds, enter 0 for A and the value for B. |
| Scroll
to 'Edit Tone A' and press E/yes.
Enter the tone and press E/yes to save
and exit. Scroll to 'Edit Tone B' and press E/yes. Enter the tone and press E/yes to save and exit. Press Menu to return. |
| Scroll to 'Set Delay Time' and press E/yes. |
| Scroll
to one of 3 settings and press E/yes to
save and exit: Off: the scanner resumes standby as soon as the carrier drops after a page. 1-5: (seconds): the scanner resumes standby mode after the carrier drops and the selected time expires. Infinite: you must press Hold after a page to resume standby mode. |
| Scroll to 'Set Alert' and press E/yes. |
| Off- the scanner will not
alert. Press E/yes to save and exit. Alert 1-9- to choose any of 9 different beep types and press E/yes. |
| At 'Set
Level' scroll to: Auto- the scanner automatically sets the emergency alert beep to the master volume level. Press E/yes to save and exit. Level 1-15- scroll to the volume level preferred. Press E/yes to save and exit. |
| Press
Menu to return then scroll to 'Tone-Out 2'
and repeat to program more tones. Press Scan to exit. |
| Using Tone-Out Standby See Setting up Tone-Out first. |
| Press Menu.
Scroll to 'Tone-Out for...' and press E/yes.
Scroll to 'Tone-Out Standby' and press E/yes. Scroll to monitor a Tone-Out channel (1-10). Press Scan to exit. |
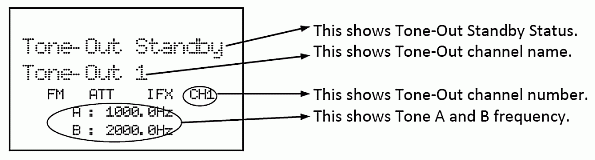 |
| The
display will show the Tone-Out name, channel number
(1-10), and tone settings. Any transmission received on
the frequency will not be heard but you will still see
the signal strength bars. All Tone-Outs (channels) that have the same frequency (and modulation and attenuation) as the one you select will also (and only) be monitored so you can monitor up to 10 Tone-Out channels for one frequency. In this case, the scanner displays each Tone-Out channel for two seconds. It does not scan them; Tone-Out monitors the frequency for all Tone-Out channels with the same frequency. Regardless of the current display, the scanner will alert on any received tone out that matches a stored setting (channel) for the frequency. To monitor a different frequency, scroll to a Tone-Out (channel) with a different frequency. If you press HOLD while in standby mode, the scanner temporarily exits standby and you will be able to hear any transmissions on that frequency. No alerts sound, even if a Tone-Out matches one you have stored in hold mode. Press HOLD again to return to standby mode. |
![]()
| Related Links/Info | Contents |
| How to view these pages in your browsers |
| I have formatted these pages so that you can view them with any monitor, in any browser (Opera, I.E., Foxfire, or Netscape), at any zoom level, and in any screen area size (ex: 600x800)-small or large fonts. So if the print is too small, go to the 'view' menu in your browser and adjust it to a bigger level (or smaller if you want to see more on the screen). |
| Links |
|
Uniden Japan-UK/European manuals |
|
| Software |
|
FreeSCAN-Freeware |
arc3500-Butel software |
|
DMA Software Support-at Radio Reference |
|
![]()
| Menu Outline | Contents |
| The scanner's menu lets you select options that let you set up and use the scanner. To use the menu, press the Menu button on the left side of the scanner. In most cases, the current menu position appears on the upper line of the menu. Menu items and a place to input information appear on the lower line of the menu. To select a menu item, turn the scroll control on top of the scanner clockwise or counterclockwise. When the menu item you want to select appears, press E/yes or press the scroll control down to select it. To back up a level or return to the previous level, press Menu. To exit the menu mode, press Scan. Below I have mapped out the menu. |
| Menu |
| Program System |
| Select System |
| New System |
| Confirm? Yes/No |
| System 1,2,3,etc. |
| Edit Name |
| (scroll to select characters) |
| Edit Sys Option |
| Set Quick Key |
| .,1-99 |
| Set Lockout |
| Unlocked, Locked |
| Set Hold Time |
| (0-255 seconds) |
| Set Delay Time |
| Off,1,2,3,4,5 (seconds) |
| Set Data Skip |
| On,Off |
| Edit Group |
| Select Group |
| Group 1,2,3,etc. or New Group |
| Edit Name |
| (scroll to select characters) |
| Set Quick Key |
| .,1,2,3,4,5,6,7,8,9,0 |
| Edit Channel |
| Select Channel |
| New Channel- |
| (Input frequency) |
| Paste Channel (Only appears if Channel is in buffer) |
| Pastes channel into current group |
| Channel 1,2,3,etc. |
| Edit Name |
| (scroll to select characters) |
| Set Priority |
| On,Off |
| Set Alert |
| Off |
| Alert 1-9 |
| Set Level |
| Auto,Level 1-15 |
| Delete Channel |
| Confirm Delete? Yes/No |
| Copy Channel |
| Copies channel to ‘copy buffer’ |
| Edit Frequency |
| (Enter frequency) |
| Set CTCSS/DCS |
| Off,Search |
| CTCSS,DCS, Set Lockout |
| (enter tone) |
| Set Modulation |
| Auto,AM,FM,NFM,WFM,WFMB |
| Set Attenuator |
| On,Off |
| Set Lockout | Search for... |
| Unlocked,Locked | Service Search |
| Delete Group | Air |
| Confirm Delete? Yes/No | Edit Service Search |
| Set Lockout | (Service 1-13) |
| Unlocked,Locked | Set Delay Time |
| Delete System | Off,1,2,3,4,5 (seconds) |
| Confirm Delete? Yes/No | Set Attenuator |
| Copy System | On,Off |
| New System Name? | Search with Scan |
| (scroll to select characters) | Set Lockout |
| Menu | Lockout,Unlocked |
| Srch/CloCall Opt | Set Hold Time |
| Freq Lockouts | (0-255 seconds) |
| Rvw Search L/O | Custom Search |
| Nothing Locked,freq-1 Unlock?,freq-2 Unlock?,etc. | Edit Custom |
| Unlock All | Select Custom |
| Confirm? Yes/No | Srch ranges 1-10 |
| Broadcast Screen | Edit Name |
| Set All Band On | (scroll to select characters) |
| (Press E/yes) | Edit Srch Limit |
| Set All Band Off | Set Lower Limit |
| (Press E/yes) | (enter lower limit) |
| Set Each Band | Set Upper Limit |
| Band 1-10 | (enter upper limit) |
| (E/yes to toggle On or Off) | Set Delay Time |
| Program Band | Off,1,2,3,4,5 (seconds) |
| Band 1-10 | Set Modulation |
| Set Lower Limit | Auto,AM,FM,NFM,WFM,WFMB |
| (enter lower limit) | Set Attenuation |
| Set Upper Limit | On,Off |
| (enter upper limit) | Set Data Skip |
| CTCSS/DCS Search | On,Off |
| On,Off | Set Step |
| Max Auto Store | Auto,5,6.25,7.5,8.33,10,12.5,15,20,25,50,100 |
| (1-255 channels) | Search with Scan |
| Set Delay Time | Set Lockout |
| Off,1,2,3,4,5 (seconds) | Lockout,Unlocked |
| Set Modulation | Set Hold Time |
| Auto,AM,FM,NFM,WFM,WFMB | (0-255 seconds) |
| Set Attenuator | Search and Store |
| On,Off | Select Store Sys |
| Set Data Skip | System 1,2,3,etc. |
| On,Off | Select Range |
| Set Step | Custom Search,Service 1-13 |
| Auto,5,6.25,7.5,8.33,10,12.5,15,20,25,50,100 | Set Priority |
| Air Band Step | Off,On,Plus On |
| 8.33,12.5 | Tone-Out for... |
| Close Call | Tone-Out Standby |
| Close Call Only | (tone-out 1-10) |
| CC Auto Store | Tone-Out Setup |
| Set CC Mode | Tone-Out 1-10 |
| Off,CC DND,CC Pri | Edit Name |
| Set CC Override | (scroll to select characters) |
| On,Off | Set Frequency |
| Set CC Alert | Edit Frequency |
| Select Mode | (enter frequency) |
| Beep,Light,Beep+Light,None | Set Modulation |
| Select Beep | Auto,FM,NFM |
| Off,Alert 1-9 | Set Attenuator |
| Set Level | On,Off |
| Auto,Level 1-15 | Set Tone |
| Select CC Pause | Edit Tone A |
| 3,5,10,15,30,45,60(seconds),Infinite | (enter tone) |
| Set CC Bands | Edit Tone B |
| VHF Low 1 | (enter tone) |
| (E/yes to toggle On or Off) | Set Delay Time |
| VHF Low 2 | Off,1,2,3,4,5 (seconds),Infinite |
| (E/yes to toggle On or Off) | Set Alert |
| Air Band | Off,Alert 1-9 |
| (E/yes to toggle On or Off) | Set Level |
| VHF High 1 | Auto,Level 1-15 |
| (E/yes to toggle On or Off) | Settings |
| VHF High 2 | Set Backlight |
| (E/yes to toggle On or Off) | 10 sec,30 sec,Squelch,Keypress,Infinite |
| UHF | Adjust Key Beep |
| (E/yes to toggle On or Off) | Auto,Level 1-15 |
| 800MHz+ | Set Battery Save |
| (E/yes to toggle On or Off) | On,Off |
| Xfer Information | Set Audio AGC |
| Wired Clone | On,Off |
| Master,Slave | Adjust Contrast |
| (scroll to Contrast 1-15) |
| PC Control |
| Off,9600,19200,38400,57600,115200 |
| See Scanner Info |
| % Memory Used |
| Firmware Version |
![]()
| Last updated August 18, 2024 |