|
|
| Easier to Read BR330T Racing Scanner Manual |
|
Last Updated November 03, 2024 |
![]()
| Contents |
| Introduction | Scanning 'Systems' |
| Main Features | Viewing Tags or Frequencies/IDs |
| Scanning Terminology | Changing ID Scan/ID Search Mode |
| Understanding Dynamic Memory | Turning System Quick Keys On/Off |
| Understanding Quick Keys | Turning a Race Off or On |
| Conventional Simplex and Repeater Systems | Turning Group/Car Quick Keys On/Off |
| Understanding CTCSS/DCS | Holding... |
| Understanding Trunking | Lockout... |
| Understanding IDs | Storing... |
| Turning on the Scanner/Setting the Squelch/Volume | Attenuation |
| Navigating the Menu | View Repeater Frequency | |
| Keypad and Knob Controls | Viewing Active IDs |
| A Look at the Display | Trunking Activity Indicators |
| Auto Step Size Chart | Changing Priority Modes |
| **Settings Menu** | Weather Alert Priority |
| Set Backlight | Changing Close Call Modes |
| Set AGC Settings | Locking/Unlocking Systems/Searches |
| Memory Used | Locking/Unlocking Group/Cars |
| Firmware/Updates | Locking/Unlocking Channels |
| Locking/Unlocking the Keypad | Reviewing L/O IDs |
| Viewing Battery Level | **Search/Close Call Options Menu** |
| Cloning | Broadcast Screen |
| Scanner Reset | **Search For... Menu** |
| Planning 'Systems' and Races | Service Search |
| Worksheets | Custom Search |
| Entering Text | Search and Store |
| **Program 'Systems' Menu** | Searching |
| Conventional Systems | Quick Search |
| Motorola Systems | Storing a Displayed Frequency |
| EDACS Systems | Reviewing Locked out Frequencies |
| LTR Systems | **Close Call Menu** |
| Race Systems | Close Call Only |
| Edit System Name | Close Call Auto store |
| Motorola/LTR System Modulation | Managing Close Call Hits |
| Trunked System Attenuation | **Weather Operation Menu** |
| Copying/Deleting Systems | Weather Scan |
| **Edit 'System' Options Menu** | Program SAME |
| Creating 'Groups' | Weather Alert |
| **Edit Group Menu** | **Tone-Out For... Menu** |
| Creating 'Cars' | Related Links/Info |
| **Edit Car Menu** | Preprogrammed Systems |
| Programming Freqs/IDs into 'Groups |
| Quickly Storing a Frequency |
| Quickly Storing an ID |
| Manually Programming Frequencies/IDs |
| **Edit Channel Options Menu** |
| Priority/Priority Plus Scan |
![]()
| Introduction | Contents |
| Again, the manual is like trying to set a watch made in China. My biggest gripe is that it doesn't follow the menus of the radio. So, I have written this manual for myself so I can actually use the scanner and will share it with you. I have tried to write my manual to follow the menu sequences as closely as possible so you can find things a little easier in the radio. |
| The scanner does
have some cool new features: Scan and Search, Close
Call with
Close
Call Do Not Disturb,
Race Track Operation, Dynamic Memory, an adjustable 'Hold (scan) time' for each system and search
band, Search and Store (actually an old feature
brought back), signal strength bars, and a numeric
battery meter. One of the few scanners to use 'Func-rcl7' for
navigating systems/groups/channels. The BR330T can hold about 2500 channels
(about 1600 with tags). You can store up to 400 different
systems (if there is enough memory). The 'Automatic
Channel Setup' allows you to enter a frequency without
having to change a step size setting. The Fire
Tone-Out works well but
you can't scan or search at the same time. The 'Broadcast
Screen' for Close Call is a plus if you live in a
busy area. You can program
alerts for selected channels, Close Call hits, and Tone-Outs with
different alert sounds and adjustable volumes. I have also been able to enter
partial IDs for Motorola (type I,IIi) and LTR systems,
not just in EDACS systems. And, of course, computer
upload/download/clone and control. The 'quick keys' allow you to scan any combination of systems. There doesn't seem to be a limit to how many priority channels you can program. The sound quality is great for a 'mini' scanner. When 'tone search' is enabled for searching or for a channel, it will search for CTCSS and DCS tones, not just one or the other. The Close Call and Weather Alert Priority features will run in the background while scanning and/or searching. An AC adapter, computer cable, and batteries come with the scanner. The firmware is upgradeable for re-banding. One thing to remember is that IDs go into channels also (no more scan lists). There is also the (optional; expensive) BC-RH96 remote head for those of you that wish to hide your scanner in the trunk. I've been able to program over 200 cars (Butel software only sees 100) and program at least 150 freqs for a driver. One trick would be to program a conventional system as a race system, use the 'driver' for the alpha tag because race systems show the frequency in the display. Too bad you can only scan 1 race system at a time. |
| Now the annoying
stuff. Dynamic Memory has its drawbacks because you have
to build everything first then program it. Press
and hold for 2 seconds to turn the scanner on then wait another
2 secs for the welcome screen to disappear??
Press and hold Func then tap the scroll control to adjust
the squelch?? Why the SMA antenna all of a sudden? No
belt clip; a knob screwed to the back of the scanner to
slide a cumbersome rotating clip. Alpha tagging is best
left to the software. Scans multiple trunking systems
relatively slow even with the hold time set to 0
(especially if you have a lot of IDs programmed). The
channels and IDs aren't numbered so they can be hard to
find if you have a lot of them in a group. The squelch
tail is long giving a distinct 'chop' at the end of
transmissions; not the nice clean 'click' of my Pro-97.
There is no 'per channel' delay; you must set the delay
for the whole system (all groups/cars, all channels). The
bottom lit display isn't as bright as my BC246T or Pro
97. The keypad is probably brighter. In the car I get horrible engine
noise on the scanner making it almost useless. An overview of the features can also be viewed at my Trunking Scanner Comparison Chart page. You will also need a better antenna as the stock antenna isn't fabulous. Scanner Master has a large selection of quality antennas. |
| It is also recommended that you download and install the latest firmware upgrade for the scanners if you don't have it. See checking Firmware Version. If you have a big database of channels to program you will definitely need the programming software. |
| For those of you who are new to trunking, dynamic memory, or haven't had a scanner in the last 10 years it is a good idea to read the respective sections on those topics. You really have to know how trunking works in order to program a trunking system. It won't do you any good to try to program a trunking system unless you know what the radio needs and is going to do with the data (control channel, IDs, LCN order, etc). |
| I will assume you know how to obtain the basic information from the original manual such as following safety procedures, putting the batteries in, connecting the antenna, finding specs, etc. and concentrate on the main functions of the scanner. |
| I hereby absolve myself from anything that happens to anyone or the scanner as a result of the information you will be reading. You are welcome to copy and/or print these pages and use them in the scanning hobby as long as you don't change, redistribute, or charge/accept money for them. I have tried the best I can to make sure everything is accurate here but if I missed a step or you see something that's obviously wrong, please email me. |
| Check back often as this document will be updated and revised from time to time. |
![]()
| Main Features | Contents |
| Trunk Tracker III Operation - follows conversations on analog Motorola, W/N/SCAT EDACS, and LTR trunked radio systems in VHF/UHF, 800 MHz, and 900 MHz bands. The scanner can scan both conventional and trunked systems at the same time. |
| Search with Scan Operation - lets you include selected service/custom search ranges during scan operation. |
| Close Call RF Capture Technology - lets you set the scanner so it detects and provides information about nearby radio transmissions. Close Call 'Do-not-Disturb' checks for Close Call activity in between channel reception so active channels are not interrupted. |
| Dynamically Allocated Channel Memory - organized into 'Systems', 'Groups/Cars' (within systems), and channels (within groups/cars). Up to 200 systems, 20 groups (? many cars) per system, and 2,500 channels (200 max IDs per system). |
| Signal Strength Meter - shows the signal strength for the more powerful transmissions. |
| Battery Meter - shows the battery strength. |
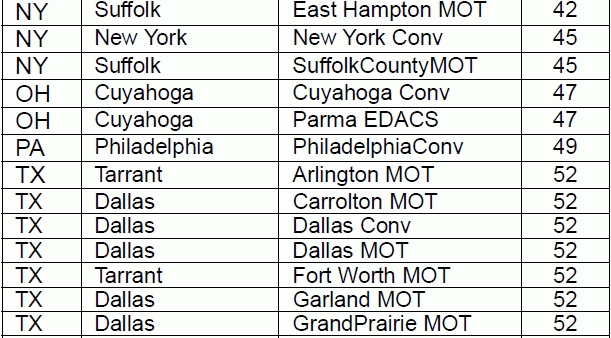
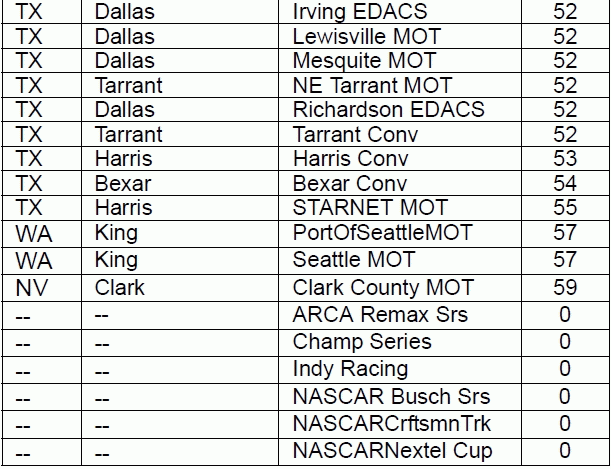
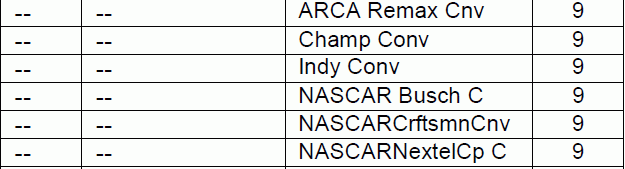
| Preprogrammed Systems - your scanner is preprogrammed with over 1000 channels covering police, fire, and ambulance operations in the 25 most populated counties in the US as well as many major races. |
| 99 Quick Keys - you can assign the number keys to systems or groups/cars to scan them. This makes it easy to listen to or quickly turn off those systems or groups/cars you don't want to scan. |
| Race Track Operation - you can set the scanner to scan races using a frequency list preprogrammed into the scanner or program your own races. You can scan by car number and driver name, assign the car to a quick key, and set the scanner so it sounds an alert when the car you are scanning transmits. |
| Extended Frequency Range - allows you to listen to Longwave, Shortwave, and AM Broadcast frequencies. |
| Built-in Bar Antenna - lets you clearly listen to AM radio broadcasts. |
| 13 Service Searches - frequencies are preset in separate public safety, marine, railroad, air, CB radio, AM broadcast, racing, FM broadcast, TV broadcast, FRS/GMRS, news, amateur radio, and special (itinerant) searches to make it easy to find specific transmissions. |
| 10 Custom Searches - lets you program up to 10 custom search ranges. |
| Quick Search - lets you search from the currently-tuned frequency if you are searching a conventional system. |
| AGC - helps automatically balance the volume level between different radio systems. |
| Fire Tone-Out Standby - lets you set the scanner to alert you if a two-tone sequential page is transmitted. You can set up to 10 settings (transmit frequency, tone frequencies) then select one for standby monitoring. |
| Broadcast Screen - allows the scanner to ignore hits on known broadcast frequencies including pager frequencies in search and Close Call modes. You can also program up to 10 custom frequency ranges that the scanner will ignore. |
| Automatic Channel Setup - allows you to program frequencies on any valid channel step without having to set a step setting. |
| Adjustable Channel/Frequency Step - allows you to set the step (5, 6.25, 7.5, 8.33, 9, 10, 12.5,15, 20, 25, 50 or 100 kHz) for Quick search or Custom search or select auto mode. |
| Frequency/ID Search and Store - the scanner can be set to automatically store all active frequencies from a service or limit search in a conventional system you select or automatically store all new talk group IDs into a trunked system you select. |
| Priority/Priority Plus Scan - priority channels let you keep track of activity on your most important channels while monitoring other channels for transmissions and you can scan just the priority channels. |
| CTCSS/DCS Search - lets you search for CTCSS and DCS tones when it finds an active frequency in search and close call modes. |
| Control Channel Only Scanning - allows you to enter just the control channels to trunktrack a Motorola system and the scanner will find the voice channels. |
| Adjustable Hold (Scan) Time per System/Search - allows you to adjust the length of time spent scanning each system. |
| CTCSS and DCS Tone Decode - decodes and displays Continuous Tone Code Squelch System tones being transmitted and plays Digital Coded Squelch being received. Also, a tone code only receive option (per channel). |
| Text Tagging - you can name each system, group, car, channel, talk group ID, custom search range, Tone-Out, and SAME group, using up to 16 characters per name (12 characters for cars). |
| Custom Alerts - you can program your scanner to alert you when, a channel is received, you receive a Close Call hit, a talkgroup ID is transmitted with an emergency alert, or you receive a Tone-Out hit. For each alert in the scanner, you can select from 9 different tone patterns and also set the alert volume level independently from the main volume level. |
| Adjustable Scan/Search Delay - from 1 to 5 seconds or off (per system or search). |
| Attenuator - you can set the scanner's attenuator to reduce the input strength of strong signals by about 18 dB per channel, search band, close call band, or trunked system. |
| Repeater Reverse - tells the scanner to try to switch to the repeater if an input frequency is found. |
| Data Skip - allows your scanner to skip unwanted (conventional) data transmissions and reduces birdies. |
| Duplicate Frequency Alert - alerts you if you try to enter a duplicate name or frequency already stored in the scanner. |
| SAME Weather Alert/Priority - (with programmable FIP codes) lets your scanner alert you when a SAME weather alert is transmitted on a NOAA weather channel. The scanner also displays the alert type. |
| Search Lockouts - you can lock out up to 200 frequencies in search or close call search. |
| PC Control/Clone - you can transfer data to and from your scanner or another scanner and your personal computer, and control the scanner using a computer. |
| Low Battery Alert - the scanner alerts you if the batteries need to be recharged or replaced. |
| Battery Saver - you can set the scanner so it reduces the amount of power it needs if there are no transmissions. |
| Key Lock - you can deactivate the scanner's keys to help prevent accidentally changing the scanner's programming. |
![]()
| Scanning Terminology | Contents |
| Channel- a programmed frequency or talk group ID location. |
| Scanning- the process of stepping through conventional channels in groups, which are in programmed 'systems'. |
| ID Scan Mode- the process of monitoring trunked systems for programmed active talkgroup IDs in ID groups, in programmed 'systems'. |
| ID Search Mode- the process of monitoring trunked systems for all active talkgroup IDs in ID groups, in programmed 'systems'. |
| Searching- the process of searching for active frequencies in quick search, service, custom search, Close Call search, Search and Store, or Close Call Auto Store. |
| Function Mode- the mode the radio is in when it's waiting for another key press or scroll. |
| Hold Mode- used for monitoring a single channel, frequency, or Close Call Hit. |
| Menu Mode- used for programming frequencies, IDs, trunking frequencies/systems/groups/fleet maps, and other 'system' settings. |
| Tone-Out Mode- the mode the radio is in when it's monitoring paging tones. |
![]()
| Understanding Dynamic Memory |
| The scanner's
memory is organized in an architecture called Dynamic
Allocated Channel memory. This type of memory is
organized differently and more efficiently than the
bank/channel architecture used by traditional scanners.
Dynamic Allocated Design matches how radio systems
actually work much more closely and make it easier to
determine how much memory you have used and how much you
have left. No memory space is wasted. Since you can only program one trunking system per bank in a traditional scanner, and let's say you only have 10 banks, you can only store 10 trunking systems. Also, since some trunked systems might have hundreds of talk groups you wish to monitor, you might have to enter those systems into multiple banks in order to monitor all the ID's. |
![]()
| Conventional Simplex and Repeater Systems | Contents |
| Simplex systems use a single frequency for both transmit and receive. Most radios using this type of operation are limited to line-of-sight operation. This type of radio is frequently used at construction job sites, and with inexpensive consumer radios such as GMRS/FRS radios. The range is typically 1-8 miles, depending upon the terrain and many other factors. |
| Repeater systems use two frequencies: one transmits from the radio to a central repeater; the other transmits from the repeater to other radios in the system. With a repeater based system, the repeater is located on top of a tall building or on a radio tower that provides great visibility to the area of operation. When a user transmits (on an input frequency), the signal is picked up by the repeater and retransmitted (on an output frequency). The user's radios always listen for activity on the output frequency and transmit on the input frequency. Since the repeater is located very high, there is a very large line of sight. Typical repeater systems provide coverage out to about a 25-mile radius from the repeater location. |
![]()
| Understanding CTCSS/DCS |
| Continuous Tone
Coded Squelch System (CTCSS) and Digital Coded Squelch
(DCS) are two methods used to prevent interference by
other radio communications. Your scanner can receive
transmissions that use these codes (or more commonly
referred to as tone codes). CTCSS and DCS systems all use some form of coded squelch. Coded squelch techniques involve the transmission of a special 'code' signal along with the audio of a radio transmission. A receiver with coded squelch only activates when the received signal has the correct 'code'. This lets many users share a single frequency, and decreases interference caused by distant transmitters on the same channel. In all major metropolitan areas of the United States, every available radio channel is assigned to more than one user. Public safety radio systems on the same frequency are usually set up at a distance of 40 miles apart, or more. This means that you may hear transmissions from a distant system when your local system is not transmitting. By programming the CTCSS tone for a local channel the scanner will not stop on transmissions from the distant system. With few exceptions, such as the VHF Aircraft and Marine bands, almost every other VHF or UHF radio system uses some form of coded squelch. By far, CTCSS is the most popular mode among non-trunked systems. For more information visit Radio Reference's respective pages on CTCSS and DCS. |
![]()
| Understanding Trunking | Contents |
|
Trunking systems let a large group of 2-way radio users (or even
different groups of 2-way radio users) efficiently use a set of
frequencies. Instead of selecting a specific frequency for a transmission,
the user’s radio selects a programmed trunking bank in the system when
that user presses their PTT (push to talk) button. The trunking system
automatically transmits the call on the first available frequency, and
also sends (on a different frequency called a Data or Control channel) a
code that uniquely identifies that transmission as a talkgroup ID (or just
ID.) So when you are trunktracking a system, you are listening to active
IDs transmitting in the system (each using the first available frequency
in the system.) Trunking systems in general allocate and use fewer
frequencies among many different users. Since the trunking system might send a call and its response on different frequencies, it is difficult to listen to trunked communications using a conventional scanner. These scanners let you monitor the control channel frequency so you can hear calls and responses for users and more easily "follow" conversations than with a conventional scanner. This scanner trunktracks the following types of systems: |
|
|
| When you
program Motorola and EDACS system frequencies into the scanner, one frequency is the
control (or data) channel, and the rest are voice frequencies shared by
all the users. There may be 3 or 4 frequencies assigned as (primary or
alternate) control channels but only one control channel will be active at
a time. These scanners will allow you to program just Motorola control
channels into the trunking system and the voice channels will
automatically be found (but not programmed). EDACS systems need all the frequencies for the
system programmed and in the correct LCN (Logical Channel Number)
order. The control channel is continually transmitted to the field units and has a sound similar to listening to a boat engine over the phone (in manual mode; you won't hear this when you are trunking the system.) This control channel is also a good check to see if you can trunktrack the system. If you can't hear a control channel when you step through the trunking frequencies (in manual mode), you either don't have all the frequencies or are too far away to receive the control channel and the system. Motorola systems are limited to a maximum of 28 frequencies per system or site. Ericsson EDACS systems are limited to 25 frequencies per system or site. Motorola and EDACS systems can be either analog, digital, or mixed (digital and analog talkgroups). This scanner can't monitor digital systems. LTR systems work a little differently. LTR systems typically do not have a dedicated control channel. This type of system encodes all trunking information as digital subaudible data that accompanies each transmission. The frequencies also have to be in LCN (Logical Channel Number) order or the correct 'slot' for the system to trunktrack properly. Each repeater has its own controller, and all of these controllers are synchronized together. Even though each controller monitors its own channel, one of the channel controllers is assigned to be a master that all controllers report to. Each of these controllers sends out a data burst approximately every 10 seconds so that the subscriber units know that the system is there. This data burst is not sent at the same time by all the channels, but happens randomly throughout all the system channels. If you listen to the frequencies of an LTR system in manual mode (not trunking), on every channel in the system you will hear this data burst that will sound like a short blip of static like someone keyed up and unkeyed a radio within about 500 msec. LTR systems are limited to 20 frequencies per system. Trunkscanning is basically scanning IDs that are programmed into ID locations (same concept as frequencies into channels.) You can then trunkscan just the programmed IDs. Trunktracking is searching for all IDs in a system (same concept as searching for frequencies in a band). |
| Radio Reference.com has an excellent page explaining the various types of trunking systems in more detail here. |
![]()
| Understanding IDs | Contents |
| IDs are what you see instead of frequencies when you monitor a trunking system. |
|
| EDACS IDs come in two formats: AFS and Decimal. |
|
| I-Call IDS (Motorola/EDACS only) are direct unit-to-unit transmissions that are not heard by other system users. I-call IDs are usually 6-digit IDs (ex: 700152). |
| LTR IDS are in the format A-HH-UUU where A is the area code (0 or 1), HH is the home repeater (01-20), and UUU is the user ID (000-254). |
![]()
| Turning on the Scanner/Setting the Squelch/Volume |
| Note: this applies to a
fresh scanner right out of the box or one that has been reset. Press and hold |
| Right away you may want to check these settings in the 'Settings' menu. Set Backlight, Adjust Key Beep, Adjust Contrast, and Set Serial Port (if you plan to upload/download). |
| The only things you will be able to scan right out of the box are the preprogrammed systems in the scanner. You will also be able to do a service search, custom search, weather scan, search and store, close call search, or close call auto store. |
![]()
| Navigating the Menu |
| The scanner's menu lets you select options that let you set up and use the scanner. To use the menu, press the Menu button on the left side of the scanner. To select a menu item, rotate the scroll control clockwise or counterclockwise. The currently-selected menu item is highlighted with a bar on the display. When the menu item you want to select is highlighted, press E/yes or the scroll control to select it. To back up a level, press Menu. To exit all menus press L/O or Scan. |
![]()
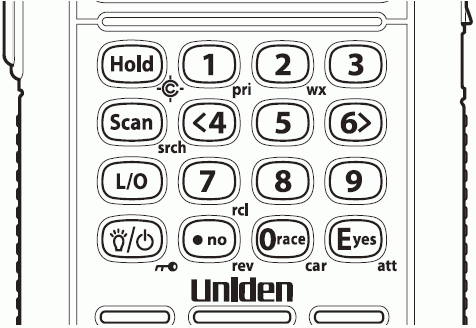
| Keypad and Knob Controls | Contents |
|
| Key | Function(s) |
| Scroll Control, Sql, Vol |
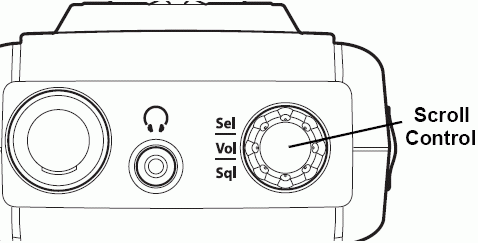
Press to select a menu item or save an entry in Menu Mode. Press then turn to adjust volume level in Scan Mode. Press to view battery info in Scan Mode. Press to view trunking activity indicators for a trunked system in Scan Mode. Turn to select scan/search direction and to continue scan/search in Scan/Search Modes. Turn to select channel or frequency in Scan/Search Hold Modes. Turn to scroll to a menu item in Menu Mode. Turn to select Tone-Outs in Tone-Out Standby. Turn to select characters when editing text. Press and hold Func then Vol once to adjust squelch in Scan Mode. Press and hold Func then Vol twice to view the AGC menu in Scan Mode. Press and hold Func then turn Vol to select AGC settings in Scan Hold Mode. Turn to adjust AGC settings in AGC Settings Mode. |
| Menu | Press to enter Menu Mode. Press to return to previous menu. Press and hold Func then Menu to go to the 'Edit' menu for the current system in Scan Mode. Press and hold Func then Menu to go to the 'Search for...' menu in Search Mode. Press and hold Func then Menu to go to the 'Close Call' menu in Close Call Only Mode. Press and hold Func then Menu to go to the 'WX Operation' menu in Any Weather Mode. Press and hold Func then Menu to go to the 'Tone-Out for...' menu in Tone-Out Standby. |
| Func | Press and hold to enter Function Mode. |
| Hold/ |
Press to hold on a
channel, frequency, search, Close Call hit, or Tone-Out Mode. Press
again to resume. Press to recall the last Close Call Hit in Close Call Only Mode. Press and hold Func then Hold/ |
| Scan/Srch | Press to
start/continue/resume scanning in Scan Mode. Press to toggle 'ID Search' or 'ID Scan' while scanning a trunked system in Scan Mode. Press and hold Func then Scan/Srch to start/continue/resume searching in Search Mode. Press and hold Func then Scan/Srch to start a 'quick search' at the current frequency while scanning a conventional system in Scan Mode. |
| L/O | Press to lockout a channel in Scan
Mode. Press to lockout a frequency in Search Mode. Press and hold to unlock (and enable) all groups/cars and channels in a system in Scan Hold Mode. Press and hold to unlock all frequencies of all search ranges/Close Call in Search Hold Mode. Press and hold Func then L/O to lockout a system/search in Scan Hold Mode. Press and hold Func then L/O to review and unlock search frequencies in Search/Close Call Only Modes. Press to exit Menu Mode or return to the last mode. |
|
|
Press
and hold for more than 2 seconds to turn the scanner on
or off. Press to turn the display backlight on or off. Press and hold Func then |
| Number Keys | Enter any frequency/ID
then Hold to go directly to in Scan/Search
Hold Modes. Press 1-9 to toggle single-digit system quick keys on or off in Scan Mode. Press 0-9 to toggle custom searches on or off in Search Mode. Press <4 to move the cursor to the left when editing text. Press 6> to move the cursor to the right when editing text. Press and hold Func then 1(Pri) to toggle priority modes in Scan Hold Mode. Press and hold Func then 2(Wx) to enter Weather Scan in Any Hold Mode. Press and hold Func then Menu to switch to Weather Alert in Weather Scan Mode. Press and hold Func then Menu to switch to Weather Scan in Weather Alert Mode. Press and hold Func then 0-9 to toggle group/car quick keys on or off in Scan Mode. Press and hold Func then 5 to toggle between frequency/ID or text display in Scan Hold Mode. Press and hold Func then 7 to scroll to a system/group/car/channel in Scan Hold Mode. |
| (.)no /rev | Press
to cancel an error or warning message. Press before entering a 2-digit system quick key to turn on or off in Scan Mode. Press to enter a decimal point for a frequency while programming. Press twice to delete current character when editing text. Press 3 times to delete all characters when editing text. Press to enter a hyphen when entering an ID while programming. Press to enter an 'i' when entering an 'I-Call' ID while programming. Press and hold Func then press and hold (.)no/rev to view the repeater frequency in Scan/Search/Close Call Only Hold Modes. |
| 0/race/car | Press to toggle custom search on or off in
Search Mode. Press to select and unlock a race in Scan Mode. |
| E/yes(att) | Press to select a
menu item or save a name in Menu Mode. Press to enter the Menu Mode for a displayed channel in Scan Mode. Press to enter the Menu Mode for the current Tone-Out in Tone-Out Standby. Press to store an ID in 'ID Search' mode while scanning a trunked system in Scan Mode. Press to 'quick store' a frequency in Search/Close Call Only/Weather Modes. Press and hold Func then E/yes(att) to toggle the attenuator on/off for a conventional channel in Scan Mode. Press and hold Func then E/yes(att) to toggle the attenuator on/off for a trunked system in Scan Mode. Press and hold Func then E/yes(att) to toggle the attenuator on/off in Search/Close Call Only/Tone-Out/Weather Modes. |
![]()
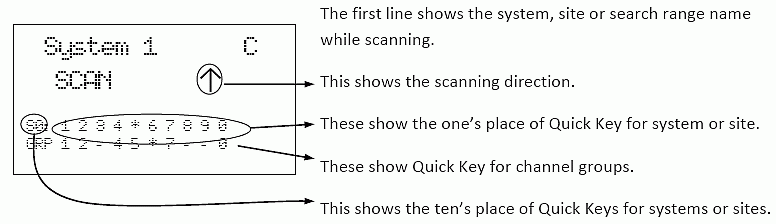
| A Look at the Display | Contents |

|
| The display has indicators that show the scanner's current operating status. The display information helps you understand how your scanner operates. |
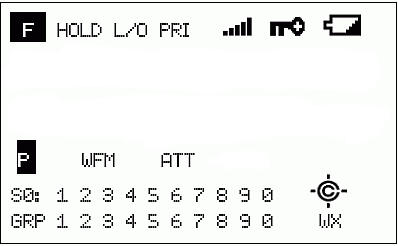
| Top Line |
|
DSKP appears when data skip is on in Scan/Search Modes. HOLD appears in Hold Mode. L/O appears if the system/group/channel/frequency/search is locked out in Hold Mode. PRI appears in priority mode and blinks in priority plus mode in Scan Mode. shows the battery level when you press Vol in Any Mode. |
| 2nd Line |
| shows
the name of the currently scanned system in Scan Mode. shows the name of the currently searched custom/service search in Search Mode. will alternate the system name and channel group name for a system in Scan Receiving/Hold Modes. shows the car number and driver for a race system in Scan Receiving/Hold Modes. will alternate the custom search name and system name for a trunking system for a 'C-Ch only Search' in Receiving or Search Hold Modes in text display mode. will alternate the custom search name and 'SID' for a trunking system for a 'C-Ch only Search' in Receiving or Search Hold Modes in ID/frequency display mode. |
| 3rd Line |
| will scroll 'SCAN'
(for a conventional system),
'ID SCAN', or 'ID SEARCH'
(for a trunked system) and show an up or down arrow to indicate the scan
direction in Scan Mode. will display the search frequency range/channels and an up or down arrow to show the scan direction in Search Mode. shows the frequency (only for a race system) or ID (or text tag if programmed) for a channel in Scan Receiving/Hold Modes. shows the search frequency (and the channel number for CB, Rail, and FRS/GMRS/MURS service searches) in Search Receiving/Hold Modes. shows the ID (with C-Ch only on) in Receiving or Search Hold Modes. will scroll SEARCH in Close Call Only Mode. |
| 4th Line |
|
shows the acquired control channel frequency of a trunking system in Scan Mode. shows the modulation and attenuation (if on) of a non-acquired trunked system in Scan Mode. shows the voice channel of a trunked system in Scan Receiving/Hold Modes. shows the receive modulation of the conventional channel in Scan Receiving/Hold Modes. shows the receive modulation of the custom/service search in Search Mode. ATT appears if the channel/search is attenuated in Receiving or Hold Modes. shows the tone code (if received) for a conventional frequency if programmed and blinks in CTCSS/DCS search mode in Receiving or Hold Modes. shows the trunking activity indicators (when scanning a trunked system) for 10 seconds when Vol is pressed in Scan Mode. |
| 5th Line |
| S0-9:
shows the first digit of
(systems assigned to) the
currently scanned
quick key on the left with the blinking
second digit (1-0) on the right
in Scan/Receiving Modes. S0-9: shows the first digit of the system quick key assigned to the displayed channel on the left with the second digit (1-0) on the right in Hold Mode. |
| a non-blinking
number on the right indicates the quick key is enabled waiting to
be scanned. a - (dash) means nothing is assign to the quick key. an * (asterisk) means the quick key is turned off. |
|
SCR appears if one or more broadcast/custom screen bands is turned on in Search/Receiving Modes. REP appears if repeater reverse is turned on in Search/Receiving Modes. shows the volume level is ready to adjust if you press Vol. shows the squelch is ready to adjust if you press and hold Func then Vol. |
| 6th Line |
| GRP
shows the group quick keys (1-0) for each system
with
(groups assigned to) the
currently scanned
quick key blinking
in Scan/Receiving Modes. GRP shows the group quick key for the displayed channel in Hold Mode. |
| a non-blinking
number on the right indicates the quick key is enabled waiting to
be scanned. a - (dash) means nothing is assign to the quick key. an * (asterisk) means the quick key is turned off. |
| WX appears if the weather alert priority feature is on in Any Mode except Tone-Out Standby. |
![]()
| BR330T Auto Step Sizes/Auto Modulation | Contents |
| Frequency Range | Step (kHz) | Mode | Band | Frequency Range | Step (kHz) | Mode | Band |
| .100-.525 | 5 | AM | Longwave | 162-174 | 12.5 | NFM | Federal |
| .530-1.700 | 10 | AM | AM Broadcast | 174-216 | 50 | WFM | VHF TV |
| 1.705-28 | 5 | AM | Shortwave/CB | 216-225 | 20 | NFM | 1.25 Meter Ham |
| 28-29.680 | 20 | NFM | 10 Meter Ham | 225-380 | 25 | AM | Military Air |
| 29.7-50 | 10 | NFM | VHF Low | 380-400 | 12.5 | NFM | Military Trunked |
| 50-54 | 20 | NFM | 6 Meter Ham | 400-420 | 12.5 | NFM | Federal Trunked |
| 54-72 | 50 | WFM | VHF TV | 420-450 | 12.5 | NFM | 70 cm Ham |
| 72-76 | 5 | FM | Astronomy | 450-470 | 12.5 | NFM | UHF Standard |
| 76-88 | 50 | WFM | VHF TV | 470-512 | 12.5 | NFM | UHF TV |
| 88-108 | 100 | WFM | FM Broadcast | 764-776 | 12.5 | NFM | PS Trunked |
| 108-137 | 25 | AM | Commercial Air | 794-806 | 12.5 | NFM | PS Trunked |
| 137-144 | 12.5 | NFM | Military Land Mobile | 806-824 | 12.5 | NFM | PS |
| 144-148 | 5 | NFM | 2 Meter Ham | 849-869 | 12.5 | NFM | PS Trunked |
| 148-150.7875 | 12.5 | NFM | Military Land Mobile | 894-956 | 12.5 | NFM | UHF Hi, 33 cm Ham |
| 150.800-162 | 5 | NFM | VHF High | 956-1300 | 25 | NFM | UHF Hi, 25 cm Ham |
| When you select 'AUTO' for a channel or mode’s modulation or step, the above values are used. Although TV bands are listed, the scanner cannot decode digital TV audio. |
![]()
| Settings Menu |
| To Edit Settings
press Menu.
Scroll to 'Settings' and press E/yes. Scroll to the settings and options below (in Blue) and press E/yes. |
| Contents |
| Set Backlight to use the backlight press
|
| Scroll
to 'Set Backlight' and press E/yes. Scroll to 1 of the 5 settings and press E/yes to save and exit. 10 sec - The backlight stays on for 10 seconds after you press 30 sec - The backlight stays on for 30 seconds after you press Squelch - The backlight turns on when the squelch opens then stays on for 5 seconds. Keypress - The backlight turns on when any key is pressed then stays on for 10 seconds. Infinite - The backlight turns on when you press |
| Adjust Key Beep this setting turns the key beep on or off and adjusts the volume level. |
| Scroll
to 'Adjust Key Beep' and press E/yes. At 'Set Level' scroll to 'Level 1-15 or Auto' (the scanner sets the alert beep to the master volume level) and press E/yes to save and exit. |
| Set Battery Save this setting turns the battery saver on or off. The
scanner turns off power for 1 second
and turns it on for 300 ms when you monitor a channel/frequency
that has no activity for more than a minute. Note: No Icon will appear in the display to tell you if the battery save feature is on or off. |
| Scroll
to 'Set Battery Save' and press E/yes. Scroll to On or Off and press E/yes to save and exit. |
| Set Audio AGC (Requires firmware 1.06.02 or newer). This setting helps balance the audio level you hear as you listen to different radio sources so you can hear them at a similar volume. |
| Note: It is important that you correctly set the modulation type for the channel you are programming. If you program a channel as NFM that is transmitting in FM mode, the audio will sound too loud as compared to correctly programmed channels. Similarly, if you program a channel as FM that is transmitting in NFM mode, the audio will be too quiet as compared to correctly programmed channels. Incorrectly matching the modulation setting to the actual modulation used is the biggest reason for unbalanced audio between channels. |
| Scroll
to 'Set Audio AGC' and press E/yes. Scroll to 'On' and press E/yes. Press Scan to exit and start scanning. |
| To adjust the AGC settings: 1. Press and hold Func then press the scroll control 2 times until AUDIO AGC is displayed. 2. Rotate the scroll control to change the setting. 3. Press and hold Func then rotate the scroll control to select another setting. 4. Return to step 2. Press the scroll control to exit. |
| AUDIO
AGC RESPONSE TIME: Range: -4 to +6 (0 is default) This parameter determines how frequently the AGC factor updates. Decreasing this value makes AGC respond faster, but could result in "pumping." A higher value decreases the response time. AUDIO AGC REFER GAIN: Range: -5 to +5 (0 is default) This parameter determines the reference level that AGC attempts to adjust the volume to. AUDIO AGC GAIN RANGE: Range: 0 to 15 (6 is default) This parameter controls the total dynamic range of the AGC adjustments. A larger value allows a wider variation in volume. |
| Contents |
| Adjust Contrast this setting controls the display's contrast (how light or dark it appears). |
| Scroll
to 'Adjust Contrast' and press E/yes. At 'Contrast 1-15' scroll to the preferred contrast level and press E/yes to save and exit. |
| Set Bar Antenna this setting lets you switch between the internal bar antenna and the antenna connected to the SMA connector for AM broadcasts. The bar antenna receives signals between 100 kHz and 1.7 MHz. It cannot receive signals out of this range even if you select it. |
| Scroll
to 'Set Bar Antenna' and press E/yes. Scroll to On or Off and press E/yes. Press Scan to exit. |
| Tuning
the Bar Antenna: Tune to a frequency between 100 kHz and 1.7 MHz. Press and hold Func then tap the scroll control twice. Scroll to a number between -8 and 7 (seen in the lower right corner of the display) to adjust the setting for the best reception. Tap scroll once to exit. |
| Note: The bar antenna has to be re-tuned for each new frequency. |
| PC Control to connect your scanner to a personal computer, you must first set the scanner's baud rate (the rate at which data is transferred between the scanner and the computer, in bits per second [bps]). Try the fastest settings first. If you have trouble transferring data between your scanner and your computer, try setting the baud rate to a slower setting. |
| Scroll
to 'PC Control' and press E/yes.
Scroll to Off, 9600, 19200, 38400, 57600, or 115200 and press E/yes to save and exit. |
| % Memory Used this setting lets you view the amount of memory left in the scanner. |
| Scroll
to 'See Scanner Info' and press E/yes.
Scroll to '% Memory Used' and press E/yes. Press Menu twice to exit. |
| Firmware Version allows you to view the firmware version. It is recommended that you download and install the latest firmware upgrade for the scanner if you don't already have it. Uniden has a new Wiki where you will find all the information necessary to upgrade your firmware. |
| Scroll
to 'See Scanner Info' and press E/yes.
Scroll to 'Firmware Version' and press E/yes. Press Menu twice to exit. |
| Contents |
| Locking/Unlocking the Keypad |
| Hold
on any channel. Press Func then
|
| Viewing the Battery Level to view the battery level (in volts) press the scroll control and look at the small numbers in the upper right of the display. Press the scroll control again to close the volume level (or let it disappear after 10 seconds). |
| Cloning
to clone (copy) data
from one (same) scanner to another, you must first
connect the scanners to each other using the included
connection cables and a DB9 null modem adapter (not included, available at most
computer stores).
Plug the smaller end of each of the included connection
cables into the Remote jack on the side
of each scanner. Then connect the other end of the cables
together using the null modem adapter. Then set up both scanners: |
| For
each scanner, press Menu. Scroll to 'Xfer
Information' and press E/yes. Scroll to 'Wired Clone' and press E/yes. Scroll to 'Master' and press E/yes for the source scanner. Scroll to 'Slave' and press E/yes for the destination scanner. When you are ready to clone the scanner, press Scan on the slave scanner first, then Scan on the master scanner. The master scanner checks the connection between the two scanners, then transfers its data to the slave scanner. When the transfer is complete, 'Complete' appears on both scanners. If the transfer did not work, 'Error' appears on the master scanner. |
| Scanner Reset to initialize the scanner's memory, turn off the scanner. Then press 2, 9, and Hold while turning it on (It helps if you can lay it flat). |
| Important! This deletes all programmed data. You cannot restore preprogrammed data that has been deleted. |
![]()
| Planning Conventional Systems and Groups | Contents |
| Planning your
systems will be very important even if you do have the
software. Organizing your quick keys will be the hardest part of the planning.
You can assign quick keys and copy and paste most of the
freqs, alpha tags, and IDs easily into the software. Most people can get everything they scan into the scanner. I like to scan by general interest so I set my system quick keys accordingly; 1-Public Safety systems, 1-Trunked PS systems, 2-Air, 2-Air Trunked systems, 3-Military, 3 Military Trunked systems, 4-Federal, etc. Then I will nest my groups (ex: Fire, Police, EMS) within the conventional systems, (Fire IDs, Police IDs, EMS ID within trunked systems) and give them all group quick keys. So, you have to figure out which systems and groups to assign to your quick keys so you can scan them without a table of contents and with some sort of logic you can remember. Use the worksheets below to help you plan your systems and groups. Alerts You can program your scanner to alert you when, a channel is received, you receive a Close Call hit, a talkgroup ID is transmitted with an emergency alert, or you receive a Tone-Out hit. For each alert in the scanner, you can select from 9 different tone patterns, and 15 volume settings. |
| Planning Race Systems |
| Most people would scan the race system and then conventional systems that compliment the race (officials, scoring, radio, etc.). So, program all the drivers and their frequencies for each race system. Program your conventional systems with groups for officials, scoring, radio, etc. Use the worksheets below to help you plan your systems and groups. |
| Worksheets |
| I have put together complete worksheets ready to print to help you plan your systems, Close Call, and Fire Tone-Out, etc. settings. Even if you don't fill them out, they are a good check list for programming. |
| Settings Worksheet Racing Worksheet Conventional Worksheet Motorola 800/900 Worksheet Motorola VHF/UHF Worksheet EDACS Worksheet LTR Worksheet |
![]()
| Entering Text |
| To program text you must first program the system, group/car, channel, custom search, Tone-Out, or SAME group. There are links to refer you back here while you are programming. |
| To enter a letter, turn the scroll control
until the character you want appears. (character order clock-wise is upper-case, lower-case, numbers, then special characters). To enter a decimal point, press (.)no. To move the cursor to the right, press 6>. To move the cursor to the left, press <4. To clear a character or enter a space, press (.)no twice. To clear all characters, press (.)no 3 times. Press E/yes when finished to exit. Press the 'Back' button in your browser to return to programming. |
![]()
| Programming Systems | Contents |
| You
have to create systems first, create groups/cars in the
systems, create channels in the groups/cars, then
program your frequencies or IDs into the channels. Or,
you can Quickstore freqs or Quickstore
IDs (only
after you program the trunking system). Trunking IDs go
into trunking system groups and conventional
frequencies go into conventional system groups/cars.
You can only store one trunking system per 'system'. You
can store up to 200 systems, up to 20 groups per system
(or 200+ cars per race system), and up to 200 channels or
IDs per group or car.
Note: Once a system
has been created, the system type cannot be changed. Total channels for the BR330T are limited to about 2500. Channels that have text tags use more memory than those that do not. If you use a text tag for every channel, total channels are about 1600. Also, remember that conventional frequencies and IDs are considered as channels. One suggestion; assign every group/car and every system to a quick key. You can assign as many systems you want to a system quick key and as many groups/cars you want to a group quick key. That way you can just turn systems and groups/cars on and off and not have to worry about locking them out. If you don't assign a system or group/car to a quick key, you have to lock it out if you don't want to scan it. See also Deciphering Trunked Systems at the Wiki. Use the worksheets to help you program your systems, groups, and cars. |
| To Create a New Conventional System, press Menu. At 'Program System' press E/yes. |
| At 'Select
System' scroll to 'New System'
and press E/yes. At 'Select Sys Type' scroll to 'Conventional' and press E/yes. At 'Confirm?' press E/yes. At 'Edit Name' press E/yes. See Entering Text. Then see Editing System Options to customize the system. Then see Creating Groups. Then see Programming Frequencies/IDs to program frequencies. |
| Tip: If you want to see the frequency and alpha tag in the display, program the conventional system as a race system, use the driver for the channel name (and then just add more freqs for the same alpha tag). Remember, you can only scan 1 race system at a time. |
| To Program a New Motorola System, press Menu. At 'Program System' press E/yes. |
| At 'Select
System' scroll to 'New System'
and press E/yes. At 'Select Sys Type' scroll to 'MOT' and press E/yes. Scroll to the type of Motorola system you want to program and press E/yes. |
| Use '800MHz
Standard' for 800 MHz systems that use the
standard band plan. Use '800MHz Splinter' for 800 MHz systems that use the splinter band plan (analog 800Mhz systems with frequencies between 866-869 MHz [or rebanded 851-854 MHz] ending with 0 instead of 5 e.g. 852.1250, not 852.1375). Use '800MHz Custom' for rebanded 800 MHz systems that use a custom band plan. |
| At 'Confirm?'
press E/yes. At 'Edit Name' press E/yes. To name the system, see Entering Text. Scroll to 'Set Frequencies' and press E/yes. At 'New Frequency' and press E/yes. At 'Input Frequency' enter the frequency and press E/yes. At 'Edit Frequency' press Menu and scroll down to 'New Frequency', then press E/yes. Repeat to program the rest of the trunking frequencies. Press Scan to exit. Then see Editing System Options to customize the system. Then see Creating Groups. Then see Programming Frequencies/IDs to program IDs. |
| To Program a New EDACS System, press Menu. At 'Program System' press E/yes. |
| At 'Select
System' scroll to 'New System'
and press E/yes. At 'Select Sys Type' scroll to 'EDCS' and press E/yes. Scroll to 'WIDE', NARROW', or 'SCAT' and press E/yes. At 'Confirm?' press E/yes. |
| Note: EDACS Wide is the same as EDACS Standard and use a 9600 baud control channel. EDACS Narrow-band systems use a 4800 baud control channel. See here at RR for a description of SCAT. |
| At 'Edit
Name' press E/yes. To name the
system, see Entering Text. Scroll to 'Set Frequencies' and press E/yes. At 'New Frequency' and press E/yes. At 'Input Frequency' enter the frequency and press E/yes. At 'Input LCN' enter the LCN number and press E/yes. See Finding EDACS LCN Order. At 'Edit Frequency' press Menu and scroll down to 'New Frequency', then press E/yes. Repeat to program the rest of the trunking frequencies. Press Scan to exit. Then see Editing System Options to customize the system. Then see Creating Groups. Then see Programming Frequencies/IDs to program IDs. |
| Contents |
| To Program a New LTR System, press Menu. At 'Program System' press E/yes. |
| At 'Select
System' scroll to 'New System'
and press E/yes. At 'Select Sys Type' scroll to 'LT' and press E/yes. At 'Confirm?' press E/yes. At 'Edit Name' press E/yes. To name the system, see Entering Text. Scroll to 'Set Frequencies' and press E/yes. At 'New Frequency' and press E/yes. At 'Input Frequency' enter the frequency and press E/yes. At 'Input LCN' enter the LCN number and press E/yes. See Finding LTR LCN Order. At 'Edit Frequency' press Menu and scroll down to 'New Frequency', then press E/yes. Repeat to program the rest of the trunking frequencies. Press Scan to exit. Then see Editing System Options to customize the system. Then see Creating Groups. Then see Programming Frequencies/IDs to program IDs. |
| To Program a Race System These prompts are designed to help you quickly enter a new race from a frequency list purchased at the track. |
| While
scanning, press 0/race. Scroll to 'New
race' and press E/yes. At 'Name the race' enter the name of the race (or press E/yes to accept the default name) and press E/yes. At 'Enter Car No' enter the first car number (0-999) and press E/yes. At 'Enter Driver' enter the first driver name (up to 12 characters) and press E/yes. At 'Enter Frequency' enter the driver's frequency and press E/yes. At 'Set CTCSS/DCS' scroll to On or Off and press E/yes. At 'Advanced Options' press E/yes for more or (.)no to skip. At 'Set Modulation' scroll to the preferred modulation and press E/yes. At 'Set Attenuator' scroll to On or Off and press E/yes. At 'Set Priority' scroll to On or Off and press E/yes. At 'Set Alert' scroll to Off or Alert 1-9 and press E/yes. (skip if alert is set to off) At 'Set Level' scroll to alert level and press E/yes. At 'Another Freq for This Driver?' press E/yes for another (and repeat) or (.)no to skip. At 'Another Car for This Race?' press E/yes for another (and repeat) or (.)no to skip. At 'Complete' press E/yes to exit. Or, Press Menu. At 'Program System' press E/yes. At 'Select System Type' scroll to 'Racing' and press E/yes. At 'Confirm?' press E/yes. At 'Edit Name' press E/yes. See Entering Text. Then see Edit Systems Options and Creating Cars/Drivers. |
| To Edit the System Name, press the Menu button. At 'Program System' press E/yes. |
| At 'Select
System' scroll to the system that you want to
assign a name to and press E/yes. At 'Edit Name' press E/yes. See Entering Text. Press Menu to exit. |
| Contents |
| To Set the Modulation for a Motorola or LTR System, press the Menu button. At 'Program System' press E/yes. |
| At 'Select
System' scroll to the system you want to set the
modulation in and press E/yes. Scroll to 'Set Modulation' and press E/yes. Scroll to one of three settings and press E/yes. Auto- the scanner uses the default modulation for the frequency band. FM- the scanner uses FM for the frequency band. NFM- the scanner uses NFM for the frequency band. Press Menu to exit. |
| While
scanning the system, press the Func then E/yes(att). Or, press Menu. At 'Program System' press E/yes. At 'Select System' scroll to the system you want to attenuate and press E/yes. Scroll to 'Set Attenuator' and press E/yes. Scroll to On or Off and press E/yes. Press Menu to exit. |
| To Copy a System, press Menu. At 'Program System' press E/yes. |
| At 'Select
System' scroll to the system you want to copy
and press E/yes. Scroll to 'Copy System' and press E/yes. At 'New Sys Name?' enter a name for the new system. See Entering Text. Press Menu to exit. Copying a system will copy all groups, channels, and settings including quick key assignments. |
| To Delete a System, press Menu. At 'Program System' press E/yes. |
| At 'Select
System' scroll to the system you want to delete
and press E/yes. Scroll to 'Delete System' and press E/yes. At 'Confirm Delete?' press E/yes. Press Menu to exit. |
![]()
| Edit System Options Menu |
| Once you have your Systems Created you can configured your System options. |
|
To Edit System Options
press Menu.
At 'Program System' press E/yes.
At 'Select System' scroll to the system that you want to edit and press E/yes. Scroll to 'Edit Sys Option' and press E/yes. Scroll to the options below and press E/yes. Press Scan/Srch to return to scanning when done with editing. |
| Contents |
| Set Quick Key (no Racing) assigns a system to a quick key and will be scanned when the key is turned on. The default setting is no quick key. |
| Scroll
to 'Set Quick Key' and press E/yes. Scroll to the quick key number (or . for no quick key) you want to assign to the system and press E/yes to save and exit. |
| Note: Pressing the first number of a 2-digit quick key will get you closer, 1 for 10, 2 for 20, etc. |
| Set
Lockout
determines whether a system will be scanned or not even
if the quick key for the system is turned on. The default
setting is unlocked. Note: You can also toggle system lockout by holding on the system in scan mode and pressing and holding Func then L/O. |
| Scroll
to 'Set Lockout' and press E/yes. Scroll to 'Locked' or 'Unlocked' and press E/yes to save and exit. |
| Set
Hold Time sets (in seconds) the amount of time the
scanner will scan the system before moving on to the next
(unlocked) system. If you select 0 for trunking systems,
the scanner stays on the system for at least 1 second.
For conventional systems, all unlocked channels will be
scanned at least once regardless of this setting. The
scanner moves to the next system after the hold time
expires, any current transmission ends, and the channel
delay time expires. The default setting is 2 seconds for
each system. Tip: set your systems to 0. |
| Scroll
to 'Set Hold Time' and press E/yes. Enter the hold time (0-255 seconds) you desire and press E/yes to save and exit. |
| Set Delay Time for the system sets (in seconds) the amount of time the scanner stays on a channel after the transmission has ended before resuming scanning. This setting applies to all channels in the system. You cannot set the delay on a 'per channel' basis. The default setting is 2 seconds. |
| Scroll
to 'Set Delay Time' and press E/yes. Scroll to the desired delay time (1-5 seconds or Off) and press E/yes to save and exit. |
| Set Data Skip (Conventional/Racing only) with the setting set to on, when it receives a data signal, the scanner stops briefly on the channel, then immediately resumes scanning automatically. With the setting set to off, the scanner remains on the channel until the transmission stops. The default setting is off. |
| Scroll
to 'Set Data Skip' and press E/yes. Scroll to On or Off and press E/yes to save and exit. |
| ID
Scan/Search sets whether the scanner
scans the programmed ID groups (ID Scan) or searches for
all IDs (ID Search) in a trunking system. The default
setting is ID search. Note: You can also do this while scanning the system by pressing SCAN while scanning the trunked system. |
| Scroll
to 'ID Scan/Search' and press E/yes. Scroll to 'ID Scan' or 'ID Search' and press E/yes to save and exit. |
| Contents |
| Edit Band Plan (Motorola Custom/VHF/UHF only) Band plans are required so the scanner can correctly determine the voice channel frequencies. |
| For Custom (rebanded) Motorola Systems (Requires firmware 1.06.02 or newer) allows you to create a custom band plan for rebanded systems. Custom band plans require that you enter both a lower and an upper base frequency value. The lower base frequency (or base) is always the base frequency as provided in the Radio Reference Database. Use this Excel spreadsheet to calculate the upper base frequency value: CustomBandPlanCalculator.xls. If you don't have the lower base frequency value, the Trunked Radio Systems User’s Page has an explanation on how to find it. Look for 'Determining Base and Offset Frequencies for the BC245xlt' by John C. |
| Scroll
to 'Edit Band Plan' and press E/yes. At 'Select Plan' scroll to 'Band Plan 1-6' and press E/yes. At 'Set Base Freq' press E/yes. At 'Input Lower' enter the lower base frequency and press E/yes. At 'Input Upper' enter the upper base frequency and press E/yes. Scroll to 'Set Offset' and press E/yes. At 'Input Offset' enter the offset and press E/yes. At 'Select Polarity' scroll to + or - and press E/yes. Scroll to 'Set Spacing' and press E/yes. Scroll to the step size and press E/yes. Press 'Menu' to return and repeat for each band plan as needed. Press 'Menu' to return. For standard Motorola 800 MHz rebanded systems you need to set Band Plan 1 and Band Plan 2 as follows:
|
| For VHF/UHF Motorola Systems allows you to set the base frequency, step size, and offset for the system. A band plan is required so the scanner can correctly determine the voice channel frequencies. You can set up to 3 different band plans. I have found an explanation at the Trunked Radio Systems User’s Page that describes how to find some of this information. Look for 'Determining Base and Offset Frequencies for the BC245xlt' by John C. Radio Reference.com also has an explanation. |
| Scroll
to 'Edit Band Plan' and press E/yes. At 'Select Plan' scroll to 'Band Plan 1' and press E/yes. At 'Input Base Freq' enter the base frequency and press E/yes. At 'Select Step' scroll to the step size and press E/yes. At 'Offset' enter the offset and press E/yes. Repeat for each band plan. Press 'Menu' to return. |
| Edit Fleetmap (Motorola Type I/lli only) allows you to select a preprogrammed fleetmap or program a fleetmap for Motorola Type I systems. You must program a system fleet map in order for the scanner to properly track and display talk group ID's. If you don’t know which fleet map to use, you can try a method I found at Radio Reference.com. Since it is rather lengthy, I will just give you the link. Determining Type I Motorola Fleet Maps by Dave Goodson. |
| Scroll to 'Edit Fleetmap' and press E/yes. |
| To
select a Preset Fleetmap, scroll to 'Preset' and
press E/yes. Scroll to the number of the preset fleetmap and press E/yes to save and exit. See Preset Fleetmaps. To program a Custom Fleetmap, scroll to 'Custom' and press E/yes. At 'Block 0' scroll to the size code (0-14) and press E/yes. See size codes. The scanner will prompt you to the next available block so you can scroll to and enter the next size code (0-14) then press E/yes. Repeat for each block as needed (0-7) and you will return to the 'Edit Sys Option' menu. |
| Note: If you select size code 12, 13, or 14, these restrictions apply: |
| 12 can only be assigned to Blocks 0, 2, 4 or 6. |
| 13 can only be assigned to Blocks 0 and 4. |
| 14 can only be assigned to Block 0. |
| Since these size codes require multiple blocks, you will be prompted for the next available block. For example, if you assign Block 0 as 12, the scanner prompts you for block 2, the next block available, instead of block 1. If you assign Block 0 as 14, you would not see another prompt because 14 uses all available blocks. |
| Contents |
| Set Status Bit (Motorola only) sets how your scanner works with status bits (also called S-bits), letting you control how the scanner interprets and displays Motorola talkgroup IDs. The default setting is ignore. |
| Scroll
to 'Set Status Bit' and press E/yes. Scroll to one of two settings and press E/yes to save and exit. Ignore- the scanner rounds all received ID's down to the next interval of 16. Yes- the scanner treats all received ID's as unique ID's. |
| Set End Code (Motorola only) sets how the scanner handles the transmission end code sent by most Motorola systems. The default setting is Yes. |
| Scroll
to 'Set End Code' and press E/yes. Scroll to one of two settings and press E/yes to save and exit. Yes- the scanner immediately returns to the control channel when it detects the end code. Ignore- the scanner does not return to the control channel until the carrier drops. |
| Set I-Call (Motorola/EDACS only) sets whether the scanner will monitor I-call IDs. I-calls (or private calls) are transmissions made from one radio user to another radio user and not heard by everyone else in the trunking system. The default setting is off. |
| Scroll
to 'Set I-Call' and press E/yes. Scroll to one of three settings and press E/yes to save and exit. Off- the scanner ignores I-call IDs. On- the scanner tracks I-call IDs. Only- the scanner tracks only I-call IDs and ignores other radio traffic on the system. |
| Emergency Alert (Motorola/EDACS only) sets how your scanner handles IDs that have the emergency flag set. The default setting is off. |
| Scroll
to 'Emergency Alert' and press E/yes. Scroll to the alert (Alert 1-9 or Off) and press E/yes. |
| At 'Set Level' scroll to 'Level 1-15 or Auto' (the scanner sets the alert beep to the master volume level) and press E/yes. |
| Set C-Ch Only (Motorola only) allows you to enter just the control channels for a Motorola system. The scanner will then find (but will not program) any active voice channels and any new voice channels. Tip: Enter all of the frequencies and set the system for C-Ch Only in case the control channels change. The default setting is on. |
| Scroll
to 'Set C-Ch Only' and press E/yes. Scroll to one of two settings and press E/yes to save and exit. Off- you must enter all voice and control channel frequencies. On- you only need to enter control channel frequencies. |
| EDACS ID Format (no EDACS SCAT) sets how your scanner displays EDACS IDs. They can be displayed in two formats: AFS and Decimal. The default setting is AFS. |
| Scroll
to 'EDCS ID Format' and press E/yes. Scroll to 'AFS Format' or 'Decimal Format' and press E/yes to save and exit. |
| Rvw ID:Srch L/O allows you to review locked out IDs in a system and unlock them. |
| Scroll
to 'Rvw ID:Srch L/O' and press E/yes. At 'Unlock?' scroll to the ID and press E/yes to unlock. 'Nothing Locked' appears if nothing is locked out. Press 'Menu' to return. |
| Clr All L/O IDs allows you to unlock all the locked IDs in a system. Press 'Menu' to return. |
| Scroll
to 'Clr All L/O IDs' and press E/yes. At 'Confirm?' press E/yes to save and exit. 'Nothing Locked' appears if nothing is locked out. |
![]()
| Creating Groups |
| Once you have your Systems Created and your Systems Options configured you can create your groups. |
|
To Create a New
Group (no EDACS SCAT) press Menu.
At 'Program System' press E/yes. At 'Select System' scroll to system where you want to create a group and press E/yes. Scroll to 'Edit Group' and press E/yes. At 'Select Group' scroll to 'New Group' and press E/yes. Press Menu and scroll to 'New Group' to create more groups. Continue at 'Edit Name' below. Then see Programming Frequencies/IDs to program frequencies. |
| Edit Name | Edit Channel | Set Lockout |
| Set Quick Key | Delete Group |
| Contents |
| Edit Name allows you to enter the name of a group. |
| At 'Edit
Name' press E/yes. See Entering Text. Press Scan to exit or Menu to return. |
| Set Quick Key sets the quick key for the group. |
| Scroll
to 'Set Quick Key' and press E/yes. Scroll to or enter the quick key number (0-9 or . for no quick key) you want to assign to the group and press E/yes to save and exit. |
| Edit
Channel creates channels and edits channel options. See Programming Frequencies/IDs. |
| Set Lockout locks or unlocks a group (even with its quick key enabled). |
| Scroll
to 'Set Lockout' and press E/yes. Scroll to 'Unlocked' or 'Lockout' and press E/yes to save and exit. |
![]()
| Creating Cars/Drivers |
| Once you have your Race System Created you can add cars, drivers, and store frequencies for them. |
| To Quickly Create a New Car, when scanning a race system, press Hold to hold on any channel. |
| Press
and hold Func then 0/race. At 'Enter Car No' enter the car number press E/yes. At 'No Such Car No Create?' press E/yes. |
| To Create a New Car, press Menu. At 'Program System' press E/yes. |
| At 'Select
System' scroll to race where you want to create
a car and press E/yes. Scroll to 'Edit Car' and press E/yes. At 'Select Car' scroll to 'New Car' and press E/yes. At 'Edit Car No' enter the car number and press E/yes. Press Menu and scroll back to 'New Car' to create more cars. Continue at 'Edit Car No' below. |
| To Edit Car Options, Press Menu. At 'Program System' press E/yes. |
| At 'Select
System' scroll to the race system that has the car
you want to edit and press E/yes. Scroll to 'Edit Car' and press E/yes. At 'Select Car' scroll to the car you want to edit and press E/yes. Scroll to the options below and press E/yes. Press Scan/Srch to return to scanning when done with editing. |
| Edit Car No | Set Quick Key | Delete Car |
| Edit Driver | Edit Channel | Set Lockout |
| Contents |
| Edit Car No allows you to program the number of a car. |
| At 'Edit
Car No' press E/yes. Enter the car number and press E/yes to save and exit. |
| Edit Driver assigns a driver (name) to the car. |
| Scroll
to 'Edit Driver' and press E/yes.
See Entering Text. Press Scan to exit or Menu to return. |
| Set Quick Key sets the quick key for the car. |
| Scroll
to 'Set Quick Key' and press E/yes. Enter the quick key number (0-9 or . for no quick key) you want to set for the car and press E/yes to save and exit. |
| Edit Channel creates channels, edits channel options, or deletes a channel for a driver. See also Quickly Storing a Conventional Frequency. |
| Scroll
to 'Edit Channel' and press E/yes. At 'Select Channel' scroll to the channel you wish to edit or 'New Channel' and press E/yes. (For New Channel only) At 'Input Frequency' enter the frequency of the driver and press E/yes to save and exit. Continue at Channel Priority below. Press Menu to return to 'Select Channel'. Scroll to 'New Channel' and press E/yes to program more frequencies for the driver. Press Menu to return to the Car menu. |
| Delete Car deletes a car. |
| Scroll
to 'Delete Car' and press E/yes. At 'Confirm Delete?' press E/yes to save and exit. |
| Set Lockout locks or unlocks a car. |
| Scroll
to 'Set Lockout' and press E/yes. Scroll to 'Unlocked' or 'Lockout' and press E/yes to save and exit. |
![]()
| Programming Frequencies/TGIDs | Contents |
| Once you have your Systems Created, Systems Options configured, Groups Created, you can (finally) program your channels. Channels are not numbered in the scanner. |
| Quickly Storing a Conventional Frequency |
| To
Program a Frequency into a 'Quick Save Group' in a 'Quick
Save System',
in scan mode press Hold to hold on any
channel. Enter the frequency and press E/yes. At 'Quick Freq Save?' press E/yes. |
| Note: If the frequency is already stored in the group, 'Frequency Exists Accept? (Y/N)' appears. Press (.)no to return. |
| The
scanner will save the frequency in a (created) group
called 'Qck Save Grp' in a (created)
system called 'Qck Save Cnv Sys' (with
no quick keys assigned) and you will be at the 'Edit Channel' menu to complete the settings for the new
channel. If you don't want to edit the channel settings
or are done editing the channel, press L/O
to return to 'Hold' to enter another
frequency or Scan to exit. Then see Edit Channel Options, Edit Group Options, and Edit Systems Options to customize the channel(s), group, and system. |
| To
Program a Frequency into an Existing Group/Car, Hold on
any channel. Enter the frequency and press E/yes. At 'Quick Freq Save?' press (.)no. At 'Select System' scroll to the system where you want to store the frequency and press E/yes. At 'Select Group' scroll to the group/car where you want to store the frequency and press E/yes. |
| Note: If the frequency is already stored in the group/car, 'Frequency Exists' Accept? (Y/N)' appears. Press (.)no to return. |
| After storing the frequency, you will be at the 'Edit Channel' menu to complete the settings for the new channel. If you don't want to edit the channel settings or are done editing the channel, press L/O to return to 'Hold' to enter another frequency or Scan to exit. |
| Quickly Storing an ID Note: You have to program the trunking system first. See Programming Trunking Systems. |
| To Program an ID into a 'Quick Save Group' in scan mode Hold on any channel in the system you want to store the ID in. |
| . | Enter the ID (see Entering IDs) and press E/yes. |
| At 'Quick
TGID Save?' press E/yes.
At 'Select System' scroll to the system where you want to store the ID and press E/yes. |
| Note: If the ID is already stored in the group, 'TGID Exists Accept? (Y/N)' appears. Press (.)no to return. |
| The
scanner stores the ID into a (created) channel group
called 'Qck Save Grp' (with no quick key
assigned) and you will be at the 'Edit Channel' menu to complete the settings for the new
channel. If you don't want to edit the channel settings
or are done editing the channel, press L/O
to return to 'Hold' to enter another
frequency or Scan to exit. Then see Edit Channel Options and Edit Group Options to customize the channel(s), and group. |
| To Program an ID into an Existing Group in scan mode Hold on any channel. |
| . | Enter the ID (see Entering IDs) and press E/yes. |
| At 'Quick
TGID Save?' press (.)no.
At 'Select System' scroll to the system where you want to store the ID and press E/yes. At 'Select Group' scroll to the group where you want to store the ID and press E/yes. |
| Note: If the ID is already stored in the group, 'TGID Exists Accept? (Y/N)' appears. Press (.)no to return. |
| After storing the ID, you will be at the 'Edit Channel' menu to complete the settings for the new channel. If you don't want to edit the channel settings or are done editing the channel, press L/O to return to 'Hold' to enter another frequency or Scan to exit. |
| Manually Programming Channel Frequencies/TGIDs | Contents |
| To
Program a New Channel press Menu. At 'Program
System' press E/yes. At 'Select System' scroll to system where you want to program a channel and press E/yes. Scroll to 'Edit Group' and press E/yes. At 'Select Group' scroll to the group that you want to program the channel in and press E/yes. Scroll to 'Edit Channel' and press E/yes. At 'Select Channel' scroll to 'New Channel' and press E/yes. At 'Input Frequency (or TGID)' enter the frequency or ID and press E/yes. |
| To enter a Conventional Frequency enter the frequency and press E/yes. |
| To enter a Motorola Type II ID enter the ID and press E/yes. |
| To enter a Motorola Type I ID enter the fleet number, press (.)no once for a hyphen, then enter the subfleet and press E/yes. |
| Note:
If you omit the subfleet (still need the hyphen), the
scanner treats this field as a wildcard (will treat the
subfleet as 1 ID and receive all IDs in the subfleet). You can also lock out this subfleet ID so you will not receive it. |
| To enter a Motorola I-Call ID, press (.)no once then enter the ID and press E/yes. |
| To enter a Motorola Wildcard (receive any) I-Call ID, press (.)no once then enter 0 and press E/yes. |
| Note: You can also lock out this wildcard ID so you will not receive I-Calls. |
| To enter an EDACS ID in AFS (default) format, enter the agency number, press (.)no once for a hyphen, then the fleet and subfleet and press E/yes. |
| Note:
If you omit the fleet and/or subfleet (still need the
hyphen), the scanner treats these fields as wildcards
(will treat the fleet and/or subfleet as 1 ID and receive all IDs in the
fleet and/or subfleet). You can also lock out this fleet and/or subfleet ID so you will not receive it. |
| To enter an EDACS ID in Decimal format, enter the ID and press E/yes. |
| To enter an EDACS I-Call ID, press (.)no once then enter the ID and press E/yes. |
| To enter an EDACS Wildcard (receive any) I-Call ID, press (.)no once then enter 0 and press E/yes. |
| Note: You can also lock out this wildcard ID so you will not receive I-Calls. |
| To enter a LTR ID, enter the area code (0 or 1) and press (.)no once, then enter the home repeater number (01-20) and press (.)no once, then the user ID (1-254) and press E/yes. |
| Note:
If you omit the user ID (still need the hyphen), the
scanner treats this field as a wildcard (will treat the
home repeater as 1 ID). You can also lock out this home repeater ID so you will not receive it. |
| Note: If the channel is already stored in the group, 'TGID or Frequency Exists Accept? (Y/N)' appears. Press (.)no to return. |
| Continue at
Edit Name below. Press Menu to return to 'Select Channel'. Scroll to 'New Channel' and press E/yes. Program the rest of the channels the same way. |
![]()
| Edit Channel Options Menu |
| Once you have your Systems Created , Systems Options configured, Groups Created, Cars Created, and your Channels Programmed you can set your channel options. |
| To Edit Channel
Options press Menu.
At 'Program System' press E/yes. At 'Select System' scroll to the system that contains the channel and press E/yes. Scroll to 'Edit Group' and press E/yes. At 'Select Group' scroll to the group that has the channel you want to edit and press E/yes. Scroll to 'Edit Channel' press E/yes. At 'Select Channel' scroll to the channel you want to edit and press E/yes. You can also press E/yes when the channel is displayed in scan mode. Scroll to the options below and press E/yes. Press Scan/Srch to return to scanning when done with editing. |
| Contents |
| Edit Name The channel name appears on the second line of the display when the scanner stops on a channel. If you do not enter a channel name, the scanner displays the frequency for conventional systems or the talk group ID for trunked systems. |
| Scroll
to 'Edit Name' and press E/yes.
See Entering Text. Press Scan to exit or Menu to return. |
| Set Priority (conventional/racing only) This setting controls whether the scanner treats the channel as a priority channel while scanning. There doesn't seem to be a limit to how many channels you can set. When you turn on the Priority feature, the channel(s) will be scanned every 2 seconds. P appears at the end of the default (not the tagged) name in the display to denote the channel is a priority channel. The default setting is off. |
| Scroll
to 'Set Priority' and press E/yes. Scroll to On or Off and press E/yes to save and exit. |
| Set Alert This setting controls whether the scanner will alert you when the channel becomes active. The default setting is off. |
| Scroll
to 'Set Alert' and press E/yes. Scroll to the alert (Alert 1-9 or Off) and press E/yes. |
| At 'Set Level' scroll to 'Level 1-15 or Auto' (the scanner sets the alert beep to the master volume level) and press E/yes. |
| Copy/Paste Channel The scanner can copy a channel (and all its settings) into a copy buffer to paste into the same system (in a different group) or a group/car in another system. |
| Scroll
to 'Copy Channel' press E/yes
to save to the channel buffer. To Paste the Channel, press Menu until 'Select System' appears. At 'Select System' scroll to system where you want to paste the channel and press E/yes. Scroll to 'Edit Group/Car' and press E/yes. At 'Select Group/Car' scroll to the group/car that you want to paste the channel in and press E/yes. Scroll to 'Edit Channel' and press E/yes. At 'Select Channel' scroll to 'Paste Channel' and press E/yes to save and exit. |
| Note: You can only copy and paste from like systems -conventional to conventional, trunking to trunking, or racing to racing. |
| Contents |
| Edit Frequency or TGID See also 'Entering IDs'. |
| Scroll
to 'Edit Frequency' or 'Edit
TGID' and press E/yes. Enter the frequency or ID and press E/yes to save and exit. |
| Set CTCSS/DCS (conventional/racing only) This setting controls how a subaudible CTCSS or DCS is used for the channel. The default setting is Off. See Understanding CTCSS/DCS. |
| Scroll
to 'Set CTCSS/DCS' and press E/yes. Scroll to 1 of 5 options and press E/yes to save and exit: Off - any signal opens squelch. Search - the scanner searches for and displays any CTCSS or DCS tone that accompanies the transmission. CTCSS - the scanner only opens squelch if the CTCSS tone you select is also present with the signal. Scroll to the desired CTCSS tone you want present with the signal. Press E/yes to save and exit. DCS- the scanner only opens squelch if the DCS code you select is also present with the signal. Scroll to the desired DCS code you want present with the signal. Press E/yes to save and exit. Set Lockout - the scanner does not stop on the channel if the tone/code you select is present. Scroll to 'CTCSS or DCS' and press E/yes. Scroll to the desired tone/code you want locked out. Press E/yes to save and exit. |
| Set Modulation (conventional/racing only) This setting selects the modulation used for the channel. The default setting is Auto (NFM for FM channels). |
| Scroll
to 'Set Modulation' and press E/yes. Scroll to Auto, AM, FM, NFM, or WFM and press E/yes to save and exit. |
| Set Attenuator (conventional only) This setting controls whether the scanner attenuates signals on The channel by about 18 dB. The default setting is off. |
| Scroll
to 'Set Attenuator' and press E/yes. Scroll to On or Off and press E/yes to save and exit. |
| Note: You can also toggle attenuation for a conventional channel in scan hold mode by pressing E/yes then E/yes(att). |
| Set Lockout determines whether a channel will be scanned or not. The default setting is unlocked. |
| Scroll
to 'Set Lockout' and press E/yes. Scroll to 'Unlocked' or 'Lockout' and press E/yes to save and exit. |
| Note: You can also toggle lockout for a channel in scan mode by pressing L/O. |
![]()
| Priority/Priority Plus Scan | Contents |
|
Priority Scan When the scanner is scanning a conventional system, it interrupts scanning every 2 seconds to check priority channels for activity. The more channels you have set to priority, the longer the interruption will be. The quick keys for the system(s) and group(s)/car(s) containing the priority channel(s) have to be turned on (and unlocked) or the scanner will display 'Priority Scan No Channel'.Priority Plus Scan The scanner only scans priority channels in (unlocked) conventional systems with system and group/car quick keys enabled. The highest priority is for channels in system and group/car quick key 1. The lowest priority is for channels in system quick key 90 and group/car quick key 0. Priority for priority channels in the same channel group/car follows the order in which the channels were created. To Use Priority Scan you must first
set your priority channels. |
| To Turn the
Priority Feature On press Menu.
Scroll to 'Priority Scan' and press E/yes. Scroll to 1 of 3 options and press E/yes. You can also toggle these modes by pressing Hold to hold on any channel then press and hold Func then press 1/Pri (each time) to select one of two priority modes or off. |
| Off - scans normally with no priority. |
| On - the scanner interrupts every 2 seconds and checks conventional priority channels. PRI appears in the display when you select this mode. |
| Plus On - the scanner only scans the priority channels. PRI flashes in the display when you select this mode. |
![]()
| Scanning 'Systems' | Contents |
| With all previous scanners, you
selected banks to scan that had channels stored in them. With this
scanner, you select 'System Quick Keys' to scan that have 'Systems'
assigned to them. So, now you turn 'System Quick Keys' on and
off and 'Group Quick Keys' on and off (within each 'System'). Race systems don't have quick keys
and can be only locked or unlocked. Turning quick keys on and off for systems/groups
is not the same as locking and unlocking
systems/groups. You can still do that separately
(if you really want to confuse yourself).
See also Using Quick Keys. First, all (unlocked) systems belonging to Quick Key 1 are scanned. Then systems that belong to Quick Key 2,…,9,0,11,…19,10,21,… … 80,91…,99,90 are scanned in order. Systems with the same quick key are scanned in order of creation. Systems with no quick key are scanned last and in order of creation (including created 'Quick Save' systems). Groups within the systems are scanned with the same rules. Conventional channels within the groups are scanned in order of creation. IDs are not really
scanned. The scanner checks for any activity in the trunking system and
if any ID becomes active, the scanner will display it in 'ID Search' mode.
In 'ID Scan' mode, the scanner will only display IDs programmed in to
groups. You can also unlock any service or custom search to include it while scanning. Service search bands and custom searches don't have quick keys and can be only locked or unlocked. |
| Press Scan/Srch. The scanner scans a system for the duration you set using the 'system hold time' option. For trunked systems, the scanner moves to the next system after the hold time expires, the current transmission ends, and the channel delay expires. Conventional systems operate similarly, but all (unlocked) channels are scanned at least one time regardless of the hold time setting. |
| Notes:
If no systems are programmed, or all systems (or groups
in a system) are locked out or turned off, 'Nothing
to Scan' appears. Turn on a system quick key or unlock a
system to scan. If you turn off all groups in a system you will not
be able to turn any back on and also see 'Nothing
to Scan'. This is a bug that frustrates everybody. In that
case, while in Scan mode, press and hold Func-don't
let go. Scroll to the system then press the number of the group quick
key(s) you want to enable then let go of Func. Any conventional system, Close Call system, trunked system, group, service search, custom search, or 'Quick Save' system/group not assigned to a quick key (and/or not locked out) will be scanned. |
| To continue scanning (move on to the next channel) press Scan or turn the scroll control. |
| To change the scan or search direction turn the scroll control backward or forward. |
| To toggle between frequency/ID or text display Hold on any channel. Press and hold Func then 5. Press Hold to resume. |
|
|
Note: You can't view the frequency in 'control channel only' mode (with just the control channel programmed) scanning a Motorola system. |
|
To toggle between ID Scan or ID Search mode while scanning each trunked system, quickly press (not press and hold) Func then Scan. |
|
To toggle System Quick Keys on or off for a single digit system, press the number key assigned to the system. To turn a double-digit system on or off, Press (.)no first then enter the 2 digits. |
|
To unlock a Race System or switch to a different race Press 0/race. Scroll to the race and press E/yes. |
|
To toggle Group/Car Quick Keys on or off while scanning the system, quickly press and hold Func then press the number key assigned to the group. |
|
|
To toggle
Group Quick Keys on or off in
another system press
and hold Func-don't let go. |
|
To toggle Search Bands locked or unlocked (Search with Scan) press and hold Func-don't let go then scroll to the service or custom search and press L/O. |
|
To hold on a frequency/ID press Hold. To step through IDs/frequencies, turn the scroll control backward or forward. Press Hold to resume. |
|
To hold on a car press Hold to hold on any channel. Press and hold Func then 0/race. Enter car the number and press E/yes. Scroll to the frequency and press E/yes. Note: Race must be unlocked. |
|
|
To hold on any specific frequency Hold on any channel in a conventional system. Enter the new frequency and press Hold. Press Scan/Srch to exit. |
|
|
To hold on a specific ID in the current system Hold on the system. Enter the new ID (press .. [2 dots] for a dash-EDACS AFS) and press Hold. Press Hold to resume. |
|
To hold on a system press and hold Func-don't let go. (You won't see IDs or tags). Release Func to resume. |
| To edit the current channel press E/yes. |
|
To lockout a channel or frequency quickly press L/O. |
|
|
To lock or unlock a group/car Hold on any channel or frequency. Press and hold Func then 7/Rcl. At 'Select System' scroll to system that contains the group/car and press E/yes. At 'Select Group' scroll to the group/car you want to lock/unlock then press and hold Func then L/O. Press Scan to resume scanning. See also Locking/Unlocking Groups/Cars. |
|
|
To lockout a system/search while receiving the system/search, quickly press Func then L/O. |
|
To store a displayed ID during ID Search mode press E/yes. Then see Storing a Displayed ID. |
|
|
To store a search frequency (Search with Scan) press E/yes. Then see Storing a Displayed Frequency. |
|
To toggle the attenuation for a conventional channel on or off quickly press and hold Func then press E/yes(att) while the frequency is in the display. (Or hold first). |
|
|
To toggle the attenuation for a trunking system or search on or off quickly press and hold Func then press E/yes(att) while scanning the system/search. (Or hold first). |
|
To check for a repeater frequency on a conventional channel quickly press and hold Func then press and hold .no(rev). (Or hold first). |
|
To view active IDs in a trunked system press Hold while scanning the system you want to monitor. Scroll to the (noisy) control channel. Active IDs will appear in the display. Press Scan to resume. |
|
To view the Trunking Activity Indicators press Vol while scanning a trunked system. You will be able to see the indicators for 10 seconds. |
|
|
Note: For Motorola systems you must program all system frequencies (control and voice frequencies) for this feature to work. |
|
To toggle Priority Modes Hold on any channel then press and hold Func then 1(Pri). Press Hold to resume. |
|
To toggle Weather Alert Priority on or off Hold on any channel then press and hold Func then 2(WX). Scroll to 'WX Alt Priority' and press E/yes. |
|
To toggle Close Call
Modes press and hold Func
then press Hold/ |
|
|
To view a Close Call hit (CC Override On) press any key to view the frequency (even if it's gone). |
|
|
To view and listen to a Close Call hit (CC Override Off) press Func to listen to and view the frequency (only if it's still there). |
|
|
To unlock a conventional channel Hold on any channel or frequency. Press and hold Func then 7/Rcl. At 'Select System' scroll to system that contains the channel and press E/yes. At 'Select Group' scroll to the group that contains the channel and press E/yes. At 'Select Channel' scroll to the channel you want to lock/unlock then press and hold Func then L/O. Press Scan to resume scanning. See also Locking/Unlocking Channels. |
|
|
To unlock and/or review locked out IDs see Reviewing Locked out IDs. |
|
|
To unlock all IDs see Clear All L/O IDs. |
|
|
To unlock a system/search press and hold Func-don't let go then scroll to the system/search and press L/O. Releasing Func will return to scanning. See also Locking/Unlocking Systems/Searches. |
|
|
To unlock search frequencies press and hold Func then L/O while searching. Scroll to the frequency and press E/yes to unlock. |
|
|
To start Weather Scan Hold on any channel then press and hold Func then 2(WX). At 'Weather Scan' and press E/yes. |
| Storing a Displayed ID (in ID Search Mode) | Contents |
| To
Store a Displayed ID into an Existing Group during ID Search, press E/yes.
You will see 'Quick TGID Save?' in the display then press (.)no. At the 'Select Group' prompt, scroll to the group where you want to store the ID and press E/yes. After storing the ID, you will be at the 'Edit Channel' menu to complete the settings for the new channel. If you don't want to edit the channel settings or are done editing the channel, press Scan to return to scanning. |
| To
Store a Displayed ID into a 'Quick Save Group'
during ID Search,
press E/yes. You will see 'Quick TGID Save?' in the display then press E/yes again. The scanner stores the ID into a (created) channel group called 'Qck Save Grp' and you will be at the 'Edit Channel' menu to complete the settings for the new channel. If you don't want to edit the channel settings or are done editing the channel, press Scan/Srch to return to scanning. |
| Note: If the ID is already stored in the group, 'TGID Exists' Accept? (Y/N)' appears. Press (.)no to return to searching (or search hold) or E/yes to go to the 'Edit Channel' menu. |
![]()
| Locking/Unlocking 'Systems' and Searches | Contents |
| Remember, unlocking or
locking out a system is not the same thing as enabling/disabling it (turning
the quick key on or off). |
| To Lock out a
System (or a search set to search with scan) in Scan Mode
While receiving the system/search, quickly press
and hold Func then L/O. Or, Hold on any channel/frequency. Press and hold Func then 7(rcl). Scroll to the system/search you want to lockout and press and hold Func then L/O. Or, use the Menu to drill down to the system/search options and lock it out there. See 'Edit System Options', 'Edit Service Search', or 'Edit Custom Search'. |
| To Unlock a
System (or a search set to search with scan) in Scan Mode press Hold to hold on any
channel. Press and hold Func then press 7/rcl. At 'Select System' scroll to the system/search you want to unlock. Press and hold Func then L/O to unlock the system/search. Press Scan/Srch to return. Or, use Menu to drill down to the system/search options and unlock it there. See 'Edit System Options', 'Edit Service Search', or 'Edit Custom Search'. |
![]()
| Locking/Unlocking Groups/Cars |
| Remember, unlocking or
locking out a group/car is not the same thing as enabling/disabling it (turning
the quick key on or off). |
| To Lock out or
Unlock a Group/Car in Scan Mode
press Hold to hold on any
channel. Press and hold Func then press 7/rcl. At 'Select System' scroll to the system that contains the group/car and press E/yes. At 'Select Group/Car' scroll to the group/car you want to lock or unlock. Press and hold Func then L/O to lock or unlock the group/car. Press Scan to exit. |
| Or, use Menu to drill down to the group/car options and lock/unlock it out there. See 'Edit Group Options' or 'Edit Car Options'. |
![]()
| Locking/Unlocking Channels | Contents |
| There are several ways to get to a channel. Some ways are quicker than others. Some ways you have to be quick with those keys, other ways you can take your time pressing them. Use what works best for you. |
| To Lock out a Channel while Scanning quickly press L/O when the channel appears in the display. |
| Or, quickly press Hold to hold on the channel. Press L/O. |
| Or, quickly press E/yes
to go to the menu for that channel. Scroll to 'Set Lockout' and press E/yes. Scroll to 'Lockout' and press E/yes. |
| Or, use Menu to drill down to the channel options and lock it out there. See 'Edit Channel Options'. |
| To Unlock a Single
Channel in
Scan Mode press Hold
to hold on any channel. Press and hold Func then press 7/rcl. At 'Select System' scroll to system that contains the channel and press E/yes. At 'Select Group/Car' scroll to the group/car that contains the channel and press E/yes. At 'Select Channel' scroll to the channel and press and hold Func then L/O to unlock the channel. |
| Or, use Menu to drill down to the channel options and unlock it there. See 'Edit Channel Options'. |
| To Unlock All Channels in a
Conventional System in Scan Mode
press Hold
to hold on any channel in the system. Press and hold L/O until 'All Unlocked' appears. Press Hold or Scan/Srch to resume scanning. Note: This will also enable all your groups (turn the quick keys on). |
![]()
| Search/Close Call Options Menu |
| These are the settings you should look at before you perform a Quick Search, Close Call Search, Search and Store, or Close Call Auto store. |
| To Edit Search
and Close Options press Menu.
Scroll to 'Srch/CloCall Opt' and press E/yes. Scroll to the options below and press E/yes. Press Scan/Srch to return to scanning when done with editing. |
| Freq Lockouts | CTCSS/DCS Search | Max Auto Store | Set Modulation | Set Data Skip |
| Broadcast Screen | Repeater Find | Set Delay Time | Set Attenuator | Set Step |
| Contents |
| Freq Lockouts allows you to review locked out frequencies or unlock all frequencies for Searching and Close Call search. |
| Unlocking
All Frequencies:
Scroll to 'Freq Lockouts' press E/yes. Scroll to 'Unlock All' press E/yes. At 'Confirm?' press E/yes. Press Menu to return. |
| Note: You can also do this in search mode by pressing and holding Func then pressing and holding L/O. |
| Reviewing Locked Out Frequencies: Scroll to 'Freq Lockouts' press E/yes. Scroll to 'Rvw Search L/O' and press E/yes. If no frequencies are locked out, you will see 'Nothing Locked'. Scroll to the frequency (or press (.)no to go to the next) and press E/yes to unlock the frequency. Press Menu twice to return. |
| Note: You can also do this in search mode by pressing and holding Func then L/O. |
| Broadcast Screen This setting determines whether the scanner automatically ignores transmissions that are on common broadcasts, paging systems, and other annoyance radio sources during Custom Search, Service Search, or Close Call Search. Note: Broadcast screen is not effective during some service searches. |
| Scroll
to 'Broadcast Screen' and press E/yes. Scroll to 1 of 4 options and press E/yes. Set All Bands On - turns on broadcast screen on for all bands. Press Menu to return. Set All Bands Off - turns off broadcast screen off for all bands. Press Menu to return. Set Each Band - then scroll to each band and press E/yes to turn off or on. Press Menu to return. |
| Pager - the scanner skips known paging system
frequencies. AM - the scanner skips known AM frequencies. FM - the scanner skips known FM frequencies. UHF TV - the scanner skips known UHF TV frequencies. |
VHF TV - the scanner skips known VHF TV
frequencies. NOAA WX - the scanner skips known NOAA weather frequencies. Band 1-10 - the scanner skips known frequencies for custom broadcast ranges. |
| Program Band - then scroll to the custom band (1-10) and press E/yes. |
| At 'Set
Lower Limit' enter the lower limit of the
frequency range and press E/yes. At 'Set Upper Limit' enter the upper limit of the frequency range and press E/yes. Scroll to the next band and repeat. Press Menu twice to return. |
| CTCSS/DCS Search This setting controls whether the scanner will search for a subaudible tone when it stops on a transmission during Searching and Close Call search. The default setting is Off. |
| Scroll
to 'CTCSS/DCS Search' and press E/yes. Scroll to On or Off and press E/yes to save and exit. |
| Repeater Find This feature sets whether the scanner tries to tune to a repeater output frequency when it detects a transmission on a repeater input frequency in Search and Close Call modes. Since you can normally only hear one side of a conversation when you listen to an input frequency transmission, turning this feature on can let you hear both sides of the conversation on the output frequency. If the scanner detects the transmission on the output frequency, it beeps and 'Repeater Found' appears, and it remains on the output frequency until transmissions end. The default setting is off. |
| Scroll
to 'Repeater Find' and press E/yes. Scroll to On or Off and press E/yes to save and exit. |
| Contents |
| Max Auto Store This value sets how many hits the scanner will automatically store when it is in either Search and Store or Close Call Auto Store mode. When the scanner reaches the maximum number of hits you set, it stops the auto-store operation. |
| Scroll
to 'Max Auto Store' and press E/yes. Enter a value from 1-256 then press E/yes to save and exit. |
| Set Delay Time This setting determines how long the scanner waits after a transmission ends before resuming Quick Search and Close Call Search operations. The default setting is 2 seconds. |
| Scroll
to 'Set Delay Time' and press E/yes. Scroll to 1, 2, 3, 4, 5, (seconds) or Off then press E/yes to save and exit. |
| Set Modulation This setting controls the modulation type used for Quick Search and Close Call Search operations. |
| Scroll
to 'Set Modulation' and press E/yes. Scroll to Auto, AM, FM, NFM, or WFM to choose the modulation then press E/yes to save and exit. |
| Set Attenuator: This setting controls the attenuator for Quick Search and Close Call Search operations. Turn on this setting if you are near other strong signal sources to attenuate about 18dB. Attenuation sometimes helps to reduce interference and desensitization that strong signals create. The default setting is Off. |
| Scroll
to 'Set Attenuator' and press E/yes. Scroll to On or Off then press E/yes to save and exit. |
| Note: You can also toggle attenuation for search/close call mode by pressing and holding Func then E/yes(att). |
| Set Data Skip This setting controls how the scanner behaves when it detects a data transmission during Quick Search and Close Call Search operations. The default setting is Off. |
| Scroll
to 'Set Data Skip' and press E/yes. Scroll to On or Off then press E/yes to save and exit. |
| Note: If you are trying to test the Close Call feature with a nearby transmitter and you do not talk into the transmitter, the scanner will detect this as data and will skip the frequency when Data Skip is on. |
| Set Step This setting selects the frequency step used for Quick Search. The default setting is Auto. See also Auto Step Sizes. |
| Scroll
to 'Set Step' and press E/yes. Scroll to Auto, 5, 6.25, 7.5, 8.33, 9, 10, 12.5, 15, 20, 25, 50, or 100 to set the step then press E/yes to save and exit. |
![]()
| Search For... Menu |
| Important! There are many
options and setting in Search/Close Call Options that affect and compliment the settings
for searching. Please review those first. Note: The items below (in Blue) do not follow the radio's menu order because (IMHO) they should be in the following order to properly setup and use the Search features. |
Edit Service Search |
Custom Search | Storing a Displayed Frequency |
| Service Search | Search and Store | Reviewing Locked out Frequencies |
| Edit Custom Search | Quick Search | Auto Step Size Chart |
| Searching |
| Contents |
| Editing a Service Search |
| To
Edit a Service Search, press and hold Func
then press Scan/Srch. At 'Quick
Search?' press (.)no. Or, Press Menu. Scroll to 'Search For...' and press E/yes. Scroll to 'Edit Service' and press E/yes. Scroll to the service search you want to edit and press E/yes. |
| Scroll
to Set
Delay Time and press E/yes. Scroll to 1, 2, 3, 4, 5, seconds or Off to set delay and press E/yes. |
| Scroll
to Set
Attenuator and
press E/yes. Scroll to On or Off and press E/yes. |
| Scroll to Search with Scan and press E/yes. |
| Scroll to
Set Lockout and press E/yes. (Used for 'Search with
Scan' only). Scroll to 'Unlocked', 'Temporary L/O', or 'Lockout' and press E/yes to save and exit. Scroll to Set Hold Time (the amount of time the search will search in Scan Mode) and press E/yes. Enter the hold time (0-255 seconds) you desire and press E/yes to save and exit. |
| Press Menu and scroll to another service search and repeat the previous steps or press L/O to exit. |
| Service Search lets you quickly select and search the scanner's preprogrammed frequencies. See Edit Service Search first. |
| To
start a Service Search, press and hold Func
then press Scan/Srch. At 'Quick
Search?' press (.)no. Or, Press Menu. Scroll to 'Search For...' and press E/yes. Scroll to 'Service Search' and press E/yes. Scroll to the service search and press E/yes to start searching. Then see Searching. |
| Editing a Custom Search allows you to edit the 10 custom search ranges. The default custom search range names appear as Custom 1, Custom 2, and so on. |
| To
Edit a Custom Search, in scan mode Press and hold Func
then press Scan/Srch. At 'Quick Search?' press (.)no. At 'Search for...' scroll to 'Edit Custom' and press E/yes. Scroll to the custom search you want to edit (1-10) and press E/yes. |
| Scroll to Edit Name and press E/yes. See Entering Text. |
| Scroll
to Edit
Srch Limit and press E/yes. At 'Set Lower Limit', enter the lower limit of the search range and press E/yes. At 'Set Upper Limit', enter the upper limit of the search range and press E/yes. |
| Scroll
to Set
Delay Time and press E/yes. Scroll to 1, 2, 3, 4, 5, seconds or Off to set delay and press E/yes. |
| Scroll
to Set
Modulation and press E/yes. Scroll to Auto, AM, FM, NFM, or WFM the set the modulation and press E/yes. |
| Scroll
to Set
Attenuator and press E/yes. Scroll to On or Off to set the attenuation and press E/yes. |
| Scroll
to Set
Data Skip and press E/yes. Scroll to On or Off to turn Data Skip on or off and press E/yes. |
| Scroll
to Set
Step and press E/yes. See also Auto
Step Sizes.
Scroll to Auto, 5, 6.25, 7.5, 8.33, 9, 10, 12.5, 15, 20, 25, 50, or 100 to set the step size and press E/yes. |
| Scroll
to Set
C-Ch only and
press E/yes. (for Motorola and LTR systems). Scroll to On or Off and press E/yes. |
| Scroll to Search with Scan and press E/yes. |
| Scroll to
Set Lockout and press E/yes. (For use for with 'Search
with Scan'). Scroll to 'Unlocked', 'Temporary L/O', or 'Lockout' and press E/yes to save and exit. Scroll to Set Hold Time (the amount of time the search will search in Scan Mode) and press E/yes. Enter the hold time (0-255 seconds) you desire and press E/yes to save and exit. (0 will search the whole band before continuing). Press Menu to exit. |
| Press Menu and scroll to another custom search and repeat the previous steps or press L/O to exit. |
| Contents |
| Custom Search lets you search the scanner's 10 programmed frequency ranges. See Editing a Custom Search first. |
| To
start a Custom Search, in scan mode Press and hold Func
then press Scan/Srch. At 'Quick Search?' press (.)no. At 'Search for...' scroll to 'Custom Search' and press E/yes to start searching. Then see Searching. |
| Search and Store |
| Lets you search and store
frequencies from enabled custom search ranges or a service search range into a
conventional system, or new talk group IDs into a trunked system. To
store frequencies or talk group IDs you find during Search and Store, you must
first select a system where the frequencies or talk group IDs will be
stored. You will not hear any audio in this mode. See Max Auto Store first to set the maximum number of hits the scanner will store. Tip: Before you start Search and Store, run the custom search(es) or service search first to lock out the birdies, data, noise, etc. This will prevent the scanner from stopping on them and doing a memory check each time it passes. |
| To
Auto Store Conventional Frequencies, press and hold Func
then press Scan/Srch. At 'Quick
Search?' press (.)no. Or, Press Menu. Scroll to 'Search For...' and press E/yes. Scroll to 'Search and Store' and press E/yes. At 'Select Store Sys' scroll to the conventional system you want to store the frequencies in and press E/yes. At 'Select Range' scroll to the 'service search' or to 'custom search' to select where to search from and press E/yes. If you select custom search, all enabled custom search ranges will be searched for frequencies. Start a custom search and disable search ranges you don't want searched first. See Custom Search. Press Scan to exit. |
| Notes: The quick key for the system must be turned on (if one is assigned to the system) and not locked out to select the system to store frequencies in otherwise you will see 'System Locked'. If no systems are programmed 'No System Stored' appears. |
| When you have selected a service search or custom search range(s), the scanner looks for active frequencies within the range(s) and 'Search and Store' appears on the display's lower line and the system name and search range name(s) appear on the display's upper line. When the scanner finds an active transmission, it checks to see if the frequency has already been stored in the system ('Memory Check' in the display). If the frequency has already been stored, the scanner continues to search. If the frequency has not been stored, it stores the frequency into a (created) group named 'Found Channels', then resumes searching. 'Limit Reached' will appear in the display when the Max Auto Store value is reached. |
| To
Auto Store IDs,
press and hold Func then press Scan/Srch.
At 'Quick Search?' press (.)no.
Or, Press Menu. Scroll to 'Search For...' and press E/yes. Scroll to 'Search and Store' and press E/yes. At 'Select Store Sys' scroll to the trunked system you want to store the IDs in and press E/yes. Press Scan to exit. |
| Notes: The quick key for the system must be turned on (if one is assigned to the system) and not locked out to select the system to store IDs in otherwise you will see 'System Locked'. If no systems are programmed, 'No System Stored' appears. Search and Store does not work if an EDACS SCAT system is selected. |
| 'ID Search and Store' appears on the display's lower line and the system name appears on the display's upper line. When the scanner finds an active transmission, it checks to see if the ID has already been stored in the system ('Memory Check' in the display). If the ID has already been stored, the scanner continues to search. If the ID has not been stored, it stores the ID into a (created) group named 'Found Channels', then resumes searching. 'Limit Reached' will appear in the display when the Max Auto Store value is reached. |
| Contents |
| Quick Search lets
you search from the currently-tuned frequency if you are
scanning, or enter a frequency to
start searching from. Quick Search will search all the way up to 1300 MHz or all the way down to 25 MHz then start over. |
| To
start searching at the currently displayed
frequency in scan mode
quickly press Hold to hold on the frequency.
Press and hold Func then press Scan/Srch. At 'Quick Search?' press E/yes to start searching. Then see Searching. |
| To
start searching at a specific frequency while
scanning or searching,
press Hold
to hold on any channel or frequency. Enter the new frequency you wish to start at then press Hold to set the new starting frequency. Press Hold again to release hold mode and start searching. Then see Searching. |
| Searching (only, not Search with Scan) |
| To start a search see Quick Search, Service Search, or Custom Search. |
| To toggle search bands on or off (custom search) press the number key of the search band. |
| To change search direction or continue searching turn the scroll control back or forward. |
| To hold on a frequency press Hold. Press Hold to resume. |
| To step through the frequencies turn the scroll control. Press Hold to resume. |
| To store a frequency press Hold to hold on the frequency then see Storing a Displayed Frequency. |
| To lock out a frequency press L/O. |
| To attenuate a search press and hold Func then press E/yes(att). |
| To check for a repeater frequency press Hold to hold on the frequency then press and hold .no(rev). Press Hold to resume. |
| To
toggle Close Call modes, press and
hold Func then Hold/ |
| To review and unlock search frequencies press and hold Func then L/O. |
| To unlock all frequencies of all search/close call ranges Hold on any search and press and hold L/O. |
| Storing a Displayed Frequency (while searching) |
| To
store a displayed frequency into an existing group/car,
quickly press E/yes. At 'Quick Freq Save?' press (.)no. At 'Select System' scroll to the system where you want to store the frequency and press E/yes. At 'Select Group/Car' scroll to the group/car where you want to store the frequency and press E/yes. After storing the frequency, you will be at the 'Edit Channel' menu to complete the settings for the new channel. If you don't want to edit the channel settings or are done editing the channel, press L/O to return to searching. |
| To
store a displayed frequency into a 'Quick Save Group/Car'
in a 'Quick Save System', quickly press E/yes. At 'Quick Freq Save?' press E/yes. The scanner will save the frequency in a (created) group called 'Qck Save Grp' in a (created) system called 'Qck Save Cnv Sys' (with no quick key assigned) and you will be at the 'Edit Channel' menu to complete the settings for the new channel. Then see Edit Group Options and Edit Systems Options to customize the group and system. If you don't want to edit the channel settings or are done editing the channel, press L/O to return to searching. |
| Note: If the frequency is already stored in the group/car, 'Frequency Exists' Accept? (Y/N)' appears. Press (.)no to return to searching (or search hold) or E/yes to go to the 'Edit Channel' menu. |
![]()
| Close Call Menu |
| Your scanner's Close
Call feature lets you set the scanner so it detects, alerts you to, and
displays the frequency of a nearby strong radio transmission. You can
set the scanner so the Close Call feature checks for a Close Call hit
every 2 seconds in the background while you are scanning or searching or use Close Call only mode. 'Close Call Do-Not-Disturb'
will only check for close call signals when you are not receiving
transmissions. You can also set the frequency band(s) where
you want the scanner to look for transmissions. When the scanner detects
a Close Call hit, it alerts you according to the Override and Alert
settings. You can also set the scanner to Auto Store Close Call hits.
The system 'Close Call' is created when you run a Close Call Auto Store. The Close Call feature works well for locating the source of strong local transmissions such as mobile and handheld two-way radios in areas with no other strong transmission sources. Several factors affect Close Call performance. Performance is increased with higher transmit power, receive antenna tuned to the target band, and a low background RF level. Other than the antenna, you have no control over these factors, but they explain why performance might vary by both location and time. The Close Call feature works better with some types of transmissions than others. It might not correctly display frequency information for transmitters using a highly directional antenna (such as an amateur radio beam antenna) or if there are many transmitters operating at the same time in the same area. |
| To Edit Close
Call Options press Menu.
Scroll to 'Close Call' and press E/yes. Scroll to the options below and press E/yes. Press Scan/Srch to return to scanning when done with editing. Important! There are many options and settings in Search/Close Call Options that affect and compliment the settings for Close Call. Please review those first. Note: The items below (in Blue) do not follow the radio's menu order because (IMHO) they should be in the following order to properly setup and use the Close Call features. |
| Set CC Bands | Set CC Override | Close Call Only | Using Close Call Modes |
| Set CC Alert | Set CC Mode | CC Auto Store | Managing Close Call Hits |
| Contents |
| Set CC Bands lets you select the Close Call bands to be searched or auto stored. |
| Scroll to 'Set
CC Bands' and press E/yes. Scroll to each band you want searched (or not searched) and press E/yes. Scroll to On or Off and press E/yes. Press Scan to exit. |
| VHF Low- 25-108 MHz | UHF 1- 318-512 MHz | |
| Air Band- 108-137 MHz | UHF 2- 512-764 MHz | |
| VHF High- 137-318 MHz | 800MHz+- 764-956 MHz |
| Set CC Alert lets you select how the scanner alerts you when it receives a Close Call signal. Pause lets you select how long the scanner waits after a hit before it returns to the previous operation. |
| Scroll to 'Set CC Alert' and press E/yes. |
| At 'Set CC Alert' scroll to 'Select Mode' and press E/yes. |
| At 'Select Mode' scroll the mode you
prefer and press E/yes. Beep, the scanner beeps when it receives a Close Call signal. Light, the backlight turns on when it receives a Close Call signal. Beep+Light, the scanner beeps and the backlight turns on when it receives a Close Call signal. None, the scanner does not alert. |
| Scroll to 'Select Beep' and press E/yes. |
| At 'Select Beep' scroll to 'Alert 1-9 or Off' and press E/yes. |
| At 'Set Level' scroll to 'Level 1-15 or Auto' (the scanner sets the alert beep to the master volume level) and press E/yes. |
| Scroll to 'Set CC Pause' and press E/yes. |
| Scroll to '3, 5, 10, 15, 30, 45, 60 sec, or Infinite' and press E/yes. |
| Press Menu to return. |
| Set CC Override lets you select how the Close Call feature works while scanning or searching. This setting has no effect in 'Close Call Only' mode. |
| Scroll
to 'Set CC Override' and press E/yes. Scroll to On or Off and press E/yes.
|
| Set Close Call Mode this turns Close Call on when scanning or searching. You can also do this by pressing and holding Func then pressing Hold while scanning or searching. |
| Scroll
to 'Set CC Mode' and press E/yes. Scroll to 1 of 3 modes and press E/yes to save and exit. Off- Close Call is turned off. CC DND- (Requires firmware 1.06.02 or newer) Close Call checks for frequencies every two seconds between transmissions. Pri- Close Call checks for frequencies every two seconds. |
| Close Call Only this setting puts the scanner in Close Call Only mode. The scanner will not scan or search programmed frequencies. |
| At 'Close
Call Only' press E/yes. Press Scan/Srch to exit. |
| Close Call Auto Store |
| Allows you to automatically store
Close Call hits into channels. If you turn this feature on,
the scanner mutes, starts Close Call Only mode, and
stores any Close Call hits from the bands selected in 'Set
CC Bands' up to
the maximum you specified in the
'Max Auto Store'
setting. The
scanner looks for active frequencies within the band(s)
and 'Search and Store' appears in the display. When the
scanner finds an active transmission, it checks to see if the frequency
has already been stored. If the frequency has not been stored, it stores the frequency into a (created) system called 'Close
Call' and a (created) group
named 'Found Channels' then resumes searching. If the
frequency has already been stored, the scanner continues to search. This
new system and group have the same options as any conventional
system/group and can be edited the same way. See also Broadcast Screen. |
| Scroll
to 'CC Auto Store' and press E/yes. 'Limit Reached' will appear in the display when the Max Auto Store value is reached. Press Scan to exit. |
![]()
Managing Close Call Hits |
Contents |
| In Close Call Only Mode: |
| When the scanner detects a
Close Call signal, 'CC Found!'
and 'Press Any Key' appear for the
length of time set in Close Call Pause (or until the signal is lost if longer). Press any key (except Hold) to display the frequency for the delay time set in Search/Close Call Options (even if it's gone). |
| To hold on a CC hit press Hold. Press Hold again to resume. See Close Call Hold Mode. |
| To store a frequency press 'Any key' then E/yes then see Storing a Displayed Frequency. |
| To cancel a CC hit turn the scroll control. |
| To lock out the frequency press L/O. |
| To view the last CC hit press Hold. Press Hold again to resume. | |
| To toggle the attenuation on or off (for all bands) press and hold Func then E/yes(att). | |
| To exit CC only press Scan. |
|
While
Scanning or Searching with Close Call Override set to
On, when the scanner detects a
Close Call signal, the scanner overrides the current audio and goes to the Close Call hit. 'CC Found!' and 'Press Any Key' appear for the length of time set in Close Call Pause (or until the signal is lost if longer). If you do not press 'Any Key', the scanner will return to scanning after 'pause' times out. Press any key (except Hold) to listen to and display the frequency for the delay time set in Search/Close Call Options (even if it's gone). Quickly press Hold to stay on the frequency. Press Hold again to resume. |
| While
Scanning or Searching with Close Call Override set to
Off, when the scanner detects a
Close Call signal, the scanner does not override the current audio. 'CC Found!' and 'E to Listen' appear for the length of time set in Close Call Pause. If you do not press E/yes, the scanner will return to scanning after 'pause' times out. Press E/yes to listen to and display the frequency for the delay time set in Search/Close Call Options (only if it's still there). Quickly press Hold to stay on the frequency. Press Hold again to resume. |
| While in Hold Mode: |
| To store a frequency press E/yes then see Storing a Displayed Frequency. | |
| To lock out the frequency press L/O. |
| To start a 'Quick Search' at the current frequency turn the scroll control then press Hold. |
| To check for a repeater frequency quickly press Hold to hold on the frequency. Press and hold Func then press and hold .no(rev). Press Hold to resume. |
![]()
| Weather Operation Menu |
| Your scanner allows you to search
for a local NOAA weather broadcast and set it to alert when a SAME
weather alert is broadcast on a NOAA weather channel. You can also
program FIPS
codes into the scanner and use
weather priority that will check the weather channel every 5 seconds for
a weather alert signal. |
| Weather Scan | Program SAME | Set Attenuator |
| Weather Alert Priority | Set Delay Time | Weather Alert |
| Contents |
|
Weather Scan
The scanner starts
scanning the preprogrammed weather frequencies and stops on the first
good signal. If the signal is lost, the scanner resumes searching for
another weather transmission. Note: You can also turn on weather scan by holding on any channel/frequency and pressing and holding Func then 2(wx) then E/yes. |
| Scroll
to 'Weather Scan' press E/yes. Press Scan to exit. |
| In Weather Scan Mode: |
| To search for another weather channel turn the scroll control. |
| To start Weather Alert in Weather Scan press and hold Func then press Menu. Scroll to 'Weather Alert' and press E/yes. |
| To store a frequency press E/yes then see Storing a Displayed Frequency. |
| To toggle the attenuation on or off press and hold Func then E/yes(att). |
| To go to the Weather Menu in any weather mode press and hold Func then Menu. |
| Weather Alert Priority Turning the weather alert priority feature on allows the scanner to check the weather channels every 5 seconds for a 1050 Hz weather alert signal and still scan or search. If you should receive an alert, you will hear a loud warbling then the weather channel audio. You will see WX in the display when Weather Alert Priority is on. Warning! If you receive an alert it will be at FULL volume. |
| Scroll to 'WX Alt Priority'
and press E/yes. Scroll to On and press E/yes. |
| Programming SAME Groups SAME (Specific
Area Messaging System) is a system developed by the
National Weather Service to reduce the number of alerts
received by consumers by allowing them to hear alerts
only for the county(ies) they are interested in. Each
alert contains information about the type and severity of
the alert, as well as the specific geographic locations
affected by the alert. In addition, certain special
regions and wildcard settings can be assigned. Your
scanner can receive all SAME alert signals broadcast
within about a 50-mile radius of where you installed it. To receive SAME alerts and broadcasts about weather occurring only in particular counties within that area, you can program up to 5 (tagable) groups of 8 FIPS codes (40 codes) into the scanners memory. This lets you avoid hearing an alert that applies to an area within a 50-mile radius but not necessarily to your county or parish. For the purpose of broadcasting weather information, the NWS has divided the United States into regions by state and county (or parish, where applicable) then assigned a 6-digit FIPS code to identify each county or parish. For example, the code for Tarrant County, Texas, is 048439. The first digit in a FIPS code identifies the county subdivision, the next two digits identify the state, and the last three digits identify the county or parish. Most FIPS codes begin with 0, which means the code represents an entire county. The NWS, however, plans to eventually subdivide some large counties. When that happens, each subdivision will be assigned a digit from 1-9, resulting in codes such as 148439, 248439, and so on. To obtain the FIPS code for the location where you installed your scanner call the NWS toll free at 1-888-697-7263 (follow the instructions you hear) or see NWR Station Search. See also SAME Event Codes. FIPS codes are in the format nSSCCC: n: A special subcounty designator. For an entire county, use 0. SS: The state code. CCC: The county code. |
| Scroll
to 'Program SAME' and press E/yes. At 'Select SAME' scroll to the SAME group (1-5) and press E/yes. At 'Edit Name' see Entering Text to edit the name otherwise scroll to 'Edit County' and press E/yes. At 'Select Code No' scroll to the spot for the code# (1-8) and press E/yes. At 'Edit FIPS Code' enter the FIPS code and press E/yes to save and exit. Scroll to the next spot for the next code and repeat Press Menu twice to return and select a different SAME group. Press Menu to save and exit. |
| Set Delay Time Sets the number of seconds the scanner should wait after a transmission stops before moving on to the next channel during weather scan. The default setting is 2 seconds. |
| Scroll to 'Set Delay Time' and press E/yes.
Scroll to 1, 2, 3, 4, 5, (seconds) or Off and press E/yes to save and exit. |
| Set Attenuator Sets the attenuator (18 dB) for weather operation. The default setting is off. |
| Scroll to 'Set Attenuator' and press E/yes.
Scroll to On or Off and press E/yes to save and exit. |
| Note: You can also toggle attenuation for weather scan by pressing and holding Func then E/yes(att). |
|
Weather Alert This setting
turns on weather alert and determines which types of signals will
trigger an alert. The scanner will mute and scan only the weather
channels. Warning! If you receive an alert it will be at FULL volume. |
| Scroll to 'Weather Alert' and press E/yes. Scroll to 1 of 7 options and press E/yes. |
| Alert Only - the scanner immediately sounds a weather alert siren when it detects the 1050 Hz weather alert tone, then opens the squelch and remains on the weather channel. |
| SAME group 1-5 - the scanner sounds a weather alert siren for the programmed county, then opens the squelch and remains on the weather channel. |
| All FIPS - the scanner sounds a weather alert siren for any programmed county, then opens the squelch and remains on the weather channel. |
![]()
| Using Fire Tone-Out | Contents |
| With the tone out feature, the scanner monitors up to 10 different channels for paging tones (two-tone sequential, single tone, and group tone). |
| Setting up Tone-Out |
| Press Menu.
Scroll to 'Tone-Out for...' and press E/yes. Scroll to 'Tone-Out Setup' and press E/yes. Scroll to 'Tone-Out 1' and press E/yes. At 'Edit Name' press E/yes. See Entering Text. Scroll to 'Set Frequency' press E/yes. |
| At 'Edit
Frequency' press E/yes. Enter the frequency to monitor
for Tone-Out and press E/yes to save and exit. Scroll to 'Set Modulation' and press E/yes. Scroll to Auto, FM, or NFM and press E/yes to save and exit. Scroll to 'Set Attenuator' and press E/yes. Scroll to On or Off and press E/yes to save and exit. Press Menu to return. |
| Scroll to 'Set Tone' and press E/yes. |
| Notes:
For two-tone pages, enter the tones (in Hz) for tone A and tone
B. For one-tone pages using short tones between 1.25 and 3.75 seconds, enter tone for tone A, and 0 for B. For long-tone pages, such as group pages of more than 3.75 seconds, enter 0 for A and the tone for B. |
| Scroll
to 'Edit Tone A' and press E/yes. Enter the tone and press E/yes to save and exit. Scroll to 'Edit Tone B' and press E/yes. Enter the tone and press E/yes to save and exit. Press Menu to return. |
| Scroll to 'Set Delay Time' and press E/yes. |
| Scroll
to one of 3 settings and press E/yes to save and exit: Off - the scanner resumes standby as soon as the carrier drops after a page. 1-30 - (seconds): the scanner resumes standby mode after the carrier drops and the selected time expires. Infinite - you must press Hold after a page to resume standby mode. |
| Scroll to 'Set Alert' and press E/yes. |
| At 'Set Tone' scroll to the alert (Alert 1-9 or Off) and press E/yes. |
| At 'Set Level' scroll to 'Level 1-15 or Auto' (the scanner sets the alert beep to the master volume level) and press E/yes to save and exit: |
| Scroll to 'Set Record' and press E/yes. |
| Scroll to On or Off and press E/yes to save and exit. |
| Press Menu
to return then scroll to 'Tone-Out 2'
and repeat to program more tones. Press Menu to return. |
|
| The
display will show the Tone-Out name, channel number
(1-10), and tone settings. Any transmission received on
the frequency will not be heard but you will still see
the signal strength bars. All Tone-Outs (channels) that have the same frequency (and modulation and attenuation) as the one you select will also (and only) be monitored so you can monitor up to 10 Tone-Out channels for one frequency. In this case, the scanner displays each Tone-Out channel for two seconds. It does not scan them; Tone-Out monitors the frequency for all Tone-Out channels with the same frequency. Regardless of the current display, the scanner will alert on any received tone out that matches a stored setting (channel) for the frequency. To monitor a different frequency, scroll to a Tone-Out (channel) with a different frequency. If you press Hold while in standby mode, the scanner temporarily exits standby and you will be able to hear any transmissions on that frequency. No alerts sound, even if a Tone-Out matches one you have stored in hold mode. Press Hold again to return to standby mode. |
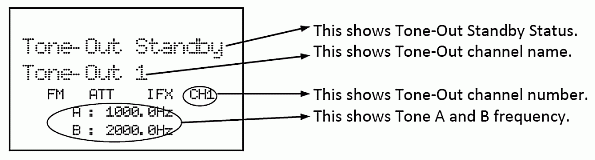 |
![]()
| Related Links/Info | Contents |
| How to view these pages in your browsers I have formatted these pages so that you can view them with any monitor, in any browser (Opera, I.E., Foxfire, or Netscape), at any zoom level, and in any screen area size (ex: 1024x768 preferred)-small or large fonts. So if the print is too small, go to the 'view' menu in your browser and adjust it to a bigger level (or smaller if you want to see more on the screen). |
| Determining Type I Motorola Fleetmaps You can try a method I found at Radio Reference.com. Determining Type I Motorola Fleet Maps. By Dave Goodson. |
| Determining Motorola VHF/UHF Base and Offset Frequencies I have found an explanation at Radio Reference.com that describes how to do this if you don't have the information. The Trunked Radio Systems User’s Page also has an explanation. Look for 'Determining Base and Offset Frequencies for the BC245xlt' by John C. |
| Finding EDACS LCN order EDACS frequencies have to be programmed in LCN (Logical Channel Number) order. I have found a procedure at the Trunked Radio Systems User’s Page which explains how to find the LCN order for an EDACS system if you don't know the order. Look for 'Finding EDACS Logical Channel Numbers' by Todd Hartzel near the bottom of the page. |
| Finding LTR LCN order LTR frequencies have to be programmed into certain channel slots for the system to trunktrack properly. Radio Reference has a good webpage here: Mapping LTR Systems. |
| Decimal/AFS Conversion Chart Here is a Conversion Chart to help convert your IDs. |
| Newsgroups and Forums |
| You will have to register for the groups. |
| Radio Reference Uniden Forums | Radio Reference Forums |
| Links |
| Radio Reference.com | Radio Reference Data Base |
| Radio Reference BR330T Wiki | Radio Reference BC-RH96 Wiki |
| Uniden DMA FAQ | eHam.net-reviews |
| Discriminator tap mod |
| Software |
| FreeSCAN-Freeware | ProScan |
| DMA Software Support-at Radio Reference | ScanControl |
| BR330 UASD-Uniden software (you have to register) | |
| TrunkstarPro | ScanControl Racing Edition-for the BR330T |
| arc330-Butel software | ID Tracker II |
|
![]()
| Preprogrammed Systems | Contents |
 |
|
||||
|
|
![]()
| Preset Fleetmaps | Contents |
| There are
16 preset fleet maps programmed into your scanner to
choose from. In Motorola II systems, all the blocks have
size code 0. In Type I systems,
size codes are used in different blocks to denote the
maximum number of users in that block. Notice that size
code 12 uses 2 blocks. A Motorola Hybrid system (Type
IIi) has 'blocks' of the system that are Type I
Fleets/Subfleets and Type II talkgroups. The maps that are Hybrid systems are in bold. |
| Preset Map 1 | Preset Map 2 | Preset Map 3 | Preset Map 4 | Preset Map 5 | Preset Map 6 | Preset Map 7 | Preset Map 8 | ||||||||
| Block | Size Code | Block | Size Code | Block | Size Code | Block | Size Code | Block | Size Code | Block | Size Code | Block | Size Code | Block | Size Code |
| 0 | S-11 | 0 | S-4 | 0 | S-4 | 0 | S-12 | 0 | S-4 | 0 | S-3 | 0 | S-10 | 0 | S-1 |
| 1 | S-11 | 1 | S-4 | 1 | S-4 | 1 | (S-12) | 1 | S-4 | 1 | S-4 | 1 | S-10 | 1 | S-1 |
| 2 | S-11 | 2 | S-4 | 2 | S-4 | 2 | S-4 | 2 | S-12 | 2 | S-4 | 2 | S-11 | 2 | S-2 |
| 3 | S-11 | 3 | S-4 | 3 | S-4 | 3 | S-4 | 3 | (S-12) | 3 | S-4 | 3 | S-4 | 3 | S-2 |
| 4 | S-11 | 4 | S-4 | 4 | S-4 | 4 | S-4 | 4 | S-4 | 4 | S-12 | 4 | S-4 | 4 | S-3 |
| 5 | S-11 | 5 | S-4 | 5 | S-4 | 5 | S-4 | 5 | S-4 | 5 | (S-12) | 5 | S-4 | 5 | S-3 |
| 6 | S-11 | 6 | S-4 | 6 | S-12 | 6 | S-4 | 6 | S-4 | 6 | S-12 | 6 | S-4 | 6 | S-4 |
| 7 | S-11 | 7 | S-4 | 7 | (S-12) | 7 | S-4 | 7 | S-4 | 7 | (S-12) | 7 | S-4 | 7 | S-4 |
| Preset Map 9 | Preset Map 10 | Preset Map 11 | Preset Map 12 | Preset Map 13 | Preset Map 14 | Preset Map 15 | Preset Map 16 | ||||||||
| Block | Size Code | Block | Size Code | Block | Size Code | Block | Size Code | Block | Size Code | Block | Size Code | Block | Size Code | Block | Size Code |
| 0 | S-4 | 0 | S-0 | 0 | S-4 | 0 | S-0 | 0 | S-3 | 0 | S-4 | 0 | S-4 | 0 | S-3 |
| 1 | S-4 | 1 | S-0 | 1 | S-0 | 1 | S-0 | 1 | S-3 | 1 | S-3 | 1 | S-4 | 1 | S-10 |
| 2 | S-0 | 2 | S-0 | 2 | S-0 | 2 | S-0 | 2 | S-11 | 2 | S-10 | 2 | S-4 | 2 | S-10 |
| 3 | S-0 | 3 | S-0 | 3 | S-0 | 3 | S-0 | 3 | S-4 | 3 | S-4 | 3 | S-11 | 3 | S-11 |
| 4 | S-0 | 4 | S-0 | 4 | S-0 | 4 | S-0 | 4 | S-4 | 4 | S-4 | 4 | S-11 | 4 | S-0 |
| 5 | S-0 | 5 | S-0 | 5 | S-0 | 5 | S-0 | 5 | S-0 | 5 | S-4 | 5 | S-0 | 5 | S-0 |
| 6 | S-0 | 6 | S-4 | 6 | S-0 | 6 | S-0 | 6 | S-0 | 6 | S-12 | 6 | S-12 | 6 | S-12 |
| 7 | S-0 | 7 | S-4 | 7 | S-0 | 7 | S-4 | 7 | S-0 | 7 | (S-12) | 7 | (S-12) | 7 | (S-12) |
| Size Code | Fleets | Sub Fleets | Number of Blocks | Number of Talkgroups per Block | Max IDs per Talkgroup | Max Radios per Block |
| S0 | N/A | N/A | N/A | N/A | N/A | 512? |
| S1 | 128 | 4 | 1 | 512 | 16 | 16 |
| S2 | 16 | 8 | 1 | 128 | 64 | 64 |
| S3 | 8 | 8 | 1 | 64 | 128 | 128 |
| S4 | 1 | 16 | 1 | 16 | 512 | 512 |
| S5 | 64 | 4 | 1 | 256 | 32 | 32 |
| S6 | 32 | 8 | 1 | 256 | 32 | 32 |
| S7 | 32 | 4 | 1 | 128 | 64 | 64 |
| S8 | 16 | 4 | 1 | 64 | 128 | 128 |
| S9 | 8 | 4 | 1 | 32 | 256 | 256 |
| S10 | 4 | 8 | 1 | 32 | 256 | 256 |
| S11 | 2 | 16 | 1 | 32 | 256 | 256 |
| S12 | 1 | 16 | 2 | 8 | 1024 | 512 |
| S13 | 1 | 16 | 4 | 4 | 2048 | 512 |
| S14 | 1 | 16 | 8 | 2 | 4096 | 512 |
| You can tell which block a Motorola ID is in by its number. |
| Block | Lower ID# | Upper ID# |
| 0 | 0000 | 8191 |
| 1 | 8192 | 16383 |
| 2 | 16384 | 24575 |
| 3 | 24576 | 32767 |
| 4 | 32768 | 40959 |
| 5 | 40960 | 49151 |
| 6 | 49152 | 57343 |
| 7 | 57344 | 65535 |
Thanks to Radio Reference.com for most of this information. |
![]()
| Type II Special Status Bits | Contents |
| Type II Motorola Smartnet systems use these status bits for special transmissions such as emergency, patches, DES/DVP scrambled transmissions, and multiselects. Motorola trunking radios directly interpret them for their special functions, thus no difference is noticed by the person with the radio. The scanner however interpret these special talkgroup status bits as different talkgroups entirely. Below is the conversion chart for these special status bits. |
| TT ID + # Usage | TT ID + # Usage |
| ID+0 Normal Talk group | ID+8 DES/DVP Encryption talk group |
| ID+1 All Talk group | ID+9 DES All Talk group |
| ID+2 Emergency | ID+10 DES Emergency |
| ID+3 Talk group patch to another | ID+11 DES Talk group patch |
| ID+4 Emergency Patch | ID+12 DES Emergency Patch |
| ID+5 Emergency multi-group | ID+13 DES Emergency multi-group |
| ID+6 unassigned | ID+14 unassigned |
| ID+7 Multi-select (initiated by dispatcher) |
ID+15 Multi-select DES TG |
| Therefore, if a user was transmitting a multi-select call on talkgroup 1808, the scanner would actually receive those transmissions on 1815. Some common uses of these status bits are as follows: |
| - | When a user hits their emergency button, all conversations on the talkgroup revert to the emergency status talkgroup (ID+2) until the dispatch clears the emergency status. Therefore, if someone hit their emergency button and their radio was on talkgroup 16, all communications would switch to talkgroup 18. |
| - | A lot of Fire and EMS departments dispatch tone-outs and alarms as Multi-select communications (ID+7). Therefore, if your fire department dispatch talkgroup is 1616, and they do dispatch tone-outs and alarms as Multi-selects, then those communications will be on talkgroup 1623. |
| Thanks to the Radio Reference.com for this information. |
![]()
| Last updated November 03, 2024 |