|
|
| Easier to Read Pro 2052 Scanner Manual |
| How do you know if you have a newer Pro 2052 or older Pro 2052? |
| Last Updated July 15, 2024 |
![]()
| Contents |
| Introduction |
| Main Features | Locking Out Talk Group IDs |
| Frequency Chart | Monitoring a Single Talk Group ID |
| Understanding Banks | Monitoring All Talk Group IDs |
| Understanding Trunking | Selecting EDACS Talk Group ID Format |
| Understanding IDs | EDACS Talk Group ID Range Search |
| Scanning Terminology | Setting the Status Bit Ignore Function |
| Keypad and Knob Controls | Motorola Type II Special Size Bits |
| Setting the Squelch | Setting the Motorola Disconnect Tone Detect |
| A Look at the Display | Matching IDs with Trunked Frequencies |
| Programming Conventional Frequencies | Searching for Frequencies |
| Deleting Frequencies | Search Delay |
| Programming a Motorola Type II System | Service Band Search |
| Programming a Motorola Type IIi or Type I System | Limit Search |
| Programming Offset and Base Frequency | Weather Scan |
| Programming an EDACS System | Search Skip Memory |
| Determining LCN Order | Changing Search Speeds |
| Programming Talk Group IDs | Special Features |
| Deleting IDs from the Scan Lists | Turning the Keytone Off and On |
| Scanning Conventional Channels | Skipping Data Signals |
| Scan Delay | Receiving SAME Weather Alerts |
| Locking Out Channels | Programming FIP Codes |
| Priority Scanning | Turning the Remote Function On or Off |
| Scanning and Trunking Banks | Scanner Reset |
| Trunkscanning the Talk Group ID Lists | Preset Fleet Maps |
| Priority Talk Group ID Scanning | Related Links/Info |
| Trunking Delay |
![]()
| Introduction | Contents |
| This is an adequate (IMHO) radio that has many fine features for scanning and trunking. However, anyone who has tried to read the manual that comes with the radio knows it can be a little hard to find, read, and figure out some of the steps, especially in the trunking section. The manual for the newer Pro 2052 (which trunks and scans simultaneously) is the worst of all RS manuals I have encountered completely leaving out many of the same features the older Pro 2052 has (and in the older manual). |
| Even as a veteran user I can’t remember everything and find myself referring back to the manual for explanations of procedures and find it frustrating trying to figure out the wording every time. I decided to write and print this for myself to make it easier to use the radio and am happy to share it with you. This should also make it easier for most people to use some of the more advanced features of the radio (and get their money’s worth if you paid full-price for the radio new) as I will try to explain procedures a little more clearly and in a more logical order. Granted, these radios aren't simple so you will have to spend some time on them but this manual will at least make it easier. If you follow the red highlighted text in the programming sections, you should find what you need to know. If you want to find out what's really going on with the radio, read everything else. |
| This radio is a lot like the Pro-94/94A handheld models with the added features of Military air and the ability to scan all 20 banks at once (vs. 10 at a time). Apparently, there is a newer model (still a Pro-2052, not a Pro-2052A) that appeared around April of 2003 that will trunk and scan simultaneously (like the Pro-94A) though I had not heard anything about it and didn't realize it until I bought (the newer) one. The older models scan the trunking systems for 5 seconds each while the newer models scan the trunking systems for 1 second each. Also, there is software available to program and control the scanner with alpha tags and tone codes (visible in the software program only). |
| For those
of you with the newer model that scans and trunks
simultaneously, I have found that it is easier to read
the display if you either scan or trunktrack with this
radio. Unless you are an expert user, it's hard to do the
simplest things because the display is so busy if you do
both. There are different key combinations for scanning
and different key combinations for trunking and you have
less than one second (before the scanner moves to the
next bank) to figure out which is which and press the
correct buttons. It also makes it hard to see what the
radio is actually doing. If all you want to do is program
it and listen, then program both trunking freqs and
conventional freqs in the same bank. For instance, if
you want to pause on a transmission you have to hit hold
for an ID or manual for a conventional frequency. Or, if
you are scanning and trunkscanning the ID lists,
it's hard to tell the scanning banks from the ID
scanlists in the display. Not to mention the fact that
the radio doesn't show the frequencies while scanning
(but shows the channel numbers only for conventional
freqs??) or the bank number while receiving an ID (but
does when receiving a conventional frequency??). If you
have the space, I would advise putting conventional
frequencies in the lower banks and trunking systems in
the upper banks or something along that line to keep them
separated. |
| I will assume you know how to obtain the basic information from the original manual such as following safety procedures, putting the batteries in, connecting the antenna, finding specs, etc. and concentrate on the main functions of the scanner. |
| I hereby absolve myself from anything that happens to anyone or the scanner as a result of the information you will be reading. You are welcome to copy and/or print these pages and use them in the scanning hobby as long as you don't change, redistribute, or charge/accept money for them. |
| Check back often as this document will be updated and revised from time to time. I have tried the best I can to make sure everything is accurate here but if I missed a step or you see something that's obviously wrong, please email me. |
![]()
| Main Features | Contents |
| The older
Pro-2052 will scan conventional or trunked
transmissions but not trunked and conventional
transmissions at the same. The newer Pro-2052 will scan conventional and trunked transmissions at the same. |
| Duel-System Trunking - you can track Motorola and EDACS (GE/Ericsson) trunking systems. |
| Triple-Conversion Circuitry - virtually eliminates (depending on your location and antenna used) any interference from IF (intermediate frequency) images, so you hear only the selected frequency. |
| (20) 50-Channel Storage Banks - you can store up to 50 channels in each of 20 different banks for a total of 1000 channels. |
| Remote PC Function - lets you control the PRO-2052 from your personal computer as well as transfer data to and from the radio with optional software. |
| 5 Talk Group ID Lists per Bank - you can store up to 50 trunking talk group IDs (10 in each list) for each trunking bank for a total of 1000 IDs). |
| EDACS Partial (AFS) Talkgroup ID - lets you program a whole agency or a whole fleet as 1 talkgroup ID to better utilize your ID lists. |
| Duplicate Channel Alert - warns you when the frequency you are storing already exists in memory. |
| Weather Alert Indicator - lets you listen to coded weather emergency information using Specific Area Message Encoding (NWR-SAME Circuitry) and program codes for your area. |
| 5 Service Banks and 1 Limit Search - frequencies that are pre-programmed in separate public safety, aircraft, ham, marine, and weather banks, to make it easy to locate frequencies in these bands and 1 programmable limit search. |
| Data Signal Skip - lets you set the scanner to skip non-modulated or data signals (such as fax or modem transmissions) while scanning or searching conventional frequencies. This lets the scanner avoid non-voice signals, making searching or scanning faster. |
| Scan/Search Delay - delays scanning or searching for about 2 seconds before moving to another channel or frequency, so you can hear more replies that are made on the same channel or frequency. |
| Trunking Scan Delay - delays trunking for about 5 seconds before searching for another talk group ID, so you can hear more replies that are made on the same talk group ID. |
| 10 Priority Channels - lets you select one (conventional) channel per bank (in the first 10 banks only) and have the scanner check that channel every 2 seconds while it scans the bank, so you don't miss transmissions on those channels. |
| Priority Talk Group ID Scanning - lets you program 1 talk group ID in each scan list (5 in all) per bank and have the scanner check that ID more frequently. Also lets you scan just the priority IDs in a bank. |
| Lock-Out Function - lets you set your scanner to skip over specified channels, frequencies, or IDs when scanning, searching, and trunking. |
| Hypersearch - lets you set the scanner to search at up to 300 steps per second in frequency bands with 5 kHz steps, compared to the normal search speed of 100 steps per second (while doing a Limit Search only). |
| Motorola Disconnect Tone Detect - the scanner automatically tunes to the trunking data channel when it receives a disconnected transmission. You can turn this off, so you can continuously monitor a channel with a weak transmission where conversations are often disconnected. |
| Motorola Status Bit Ignore - allows you turn off Status Bit Ignore to receive IDs for special transmissions such as emergency, patches, DES/DVP scrambled transmissions, and multiselects. |
| Key Confirmation Tones - the scanner sounds a tone when you press a key, perform an operation correctly, and an error tone if you make an error. Can be turned off. |
| Memory Backup - keeps the frequencies stored in memory for an extended time if the radio loses power. |
![]()
| Frequency Chart |
| Frequency Range | Step Size (kHz) |
Mode |
Band | Frequency Range | Step Size (kHz) | Mode | Band |
| 29-29.695 | 5 | FM | 10-Meter Ham Band | 225-399.9875 | 12.5 | AM | Military Air |
| 29.700-49.995 | 5 | FM | VHF Lo Band | 400-419.9875 | 12.5 | FM | Federal Government |
| 50-54 | 5 | FM | 6-Meter Ham Band | 420-449.9875 | 12.5 | FM | 70-cm Ham Band |
| 108-136.975 | 12.5 | AM | Aircraft Band | 450-469.9875 | 12.5 | FM | UHF Standard Band |
| 137-143.995 | 5 | FM | Military Land Mobile | 470-512 | 12.5 | FM | UHF "T" Band |
| 144-147.995 | 5 | FM | 2-Meter Ham Band | 806-823.9375 | 12.5 | FM | Public Service "800" Band |
| 148-174 | 5 | FM | VHF Hi Band | 851-868.9875 | 12.5 | FM | Public Service "800" Band |
| 179.750-215.750 | 6 MHz | WFM | VHF TV | 896.1125-956 | 12.5 | FM | UHF Hi, 33-cm Ham Band |
| 216-224.995 | 5 | FM | 1.25-Meter Ham Band | 1240-1300 | 12.5 | FM | 25-cm Ham Band |
![]()
| Understanding Banks |
| Service Banks |
| The
scanner is preprogrammed with all the frequencies
allocated to the weather, ham, marine, aircraft, and
public safety services. This helps you quickly find
active or unknown frequencies instead of doing a limit
search. Also, they are good for finding frequencies when traveling. |
| Channel Storage Banks |
| All the channels are divided into 20 banks of 50 channels. Use each channel-storage bank to group frequencies, such as those for police, fire, ambulance, aircraft, and/or trunking systems. |
| You can also program your trunking frequencies and conventional frequencies into the same banks as well to utilize channel space better. By simply locking out the trunking frequencies, you can then either trunktrack a bank or scan a bank. The scanner will still trunktrack the locked out frequencies (in the newer model anyway). |
| Tip: Theoretically, you can also program more than one trunking system into a bank as long as you can only monitor one at a time, in different locations, far enough apart, so the system you are monitoring won’t interfere with any other system (the radio will only monitor one control channel [system] per bank). They would also have to be the same system type (Motorola or EDACS) and be in the same valid trunking frequency range (800 MHz band or 900Mhz band etc.) as the radio will only allow you to program one type of trunking system per bank. |
![]()
| Understanding Trunking | Contents |
|
Trunking systems let a large group of 2-way radio users (or even
different groups of 2-way radio users) efficiently use a set of
frequencies. Instead of selecting a specific frequency for a transmission,
the user’s radio selects a programmed trunking bank in the system when
that user presses their PTT (push to talk) button. The trunking system
automatically transmits the call on the first available frequency, and
also sends (on a different frequency called a Data or Control channel) a
code that uniquely identifies that transmission as a talkgroup ID (or just
ID.) So when you are trunktracking a system, you are listening to active
IDs transmitting in the system (each using the first available frequency
in the system.) Trunking systems in general allocate and use fewer
frequencies among many different users. Since the trunking system might send a call and its response on different frequencies, it is difficult to listen to trunked communications using a conventional scanner. These scanners let you monitor the control channel frequency so you can hear calls and responses for users and more easily "follow" conversations than with a conventional scanner. This scanner trunktracks the following types of systems: |
|
|
| When you
program Motorola and EDACS system frequencies into the scanner, one
frequency is the control (or data) channel, and the rest are voice
frequencies shared by all the users. There may be 3 or 4 frequencies
assigned as (primary or alternate) control channels but only one control
channel will be active at a time. EDACS systems need all the frequencies
for the system programmed and in the correct
LCN (Logical Channel Number) order. The control channel is continually transmitted to the field units and has a sound similar to listening to a boat engine over the phone (in manual mode; you won't hear this when you are trunking the system.) This control channel is also a good check to see if you can trunktrack the system. If you can't hear a control channel when you step through the trunking frequencies (in manual mode), you either don't have all the frequencies or are too far away to receive the control channel and the system. Motorola systems are limited to a maximum of 28 frequencies per system or site. Ericsson EDACS systems are limited to 25 frequencies per system or site. Motorola and EDACS systems can be either analog, digital, or mixed (digital and analog talkgroups). This scanner can't monitor digital systems. Trunkscanning is basically scanning IDs that are programmed into ID locations (same concept as frequencies into channels.) You can then trunkscan just the programmed IDs. Trunktracking is searching for all IDs in a system (same concept as searching for frequencies in a band). |
| Radio Reference.com has an excellent page explaining the various types of trunking systems in more detail here. |
![]()
| Understanding IDs | Contents |
| Motorola IDs come in two formats: Type I and Type II. Each format displays and uses Talk Group IDs in slightly different ways. Type I/II hybrid systems use both Type I and Type II formats for Talk Group IDs. |
|
| EDACS IDs come in two formats: AFS (Agency-Fleet-Subfleet) and Decimal. |
|
![]()
| Scanning Terminology | Contents |
| Scanning- the process of stepping through conventional channels in scan banks. |
| Trunktracking (or Trunking)- the process of searching for all active talkgroup IDs in trunked systems, in scan banks. |
| Trunkscanning- the process of stepping through programmed talkgroup IDs in ID lists, in trunked systems, in scan banks. |
| Searching- the process of searching for active frequencies in pre-programmed service searches or the limit search. |
| Manual Mode- used for browsing, monitoring, and programming conventional frequencies. |
| Trunk Mode- used for trunking and programming trunking frequencies and functions. |
| Shift Mode- the mode the radio is in to select the upper 10 banks (11-20). |
| Remote Mode- the mode the radio is in while being controlled by the computer. |
![]()
| Keypad and Knob Controls | Contents |
| Your scanner's keys might seem confusing at first, but this information should help you understand each key's function. |
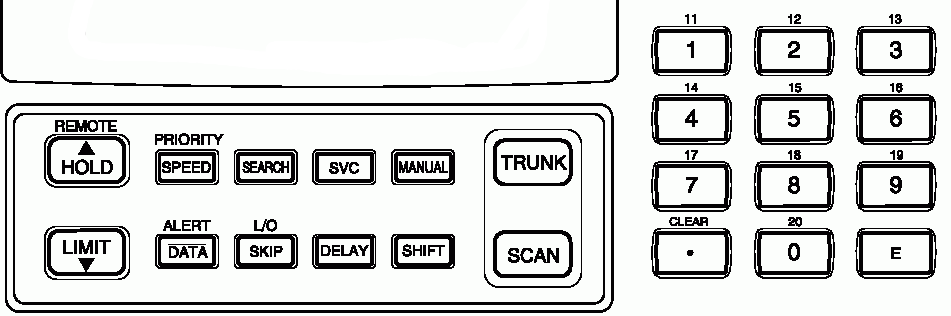 |
| Key | Function(s) |
| (REMOTE) ▲ HOLD | Holds the
frequency in search mode (and changes the search
direction to up if searching down); continues searching up; holds the current talk group ID while trunking; continues trunking or trunkscanning in trunk mode; puts the scanner in remote mode for computer control. |
| (PRIORITY) SPEED | Turns priority on and
off while scanning or trunkscanning; stores priority channel in scan mode; stores the priority ID while trunkscanning; turns Hypersearch on and off during a limit search. |
| SEARCH | Continues searching
through a limit or service search; continues trunking in trunk mode; returns to trunking when trunkscanning the ID lists; starts searching a programmed EDACS talk group ID range; monitors active IDs in a bank. |
| SVC | Starts a
service bank search and selects the next service bank;
toggles between ID formats while scanning EDACS systems; turns the Motorola disconnect tone detect function on or off in trunk mode. |
| MANUAL | Stops
scanning and scan mode; lets you directly enter a channel number in manual mode or frequencies for a limit search in search mode; steps to next channel in manual mode; brings up the talk group ID lists and steps through talk group IDs in trunk mode. |
| TRUNK | Puts scanner in and takes scanner out of trunk mode. |
| LIMIT ▼ | Enters
the lower and upper limits of limit search in manual
mode; holds the frequency in search mode (and changes the search direction to down if searching up). |
| (ALERT) DATA | Turns the
data signal skip feature on or off in while scanning or
searching; turns the NWR-SAME weather alert on or off, clears SAME alerts, tests alert tones, enters/exits test mode; allows you to turn on/off trunking banks during trunking; moves through menu settings in trunk mode. |
| (L/O) SKIP | Locks/unlocks
displayed channels while scanning; locks/unlocks displayed frequencies during a limit or service search; locks out a displayed talk group IDs while trunking. |
| DELAY | Sets/unsets
a 2-second delay for any selected channel in manual or
scan mode; sets/unsets a 2-second delay for a limit or service search in search mode; sets/unsets a 5-second ID delay while trunking. |
| SHIFT | Allows you to select the upper 10 banks (banks 11-20). |
| SCAN | Continues
scanning in scan mode; starts scanning the stored channels in scan mode (up only); puts the scanner in trunkscanning mode while trunking to scan talk group ID lists; turns the status bit ignore feature on or off in trunk mode. |
| Number Keys | Enter a
channel or a frequency; select which banks to scan in scanning mode; select which banks to program or trunk in trunk mode. |
| (Clear) . | Enters a decimal point; clears the ERROR message and display. |
| E | Stores
frequencies into channels in manual mode; stores IDs into scan lists in trunk mode; enters S-bit status (on or off); unlocks all talk group IDs in trunk mode; stores programming functions in trunk mode. |
![]()
| Turning On The Scanner And Setting the Squelch | Contents |
| 1. Turn SQUELCH fully counterclockwise. |
| 2. Turn VOLUME/OFF clockwise until it clicks and you hear a hissing sound. |
| 3. Turn SQUELCH clockwise until the hissing stops. |
| If you
are using the scanner for the first time, straight out of
the box (or if you have just reset it), you should see
all zeros in the frequency display. All of the banks are
turned on and the scanner is in scan mode (??) although
the scanner will not scan or trunktrack until you program
frequencies into the banks. However, you can do a service
or limit search. To avoid confusion, turn off all the banks except bank 1 (the bank you will probably program first) by pressing the corresponding numbers on the keypad. Press 2 thru 9 to turn off banks 2-9, 0 to turn off bank 10; press SHIFT (once) then 1 thru 0 to turn off banks 11-20. Remember to press SHIFT again so you will be able to select any of the first 10 banks (the banks you will probably be working with first). Press MANUAL to take the scanner out of scan mode. |
| If you are turning the radio on after you have programmed frequencies into it, the scanner will start scanning the last select banks if you turned the radio off in scanning mode or, start trunking the last selected banks if you turned the radio off in trunking mode. |
![]()
| A Look at the Display | Contents |
| The display has indicators that show the scanner's current operating status. The display information helps you understand how your scanner operates. |
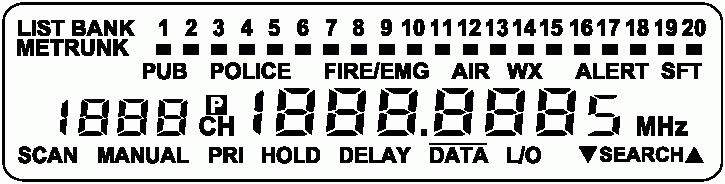 |
|
LIST |
appears when trunkscanning or programming talk group ID lists. |
|
BANK |
indicates the bank(s) being used. |
|
1-20
|
(Small numbers at the top of the display). |
|
Manual Mode: shows which bank the displayed channel is in. |
|
|
Scanning Mode:
show which channel-storage banks are being scanned. |
|
|
|
|
Search Mode: shows the bank of the current channel memory ready to be programmed. |
|
|
Trunking Mode:
shows which trunking bank is currently being trunked; |
|
|
Trunkscanning Mode:
shows which talk group ID lists (1-5) are being scanned in the current
trunking bank; |
|
|
TRUNK |
appears while you are trunking or trunkscanning;
|
|
MON |
appears
during a limit, direct or service search; in monitor mode; |
|
|
Trunking mode:
Each frequency you store in a trunking bank has a corresponding activity
bar. However, there are only 20 bars for a possible maximum of 50
frequencies. |
|
One will
stay on indicating the data channel frequency. Others will appear and
disappear as active or locked out frequencies come (appear) and go
(disappear). |
|
|
If bars appear without any talk group IDs locked out and no audio is heard, then they are probably telephone interconnect or private calls which the scanner does not receive. |
|
|
If the scanner is holding on an ID which is not being used, the other activity bars turn on and off as other frequencies use the system. |
|
|
In the Service Band search mode: will appear above the service band being searched. |
|
|
M or E |
indicates either a Motorola (M) trunking system or EDACS (E) system in trunking mode. |
|
HYPER |
appears when scanning; while Hypersearch is active during a direct or limit search. |
|
WX HAM MRN AIR POL |
appears during a service bank search with an activity bar above the current service bank being searched. |
|
ALERT |
appears when the SAME weather alert is turned on, or flashes when the scanner detects an alert coded signal. |
|
SFT |
appears when the scanner is in shift mode and blinks when the scanner is in remote mode. |
|
K/L |
appears when you lock the keypad. |
|
888 |
displays the channel numbers in manual and program modes. |
|
displays alert levels when SAME alert is received. |
|
|
blinks channel activity bar number of data frequency when trunking and waiting for ID. |
|
|
shows channel activity bar number associated with displayed talk group ID. |
|
|
shows the talk group ID number in the talk group ID list when trunkscanning. |
|
|
|
appears
when you select a priority channel or talk group ID; |
|
CH |
appears with a number to its left to indicate to which channel the scanner is tuned to. |
|
1888.888 5 MHz |
shows frequencies in scan and manual modes;
|
|
SCAN |
appears when you scan channels in scan mode and when trunkscanning talk group IDs. |
|
MAN |
appears in manual mode;
|
|
PGM |
appears in program mode when you program frequencies, priority channels, limit searches, trunking systems, fleet maps, talk group IDs or move monitor memories or IDs. |
|
PRI |
appears when the priority feature is turned on. |
|
L/O |
appears when a locked out channel or frequency is displayed. |
|
DLY |
appears when you turn the delay feature on. |
|
HOLD |
appears
during limit, direct, and service searches after hold button has been
pressed; |
|
DATA |
appears
when the data skip function is active in scanning mode; |
|
▼ or ▲ |
appear during a limit, direct, or service search, indicating the search direction. |
|
SEARCH |
appears
during limit, direct, and service searches; |
![]()
| Programming Conventional Frequencies | Contents |
| You can
program trunking frequencies and conventional
frequencies into the same bank to utilize channel space
better if you have a lot of channels and/or trunking
systems. That way, you don’t have to waste a whole
bank on a trunking system that has only 5 channels. I
typically put my trunking frequencies in starting at the
beginning of the banks (1, 51, 101, 151, etc.) because
you’ll rarely have more than 25 of those (for each
trunking system) and then fill up the banks with
conventional frequencies. If you program trunking
frequencies into the first channels of the first 10 banks,
change the pre-set (default first channel in each bank)
priority channel to a conventional or empty channel.
Having a trunking frequency as a priority channel is
useless because the scanner looks for IDs not frequencies
in a trunking system. However, if you want to have conventional frequencies and trunking frequencies in the same bank, this can be tricky. If all you want to do is program everything in and listen, you'll be ok. Because the scanner can switch from scanning to trunking every second, you will have to be quick when performing the keypad functions. If you are one of those who likes to pause or hold or turn banks on/off etc. and especially if you are going to be using priority for scanning or trunkscanning, you might be better off, for instance, grouping your conventional frequencies in the lower banks and your trunking systems in the upper banks (you can't set any of the channels in the upper banks, 11-20, as priority channels). Otherwise, if you want to press MANUAL to pause on a conventional channel and you are too late you may bring up the ID list for a trunking bank. See the individual sections on programming trunked systems to program trunked frequencies. |
|
|
| 1. In Manual Mode, enter the channel number where you want to program the frequency then press MANUAL to advance to the channel. |
| 2. Use the number keys and decimal point key to enter the frequency you want to store. To Clear a Channel, enter 0 as the frequency. |
| 3. Press E to store the frequency into the channel. |
| Note: If you entered an invalid frequency (not in the receiver's range), Error appears and the scanner beeps three times. You have to press .(CLEAR) to clear the error message. |
| Note: The scanner automatically rounds the entered number to the nearest valid frequency. For example, if you enter 151.473 (MHz), your scanner accepts it as 151.475. |
| Note: If you enter a duplicate frequency, the scanner will beep twice and show you the channel number of the first frequency. Press .(CLEAR) to clear the display or E again to store it anyway. |
| Tip: You may press DELAY if you want to at this time to set the delay for the channel. Each channel can have its own delay setting. See Scan Delay. |
| 4. To Program the next channel in sequence, press MANUAL, which advances to the next channel. Return to step 2. To program any other channel, return to step 1. |
| Press MANUAL to exit programming. |
![]()
| Programming a Motorola Type II System | Contents |
| Valid Trunking Frequencies |
| 851.0000-868.9875 MHz (except cellular) | 137.0000-174.0000 MHz |
| 935.0125-939.9875 MHz | 406.0000-512.0000 MHz |
| The radio also includes a trunking ‘Frequency and Talk Group Guide’ to help you get started programming your scanner. However, some of this information may be outdated or changed by now so you should re-check the information before using it. See Radio Reference.com and look for the 'RR Database' link. |
| You can
program trunking frequencies and conventional
frequencies into the same bank to utilize channel space
better if you have a lot of channels and/or trunking
systems. That way, you don’t have to waste a whole
bank on a trunking system that has only 5 channels. I
typically put my trunking frequencies in starting at the
beginning of the banks (1,51,101, 151,etc.) because
you’ll rarely have more than 25 of those (for each
trunking system) and then fill up the banks with
conventional frequencies. If you program trunking
frequencies into the first channels of the first 10 banks,
change the pre-set (default first channel in each bank)
priority channel to a conventional or empty channel.
Having a trunking frequency as a priority channel is
useless because the scanner looks for IDs not frequencies
in a trunking system. If you have conventional frequencies and trunking frequencies in the same bank, this can be tricky. If all you want to do is program everything and listen, you'll be ok. Because the scanner can switch from scanning to trunking every second, you will have to be quick when performing the keypad functions. If you are one of those who likes to pause or hold or turn banks on/off etc., you might be better off, for instance, grouping your conventional frequencies in the lower banks (where you can set priority channels) and your trunking systems in the upper banks. Otherwise, if you want to press MANUAL to pause on a conventional channel and you are too late you may bring up the ID list for a bank. |
| You should also turn off the Status Bit Ignore Function to properly receive all Type II IDs. See Setting the Status Bit Ignore Function. |
| 1. In manual mode, press and hold TRUNK until the scanner beeps twice. You will see all the banks blink at the top of the display. |
| 2. Select the bank you want to program by pressing the corresponding number on the keypad, 1-9; press 0 for bank 10. Press SHIFT then 1 thru 0 to select banks 11-20. SFT will appear in the upper right of the display. |
| Note: While SFT is in the display you will only be able to select banks 11-20. To select banks 1-10 again, press SHIFT to remove SFT from the display. |
| 3. Press ▼ or ▲ until you find one of the following 4 Motorola II systems you want to program: |
| Display | Trunk System |
| E2 - 800 | Motorola Type II, 800 MHz frequencies |
| E2 - 900 | Motorola Type II, 900 MHz frequencies |
| E2 - UHF | Motorola Type II, UHF frequencies |
| E2 - Hi | Motorola Type II, VHF frequencies |
| 4.
Press E to select the system. The scanner
will automatically select the first channel in the bank.
To start programming at a different channel, press
▲ until you find the desired
channel. The bank number, channel number, and TRUNK will appear in the display. |
| 5. Use the number keys and decimal point key to enter the frequency you want to store. To delete a frequency, program 0 as the frequency. |
| 6. Press E to store the frequency into the channel. |
| Note: If you entered an invalid frequency (not a valid trunking frequency), Error appears and the scanner beeps three times. You have to press .(CLEAR) to clear the error message. |
| Note: The scanner automatically rounds the entered number to the nearest valid frequency. For example, if you enter 855.122 (MHz), your scanner accepts it as 855.125. |
| Note: If you enter a duplicate frequency, the scanner will beep twice and show you the channel number of the first frequency. Press .(CLEAR) to clear the display. |
| Tip:
If you press SKIP(L/O) to lock out the trunked
frequency, you will be able to scan just conventional
channels in scan mode. The scanner will still trunktrack the channel in trunk mode with it locked out (on the newer model anyway). |
| 7. Press MANUAL to advance to the next channel and repeat steps 5-7 until you have programmed all the trunking frequencies. |
| Press TRUNK to exit programming. |
| If you programmed a VHF or UHF system, see Programming Offset and Base Frequency. |
![]()
| Programming a Motorola Type IIi or Type I System | Contents |
| Valid Trunking Frequencies |
| Motorola Type IIi systems: | Motorola Type I systems: |
| 851.0000-868.9875 MHz (except cellular) | 806.0000-899.9875 MHz (except cellular) |
| 935.0125-939.9875 MHz |
| The radio also includes a trunking ‘Frequency and Talk Group Guide’ to help you get started programming your scanner. However, some of this information may be outdated or changed by now so you should re-check the information before using it. See Radio Reference.com and look for the 'RR Database' link. |
| For a
Type I or Type IIi system, you have to select a Pre-Programmed Fleet Map or program a
fleet map if the one you need isn't pre-programmed. If you
know the preset fleet map or have the size codes, that's
great. If you don't, you need to determine the size
codes so you can select (or program) the fleet map. If you don't know the size codes, you can try a method I found at Radio Reference.com. Since it is rather lengthy, I will just give you the link. Determining Type I Motorola Fleet Maps. By Dave Goodson. |
| You can
program trunking frequencies and conventional
frequencies into the same bank to utilize channel space
better if you have a lot of channels and/or trunking
systems. That way, you don’t have to waste a whole
bank on a trunking system that has only 5 channels. I
typically put my trunking frequencies in starting at the
beginning of the banks (1,51,101, 151,etc.) because
you’ll rarely have more than 25 of those (for each
trunking system) and then fill up the banks with
conventional frequencies. If you program trunking
frequencies into the first channels of the first 10 banks,
change the pre-set (default first channel in each bank)
priority channel to a conventional or empty channel.
Having a trunking frequency as a priority channel is
useless because the scanner looks for IDs not frequencies
in a trunking system. If you have conventional frequencies and trunking frequencies in the same bank, this can be tricky. If all you want to do is program everything and listen, you'll be ok. Because the scanner can switch from scanning to trunking every second, you will have to be quick when performing the keypad functions. If you are one of those who likes to pause or hold or turn banks on/off etc., you might be better off, for instance, grouping your conventional frequencies in the lower banks (where you can set priority channels) and your trunking systems in the upper banks. Otherwise, if you want to press MANUAL to pause on a conventional channel and you are too late you may bring up the ID list for a bank. |
| You should also turn off the Status Bit Ignore Function to properly receive all Type IIi IDs. See Setting the Status Bit Ignore Function. |
| 1. In manual mode, press and hold TRUNK until the scanner beeps twice. You will see all the banks blink at the top of the display. |
| 2. Select the bank you want to program by pressing the corresponding number on the keypad, 1-9; press 0 for bank 10. Press SHIFT then 1 thru 0 to select banks 11-20. SFT will appear in the upper right of the display. |
| Note: While SFT is in the display you will only be able to select banks 11-20. To select banks 1-10 again, press SHIFT to remove SFT from the display. |
| 3. Press ▼ or ▲ to select E1, then press E. The scanner automatically selects the first channel in the selected bank. |
| 4. Use the number keys and decimal point key to enter the frequency you want to store. If you make a mistake press .(CLEAR) to clear the display. To delete a frequency, program 0 as the frequency. |
| 5. Press E to store the frequency into the channel. |
| Note: If you entered an invalid frequency (not a valid trunking frequency), Error appears and the scanner beeps three times. Press .(CLEAR) to clear the Error message. |
| Note: The scanner automatically rounds the entered number to the nearest valid frequency. For example, if you enter 855.122 (MHz), your scanner accepts it as 855.125. |
| Note: If you enter a duplicate frequency, the scanner will beep twice and show you the channel number of the first frequency. Press .(CLEAR) to clear the display. |
| Tip:
If you press SKIP(L/O) to lock out the trunked
frequency, you will be able to scan just conventional
channels in scan mode. The scanner will still trunktrack the channel in trunk mode with it locked out (on the newer model anyway). |
| 6. Press MANUAL to advance to the next channel and repeat steps 4-6 until you have entered all the trunking frequencies. |
| 7. Press DATA(ALERT). A pre-programmed fleet map (example E1P7) or Usr appears in the display. |
| 8. If
you are going to use a preset fleet map, press
▼
or
▲ to select the desired preset fleet
map. You are done. Press MANUAL to exit
programming. If you need to program a fleet map that doesn't have the size codes in any of the preset fleet maps, press ▼ or ▲ until Usr appears. |
| 9. Press DATA(ALERT) to display the size code list. You will see b0 (block 0) in the left of the display. |
| 10. Press ▼ or ▲ to select the size code for the first block, then press E. The next available block appears. |
| Note: If you select size code S-12, S-13, or S-14, these restrictions apply: |
| S-12 can only be assigned to Blocks 0, 2, 4 or 6. |
| S-13 can only be assigned to Blocks 0 and 4. |
| S-14 can only be assigned to Block 0. |
| Since these size codes require multiple blocks, you will be prompted for the next available block. For example, if you assign Block 0 as S-12, the scanner prompts you for block 2, the next block available, instead of block 1. If you assign Block 0 as S-14, you would not see another prompt because S-14 uses all available blocks. |
| 11. Repeat Step 10 until you have selected a size code for each desired block. You will see b0 return in the display when you are done. |
| Press TRUNK to exit programming. |
![]()
| Programming the Offset and Base Frequency | Contents |
| To
properly track Motorola VHF (137.0000-174.0000 MHz) and
UHF (406.0000-512.0000 MHz) trunked systems, you must
program the applicable offset and base frequency for each
system. This can be done after you program the trunking frequencies and system. |
| I have found an
explanation at the
Trunked Radio Systems
User’s Page that describes how
to do this if you don't have the information. Look for 'Determining Base and Offset Frequencies for the BC245xlt' by John C. There is another explanation at Radio Reference.com. |
| 1. In manual mode, press and hold TRUNK until the scanner beeps twice. You will see all the banks blink at the top of the display. |
| 2. Select the bank you want to program by pressing the corresponding number on the keypad, 1-9; press 0 for bank 10. Press SHIFT then 1 thru 0 to select banks 11-20. SFT will appear in the upper right of the display. |
| Note: While SFT is in the display you will only be able to select banks 11-20. To select banks 1-10 again, press SHIFT to remove SFT from the display. |
| 3. Press ▼ or ▲ to select E2-Hi (for VHF) or E2-UHF (for UHF), then press E. The scanner automatically selects the first channel in the selected bank. |
| 4. Press DATA(ALERT). The preset base frequency and bAS appear in the display. |
| 5. Enter a new base frequency then press E to store it. |
| 6. Press DATA(ALERT) again. The preset offset and OFS appear in the display. |
| Use the following guide: |
| For Motorola Type II VHF, (E2-VHF Hi band) use 5 kHz steps between 5 kHz -100 kHz. Ex: 5,10,15,25. |
| For Motorola Type II UHF, (E2-UHF band) use 12.5 kHz steps between 12.5 kHz -100 kHz. Ex: 12.5,25. |
| 7. Enter the new offset then press E to store it. |
| Press TRUNK to exit programming. |
![]()
| Programming an EDACS Trunked System | Contents |
| Valid Trunking Frequencies |
| 806.0000-899.9875 MHz (except cellular) | 137.0000-174.0000 MHz |
| 900.0000-956.0000 MHz | 406.0000-512.0000 MHz |
| The radio
also includes a trunking ‘Frequency and Talk Group
Guide’ to help you get started programming your
scanner. However, some of this information may be
outdated or changed by now so you should re-check the
information before using it. See Radio Reference.com and look for the
'RR Database' link. You can program trunking frequencies and conventional frequencies into the same bank to utilize channel space better if you have a lot of channels and/or trunking systems. That way, you don’t have to waste a whole bank on a trunking system that has only 5 channels. I typically put my trunking frequencies in starting at the beginning of the banks (1,51,101, 151,etc.) because you’ll rarely have more than 25 of those (for each trunking system) and then fill up the banks with conventional frequencies. If you program trunking frequencies into the first channels of the first 10 banks, change the pre-set (default first channel in each bank) priority channel to a conventional or empty channel. Having a trunking frequency as a priority channel is useless because the scanner looks for IDs not frequencies in a trunking system. If you have conventional frequencies and trunking frequencies in the same bank, this can be tricky. If all you want to do is program everything and listen, you'll be ok. Because the scanner can switch from scanning to trunking every second, you will have to be quick when performing the keypad functions. If you are one of those who likes to pause or hold or turn banks on/off etc., you might be better off, for instance, grouping your conventional frequencies in the lower banks (where you can set priority channels) and your trunking systems in the upper banks. Otherwise, if you want to press MANUAL to pause on a conventional channel and you are too late you may bring up the ID list for a bank. |
| 1. In manual mode, press and hold TRUNK until the scanner beeps twice. You will see all the banks blink at the top of the display. |
| 2. Select the bank you want to program by pressing the corresponding number on the keypad, 1-9; press 0 for bank 10. Press SHIFT then 1 thru 0 to select banks 11-20. SFT will appear in the upper right of the display. |
| Note: While SFT is in the display you will only be able to select banks 11-20. To select banks 1-10 again, press SHIFT to remove SFT from the display. |
| 3. Press ▼ or ▲ until Ed appears in the display then press E. The scanner automatically selects the first channel in the selected bank. |
| 4. Use
the number keys and decimal point key to enter the
frequency you want to store. If you make a mistake press .(CLEAR)
to clear the display.
To delete a frequency, program 0 as the frequency. |
| Note: EDACS frequencies have to be programmed in LCN (Logical Channel Number) order. See Finding LCN Order. |
| 5. Press E to store the frequency into the channel. |
| Note: If you entered an invalid frequency (not a valid trunking frequency), Error appears and the scanner beeps three times. Press .(CLEAR) to clear the Error message. |
| Note: The scanner automatically rounds the entered number to the nearest valid frequency. For example, if you enter 855.122 (MHz), your scanner accepts it as 855.125. |
| Note: If you enter a duplicate frequency, the scanner will beep twice and show you the channel number of the first frequency. Press .(CLEAR) to clear the display. |
| Tip:
If you press SKIP(L/O) to lock out the trunked
frequency, you will be able to scan just conventional
channels in scan mode. The scanner will still trunktrack the channel in trunk mode with it locked out (on the newer model anyway). |
| 6. Press MANUAL to advance to the next channel and repeat steps 4-6 until you have entered all the trunking frequencies. |
| Press TRUNK to exit programming. |
![]()
| Programming Talk Group IDs | Contents |
| You have
to program the trunking frequencies first to be able to
program the IDs. Your scanner has 5 scan lists for each
bank where you can store IDs. Each list can contain up to
10 IDs, for a total of 50 IDs for each bank. If you use
all the banks as trunking banks, you can store up to 1000
IDs. If you are programming EDACS IDs in AFS format, you
can also program a whole fleet or whole agency as one ID and/or
lock out that ID as you would a single ID. Talk group ID lists help you to organize talk group IDs into categories. For example, you might use List 1 for police IDs, List 2 for fire department IDs, List 3 for emergency medical service IDs, and so on. Once you store all the IDs in the lists, you can trunkscan them (almost) the same way the scanner scans conventional channels. Note: When you trunkscan IDs with the Motorola Status Bit Ignore function set to off, you may miss transmissions with special status bits. See Setting the Status Bit Ignore Function. |
| 1. In manual mode, press SCAN. |
| 2. Select the one and only bank you want to program by pressing the corresponding number on the keypad, 1-9; press 0 for bank 10. Press SHIFT then 1 thru 0 to select banks 11-20 and turn the rest of the banks off. |
| Note: While SFT is in the display you will only be able to select banks 11-20. To select banks 1-10 again, press SHIFT to remove SFT from the display. |
| 3. Press TRUNK to start trunking the bank. |
| 4. Press
MANUAL. A number showing
the current ID list (1-5) appears at the top of
the display, and the ID location in that
list (1-10) appears in the display on the left.
(Should be list 1, location 1 if never programmed).
Pressing ▼ or ▼ will select the next or previous talk group ID location in the list. |
| 5. Enter IDs according the system you are trunking. To clear a mistake while entering an ID, press .(CLEAR). |
| To enter a Motorola Type I ID, (Ex: 600-14) use the number keys to enter the block number (6) and the fleet number (00), then press .(CLEAR) for a hyphen, then enter the subfleet number (14) and press E to store the ID. |
| To enter a Motorola Type II ID, use the number keys to enter the ID and press E to store the ID. |
| To enter an EDACS ID in AFS format (the default), (Ex: 04-070) use the number keys to enter the agency number (04), then press .(CLEAR) for a hyphen, then enter the fleet number (07) and the subfleet number (0), then press E to store the ID. |
| To enter
an EDACS ID in Decimal format, (Ex: 568) press
and hold SVC to change the format. The E
in the display will blink. Use the number keys to enter the ID (Ex: 568), then press E to store the ID. |
| To enter partial EDACS IDs, you have to use AFS format. Press and hold SVC to change the format if is set to Decimal. |
| To enter an EDACS agency as an ID, (Ex: 04-***) use the number keys to enter the agency number (04), then press .(CLEAR) for a hyphen and press E to store the ID. |
| To enter an EDACS fleet as an ID, (Ex: 04-07*) use the number keys to enter the agency number (04), then press .(CLEAR) for a hyphen, then enter the fleet number (07) and press E to store the ID. |
| To delete an ID, select an ID in the scan list, (steps 1-4), then press 0 then E to clear the ID location. |
| 6. Press ▲ to advance to the next location and enter the rest of the IDs the same way (step 5). |
| Press SEARCH to exit programming and resume trunking. |
![]()
| Scanning Conventional Channels | Contents |
| To Scan Conventional Channels, press SCAN. |
| Select any combination of banks to scan by pushing the number keys that correspond to the banks, 1-9; press 0 for bank 10; press SHIFT then 1 thru 0 to select banks 11-20. Numbers appear at the top of the display, showing the currently selected banks. The scanner scans (up only) through all the channels (that aren’t locked out) in the selected banks and starts over again. The bank number blinks when the scanner scans the channels in that bank. If the scanner finds an active frequency, it stops on it. When the transmission ends, the scanner resumes scanning. If it is a long transmission, (such as a Ham rag chewing) and you want to move on, press SCAN again to resume scanning. |
| Note: While SFT is in the display you will only be able to select banks 11-20. To select banks 1-10 again, press SHIFT to remove SFT from the display. |
| If the scanner picks up an unwanted partial station, turn SQUELCH clockwise to decrease the scanner's sensitivity and mute the scanner so it will continue scanning. |
| To listen to a weak or distant station, turn SQUELCH counterclockwise. |
| To turn
banks on or off while scanning, press the number keys, 0-9 (0
for bank 10, press SHIFT then 1
thru 0 to select banks 11-20) that
corresponds to the bank you want to turn on or off. You cannot turn off all banks. One bank must always be active. |
| To pause on a channel, quickly press MANUAL while the channel is displayed. Press SCAN to resume. |
| To lock
out a channel, quickly press SKIP(L/O) while
the channel is displayed to lock out any channel so
it won’t be scanned if it is a noisy or unwanted
frequency. Each channel can have its own lock out setting. See Locking Out Channels. |
| To turn
on the delay for the channel, quickly press DELAY while the
channel is displayed to pause 2 seconds before
searching resumes after the transmission ends. Each channel can have its own delay setting. See Scan Delay. |
| To skip data signals, press DATA(ALERT) to skip pagers, modems, MDTs, etc. so they won’t be scanned See Skipping Data Signals. |
| To stop scanning, press MANUAL. |
| Scan Delay |
| Sometimes
a user might pause before replying to a transmission. To
help missing a reply on a specific channel or frequency,
you can program a 2-second delay into any channel. The scanner continues
to monitor the channel or frequency for an additional 2
seconds after the transmission stops before resuming
scanning or searching when the delay feature is turned
on. Setting the delay for a trunking frequency has no effect on trunking or IDs. See Trunking Delay. |
| To Turn the Delay on or off for a conventional channel: |
| If the desired channel is not selected, in manual or program mode, select the channel then press DELAY to turn the delay on or off for the selected channel. DLY will appear or disappear in the display. |
| If the scanner is scanning and stops on an active channel, quickly press DELAY before it continues scanning again. DLY will appear or disappear in the display when the channel is scanned. |
| Locking Out Channels |
| You can keep the scanner scanning by locking out channels that have a continuous transmission, such as a weather channel. |
| To lock out a channel, select the channel in manual mode then press SKIP(L/O). L/O appears in the display. |
| If the scanner is scanning and stops on an active channel, quickly press SKIP(L/O) before it continues scanning again. The scanner will lock out the channel and automatically resume scanning. |
| To remove the lock out from a channel, in manual mode, select the channel then press SKIP(L/O). L/O disappears from the display. |
| To unlock all channels in the banks that are turned on, in manual mode, press and hold SKIP(L/O) until the scanner beeps twice. |
| Note: You can still select locked-out channels in manual or program mode. |
| Priority Scanning |
| The
priority feature lets you scan through the channels and
still not miss important or interesting calls on specific
channels. You can program one stored (conventional)
channel in each (of the first 10 banks only) as a priority
channel (up to 10 channels). If the priority feature is
turned on, as the scanner scans each active
bank, it checks that bank's priority channel for activity
every 2 seconds. Priority is kind of screwy on these scanners. Priority scanning is a separate process from priority trunkscanning. You can do one or the other or both but each has to be turned on or off separately. For more see Priority Trunkscanning. As mentioned in Programming Conventional Frequencies, it may be better to program conventional frequencies in the lower banks and trunking frequencies in the upper banks (because you can't set any of the channels in the upper banks, 11-20, as priority channels). The scanner automatically designates each bank's first channel (of the first 10 banks) as its priority channel. Having a trunking frequency as a priority channel is useless because the scanner looks for IDs not frequencies in a trunking system. |
| Note: The priority feature must be turned off to use the data skip feature. |
| Note: The scanner automatically designates each bank's first channel (of the first 10 banks) as its priority channel. |
| To select
a different channel in a bank as the priority channel, in manual mode,
enter the channel number you want to select as the
priority channel then press MANUAL to
advance to the channel. Press and hold SPEED(PRIORITY). |
| To turn on the priority feature, press SPEED(PRIORITY) during scanning. PRI appears. Then the scanner checks the designated priority channel every 2 seconds in each bank. |
| To turn off the priority feature, press SPEED(PRIORITY) during scanning. PRI disappears. |
| Note: If you have locked out all priority channels, Loc Out appears in the display when you activate the priority feature. |
![]()
| Scanning and Trunking Banks | Contents |
| You can
trunk a selected bank only after you have programmed the
trunking system for that bank. See the individual
sections on programming trunked systems. You can just scan conventional channels in the banks or just trunk systems (with the older 2052). You can scan and trunk banks at the same time (with the newer 2052). If you want to be able to just scan conventional channels, lock out the trunking frequencies. The scanner will still trunk the locked out trunking frequencies (in the newer model anyway). That way you don't have to hear the annoying control channels if you just want to scan conventional channels. See here to check if you have the older or newer model 2052. |
| Your scanner's squelch setting is automatically adjusted during trunking, which means it is not necessary to manually adjust squelch while scanning trunked transmissions. However, the squelch setting can affect how fast your scanner acquires the data channel, and in some instances, can prevent your scanner from acquiring the data channel at all. It is recommended that you set the SQUELCH just after the hissing stops before selecting a trunked bank. You can change this setting as needed for the best performance in your area. |
| To Trunktrack Only with the Older 2052, in manual mode press SCAN to start scanning. |
| Press TRUNK. The numbers of the banks that have stored frequencies and (properly) stored trunked systems blink and TRUNK appears in the display. |
| Select any combination of banks to trunk by pushing the number keys that correspond to the banks, 1-9; press 0 for bank 10; press SHIFT then 1 thru 0 to select banks 11-20. |
| Note: Pressing ▼ or ▲ toggles through just E (EDACS) banks, just M (Motorola) banks, and all banks. |
| Press SEARCH. As the scanner looks through the frequencies, you see them on the display. When the scanner finds the controlling data channel, the scanner begins trunking. You will then see -- --- in the display. If you are relatively close to the system, this may all happen so quickly that you just see -- ---. The closer you are to the transmitting signal, the faster the data channel will be found. The radio may also lose data channels from time to time, which are farther away, and have to find them again. |
| If a trunking system is inactive for 5 seconds, the scanner starts trunking the next selected trunk bank. This can be a problem if, say you are scanning 3 banks and one is real busy. It may take a while for the scanner to move on to the next bank if there isn't a 5 second delay in transmissions. One solution is to trunkscan the banks. See Trunkscanning the Talk Group ID Lists. |
| To stop trunking, press TRUNK. |
| To Scan Conventional and Trunked Channels with the Newer 2052, in manual mode press SCAN to start scanning. |
| Select any combination of banks to scan and trunk by pushing the number keys that correspond to the banks, 1-9; press 0 for bank 10; press SHIFT then 1 thru 0 to select banks 11-20. |
| Press TRUNK
to start trunking. As the scanner
looks through the trunking frequencies, you may see them
on the display. When the scanner finds the controlling
data channel, the scanner begins trunking. You will then see -- --- in the display. If you are relatively close to the system, this may all happen so quickly that you just see -- ---. The radio may also lose data channels from time to time, which are farther away, and have to find them again. When a trunking system is inactive for 1 second, the scanner starts scanning the conventional channels or, starts trunking the next bank if there aren't any conventional channels in the bank. |
| To stop trunking, press TRUNK. If you have conventional frequencies in the bank, press MANUAL to stop scanning. |
|
When scanning: |
| If the scanner picks up an unwanted partial station, turn SQUELCH clockwise to decrease the scanner's sensitivity and mute the scanner so it will continue scanning. |
| To listen to a weak or distant station, turn SQUELCH counterclockwise. |
| To trunkscan the
ID lists, while
trunking, press SCAN. SCAN
Id will move across the display when the
scanner trunkscans a bank. To turn lists on or off, while trunking a bank, press the list number on the top of the display (1-5). To resume trunking (all IDs), press SEARCH while trunkscanning. See Trunkscanning the Talk Group ID Lists. |
| To turn banks on or off, while scanning or trunking press DATA(ALERT). The banks selected for scan appear and blink in the top of the display for about 5 seconds. Press the bank number 0-9 (0 for bank 10, press SHIFT then 1 thru 0 to select banks 11-20), to turn the desired bank on or off. |
| To continue scanning, (move off a long transmission) press SCAN while scanning. |
| To move to the next active ID in the bank, (while receiving an ID) quickly press SEARCH while trunking. |
| To scan conventional frequencies in the bank, press and hold SEARCH. If there are no conventional frequencies, the scanner will skip to the next bank. |
| To pause on a conventional channel, quickly press MANUAL while the channel is displayed. Press SCAN to resume. |
| To pause
on an ID, press HOLD while
the ID is displayed. HOLD appears in the
display and the scanner stays on the selected ID. If you want to listen to (and hold) a different ID, use the number keys to enter that ID then press E to advance to the ID. To resume trunking, press HOLD again. |
| To lock out a conventional channel, quickly press SKIP(L/O) while the channel is displayed. If you lock out a trunking channel, the trunking system may not trunk properly. See Locking Out Channels. |
| To lock out an ID, quickly press SKIP(L/O) while the ID is displayed. See Locking Out Talk Group IDs. |
| To turn the delay on or off for a conventional channel, quickly press DELAY while the channel is displayed. See Scan Delay. |
| To turn the delay on or off for all trunking IDs, press DELAY while trunking a bank. See Trunking Delay. |
| To use the EDACS agency or agency/fleet search feature, see EDACS Talk Group ID Range Search. |
| To turn the Motorola Status Bit Ignore function on or off, while trunking a Motorola bank, press and hold SCAN until the current status bit ignore setting (ON or OFF) appears. Press ▼ or ▲ to select to select ON or OFF, then press E to save the setting. See Setting the Status Bit Ignore Function. |
| To activate the Motorola disconnect tone detect function, while trunking a Motorola bank, press SVC. DATA blinks for about 5 seconds then remains in the display when trunking a Motorola bank. See Setting the Disconnect Tone Detect. |
| Note: If you consistently miss responses when trunking a Motorola Type I system, try changing the fleet map being used. | |
| See Programming a Motorola Type IIi or Type I System. |
| Trunkscanning the Talk Group ID Lists | Contents |
| Trunkscanning
allows you to scan just the talk group IDs programmed in
the talk group ID lists. The scanner will scan IDs in all
the selected trunking banks. You cannot just trunk some
banks and trunkscan others. Note: When you trunkscan IDs with the Status Bit Ignore function set to off, you may miss transmissions with special status bits. See Setting the Status Bit Ignore Function. |
| While trunking any bank, press SCAN to begin scanning the lists you have stored. SCAN will appear in the display and SCAN Id will move across the display. |
| Note: If you don’t have any talk group IDs stored, the scanner will beep twice, Error will briefly appear in the display, then -- --- will stay in the display. Because there are no IDs programmed, the scanner will not receive any IDs. Press SEARCH to return to trunking. |
| Note: If one or more of the IDs you stored are incorrect, Error flashes twice and the scanner beeps several times, then the scan list numbers appear at the top of the display. To correct this, delete at least one of the incorrect IDs. See Programming Talk Group IDs. |
| To turn scan lists on or off, while trunkscanning the bank, use the number keys to turn the scan list's number on or off. Only the IDs in lists that are turned on will be scanned. |
| Note: One of the five scan lists will always be active. You cannot turn off all of them. |
| Press SEARCH to return to trunking (all IDs). |
| Priority Talk Group ID Scanning |
| You can
set 1 ID in each talk group ID list (1-5) as priority so
during trunkscanning the scanner checks that ID more
frequently than the others in the list. The ID set in
List 1 has the highest priority of all. Priority is kind of screwy on these scanners. Priority scanning is a separate process from priority trunkscanning. You can do one or the other or both but each has to be turned on or off separately. For more see Priority Scanning. |
| To manually set an ID as priority, while trunkscanning the ID lists of the bank you want to set the ID in, press MANUAL. A number showing the current ID list (1-5) appears at the top of the display, and the ID location in that list (1-10) appears in the display on the left. Pressing ▼ or ▲ will select a different talk group ID location in the list. Press and hold SPEED(PRIORITY) to set the ID as a priority ID. Press SCAN again to continue trunkscanning. |
| To set an ID as priority while trunkscanning, when the ID appears in the display, press and hold SPEED(PRIORITY) to set the ID as a priority ID. Press SCAN again to continue trunkscanning. |
| To turn priority ID scanning on or off, while trunkscanning, press SPEED(PRIORITY). PRI appears or disappears in the display. |
| Note: I've noticed that if you turn on priority while trunking an EDACS bank, only EDACS banks have the priority on, you have to turn on priority while trunkscanning Motorola banks for those and vice versa(??). Same thing for turning priority off (at least on the newer 2052). |
| To trunkscan just the priority channels in a bank, while trunkscanning with priority on, press HOLD to monitoring any ID. The scanner will monitor the selected ID and trunkscan all the priority IDs in the 5 scan lists. MANUAL and the selected ID appear in the display until a priority ID becomes active. Pressing SCAN again returns to normal trunkscanning. |
| Note: Priority trunkscanning does not operate when priority IDs are locked out. |
| Trunking Delay | Contents |
| Sometimes a user might pause before replying to a transmission. You can set the scanner to hold on an ID for 5 seconds to wait for a reply. That way, the scanner continues to monitor the ID for 5 seconds after the transmission stops before resuming scanning. |
| To turn trunking delay on or off for all IDs, press DELAY while trunking. DELAY will appear or disappear in the display. |
| Note: I've noticed that if you turn on delay while trunking an EDACS bank, only EDACS banks have the delay on, you have to turn on delay while trunking Motorola banks to get the delay on for those and vice versa(??). Same thing for turning delay off (at least on the newer 2052). |
| Note: If you consistently miss responses even with scan delay turned on when trunking a Motorola Type I system, try changing the fleet map being used. See Programming a Motorola Type IIi or Type I System. |
| Locking Out Talk Group IDs |
| Many
municipal and commercial services use trunking systems to
transmit signals from such devices as water meter
transmitters, door alarms, and traffic signals. Some
signals are encrypted, as well, and most are not voice
signals. Since all these are assigned IDs just like other
users, you may want to lock out reception of these ID
signals. You can lock out up to 100 IDs at one time. With the EDACS partial ID feature, you can program agencies and fleets (in AFS format) as 1 ID and lock them out. |
| To lock out an ID, while trunking a bank, press SKIP(L/O) when the ID appears in the display. The ID is locked out, and the scanner resumes trunking. |
| Note: If you lock out an ID while trunking, it is also locked out of the scan list(s) when trunkscanning. |
| To unlock a single ID, while trunking the bank that has the ID: |
| 1. Press and hold SKIP(L/O) until you hear two short beeps. |
| 2. Press ▼ or ▲ to select the ID you want to unlock. |
| 3. Press SKIP(L/O). The ID is unlocked, and the next locked ID appears. If you have unlocked all the IDs, the scan list will appear. |
| 4. Press SCAN to return to trunkscanning or SEARCH to return to trunking. |
| To unlock all IDs in a bank, while trunking the bank: |
| 1. Press and hold SKIP(L/O) until you hear two short beeps. If there are no IDs locked out, you will just hear 3 short beeps. |
| 2. Press E to unlock all the IDs at once in the bank. When you unlock all the IDs, the scan list appears. |
| 3. Press SCAN to return to trunkscanning or SEARCH to return to trunking. |
| Monitoring a Single Talk Group ID |
| To monitor a single ID in a bank (newer model only), while trunking a bank, you can directly enter an ID (press .(CLEAR) for an EDACS dash) then E and the scanner will go to the ID in hold mode automatically. |
| Or, press HOLD while any ID is displayed. HOLD appears in the display and the scanner stays on the selected ID. To listen to (and hold) a different ID, use the number keys to enter an ID and press HOLD to advance to the new ID. |
| To stop monitoring the ID, Press SEARCH to return to trunking or SCAN to return to trunkscanning. |
| Monitoring All Talk Group IDs |
| You can use your scanner's display to monitor the talk group IDs of a trunked system for activity. While you cannot hear conversations in this mode, it is an excellent way to determine which talk group IDs are the most active. |
| To monitor all IDs, while trunking or trunkscanning, press and hold SEARCH until SEARCH and the channel number flash. All activate group IDs appear in quick succession. When you monitor IDs, any IDs you have locked out also appear. |
| To stop monitoring all IDs, press SEARCH again. |
| Selecting the EDACS Talk Group ID Format | Contents |
| EDACS system uses two group ID formats. Decimal, and Agency-Fleet Subfleet (AFS). Decimal IDs appear as 3 or 4 digit numbers, 577 (for example). AFS format IDs appear as 10- 047 (for example). If you use a list of IDs shown in one format and the ID you want to receive is in the other format, you can switch. |
| While trunking an EDACS system, or storing IDs into ID lists in an EDACS system, press SVC to switch formats. E flashes on the display when the Decimal format is selected. |
| EDACS Talk Group ID Range Search |
| You have to use AFS (default) format (see Selecting EDACS ID Format) to use the search range feature. EDACS talk group IDs are displayed as: Agency 01, Fleet -01, then Sub-fleet 1. Ex: 01-011. You can just trunk certain agencies or fleets without having to program them into the scan lists by programming a search while trunking. |
| To search EDACS talk group IDs, program a range for the Agency or Fleet listings. |
| Example 1, searching within the 01 agency: |
| While trunking the bank you want to search, press 0 1 then .(CLEAR) then SEARCH. 01- --- appears during search. You will receive only those IDs that start with 01. |
| Example 2, searching within the 01 agency and 01 fleet: |
| While trunking the bank you want to search, press 0 1 then .(CLEAR) then 0 1 then SEARCH. 01- 01- appears during search. You will receive only those IDs that start with 01-01. |
| To cancel an ID range search, press SEARCH. |
| Turning the Motorola Status Bit Ignore (S-bit) On or Off |
| You can set how your scanner works with Motorola status bits (also called S-bits), letting you control how the scanner interprets and displays talkgroup IDs. |
| The last four bits of a Motorola Type II talkgroup ID (a binary 16-bit code) are the status bits. Your scanner is preset to assume that the status bits in a talkgroup ID are set to 0 and ignores them. For example, when the scanner receives the talkgroup ID 010111001110 0011, it reads the ID as 010111001110 0000 and converts the first 12 bits of the ID to 23776 (the talkgroup ID). However, since the status bit value is 3 (0011 converted to decimal equals 3), the ID is actually 23779. |
| Follow these steps to turn status bit ignore on or off. |
| 1. While trunking a Motorola bank, press and hold SCAN until the current status bit ignore setting (ON or OFF) appears. |
| 2. Press ▼ or ▲ to select to select ON or OFF, then press E to save the setting. |
| Motorola Type II Special Status Bits | Contents |
| Type II Motorola Smartnet systems use these status bits for special transmissions such as emergency, patches, DES/DVP scrambled transmissions, and multiselects. Motorola trunking radios directly interpret them for their special functions, thus no difference is noticed by the person with the radio. The scanner however interprets these special talkgroup status bits as different talkgroups entirely. Below is the conversion chart for these special status bits. |
| TT ID + # Usage | TT ID + # Usage |
| ID+0 Normal Talk group | ID+8 DES/DVP Encryption talk group |
| ID+1 All Talk group | ID+9 DES All Talk group |
| ID+2 Emergency | ID+10 DES Emergency |
| ID+3 Talk group patch to another | ID+11 DES Talk group patch |
| ID+4 Emergency Patch | ID+12 DES Emergency Patch |
| ID+5 Emergency multi-group | ID+13 DES Emergency multi-group |
| ID+6 unassigned | ID+14 unassigned |
| ID+7 Multi-select (initiated by dispatcher) |
ID+15 Multi-select DES TG |
| Therefore, if a user were transmitting a multi-select call on talkgroup 1808, the scanner would actually receive those transmissions on 1815. Some common uses of these status bits are as follows: |
| - | When a user hits their emergency button, all conversations on the talkgroup revert to the emergency status talkgroup (ID+2) until the dispatch clears the emergency status. Therefore, if someone hit their emergency button and their radio was on talkgroup 16, all communications would switch to talkgroup 18. |
| - | A lot of Fire and EMS departments dispatch tone-outs and alarms as Multi-select communications (ID+7). Therefore, if your fire department dispatch talkgroup is 1616, and they do dispatch tone-outs and alarms as Multi-selects, then those communications will be on talkgroup 1623. |
| Thanks to the Radio Reference for this information. |
| Turning On/Off the Motorola Disconnect Tone Detect Function |
| While trunking a Motorola system, your scanner automatically tunes to the data channel when it detects a disconnect tone (a code that tells the trunking system that the transmitter has finished sending) on the voice channel. You cannot use the disconnect tone detect function if you are programming a trunking frequency or a fleet map. |
| You can manually turn off the function so the scanner does not tune to the data channel under those conditions. You might use this feature to listen to weak transmissions when conversations are generally disconnected. |
| To turn the Motorola disconnect tone detect function off, while trunking a Motorola bank, press SVC. The scanner beeps and DATA flashes for about 5 seconds and appears in the display. |
| To turn the Motorola disconnect tone detect function on, while trunking a Motorola bank, press SVC. DATA disappears from the display. |
| Note: To set the scanner so it remains on the voice channel (even when a disconnect tone is transmitted or there is no signal at all) set SQUELCH so you hear a hissing. |
| Matching IDs with Trunked Frequencies |
| You can see the trunking frequencies that the IDs are using while trunking. |
| To see the current trunked frequency using the displayed ID, while trunking, press ▼. The frequency flashes twice then the ID returns. |
| To match all the trunking frequencies with their respective IDs, hold down ▼ until a confirmation tone sounds and the ID and the frequency alternately appear. On a busy system, this could happen very fast and may be confusing. Turning on the trunking delay function will give you a better chance of seeing the frequency and ID alternate. See Trunking Delay. |
| To return to trunking, press ▼ again. |
![]()
| Searching for Frequencies |
| Search Delay | Contents |
|
Sometimes
a user might pause before replying to a transmission. To
help missing a reply on a specific frequency,
you can program a 2-second delay into any
search (limit, direct, or service). |
| To Turn the Delay on or off for a search band: |
| Press DELAY while searching to turn the delay on or off for the band. DLY appears or disappears from the display. |
| Service Band Search | Contents |
| With a service band search, You can search for public service, police, fire/emergency, aircraft, and weather transmissions without knowing the specific frequencies used in your area. The scanner is preprogrammed with all (most) of the frequencies allocated to these services. |
| Note: If you are going to be storing selected frequencies that you will be searching, in manual mode enter the channel number where you want to start storing the frequencies then press MANUAL to advance to the channel before you start searching. |
| In manual mode press SVC. After a 2 second delay, the scanner automatically starts searching the last selected search band. PUB POLICE FIRE/EMG AIR WX appear in the display with a blinking bar above the selected service band. SEARCH and ▲ or ▼ will appear to show the search direction. The selected channel storage bank will appear in the top of the display and the selected channel storage number will blink (if you want to save any frequencies). |
| To select a different service band, press SVC to move to the next service band. A bar will appear above the band and will blink when searching begins. |
| To turn on the delay for the band, press DELAY to set the scanner to pause 2 seconds before searching resumes after the transmission ends. DELAY will appear in the display. See Search Delay. |
| To skip data signals, press DATA to skip pagers, modems, MDTs, etc. so they won’t be monitored. DATA will appear in the display. See Skipping Data Signals. |
| To continue searching press SEARCH to resume searching. |
| To skip (lockout) a frequency press SKIP(L/O) to lock out a frequency if it is a noisy or unwanted frequency. The scanner stores the frequency in skip memory and automatically resumes the search. |
| To change search directions, press ▼ or ▲. This also puts the search on hold(??). Press SEARCH to resume searching. |
| To monitor to a frequency, quickly press ▲ (▼ if searching down) to stop searching and listen to the transmission. HOLD appears in the display. To continue searching, press SEARCH. |
| To step through the frequencies one at a time, press ▲ (▼ if searching down) to stop searching. Press ▼ or ▲ to step through the frequencies. To continue searching, press SEARCH. |
| To store a frequency, press E to store it into the selected channel (blinking in the left of the display). The scanner will store the frequency and stay in manual mode. Press MANUAL again to step to the next channel where you want to store the next frequency (or enter the channel number where you want to store the next frequency and press MANUAL to advance to the channel). Press SEARCH to resume searching. |
| To exit searching, press MANUAL. |
| Limit Search |
| A limit search lets you search within a specific range of frequencies. (between 150.000 and 160.000 for example). The radio will start at the lower frequency, go up to the upper frequency, and start over again. Or, you can search backwards. The radio will also retain the programmed range until you re-program it. |
| Note: If you are going to be storing selected frequencies that you will be searching, in manual mode enter the channel number where you want to start storing the frequencies then press MANUAL to advance to the channel before you start searching. |
| 1. In manual mode, enter the lower search limit then press LIMIT. |
| 2. Enter the upper search limit and press LIMIT then SEARCH. |
| To search faster, press SPEED. SEARCH will blink in the display. See Changing Search Speeds. |
| Note: You can use HyperSearch only in the 5 kHz step bands (29-54 MHz, 137-174 MHz, and 216-224.995 MHz). |
| To turn on the delay for the search, press DELAY to set the scanner to pause 2 seconds before searching resumes after the transmission ends. DELAY will appear in the display. See Search Delay. |
| To skip data signals, press DATA to skip pagers, modems, MDTs, etc. so they won’t be monitored. DATA will appear in the display. See Skipping Data Signals. |
| To continue searching press SEARCH to resume searching. |
| To skip (lockout) a frequency press SKIP(L/O) to lock out a frequency if it is a noisy or unwanted frequency. The scanner stores the frequency in skip memory and automatically resumes the search. |
| Note: If you have selected all frequencies to be skipped within the search range, the scanner beeps 3 times when you try to search. |
| To change search directions, press ▼ or ▲. This also puts the search on hold(??). Press SEARCH to resume searching. |
| To monitor to a frequency, quickly press ▲ (▼ if searching down) to stop searching and listen to the transmission. HOLD appears in the display. To continue searching, press SEARCH. |
| To step through the frequencies one at a time, press ▲ (▼ if searching down) to stop searching. Press ▼ or ▲ to step through the frequencies. To continue searching, press SEARCH. |
| To store a frequency, press E to store it into the selected channel (blinking in the left of the display). The scanner will store the frequency and stay in manual mode. Press MANUAL again to step to the next channel where you want to store the next frequency (or enter the channel number where you want to store the next frequency and press MANUAL to advance to the channel). Then press SEARCH to resume searching. |
| To exit searching, press MANUAL. |
| Search Skip Memory | Contents |
| You can skip (lock out) up to 50 frequencies during a limit search and 20 frequencies during a service search. This lets you avoid unwanted frequencies or those already stored in a channel. |
| Note: If you try to lock out more than the maximum frequencies, each new frequency replaces a frequency previously stored, beginning with the first stored frequency. |
| To clear a single frequency from skip memory so the scanner stops on it again: |
| 1. While searching, press ▲ (▼ if searching down) near the frequency to stop the search. |
| 2. Press ▼ or ▲ to find the frequency you locked out. |
| 3. Press SKIP(L/O). L/O disappears from the display. |
| 4. Press SEARCH to continue searching. |
| To clear all the skip frequencies at once: |
| 1. While searching, press HOLD (LIMIT if searching down). |
| 2. Press and hold SKIP(L/O) until the scanner beeps twice. |
| 3. Press SEARCH to continue searching. |
| Changing Search Speeds |
| The scanner has two search speeds when doing a Limit Search. Normal search, 100 steps/second, and Hypersearch, 300 steps/second. |
| To switch between the Normal and Hypersearch speeds, during limit search press SPEED(PRIORITY). SEARCH blinks during Hypersearch. |
| Note: Hypersearch applies only to the 5 kHz step bands (29-54 MHz, 137-174 MHz, and 216-224.9950 MHz). |
![]()
| Special Features |
| Turning The Keytone Off/On |
| You have the option of turning the key conformation tone off or on (to confirm that the keys have been pressed). The keypad area is kind of small so some of us with big fingers, afraid that they have pressed more than one key at a time, might appreciate this. |
| To turn the keytone on, turn off the scanner, then hold down SKIP(L/O), and turn on the scanner. ON bEEP appears briefly in the display. |
| To turn the keytone off, turn off the scanner, then hold down SKIP(L/O), and turn on the scanner. OFF bEEP appears briefly in the display. |
| Skipping Data Signals | Contents |
| To prevent the scanner from stopping on channels that consist of non-modulated or data signals (such as fax or modem transmissions) during a search or scan, turn on the data skip feature. When the radio receives a data signal and data skip is selected, the signal is ignored. (Although I have yet to see this really work on any RS scanner). |
| To turn the data skip feature on, while scanning or searching (not trunking), turn off the priority feature if it is on, then press DATA(ALERT). DATA appears in the display with a line over it. |
| To turn the data skip feature off, while scanning or searching, press DATA(ALERT). DATA disappears. |
| Note: This feature does not apply to the air or weather service band. |
| Receiving NWR-SAME Weather Alert Signals |
| In 1994, the National Oceanic and Aerospace Administration (NOAA) began broadcasting alerts that include digitally encoded data. Specific Area Message Encoding (SAME) includes information that identifies the severity of the alert. The scanner displays this data as codes corresponding to the levels of severity (L1, L2, and L3). When the scanner receives a SAME-coded signal, it retains information about the most recent alert until you turn off the power. |
| The National Weather Service also sends out daily, weekly, and monthly test (and sometimes demonstration) signals, which let anyone with a capable receiver verify that the equipment is working properly. In the United States, the NWS broadcasts a test alert every week on Wednesday between 11 AM and 1 PM. To find out the specific test schedule in your area, contact your local NOAA or NWS office. Those offices are usually listed in the telephone book under US Government, Department of Commerce. |
| To Use the SAME Weather Alert Feature: |
| 1. In manual mode, press SVC until you select the weather service search. |
| 2. Press DATA(ALERT). This mutes the audio until the scanner receives a SAME coded signal. You will see ALERT in the display. |
| To Test the display, press and hold down DATA(ALERT) for about 1 second. The frequency and TESt appear alternately. To cancel the test, press and hold down DATA(ALERT) again for about 1 second. |
| If the scanner receives a test coded signal, TESt appears in the display. To exit the test mode, press DATA(ALERT) for about 1 second. |
| Note: If an actual alert is sent, the scanner sounds the appropriate tone and displays the corresponding alert level. |
| If the
scanner receives a real SAME coded signal, ALERT flashes in the display and an associated "L"
code appears in the display which indicates the severity
of the alert. The scanner remains on the weather channel and the audio turns on so you can hear the weather broadcast. The scanner displays one of the following codes to indicate the alert level: |
| L1: Warning |
| L2: Watch |
| L3: Statement |
| -----: Non-emergency |
| To Verify and clear a specific alert level, press any key to stop the alert. |
| 3. Press DATA(ALERT) again to turn off the alert feature. |
| To Hear and test the tones for the three alert levels, press SVC to select the weather service, then hold down DATA(ALERT) for about 1 second. The tones sound in the order L3, L2, then L1, and TESt flashes. Each alert code appears as its tone sounds. Press any key to end the test sequence. |
|
Understanding FIP Codes |
| For the purpose of
broadcasting weather information, the NWS has divided the
United States into regions by state and county (or
parish, where applicable) then assigned a 6-digit FIPS
code to identify each county or parish. For example, the
code for Tarrant County, Texas, is 048439. The first
digit in a FIPS code identifies the county subdivision,
the next two digits identify the state, and the last
three digits identify the county or parish. Most FIPS
codes begin with 0, which means the code represents an
entire county. The NWS, however, plans to eventually
subdivide some large counties. When that happens, each
subdivision will be assigned a digit from 1-9, resulting
in codes such as 148439, 248439, and so on. Your scanner can receive all SAME alert signals broadcast within about a 50-mile radius of where you installed it. To receive SAME alerts and broadcasts about weather occurring only in particular counties within that area, you can program up to fifteen FIPS codes into the scanners memory. This lets you avoid hearing an alert that applies to an area within a 50-mile radius but not necessarily to your county or parish. If you do not program any FIPS location codes into the scanners first memory (F1), the scanner sounds an alert if it receives a weather alert with any (receivable) FIPS code. To find out the codes for your area see FIP codes for the United States and its Possessions. |
| Programming FIP Codes | Contents |
| To obtain the FIPS code for the location where you installed your scanner call the NWS toll free at 1-888-697-7263 or see FIP codes for the United States and its Possessions. Follow the instructions you hear. You can program up to 15 codes. For more info about FIP codes see Understanding FIP Codes. |
| 1. In manual mode, press SVC until you select the weather service search. |
| 2. Press DATA(ALERT). This mutes the audio until the scanner receives a SAME coded signal. You will see ALERT in the display. |
| 3. Press and hold E until F1 appears. |
| 4. Enter the FIP code then press E to store the code. |
| 5. To enter another FIP code press ▼ or ▲ then repeat step 3. |
| Press SVC to exit programming. |
| Turning the Remote Function On or Off |
| Your scanner's PC Remote function lets you connect the scanner to a computer then use the computer to operate most of the scanner's functions, the same way as if you were using the keys on the scanner's front panel. |
| To turn the remote function on or off, hold down REMOTE until the scanner beeps. SFT flashes when the remote function is turned on. |
| Scanner Reset |
| If the scanner's display locks up or stops operating properly, you might need to reset the scanner. |
| Note: This procedure clears all the information you have stored in the scanner. Before you reset the scanner, try turning it off and on to see if it begins working properly. Reset the scanner only when you are sure it is not working properly. |
| To reset the scanner, turn off the scanner. While holding down the 2 and 9 keys, turn on the scanner. CLEAR flashes for about 5 seconds as the scanner clears its memory. |
| Note: Do not turn off the scanner again until CLEAR stops flashing. Otherwise, the scanner might not clear its memory properly. |
| Pre-set Fleet Maps | Contents |
|
There are
16 preset fleet maps programmed into your scanner to
choose from. In Motorola II systems, all the blocks have
size code S0. In Type I systems,
size codes are used in different blocks to denote the
maximum number of users in that block. Notice that size
code S-12 uses 2 blocks. A Motorola Hybrid system (Type
IIi) has 'blocks' of the system that are Type I
Fleets/Subfleets and Type II talkgroups. |
| E1P1 | E1P2 | E1P3 | E1P4 | E1P5 | E1P6 | E1P7 | E1P8 | ||||||||
| Block | Size Code | Block | Size Code | Block | Size Code | Block | Size Code | Block | Size Code | Block | Size Code | Block | Size Code | Block | Size Code |
| 0 | S-11 | 0 | S-4 | 0 | S-4 | 0 | S-12 | 0 | S-4 | 0 | S-3 | 0 | S-10 | 0 | S-1 |
| 1 | S-11 | 1 | S-4 | 1 | S-4 | 1 | (S-12) | 1 | S-4 | 1 | S-4 | 1 | S-10 | 1 | S-1 |
| 2 | S-11 | 2 | S-4 | 2 | S-4 | 2 | S-4 | 2 | S-12 | 2 | S-4 | 2 | S-11 | 2 | S-2 |
| 3 | S-11 | 3 | S-4 | 3 | S-4 | 3 | S-4 | 3 | (S-12) | 3 | S-4 | 3 | S-4 | 3 | S-2 |
| 4 | S-11 | 4 | S-4 | 4 | S-4 | 4 | S-4 | 4 | S-4 | 4 | S-12 | 4 | S-4 | 4 | S-3 |
| 5 | S-11 | 5 | S-4 | 5 | S-4 | 5 | S-4 | 5 | S-4 | 5 | (S-12) | 5 | S-4 | 5 | S-3 |
| 6 | S-11 | 6 | S-4 | 6 | S-12 | 6 | S-4 | 6 | S-4 | 6 | S-12 | 6 | S-4 | 6 | S-4 |
| 7 | S-11 | 7 | S-4 | 7 | (S-12) | 7 | S-4 | 7 | S-4 | 7 | (S-12) | 7 | S-4 | 7 | S-4 |
| E1P9 | E1P10 | E1P11 | E1P12 | E1P13 | E1P14 | E1P15 | E1P16 | ||||||||
| Block | Size Code | Block | Size Code | Block | Size Code | Block | Size Code | Block | Size Code | Block | Size Code | Block | Size Code | Block | Size Code |
| 0 | S-4 | 0 | S-0 | 0 | S-4 | 0 | S-0 | 0 | S-3 | 0 | S-4 | 0 | S-4 | 0 | S-3 |
| 1 | S-4 | 1 | S-0 | 1 | S-0 | 1 | S-0 | 1 | S-3 | 1 | S-3 | 1 | S-4 | 1 | S-10 |
| 2 | S-0 | 2 | S-0 | 2 | S-0 | 2 | S-0 | 2 | S-11 | 2 | S-10 | 2 | S-4 | 2 | S-10 |
| 3 | S-0 | 3 | S-0 | 3 | S-0 | 3 | S-0 | 3 | S-4 | 3 | S-4 | 3 | S-11 | 3 | S-11 |
| 4 | S-0 | 4 | S-0 | 4 | S-0 | 4 | S-0 | 4 | S-4 | 4 | S-4 | 4 | S-11 | 4 | S-0 |
| 5 | S-0 | 5 | S-0 | 5 | S-0 | 5 | S-0 | 5 | S-0 | 5 | S-4 | 5 | S-0 | 5 | S-0 |
| 6 | S-0 | 6 | S-4 | 6 | S-0 | 6 | S-0 | 6 | S-0 | 6 | S-12 | 6 | S-12 | 6 | S-12 |
| 7 | S-0 | 7 | S-4 | 7 | S-0 | 7 | S-4 | 7 | S-0 | 7 | (S-12) | 7 | (S-12) | 7 | (S-12) |
You can tell which block a Motorola ID is
in by its number.
|
|
Thanks to Radio Reference.com for most of this information. |
![]()
| Related Links/Info | Contents |
| How to view these pages in your browsers |
| I have formatted these pages so that you can view them with any monitor, in any browser (Opera, I.E., or Netscape), at any zoom level, and in any screen area size (ex: 600x800)-small or large fonts. So if the print is too small, go to the 'view' menu in your browser and adjust it to a bigger level (or smaller if you want to see more on the screen). |
| How to tell if you have a newer 2052 or older 2052 |
| On the bottom of
the scanner is the date code (the date code on the box
may or may not be correct). It will read something like
06A04. The first 2 digits are the month and the last 2
are the year. So, this scanner was made June of 2004. Any scanner made after April of 2003 (04A03) will trunktrack and scan conventional channels simultaneously. Any scanner made before this date will either trunktrack or scan conventional channels, not both at the same time. |
| Determining Type I Motorola Fleet Maps |
| If you don’t know which fleet map to use, you could try selecting the preset fleet maps that are pre-programmed into your scanner, one at a time, or you can try a method I found at Radio Reference.com. Determining Type I Motorola Fleet Maps. By Dave Goodson. |
| Determining Base/Step/Offset for VHF/UHF Motorola Systems |
| I have found an explanation at Radio Reference.com that describes how to do this if you don't have the information. The Trunked Radio Systems User’s Page also has an explanation. Look for 'Determining Base and Offset Frequencies for the BC245xlt' by John C. |
| Decimal/AFS Conversion Chart |
| Here is a Conversion Chart to help convert your IDs. |
| Determining LCN Order |
| EDACS frequencies have to be programmed in LCN (Logical Channel Number) order. I have found a procedure at the Trunked Radio Systems User’s Page which explains how to find the LCN order for an EDACS system if you don't know the order. Look for 'Finding EDACS Logical Channel Numbers' by Todd Hartzel near the bottom of the page. |
| Newsgroups and Forums |
|
You will have to register for the groups. |
| Radio Reference Radio Shack Scanners Forum | Radio Reference Forums |
| Links |
| Radio Reference.com |
| Radio Reference Pro 2052 Wiki-also for software |
| Radio Reference Data Base | eHam.net-reviews |
|
Software |
| Radio Commander 2052 | ScanControl |
![]()
|
|
| Last updated July 15, 2024 |